Multi-language Support
Translate your upsell offers into multiple languages to match your store's published languages. Buyers see the translated offer based on their shipping country.
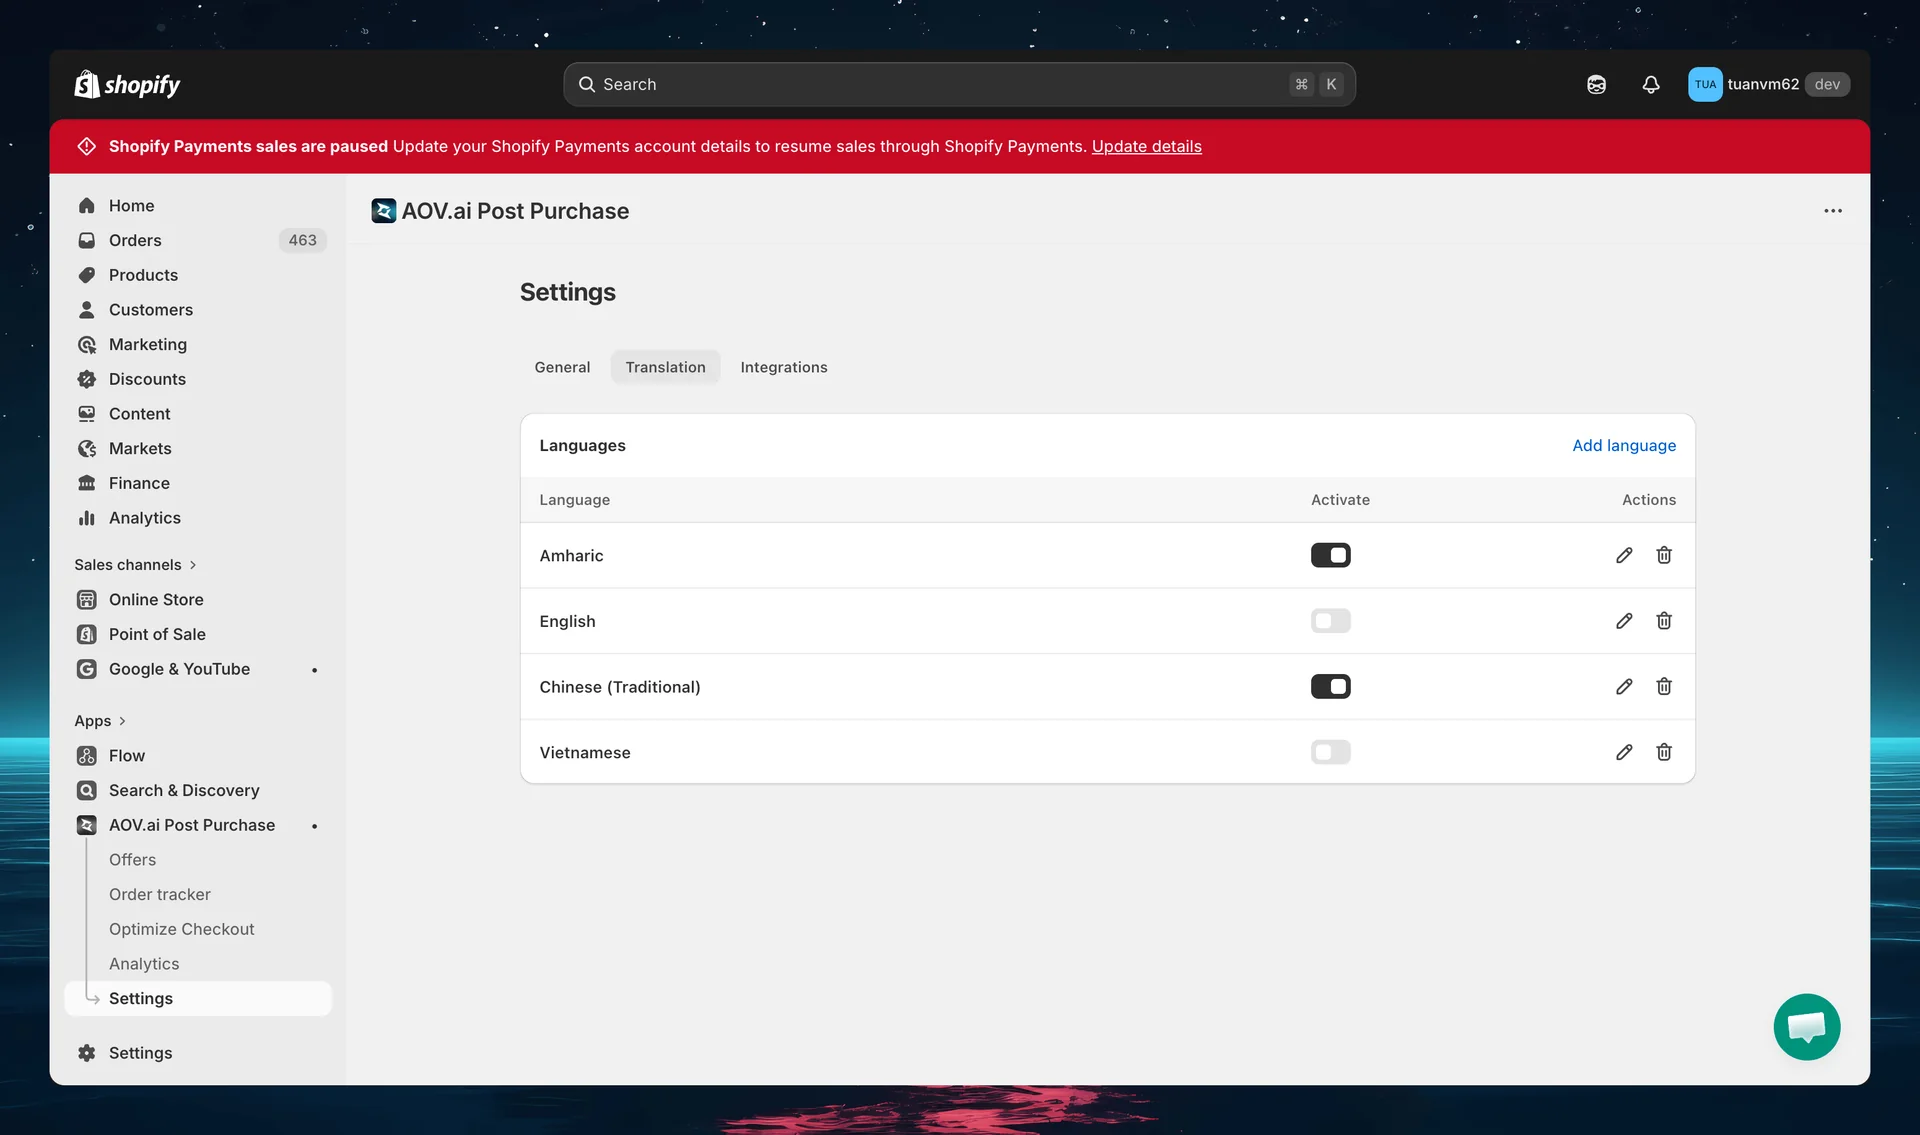
How it works
The app determines which languages you can add based on the Markets you have set up in Shopify Admin → Markets. Each Market defines the countries and languages your store serves: the app reads this configuration automatically and makes those languages available for translation.
Each language starts with a default list of shipping countries that receive it (a standard country-to-language table), but you can override this at any time: pick exactly which countries get each language using Manage countries (see Choosing which countries receive a language below). A country can only belong to one language at a time.
- The app reads the languages from your active Shopify Markets
- You activate and translate offer content for each language, and choose which countries receive it
- The translated offer is shown to buyers whose shipping country is assigned to that language
- If no translation exists, or the buyer's country isn't assigned to any language, the default language is shown
Heads up
Only buyers whose shipping country is assigned to a language will see the upsell offer pages in that language. Translation targeting is based on shipping country, not the buyer's browser language.
What can be translated
Offer-level content
| Element | Description |
|---|---|
| Offer title (header) | The main headline of your offer |
| Countdown timer text | The urgency message above the timer |
| Free shipping text | Free shipping badge label |
| Coupon title | Main coupon text (TKU coupon offers) |
| Coupon subtitle | Secondary coupon text |
Widget-level content
| Element | Description |
|---|---|
| Variant picker (Label) | Label for variant selection dropdown |
| Quantity selector (Label) | Label for quantity input |
| Discounted price label | Compare/discount text under Price & Discount |
| Note (Content) | Additional info/note content |
| Accept button text | CTA button text |
| Decline button text | Skip/decline button text |
| Per-product decline button | Individual product decline text |
| Accept failure message | Banner shown when Shopify couldn't add the accepted item (fixable case, for example out of stock) |
| Unconfirmed accept message | Banner shown when Shopify didn't confirm whether the accepted item was added |
| Continue button text after accept failure | Button that moves the customer to the Thank you page after an accept failure that can't be fixed |
The accept failure banner's Go back button isn't listed above. It reuses the Back button text from the offer's Confirmation panel in the widget editor, which applies to every language and isn't a separate per-language item here. See When the item can't be added.
Price breakdown labels
| Element | Default text |
|---|---|
| Subtotal text | Subtotal |
| Discount text | Discount |
| Shipping text | Shipping |
| Applied discount text | Applied discount |
| Free text | Free |
| Taxes text | Tax |
| Total text | Total |
| Show / Hide price breakdown text | Show / Hide |
Testimonial widget
| Element | Description |
|---|---|
| View more text | "View more" link text |
| View less text | "View less" link text |
Subscription labels (if using selling plans)
| Element | Description |
|---|---|
| Accept terms text | Subscription terms acceptance |
| Recurring subtotal text | Recurring payment label |
| Selling plan help text | Help text for subscription options |
| One-time purchase label | One-time purchase option label |
| Subscription label | Subscription option label |
Claim Confirmation labels
| Element | Default text |
|---|---|
| Confirmation message | "You've accepted the deal!" |
| Description | "Your order has been updated – see below" |
| Original order text | "Original order" |
| Subtotal, Shipping, Tax labels | Standard labels |
| Item text | "item(s)" |
| Show/Hide text | "Show" / "Hide" |
Setting up translations
Step 1: Ensure languages are published in Shopify
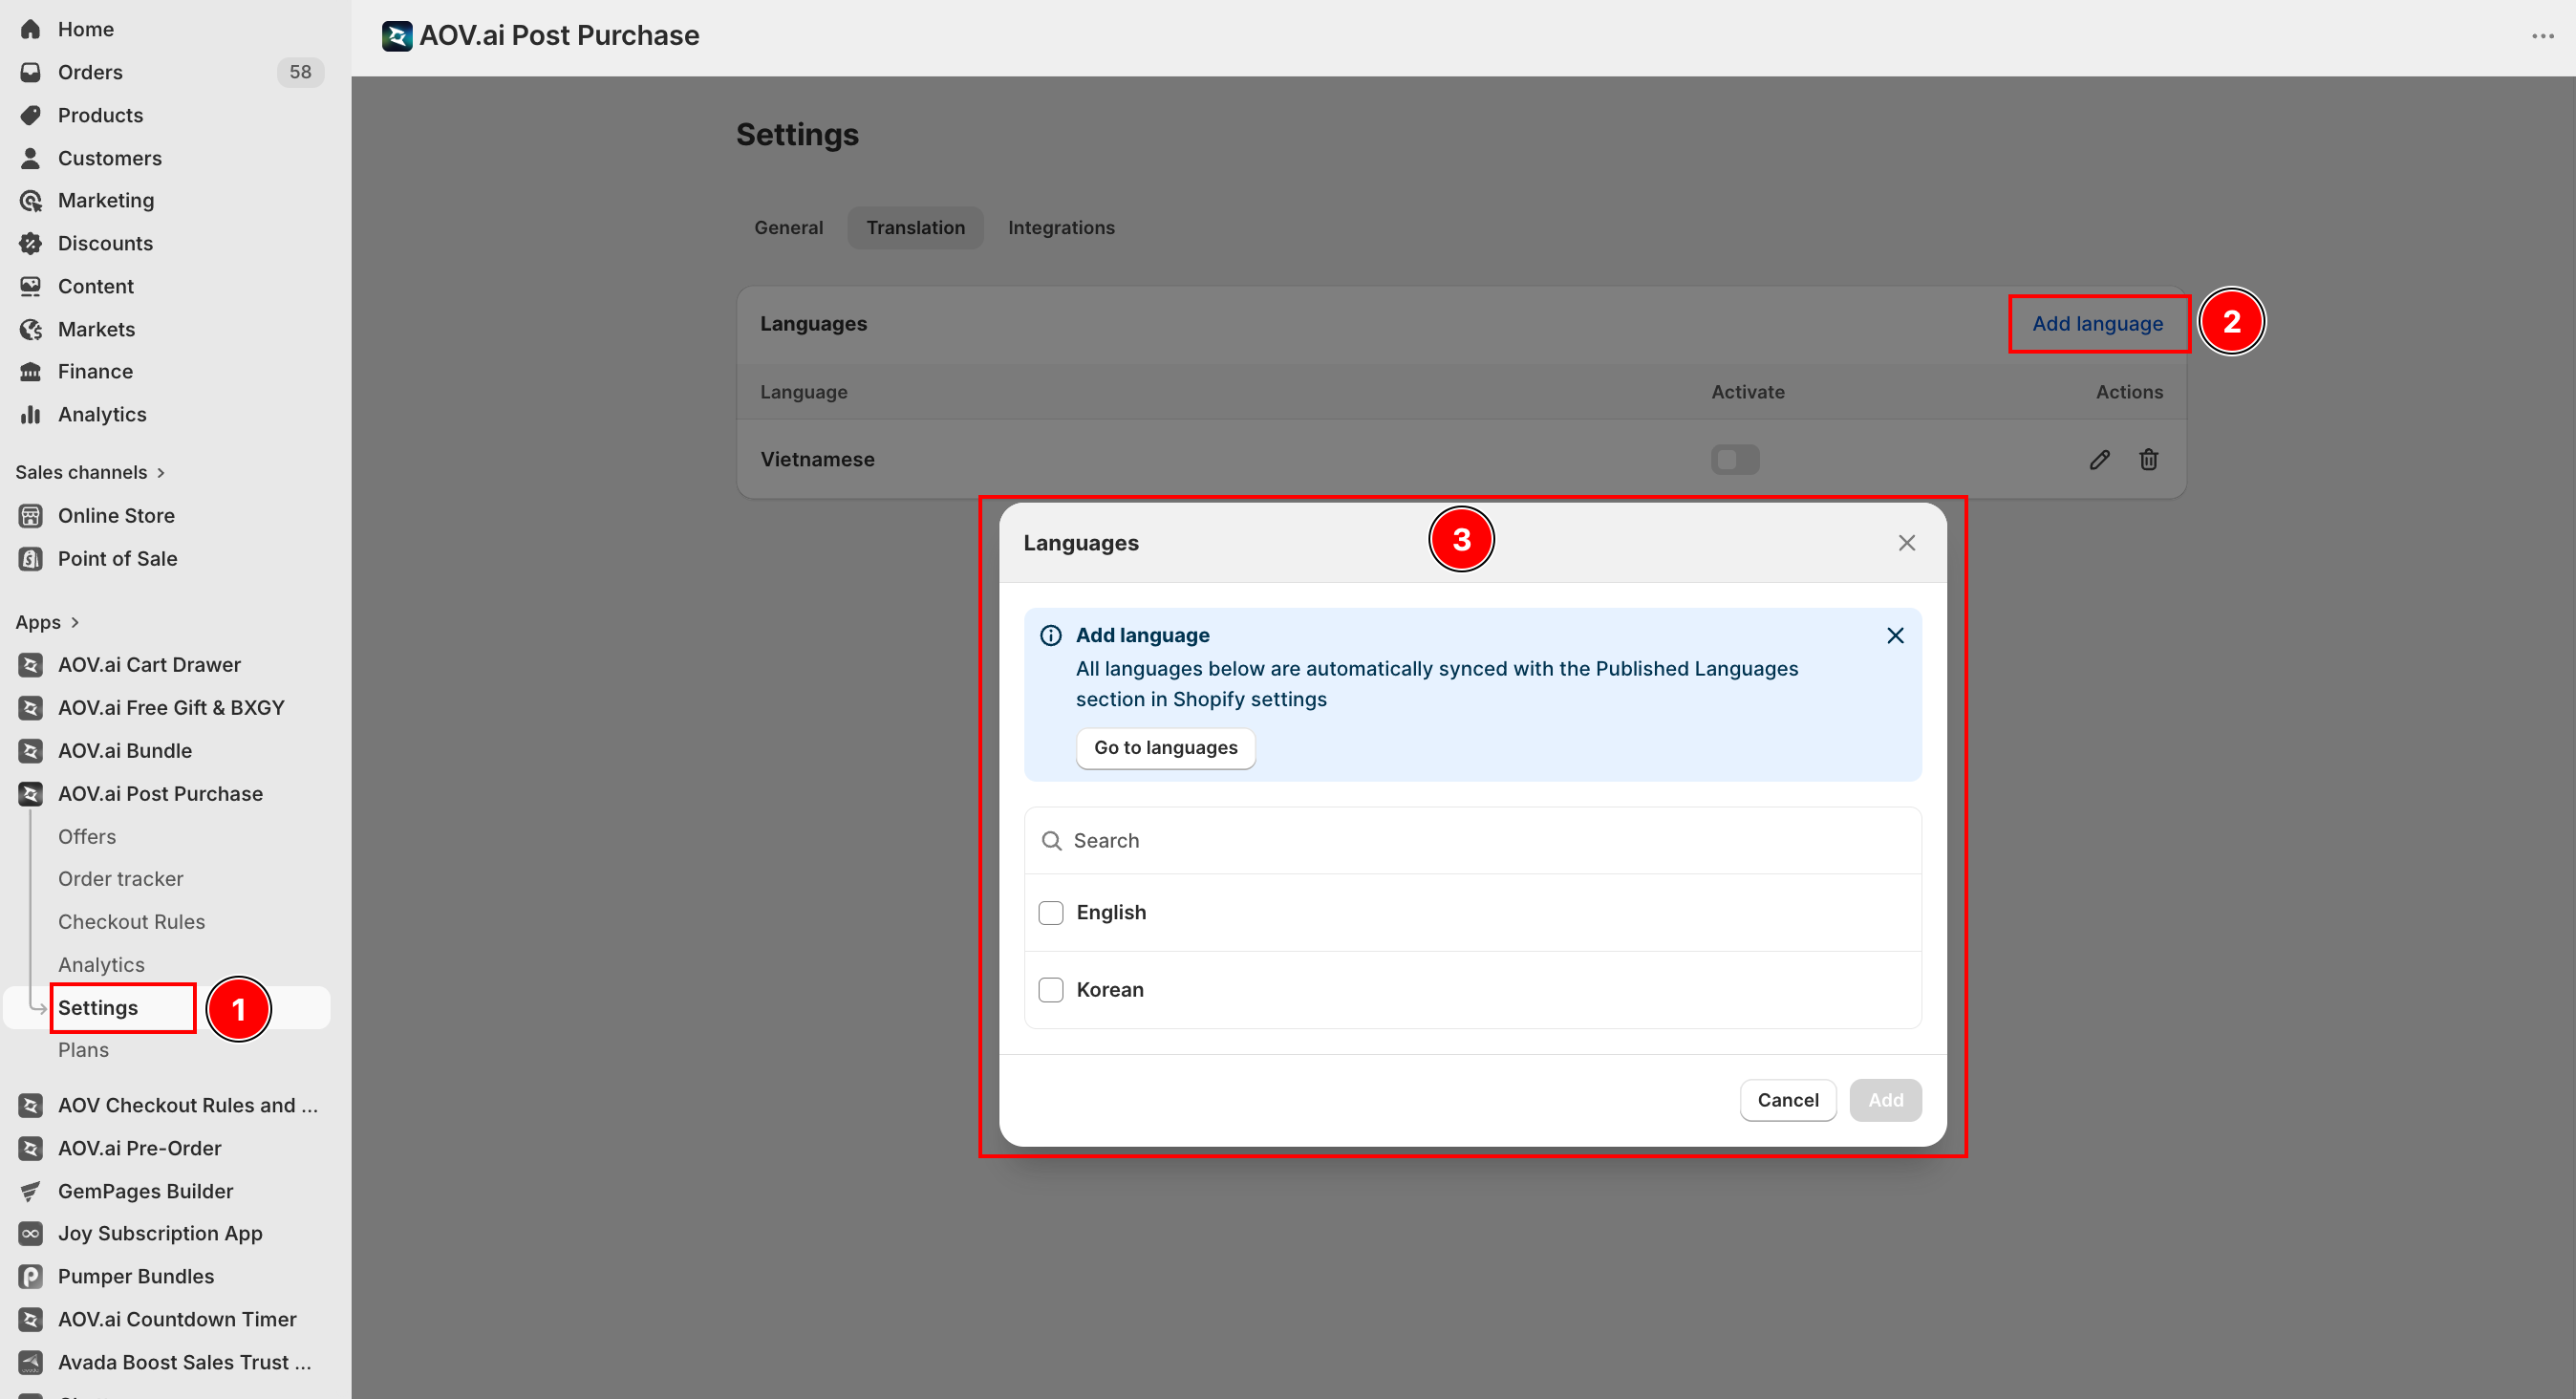
Go to Shopify Admin → Markets and confirm that the Markets covering your target countries are active. The languages associated with those Markets will automatically appear in the app's Translation settings.
Step 2: Open translation settings
In the app, go to Settings and open the Translation tab. You'll see your store's published languages, along with a Shown to column (which countries currently receive that language) and a Translated column (a done/total badge for how much of that language is finished).
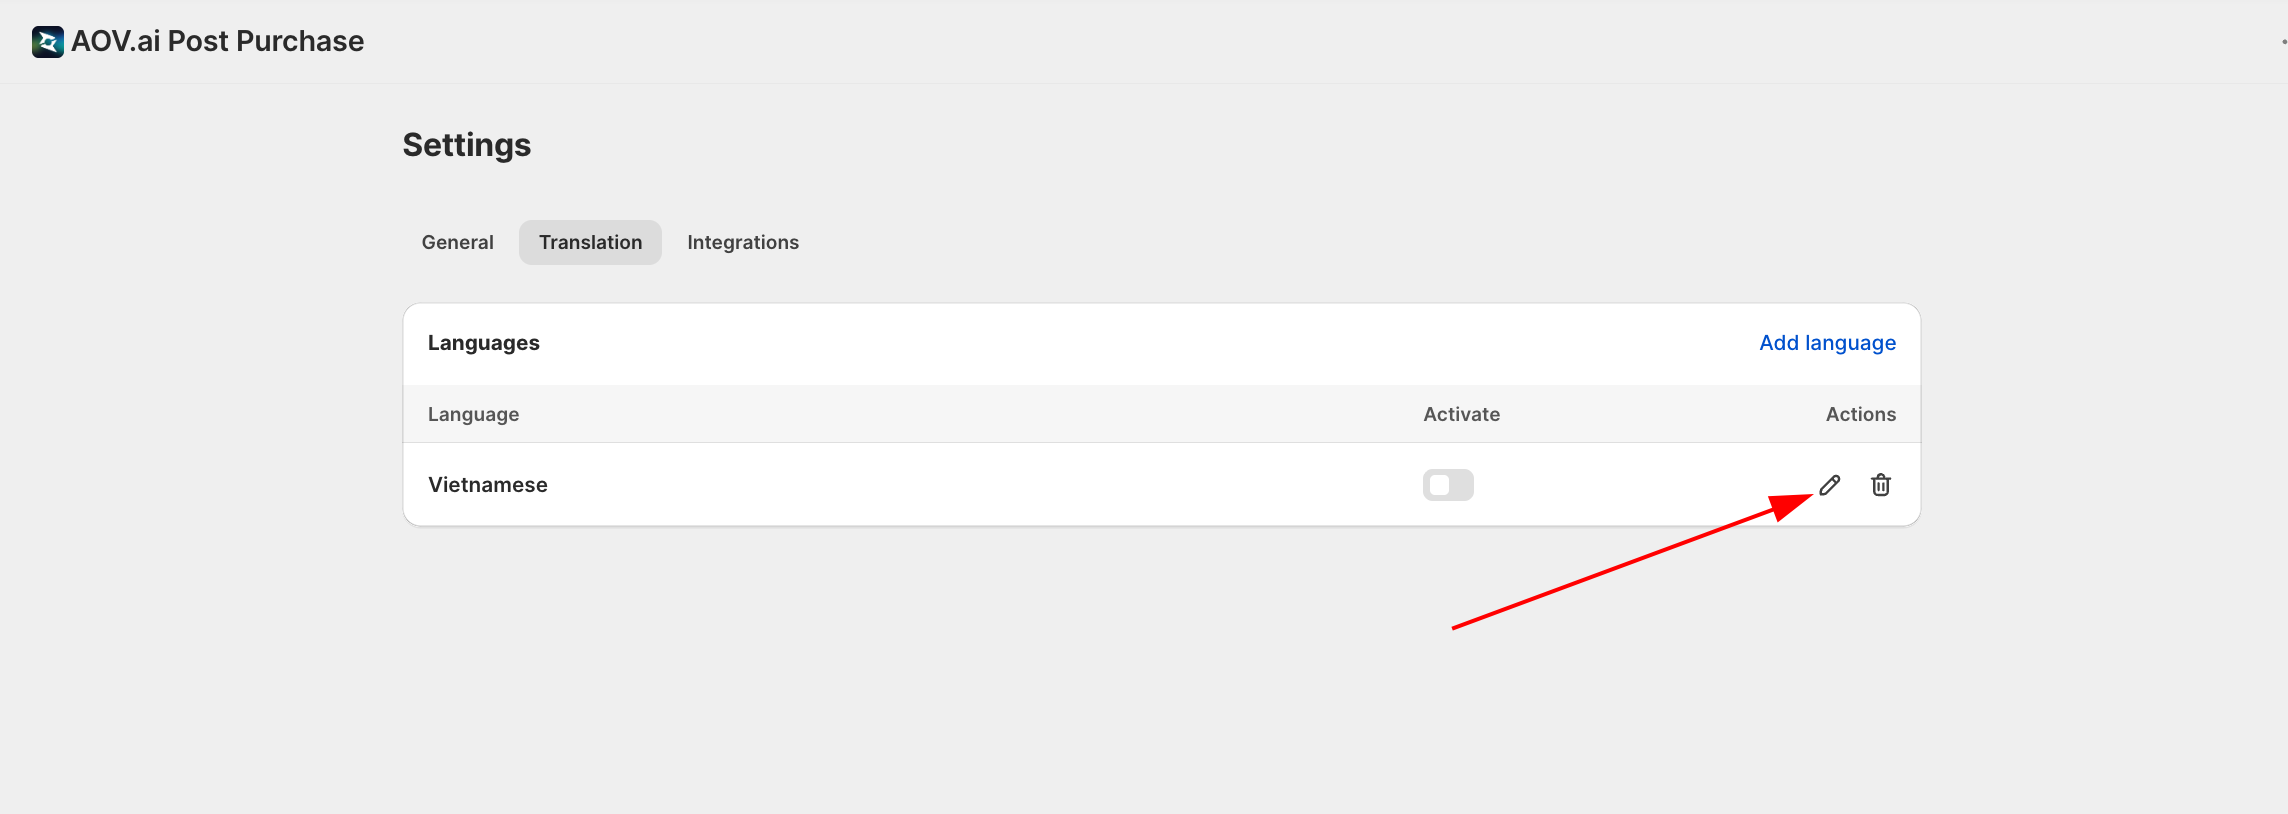
Step 3: Open a language
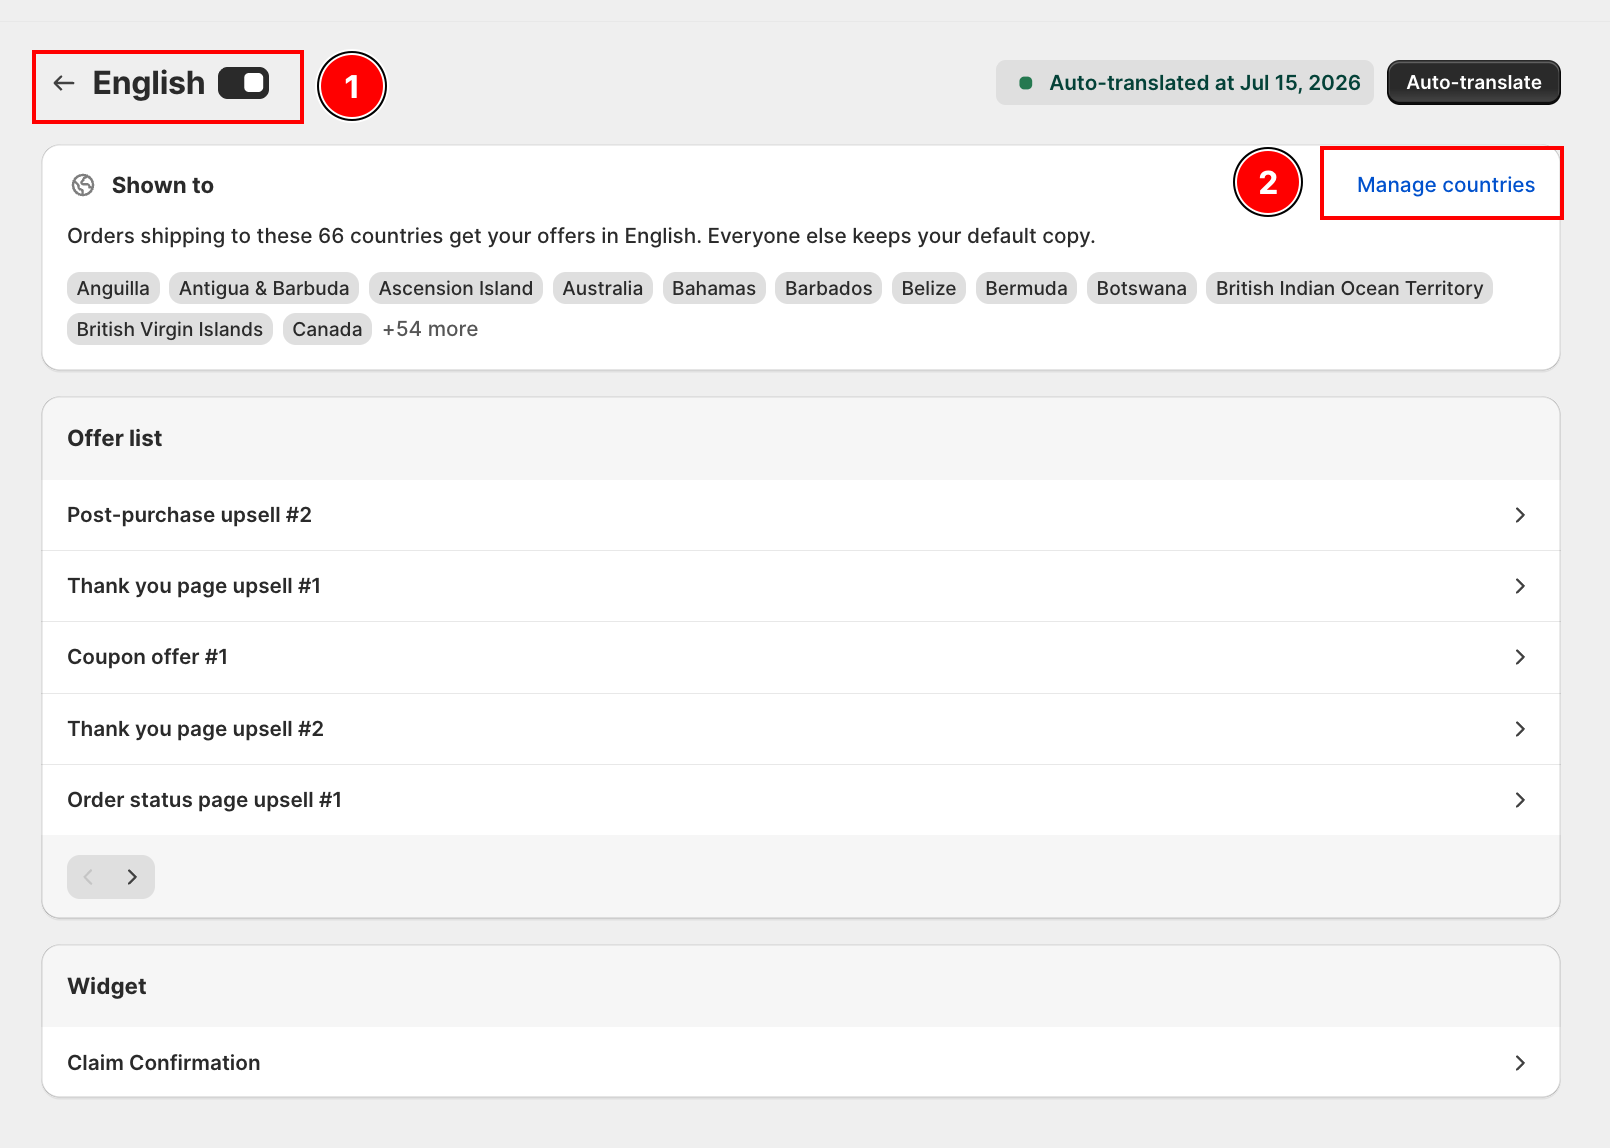
Select a language to open its translation page. At the top you can toggle the language active, and the Shown to card lets you pick which shipping countries receive it (see Choosing which countries receive a language below). The page also lists an Offer list (each of your offers) and a Widget section (currently Claim Confirmation).
Choosing which countries receive a language
Each language has a Shown to card at the top of its translation page, showing the shipping countries currently assigned to it. Open Manage countries to change them.
In the Manage countries modal:
- Search for a country, or scroll the list. Countries are grouped into Countries that speak {language} and Other countries
- Tick or untick countries to assign or remove them from this language
- A country already assigned to another language shows disabled, with a Used by {language} label. Remove it from the other language first if you want to reassign it
- Click Save
Heads up
- A country can only be assigned to one language at a time.
- If you remove all countries from a language, Save still works: the app shows a warning banner ("No country is selected, so no buyer sees this translation") instead of blocking you. Your translated content is kept, so you can assign countries again later without retranslating.
- Country changes take effect immediately, no sync delay. A buyer whose country was just removed from a language sees the default (untranslated) copy starting with their very next order.
Step 4: Translate content
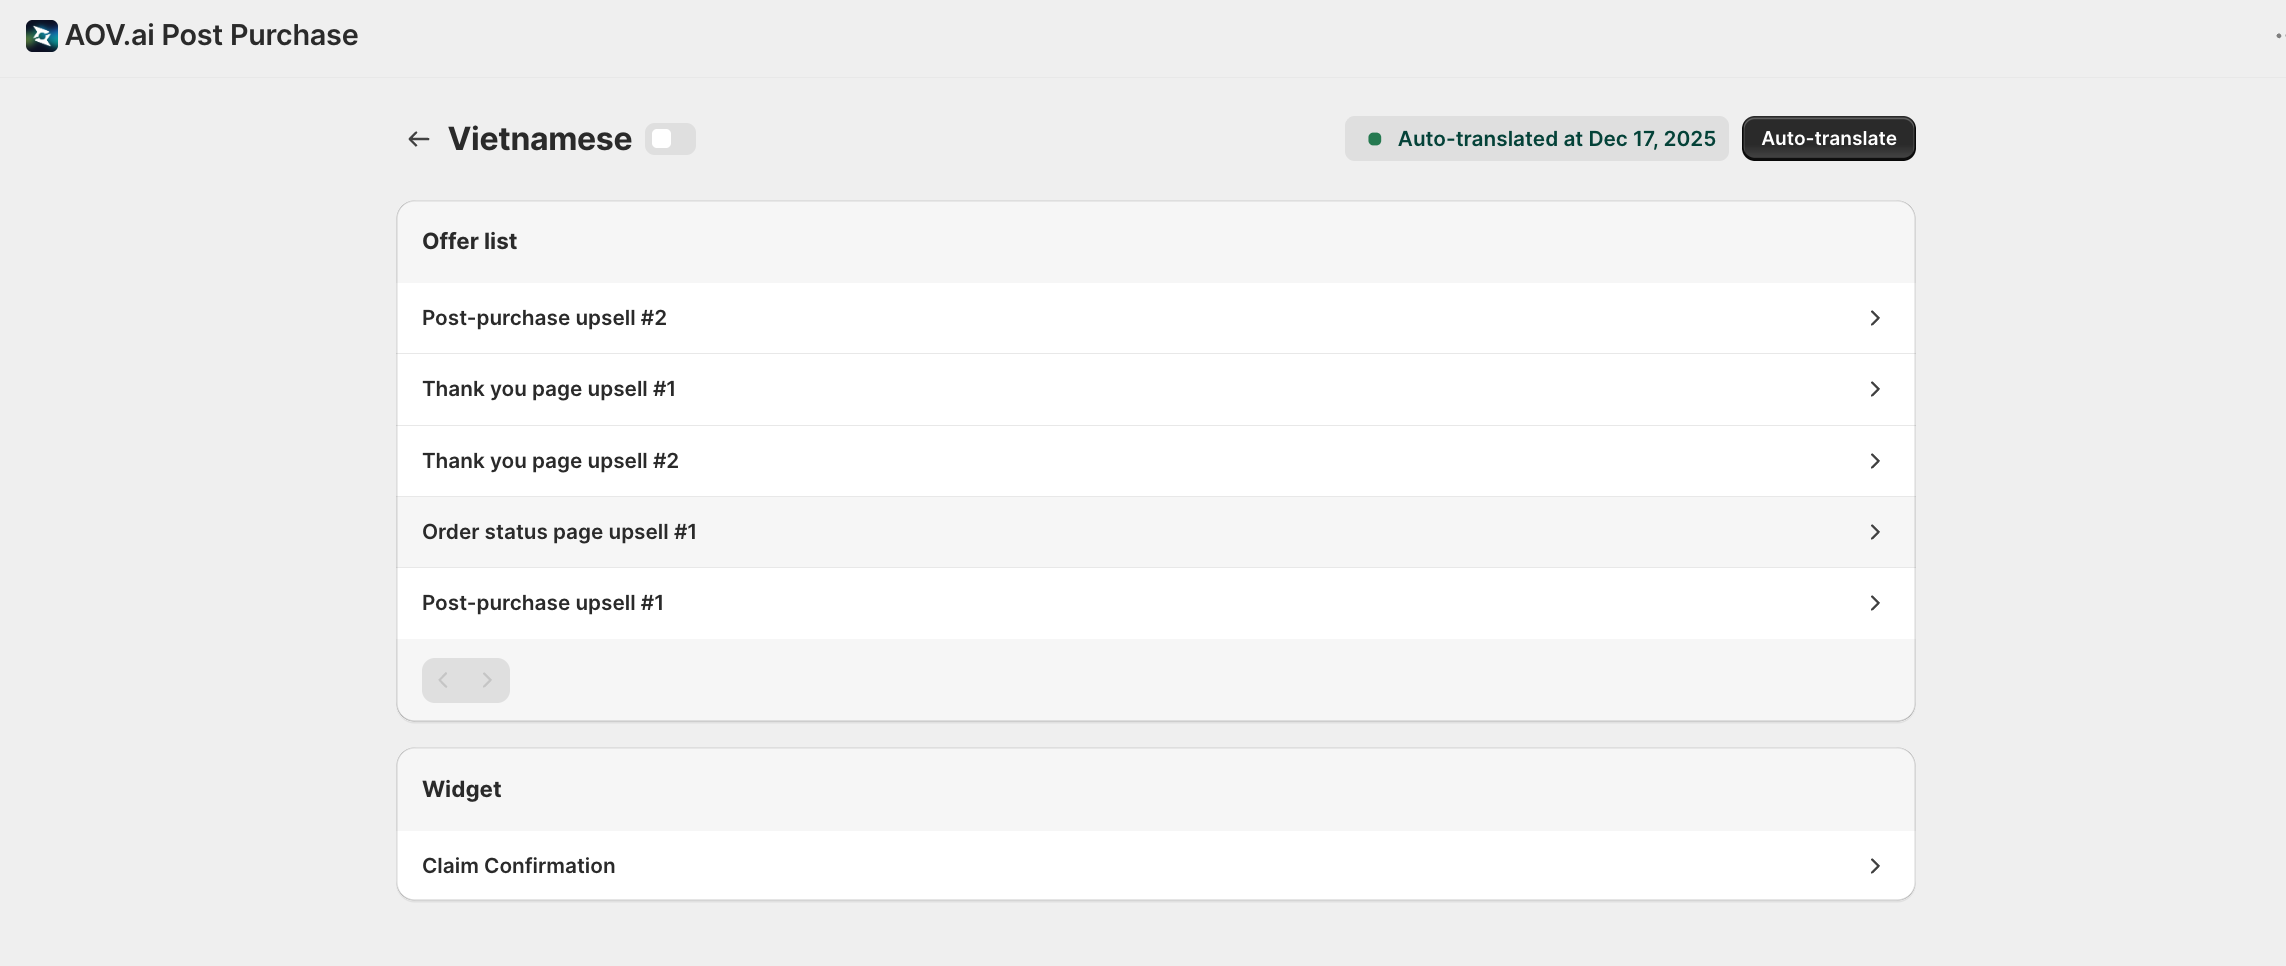
Select an offer or the Claim Confirmation widget to open the translation editor. The editor shows each item's Default text next to the translation field for the chosen language. For offers you can also switch the Template and, if an A/B test is running, the Base version or A/B option being translated.
Step 5: Save
Save your translations using the save bar at the top of the page.
AI-powered translation
On paid plans, Auto-translate is available. It uses ChatGPT to translate your offer content into the selected language in the background.
To use Auto-translate:
- Open a language page (Settings > Translation > select a language)
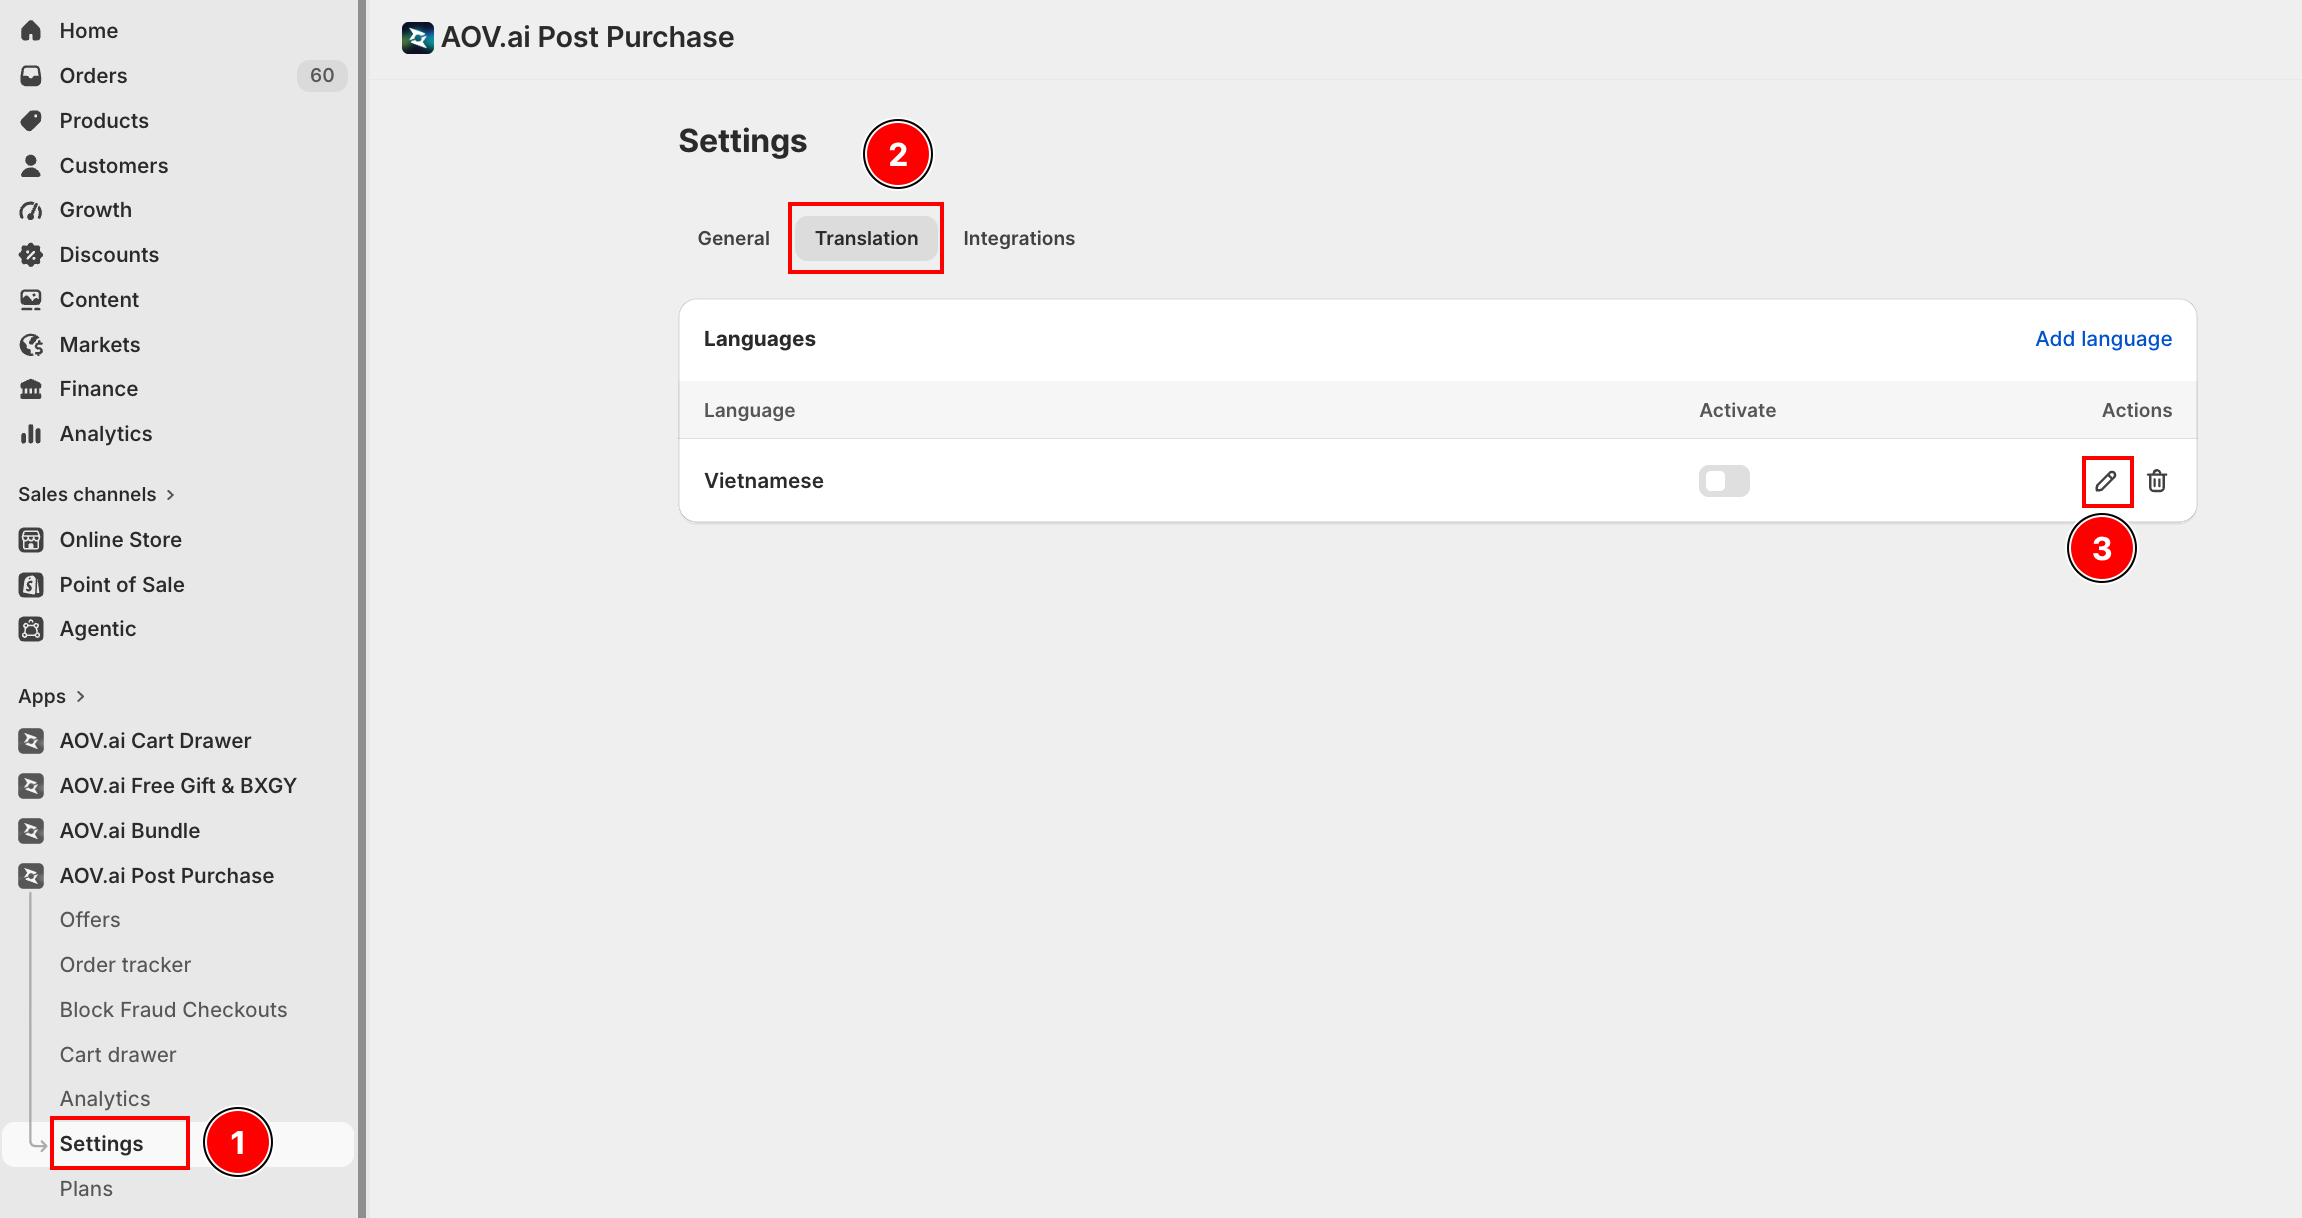
- Click Auto-translate at the top of the page
- Confirm in the dialog. Translation runs in the background and usually takes 1 to 2 minutes, so you can leave the page and come back
- Review the generated translations
- Adjust any translations as needed and save
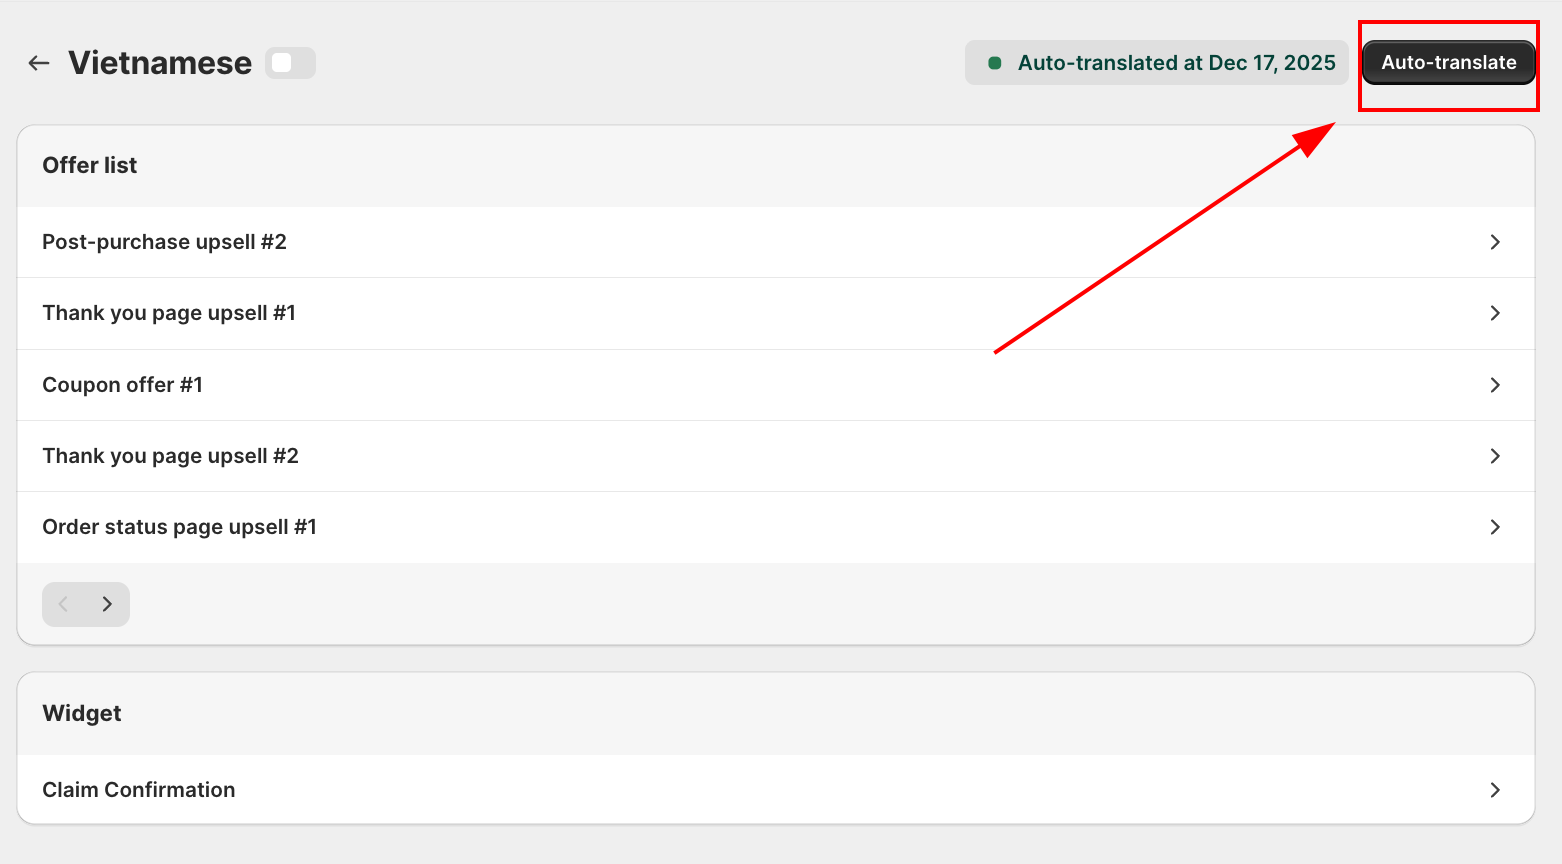
Note: AI translation provides a starting point. We recommend reviewing translations for accuracy, especially for marketing copy and brand-specific terminology. On the free plan this feature is locked.
Preview translations in the editor
Once you've translated an offer, you can check how each language looks without placing a test order.
How to use it
- Open the offer and click Edit layout & content to open the widget editor.
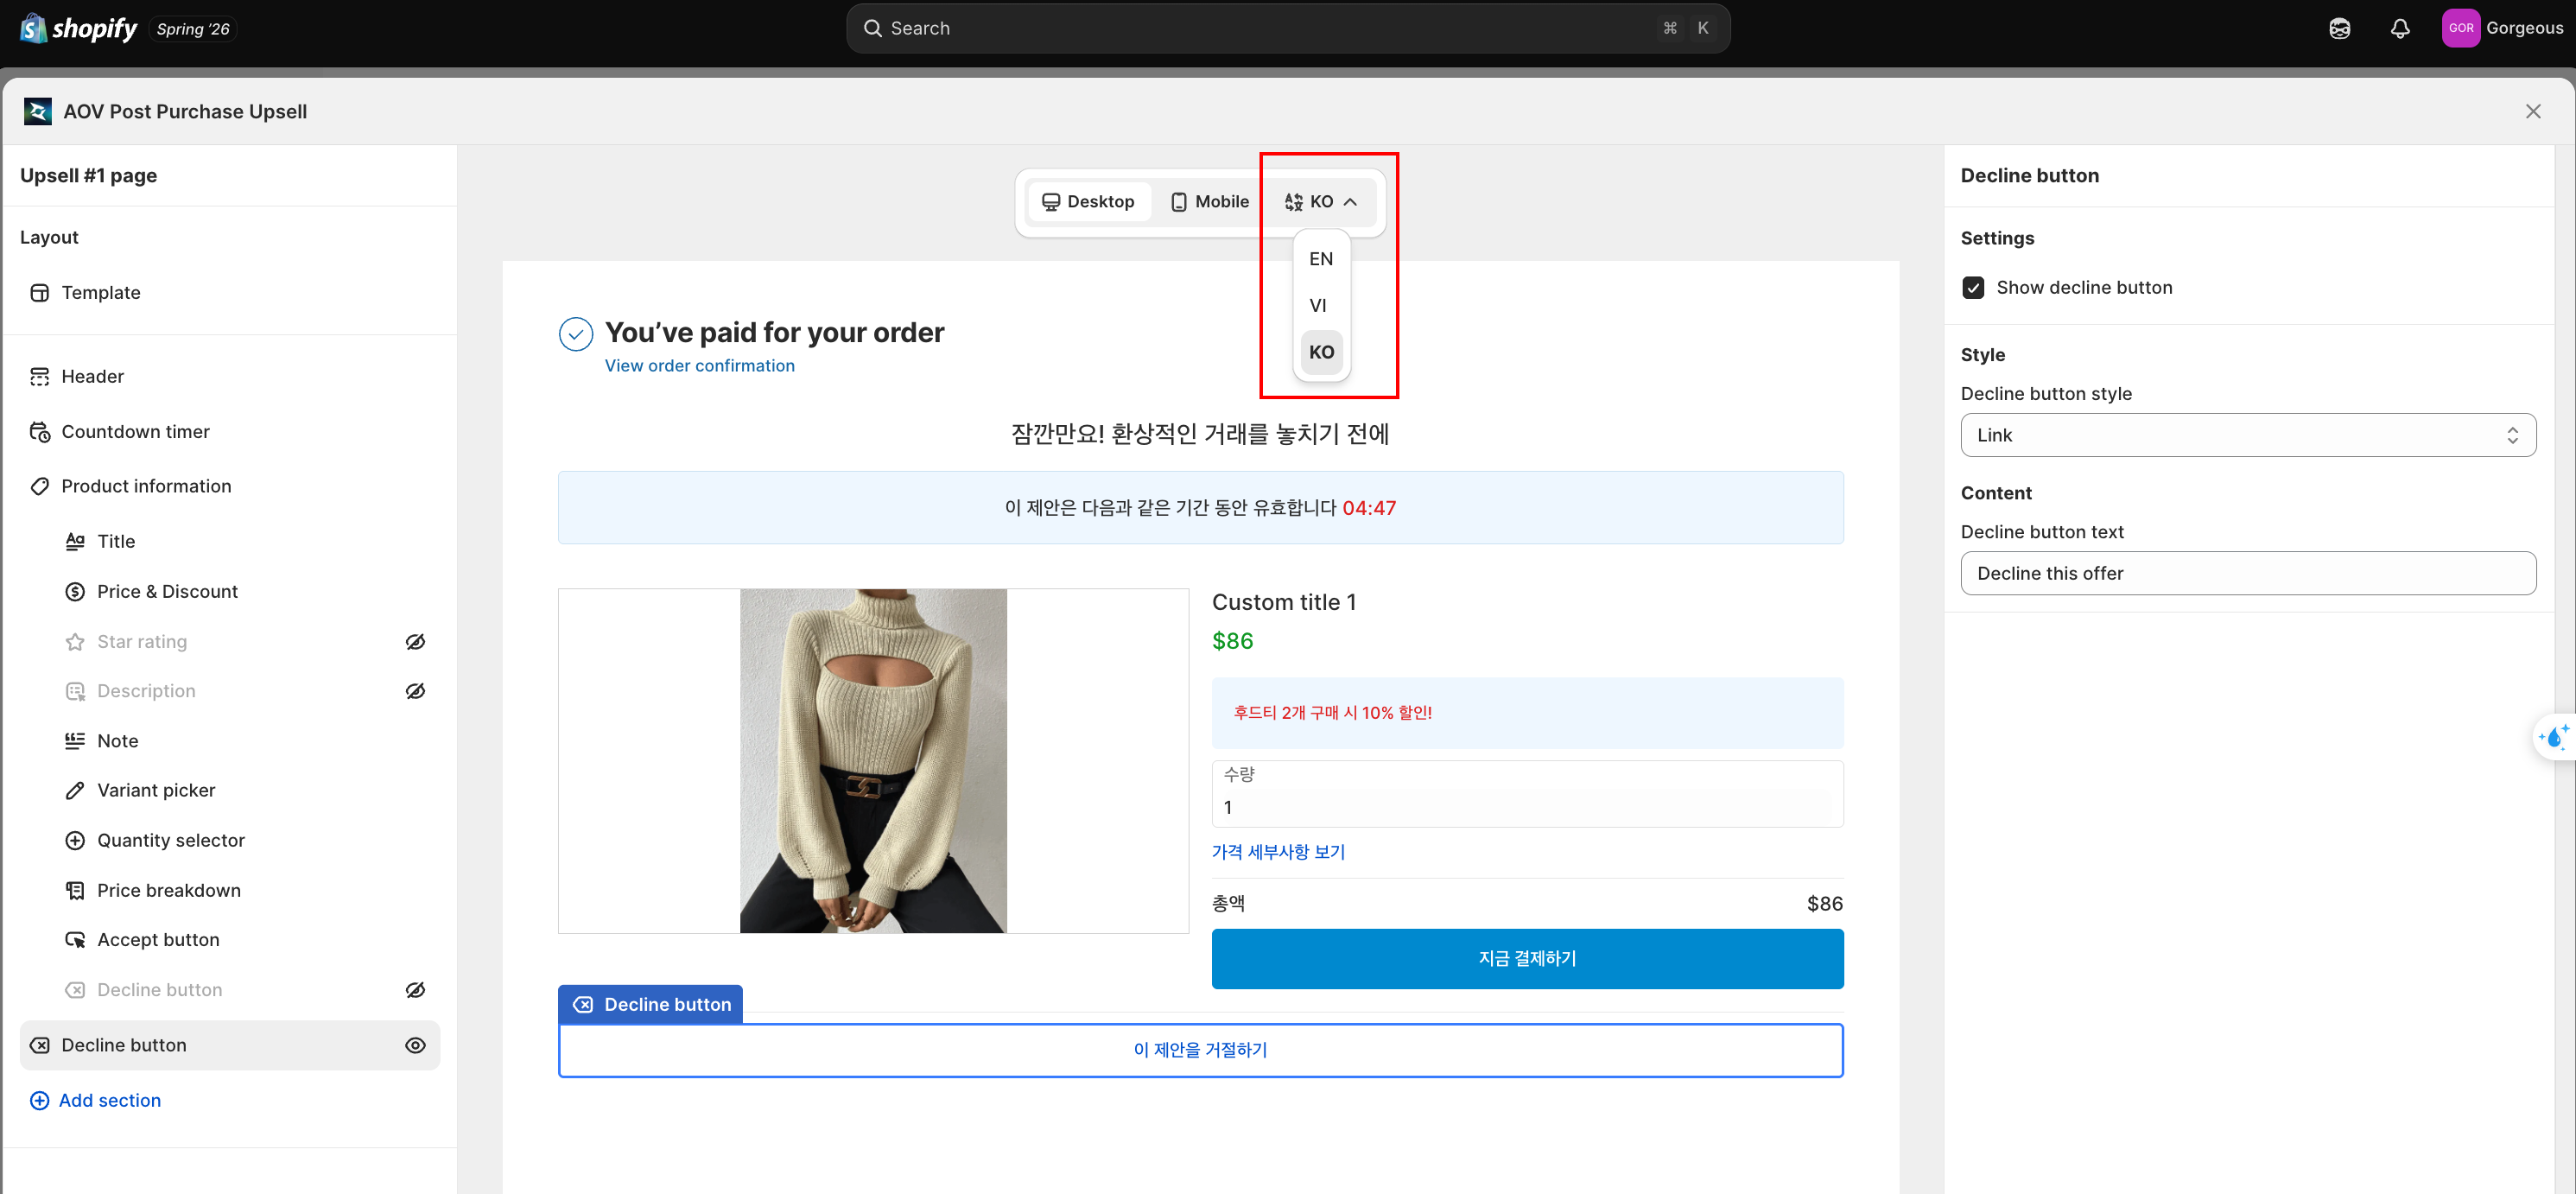
- Above the preview pane, next to the Desktop / Mobile toggle, click the language button. It shows the locale currently being previewed (for example, EN).
- Pick a language from the list. The preview instantly switches to that translation. Any field you haven't translated yet still shows the default text, so the preview is never blank.
Heads up
The language list only shows languages you've already added in Settings → Translation, plus your store's default language. If a language is missing from the list, add it in Settings → Translation first.
What it does and doesn't do
- Preview only. Switching languages changes only the preview pane. The editor's settings panel on the right keeps showing your default content, so you can't accidentally edit a translation from here. To edit a translation, go to Settings → Translation → Edit, same as before.
- Applies to every offer type. Post-purchase upsell, Thank You Page upsell, Coupon offer, and Order Status Page upsell all use the same preview.
- A deactivated language previews as default. If you've toggled a language off (Deactivate) in Settings → Translation, the preview shows the default text for it, matching exactly what buyers see live. Turn it back on (Activate) and the preview shows the translation again.
- Selecting your store's default language returns the preview to the default text.
Tips
- Use the in-editor language preview (above) for a quick check of how a translation looks, then place a test order with a shipping address in the target country to confirm the full buyer experience
- Always review AI translations for brand voice consistency
- Remember to translate both offer-level AND widget-level content for a fully localized experience
- Claim Confirmation text should also be translated if you use the Claim Confirmation feature
- Check the Shown to card before launching a new language: an empty or wrong country list means buyers keep seeing the default copy