How to set up
Who can use this feature
- Store owners and staff with permission to install and manage apps on Shopify.
- Merchants who use payment methods supported by post‑purchase offers (Credit card, PayPal, Shop Pay). For other payment providers, use Thank you page upsell or Order status page upsell.
- Some themes do NOT support the post-purchase page, if your theme is not compatible, this campaign type will not be available.
What is Post-purchase upsell?
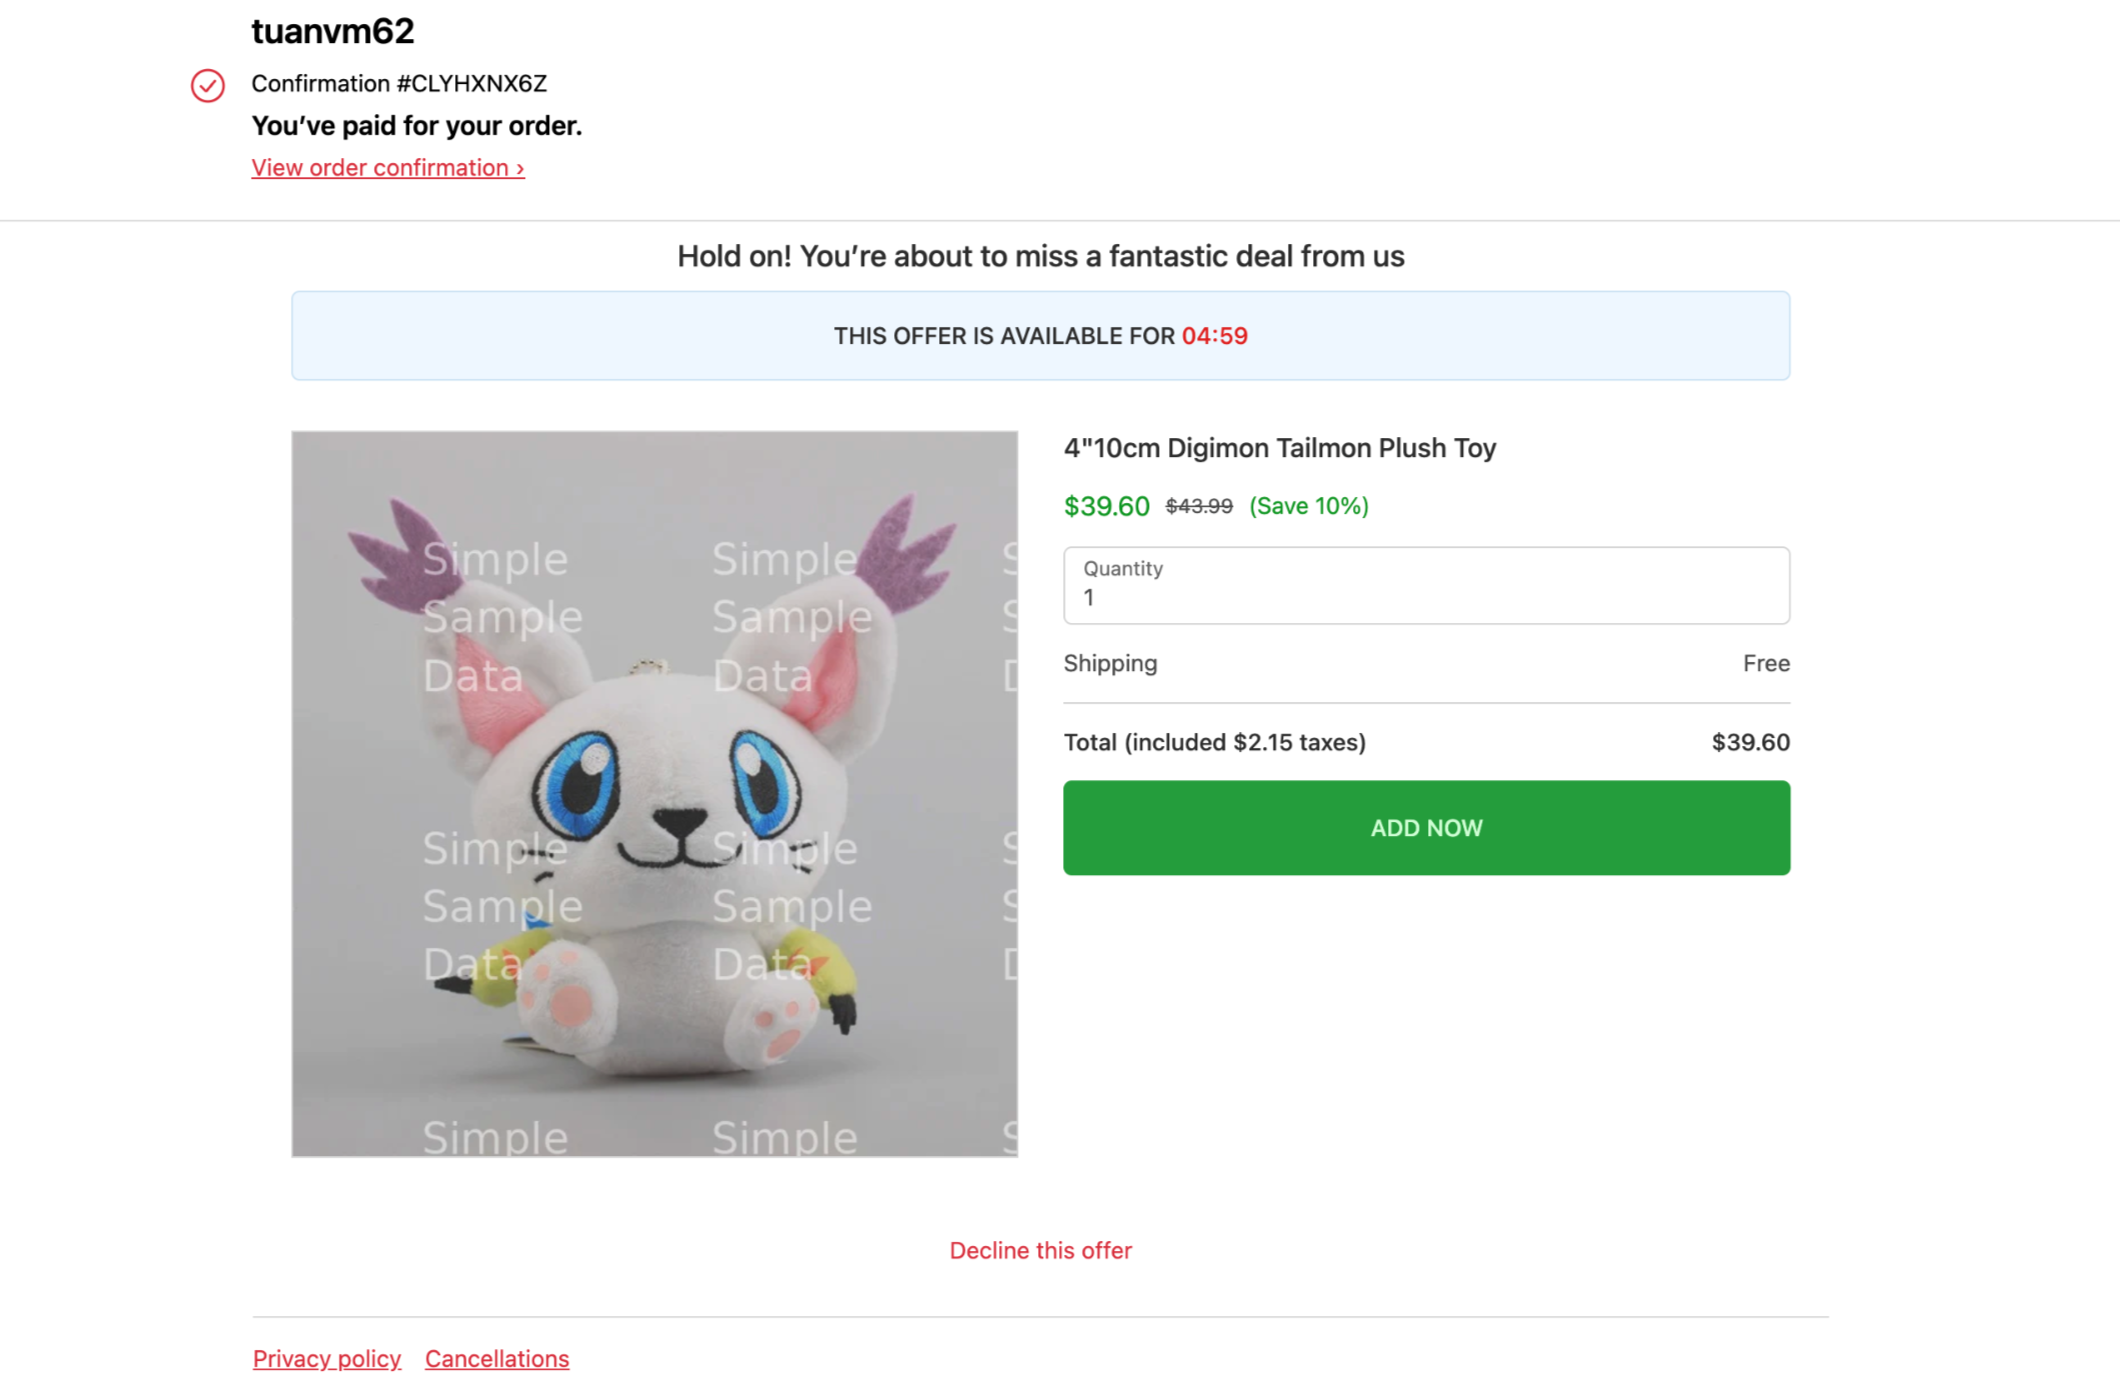
The Post-Purchase Upsell feature allows you to recommend complementary products to customers after they complete their checkout. It's an effective way to encourage additional purchases and boost your store's Average Order Value (AOV).
Campaigns created with this feature will appear on the Post-Purchase page, shown to customers right after they complete checkout, before they reach the thank you page.
Why Post-purchase upsell?
Optimize "last-minute" purchase window
Post-purchase upselling utilizes last-minute purchase window where customers already have the momentum of a completed transaction, thereby suggesting products customers didn't think to buy initially.
Tap into emotional buying
At checkout, customers are already in a buying mindset. Optimizing this psychological state, Post-purchase upsell creates time-sensitive deals that they can't resist.
Enhance customer shopping experience
You can offer useful product recommendations, such as suggesting specific products, applying percentage or fixed amount discounts for their purchases, etc to make the shopping more valued and engaging.
How to set up Post-purchase upsell offer?
Requirements before using
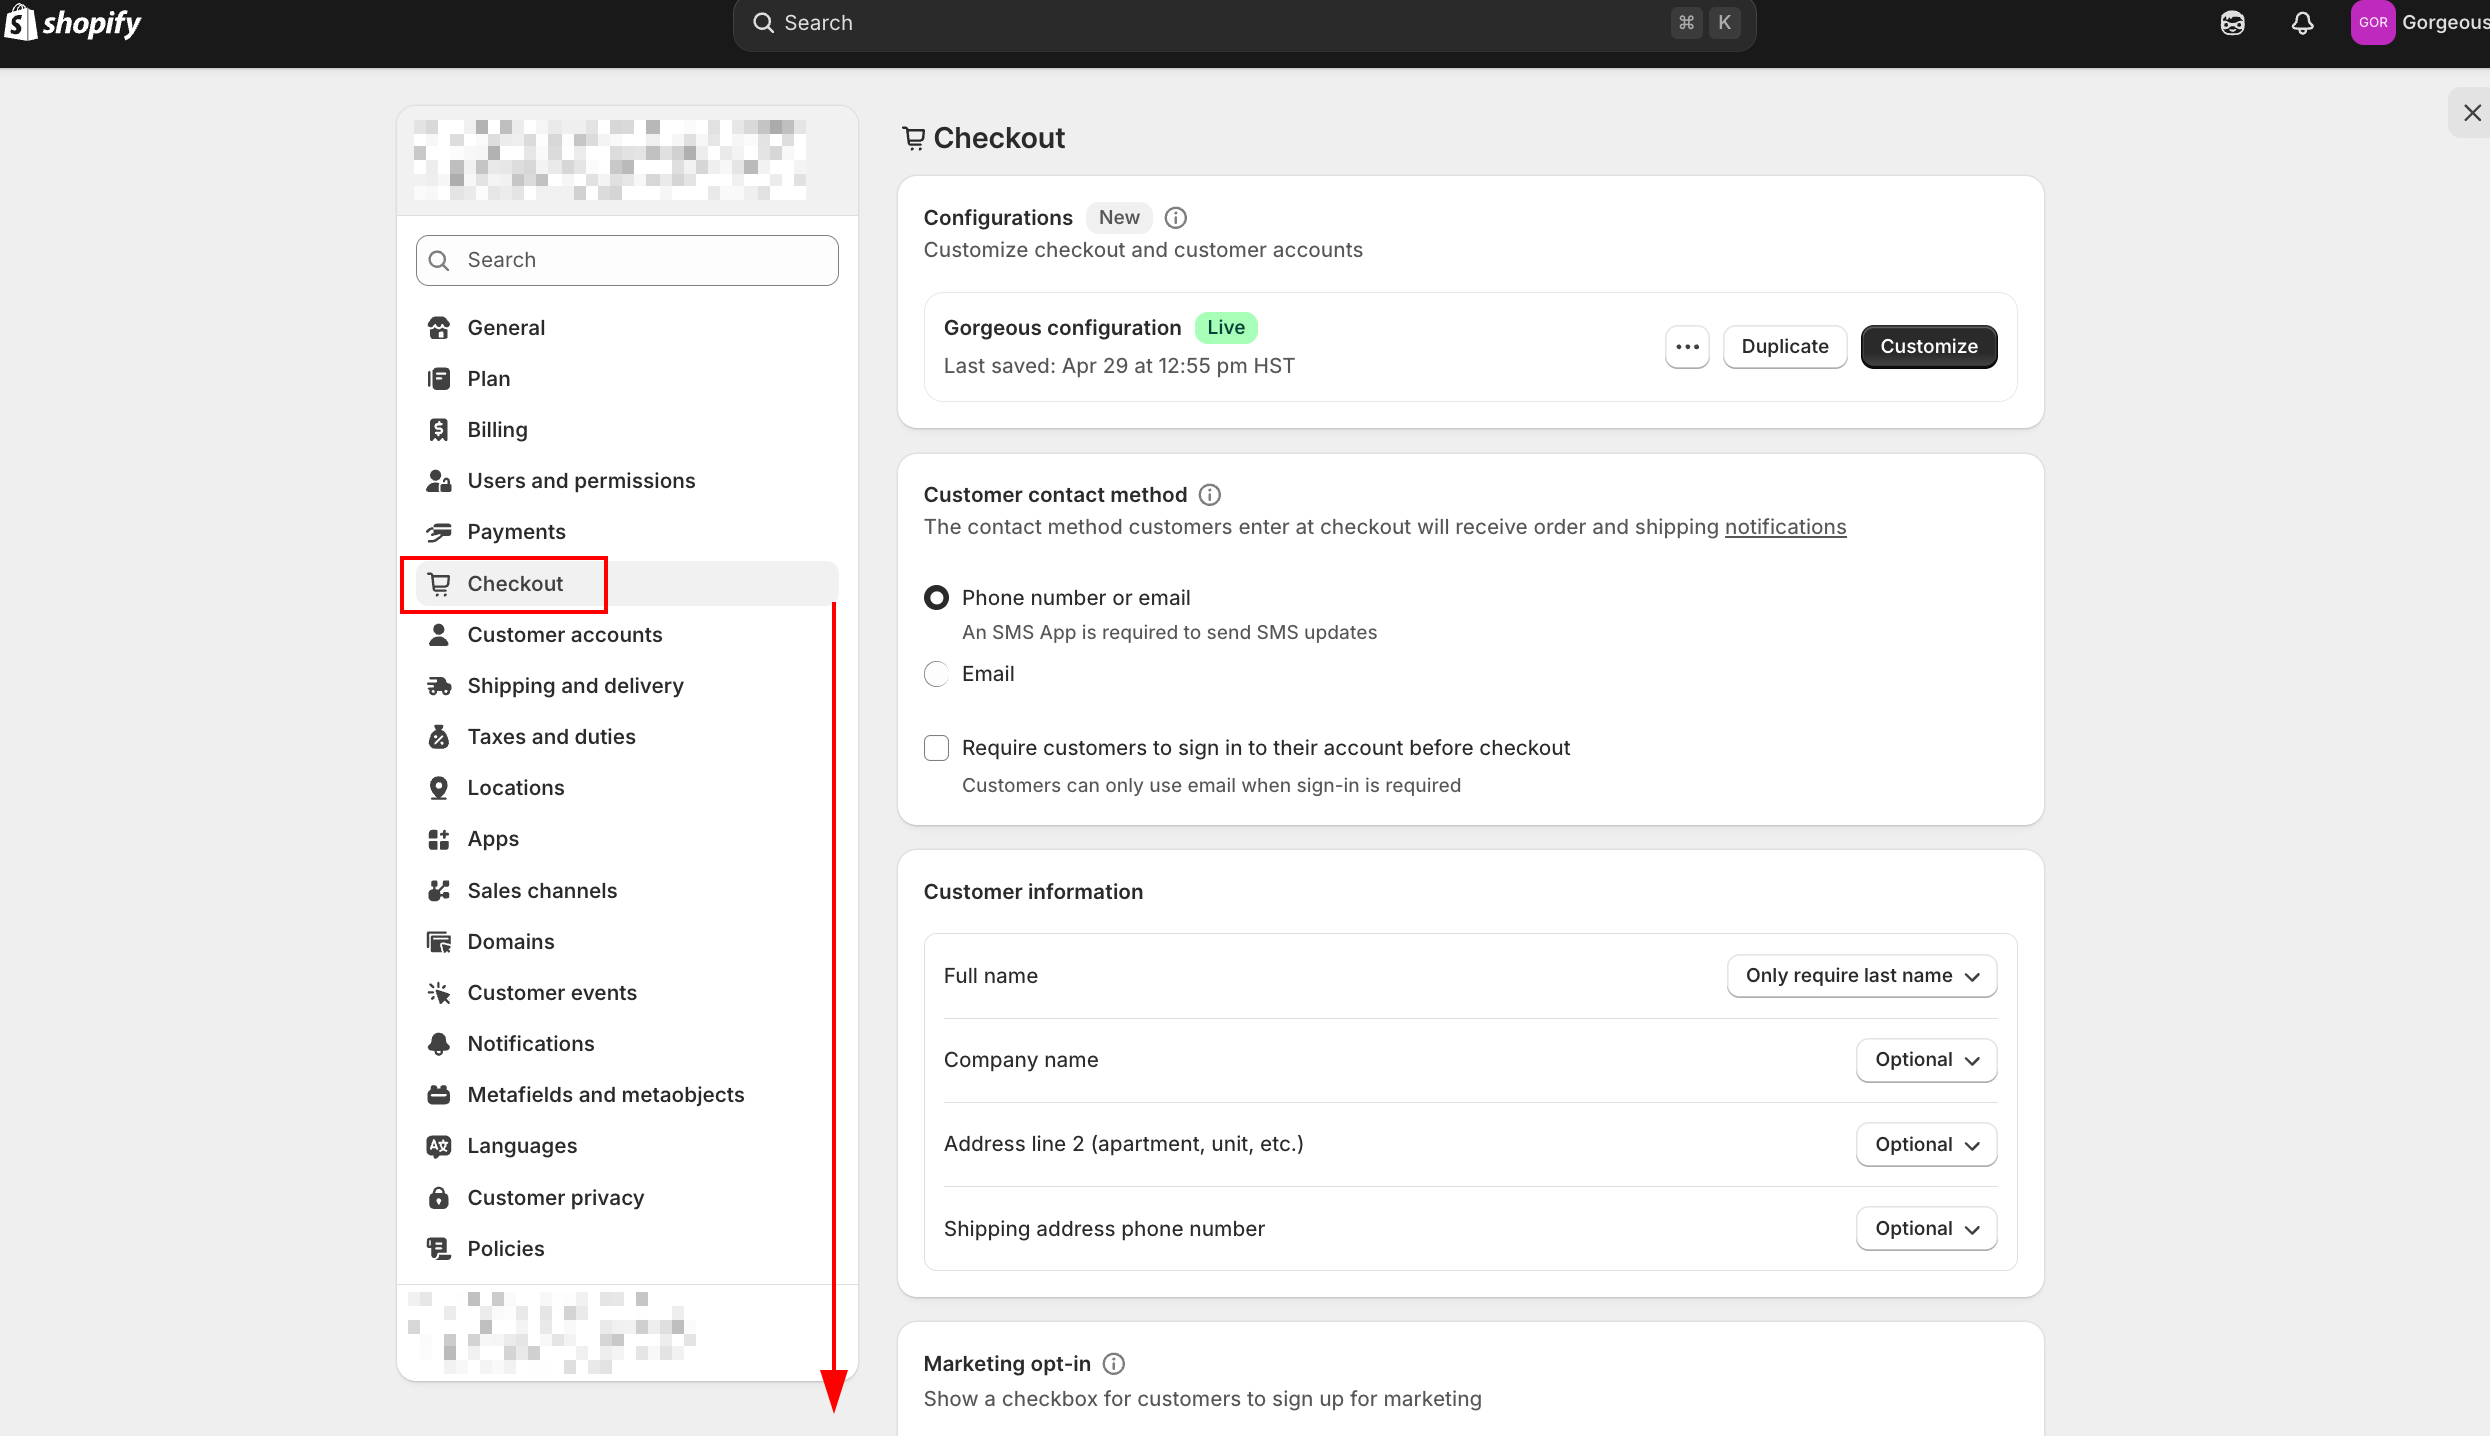
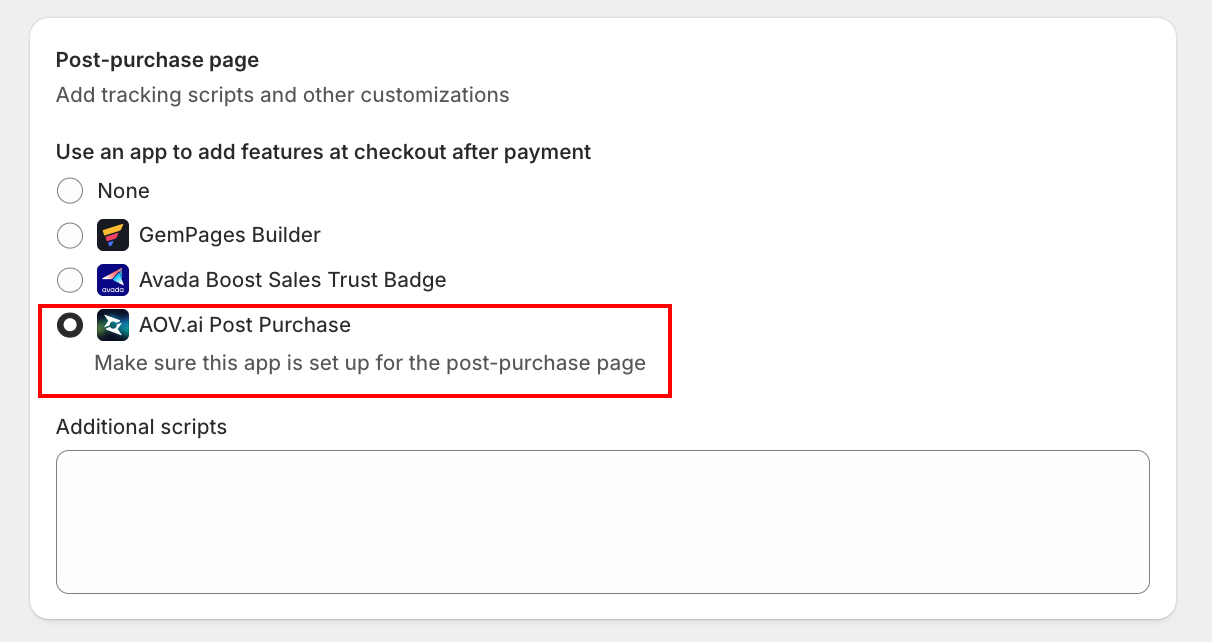
- Enable AOV.ai Post Purchase Upsell in Shopify Admin → Settings → Checkout → Post-purchase page.
- Store must support one of the accepted payment methods: credit card, PayPal, or Shop Pay.
- Customer must complete checkout before seeing the offer.
- Currency must match the store's default currency.
Step 1: Select Post-purchase upsell
Navigate to Offers in the menu > select Create new offer (this opens the Choose offer type page) > click Create on the Post-purchase upsell card.
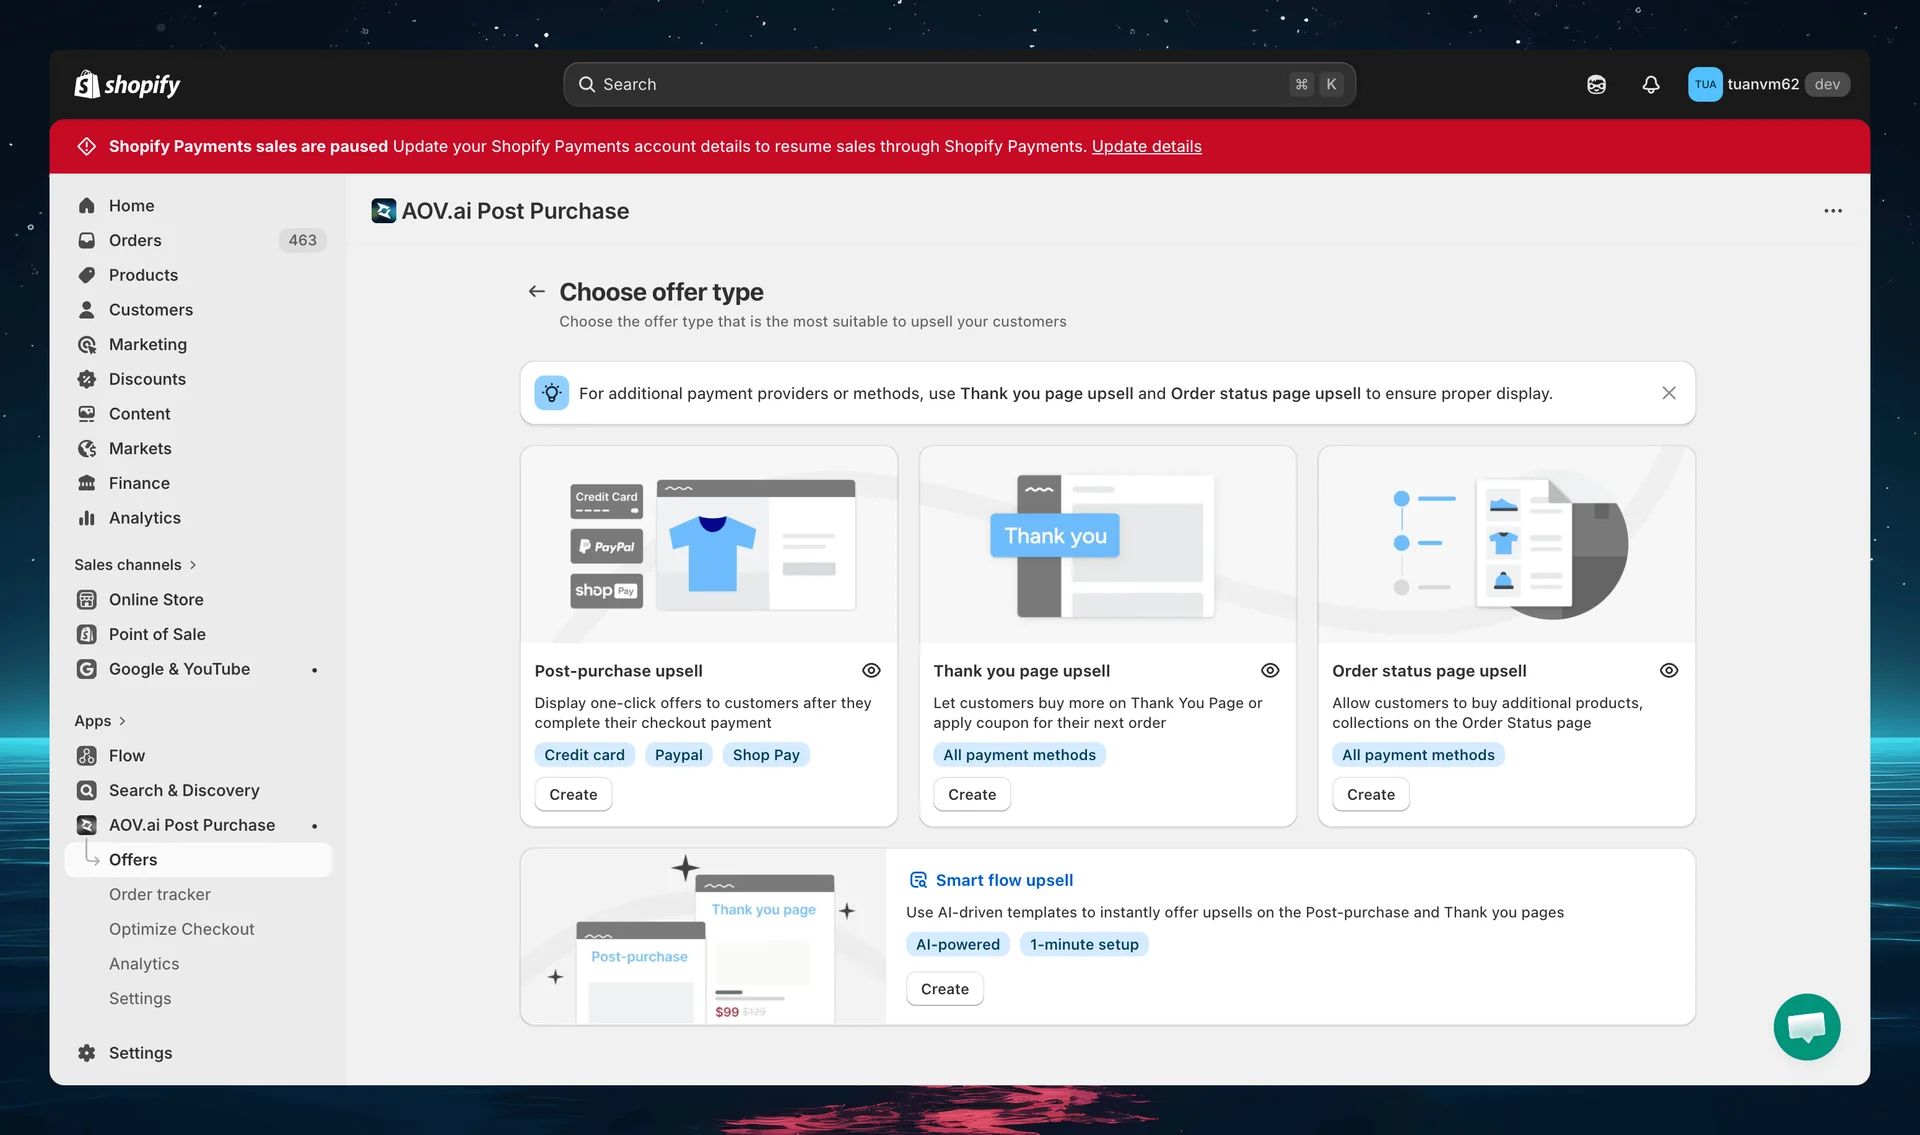
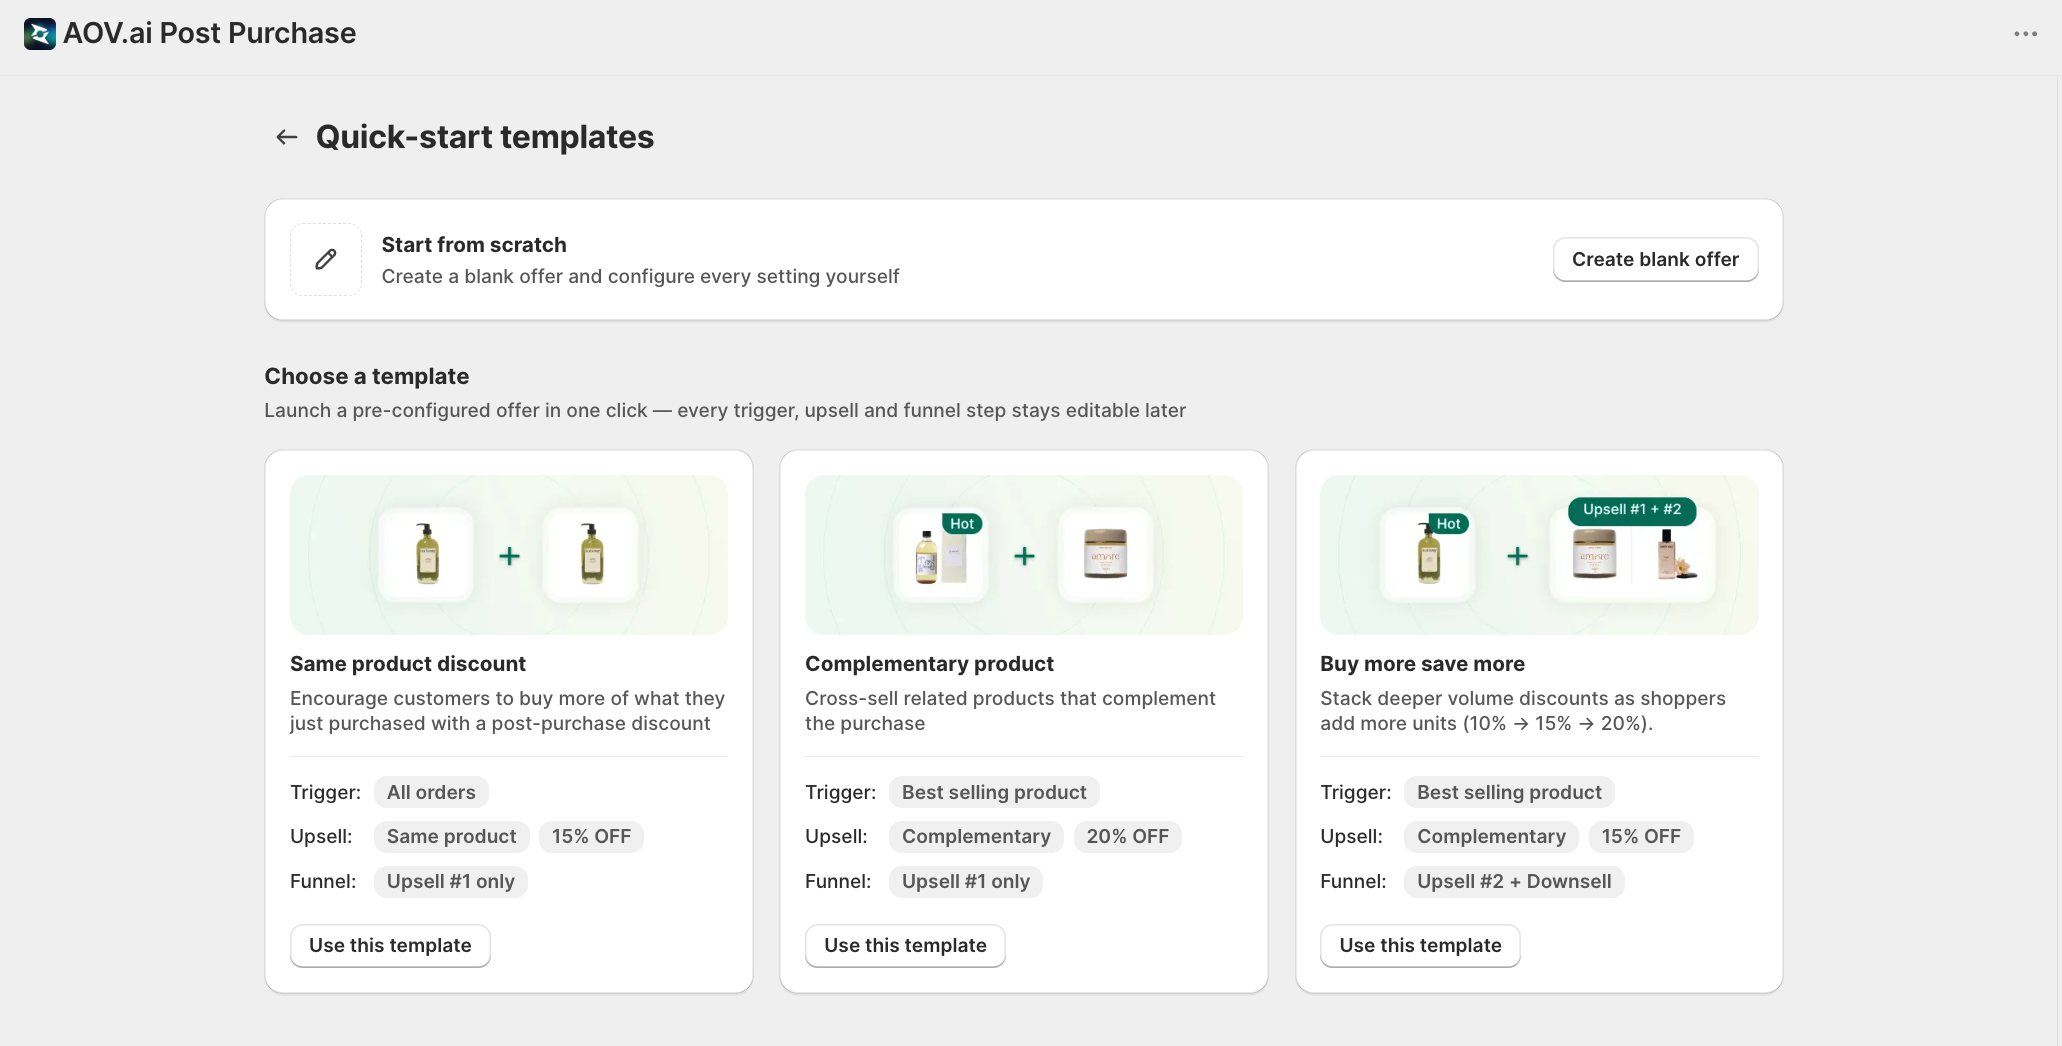
You can also choose a Quick-start template to launch a pre-configured offer in one click, trigger, upsell, and funnel stay editable later.
If this is your first time using the feature, you'll need to embed the app into your post-purchase page. Follow the instructions provided in the yellow banner.
Step 2: Define your Offer information
Offer name
Enter a name for your campaign so that you can easily identify it later on. Your customers won't see this name on the storefront.
(Optional) Select Edit discount code to customize the discount applied.
Step 3: Add Trigger conditions
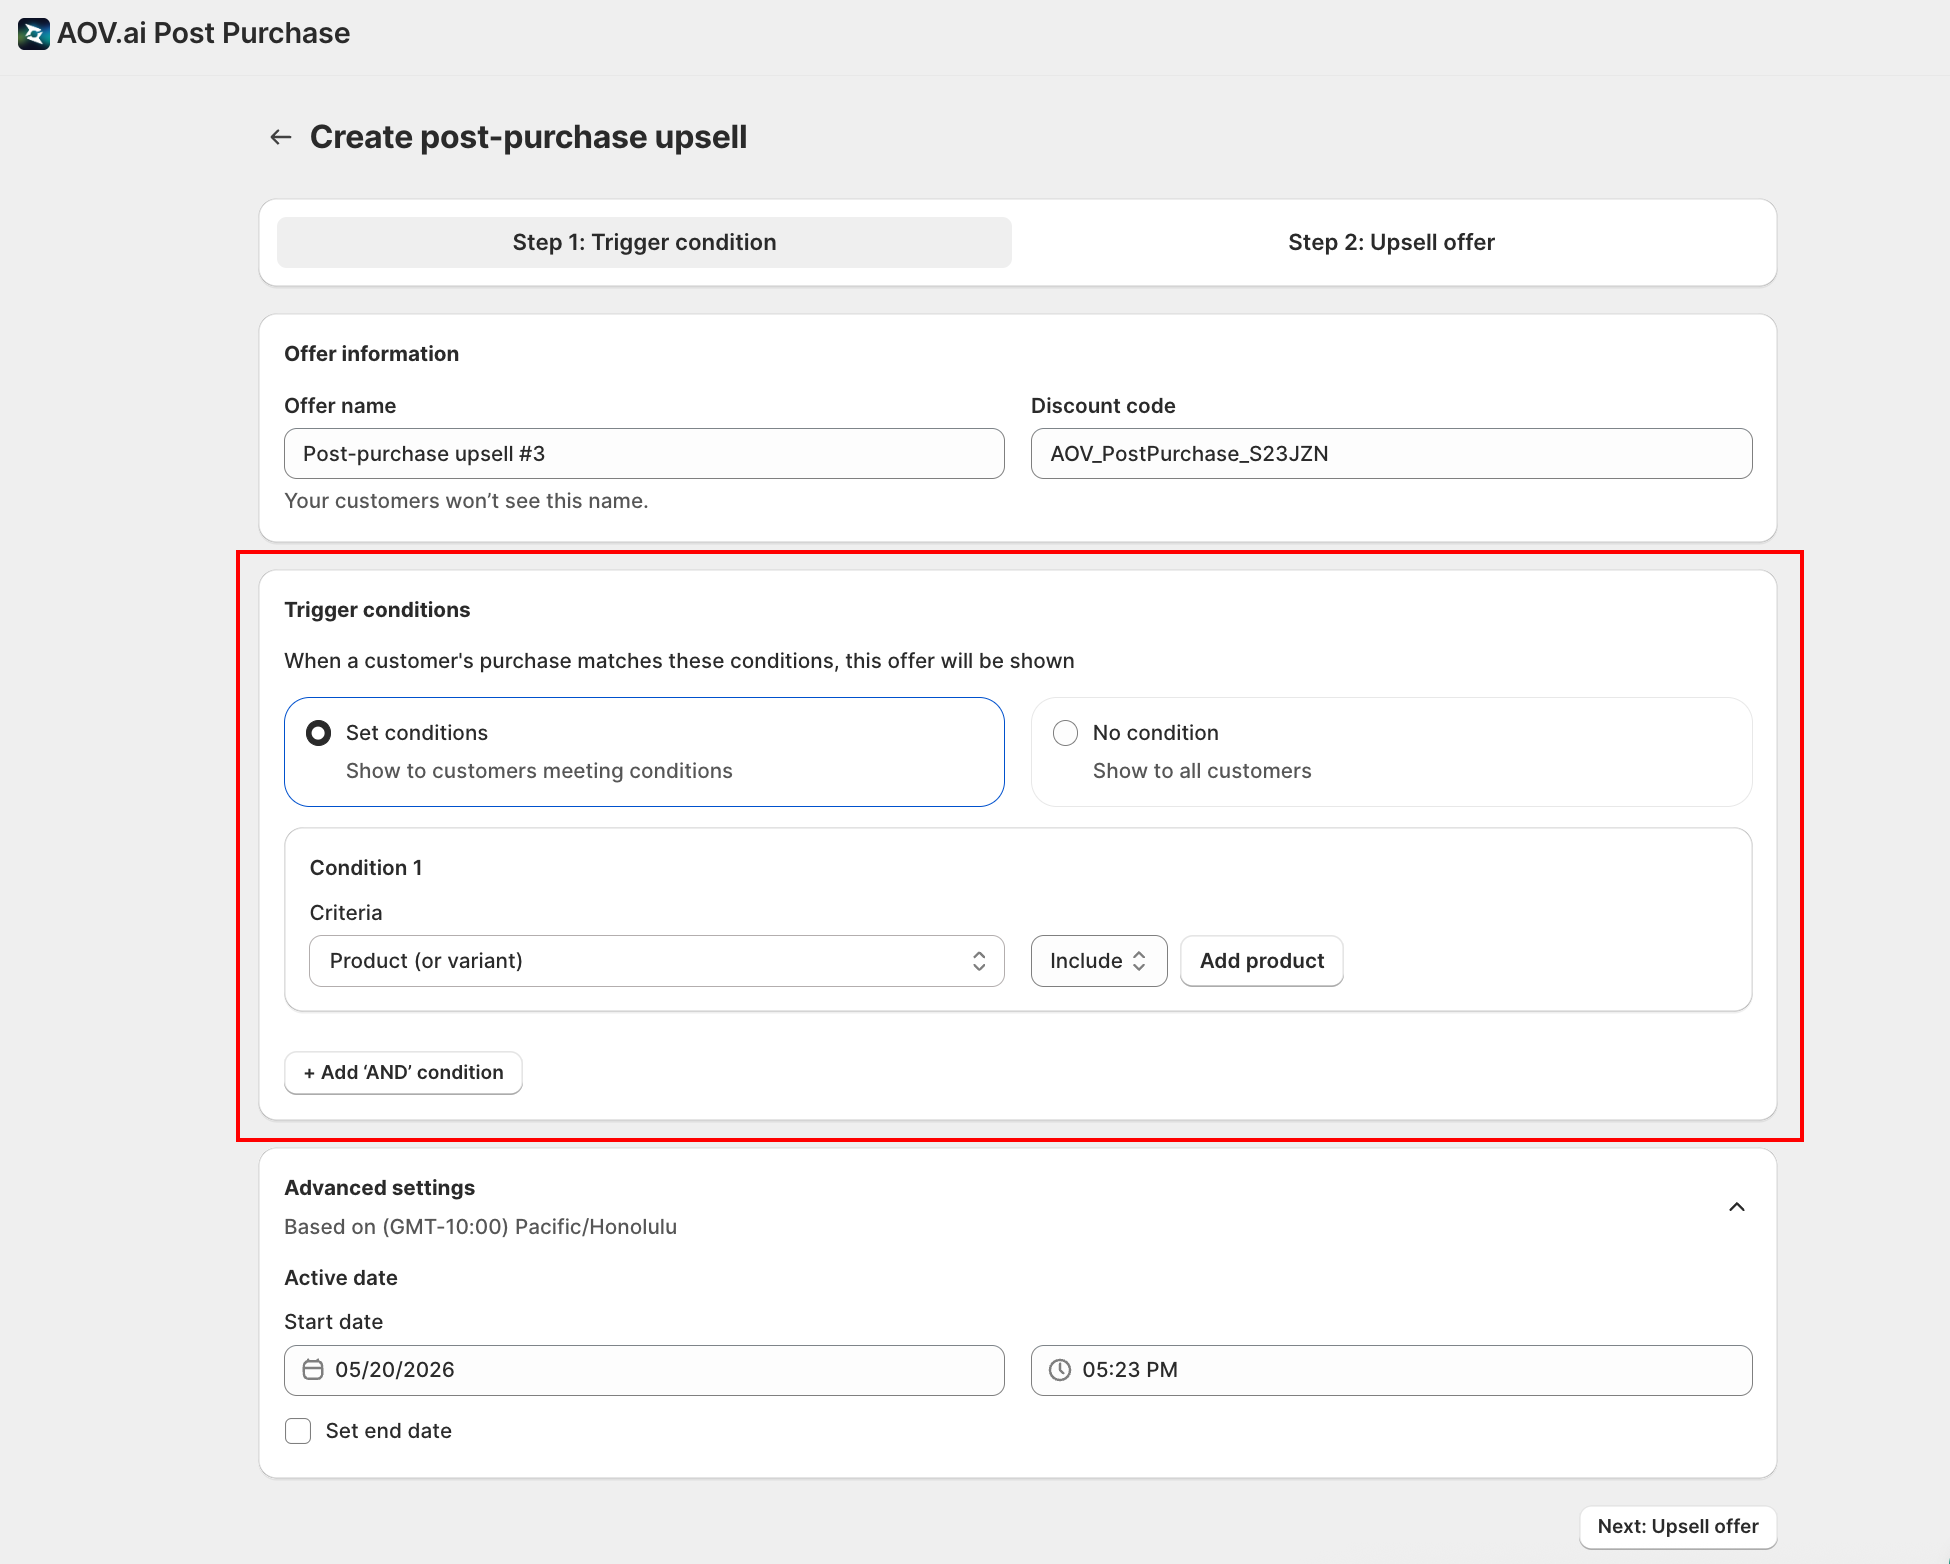
Under Trigger conditions, choose one the trigger conditions so that your post-purchase offers can be shown:
- Set conditions: Target specific purchases.
- No condition: Show the offer to all customers.
If you select Set conditions, you can build rules using criteria:
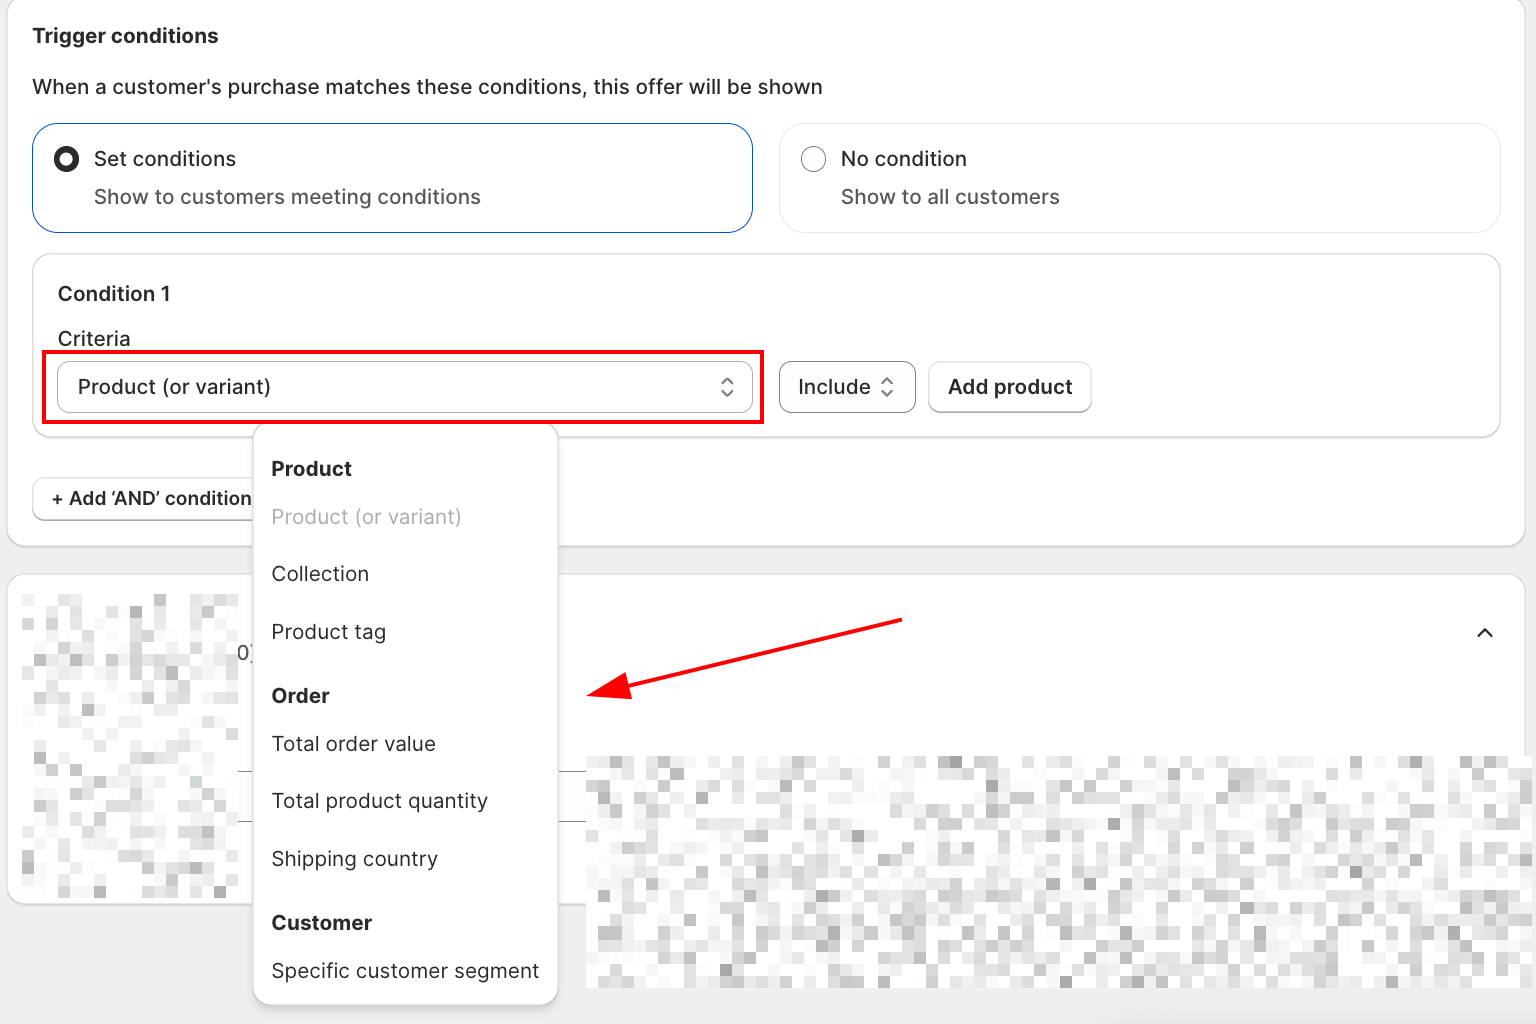
| Category | Condition | Description |
|---|---|---|
| Product | Product (or variant) | Show only if the order includes or excludes specific SKUs. |
| Collection | Target entire collections (e.g., "Winter Skincare"). | |
| Included product tag | Show only if products have ALL specified tags (AND logic). | |
| Excluded product tag | Hide the offer if any product in the order has one of the specified tags. | |
| Order | Total order value | Show only if cart subtotal reaches a threshold (e.g., orders above $50). |
| Total product quantity | Trigger based on the total number of items in the order. Supports ≥, ≤, and = operators. | |
Shipping fee NEW | Show only if the order's shipping fee is greater than, less than, or equal to a specific amount (≥, ≤, =). The amount field shows your store's currency symbol; enter 0 to target free-shipping orders. | |
| Shipping country | Restrict offers to customers shipping to specific countries. | |
| Customer | Specific customer segment | Target Shopify segments (e.g., returning buyers). |
For each condition:
- Select the Criteria from the dropdown.
- Choose an operator (Include / Exclude, or ≥ / ≤ / = for numeric fields).
- Add the value to match.
- Use + Add 'AND' condition to combine multiple rules.
Good to know: how Shipping fee is calculated
- Shipping fee is calculated after discounts are subtracted, so a free-shipping order reads as 0.
- Orders with no shipping fee at all (local pickup, digital products) also read as 0.
- A Less (≤) condition matches those orders too. Use Greater (≥) with a value above 0 if you want to exclude them.
- For multi-currency shops, the number you enter is compared directly against the order's amount, it is not converted, the same behavior as Total order value.
When done, review the Summary panel, it will note: Offer will show after a payment is made via Credit card, PayPal or Shop Pay. Click Preview offer to test visibility.
Decision help
- Start with No condition if you need to validate the layout and copy.
- Use Set conditions when the add‑on should match items in the order (accessories, refills, size‑ups).
Step 4: Advanced settings
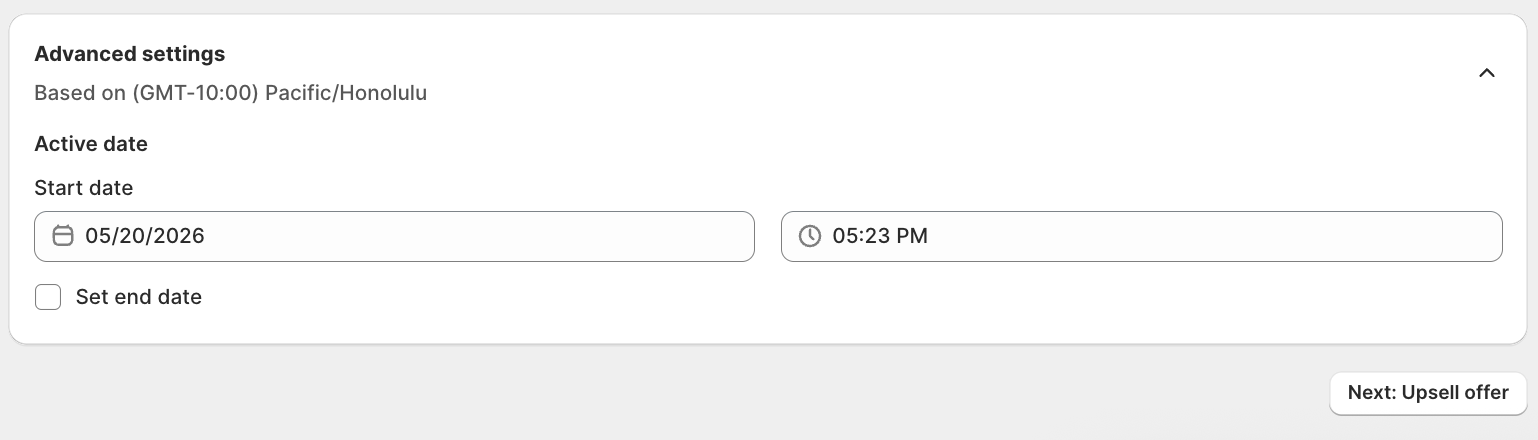
- Open Advanced settings.
- In Active date, pick a Start date and time. Use the timezone shown in the panel.
- (Optional) Select Set end date, then pick the end date and time.
- Select Save.
Upsell offer
This step defines what customers see after they pay. Configure each card from top to bottom.
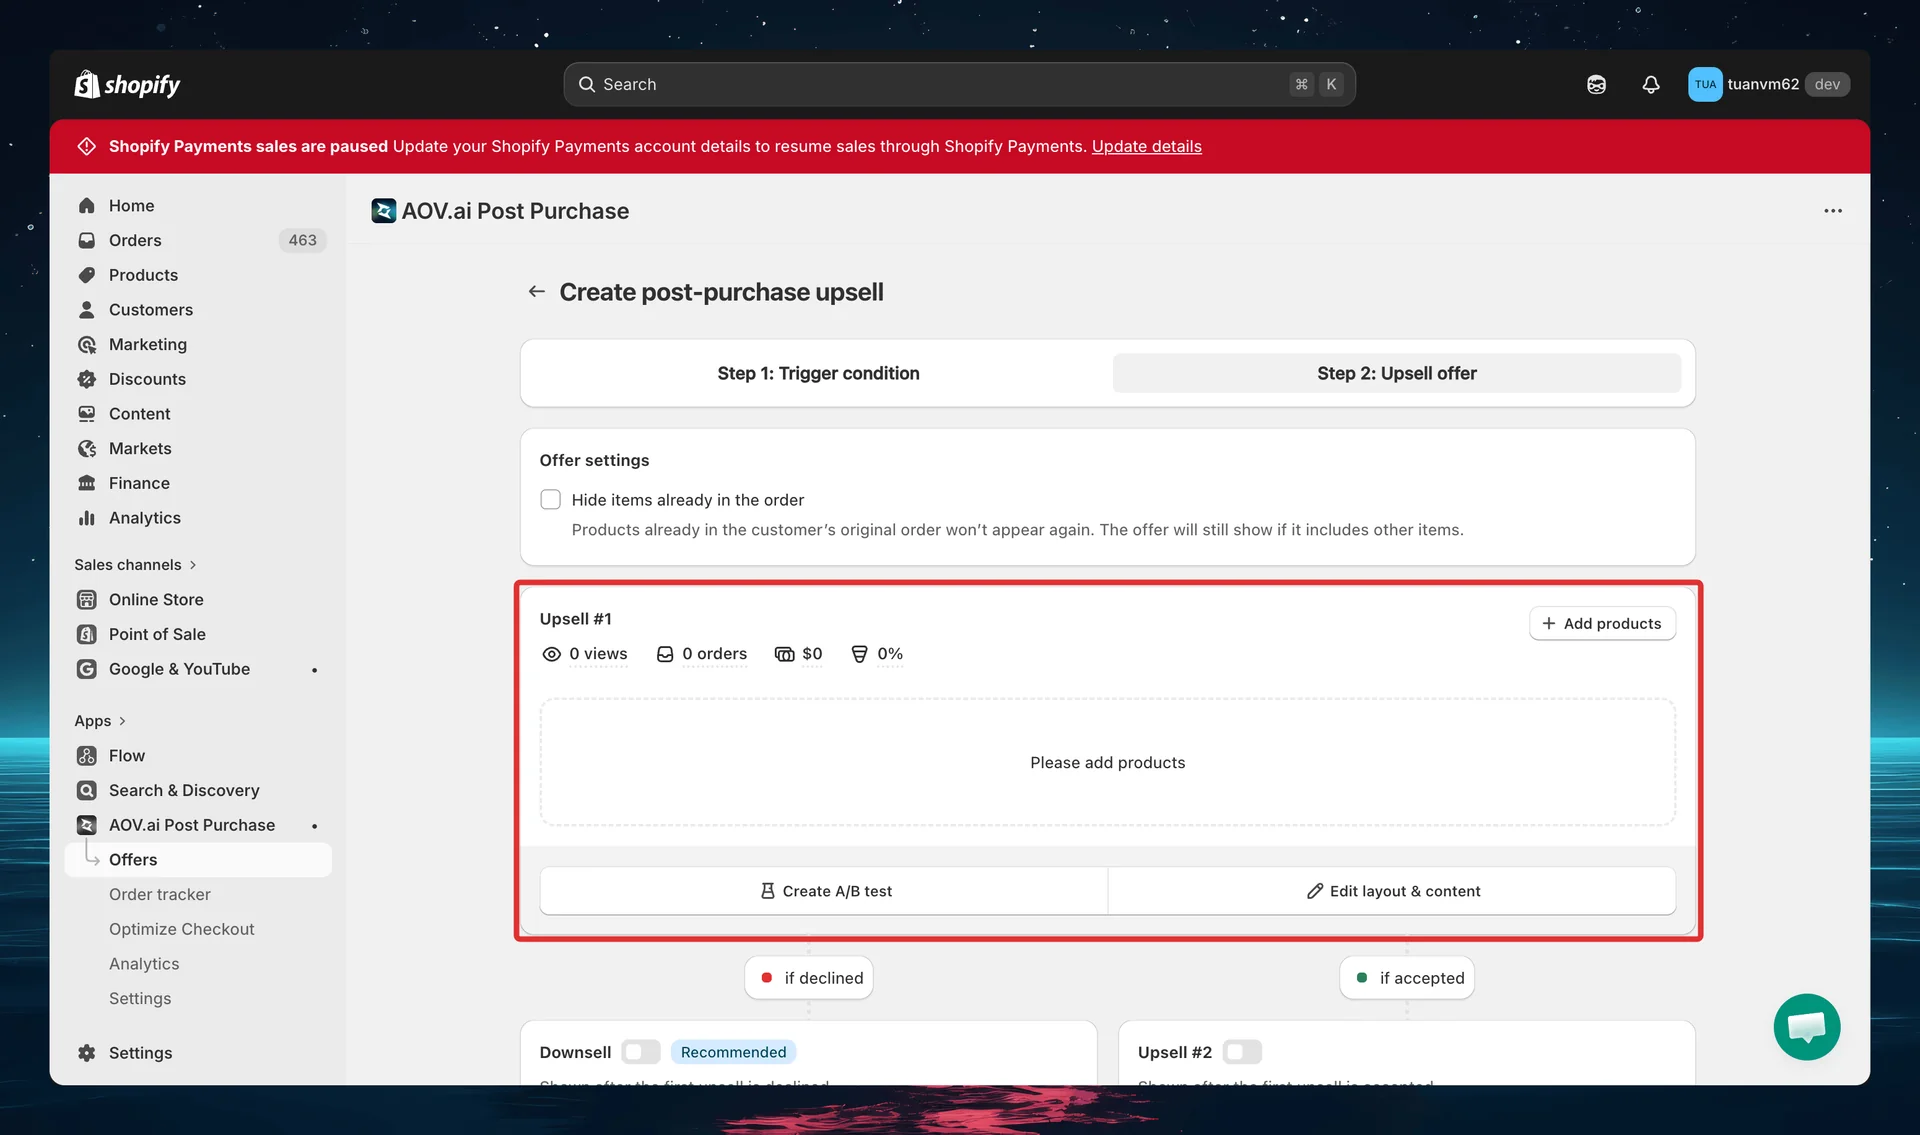
Step 1: Offer settings
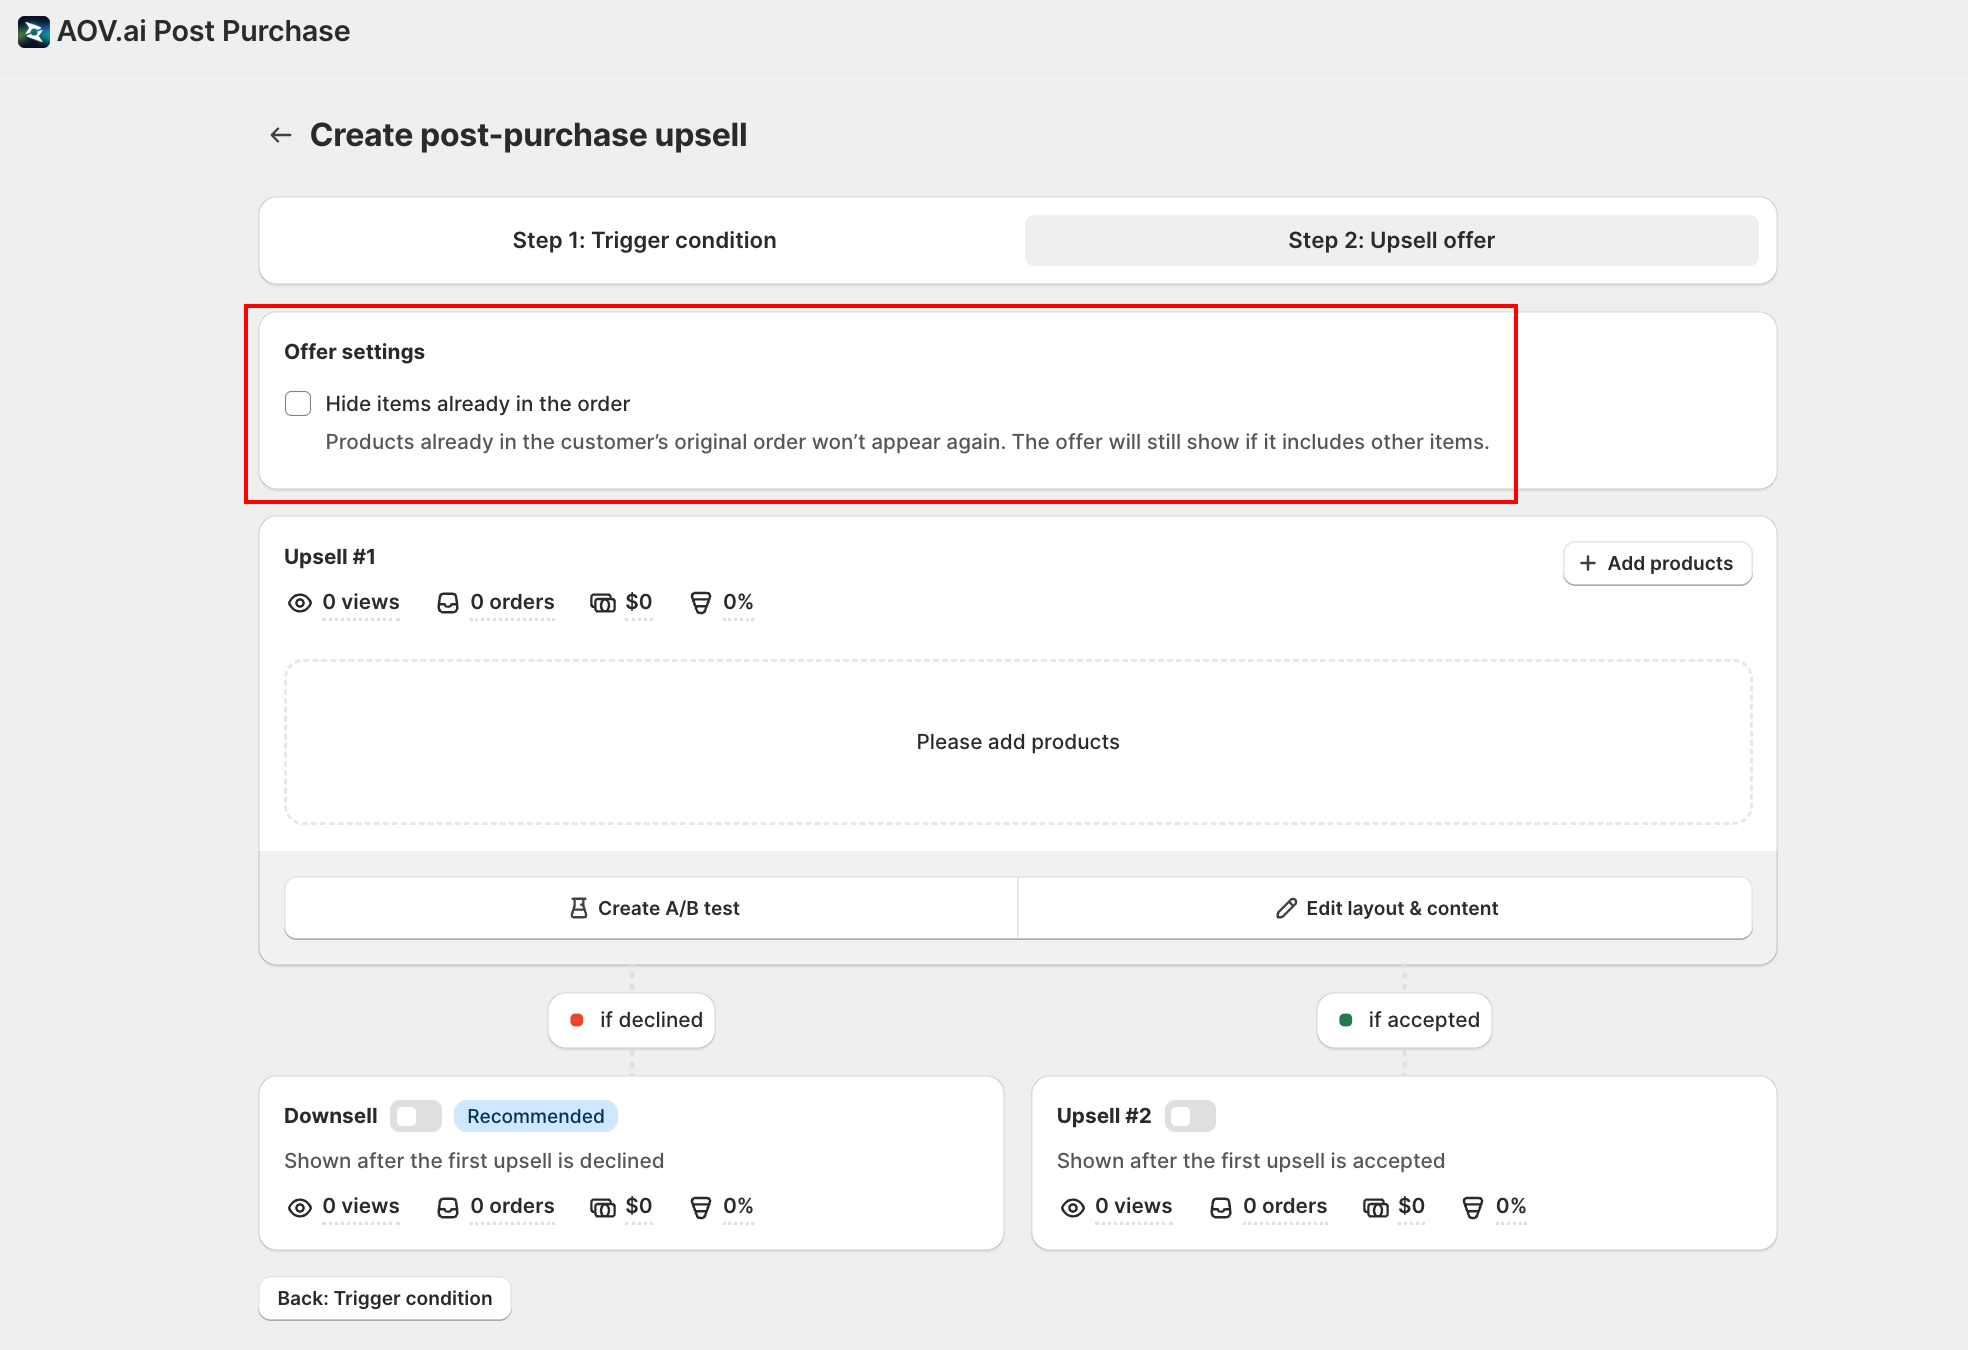
Hide items already in the order (checkbox): When enabled, any product that is already in the original order will not appear in the upsell.
Step 2: Set up Upsell #1
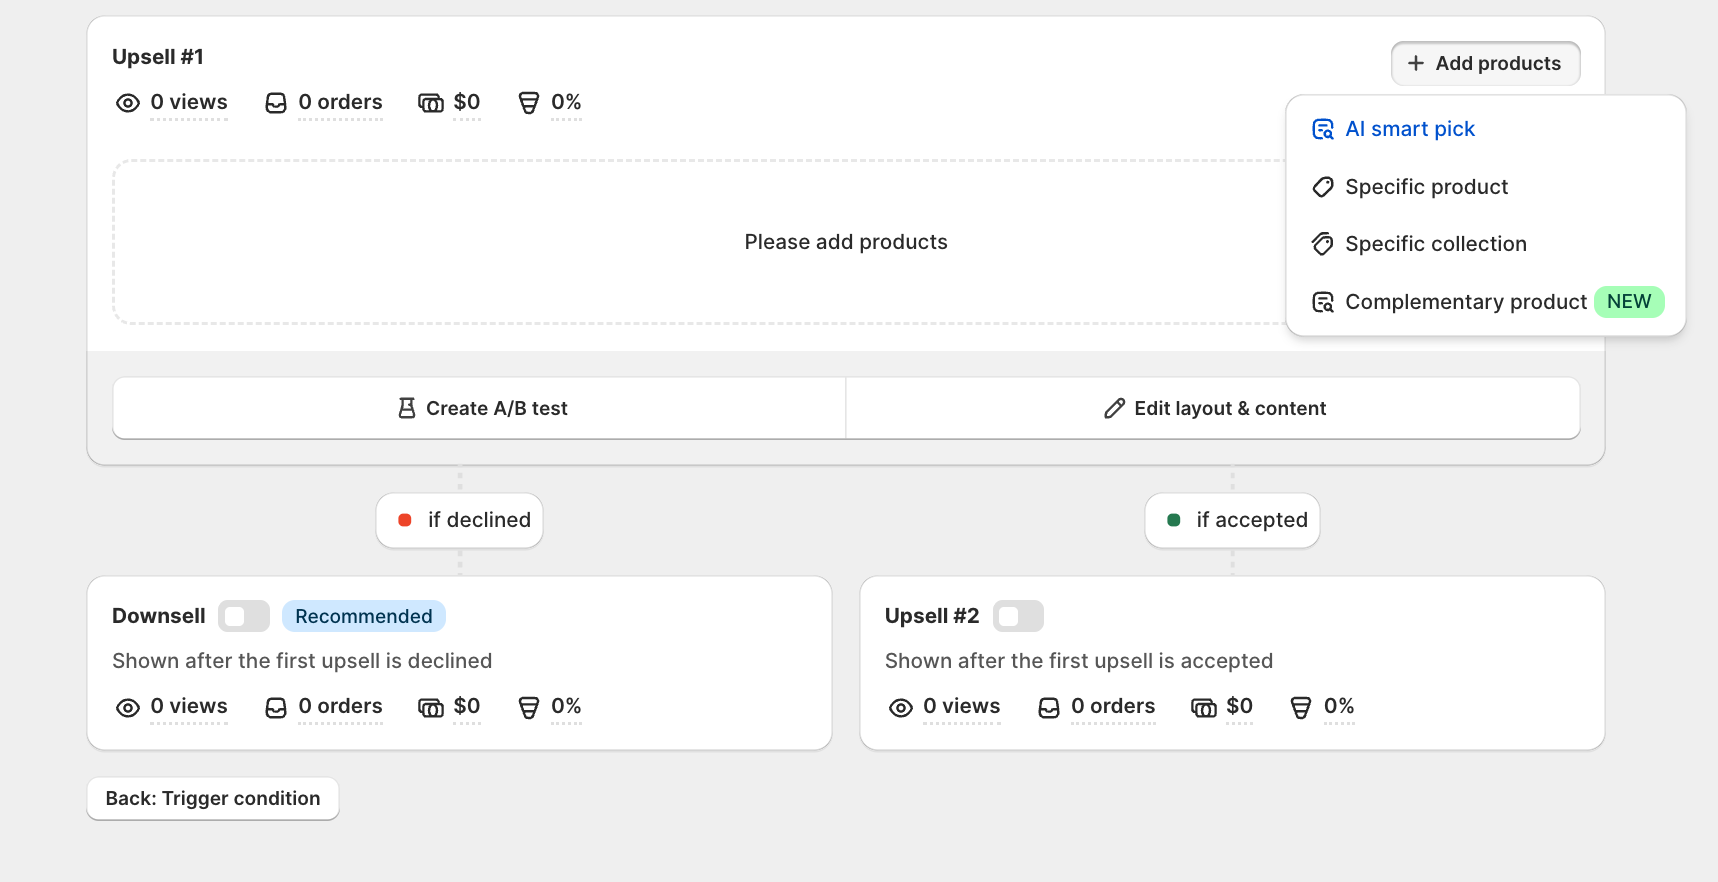
It's the first offer customers see on the post‑purchase page.
Select Add products to open the source menu, then choose one of:
| Source | Description |
|---|---|
| AI smart pick | Let AOV.ai suggest products based on your store type and goals. The product is labelled AI recommendation on its tile. |
| Specific product | Pick one or more products/variants manually. Opens a submenu: • Select product, search and choose specific products/variants. • Most expensive in cart, discount the highest-priced item in the order. • Least expensive in cart, discount the lowest-priced item in the order. |
| Specific collection | Select a collection to auto-populate from its items. Useful for dynamic or seasonal ranges. |
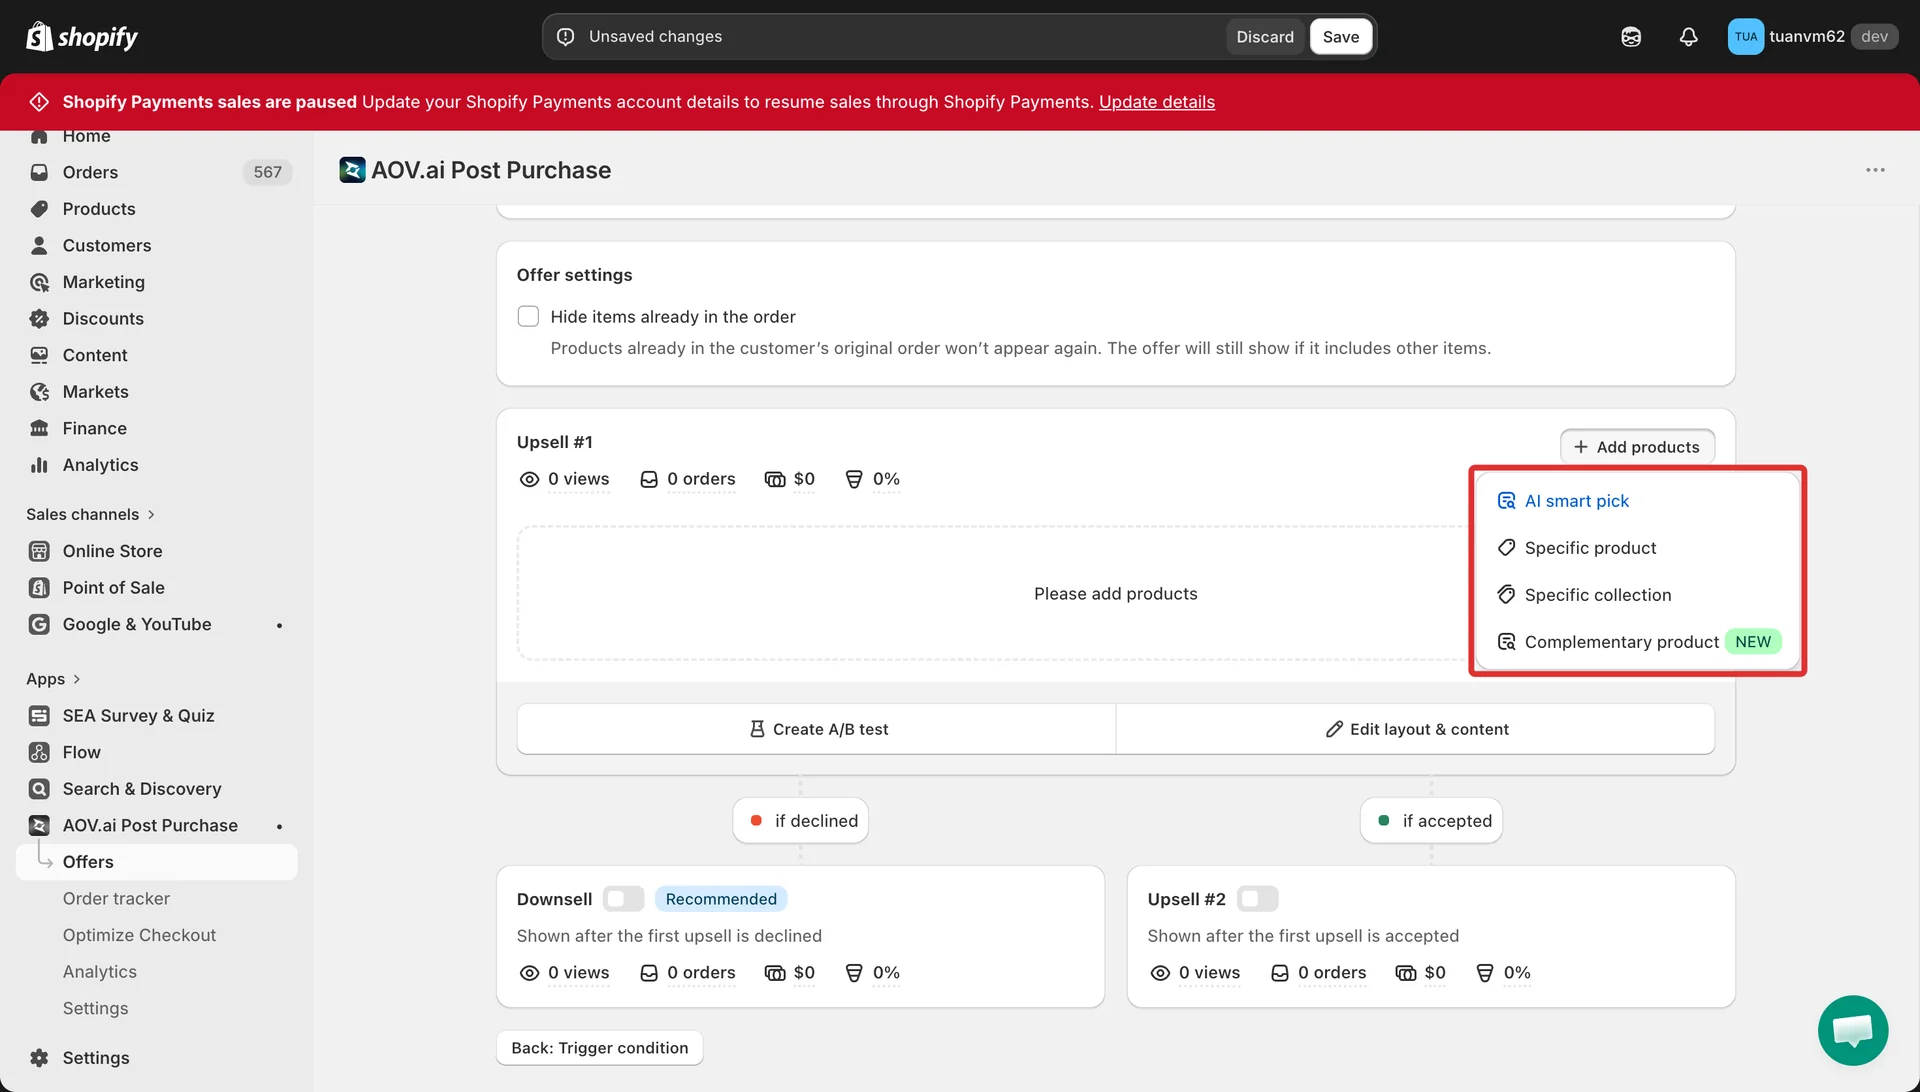
Complementary product NEW | Auto-suggests add-ons most often bought together with your trigger products. Requires Specific product triggers with at least one product. |
If a product you add here has a high return rate, it may show a Removed or Near the limit badge and a warning banner instead of being offered to buyers. See Return-Rate Guardrail to review or change the limit.
Selecting variants for a product
When you choose Select product and pick a product that has variants, the picker shows a checkbox for every variant.
- Check the box next to the product name to select every variant. For a product with more variants than the picker has loaded yet, a hint appears under the product name: Select all N variants. This selection stays up to date automatically, if you add a new variant to that product in Shopify later, it's included in this offer too, with no need to come back and reselect.
- Check individual variant boxes instead to hand-pick specific ones. This selection is fixed to what you ticked. A variant added later in Shopify is not included automatically.
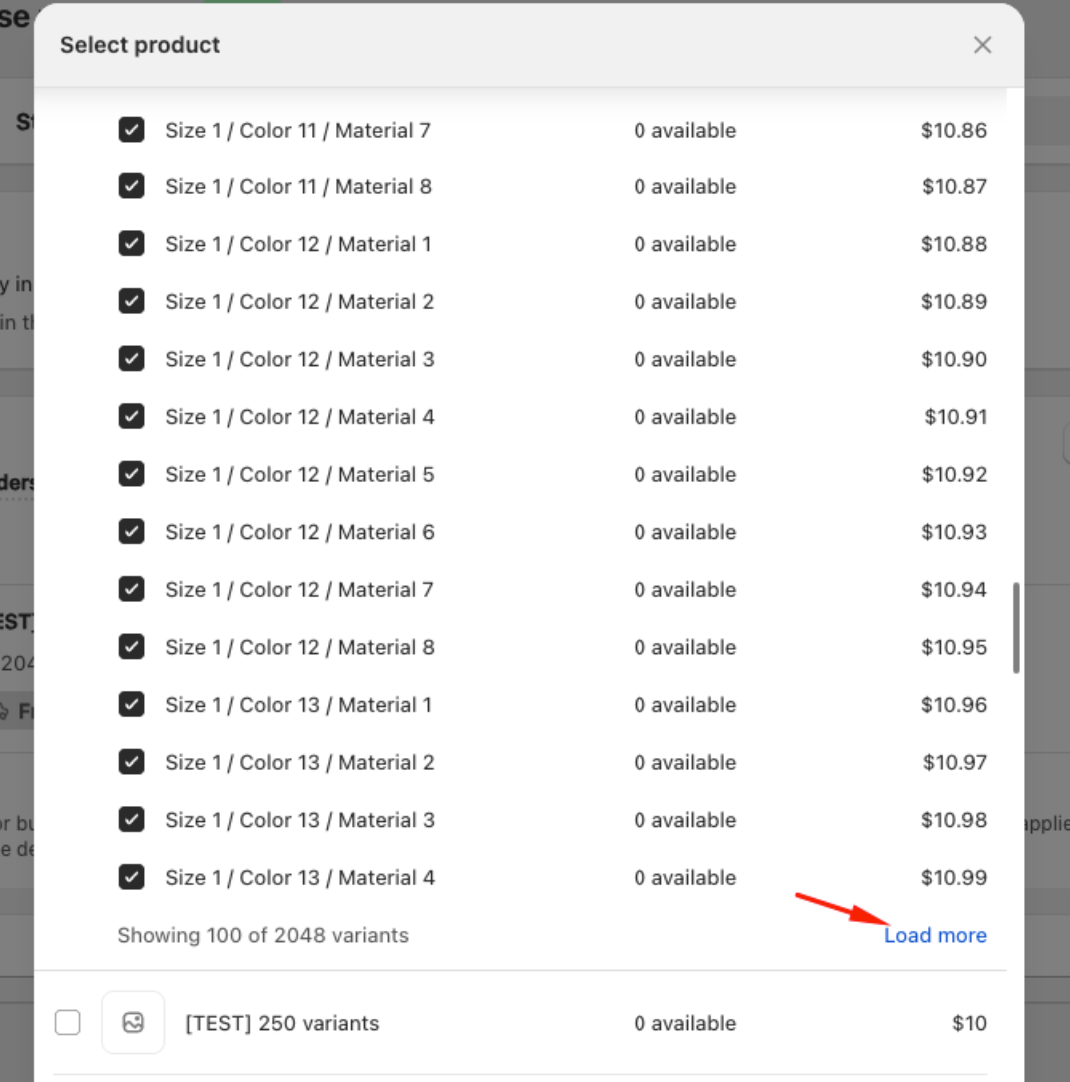
- For a product with many variants, the list loads a page at a time. Look for Showing X of Y variants with a Load more variants button underneath to fetch the rest.
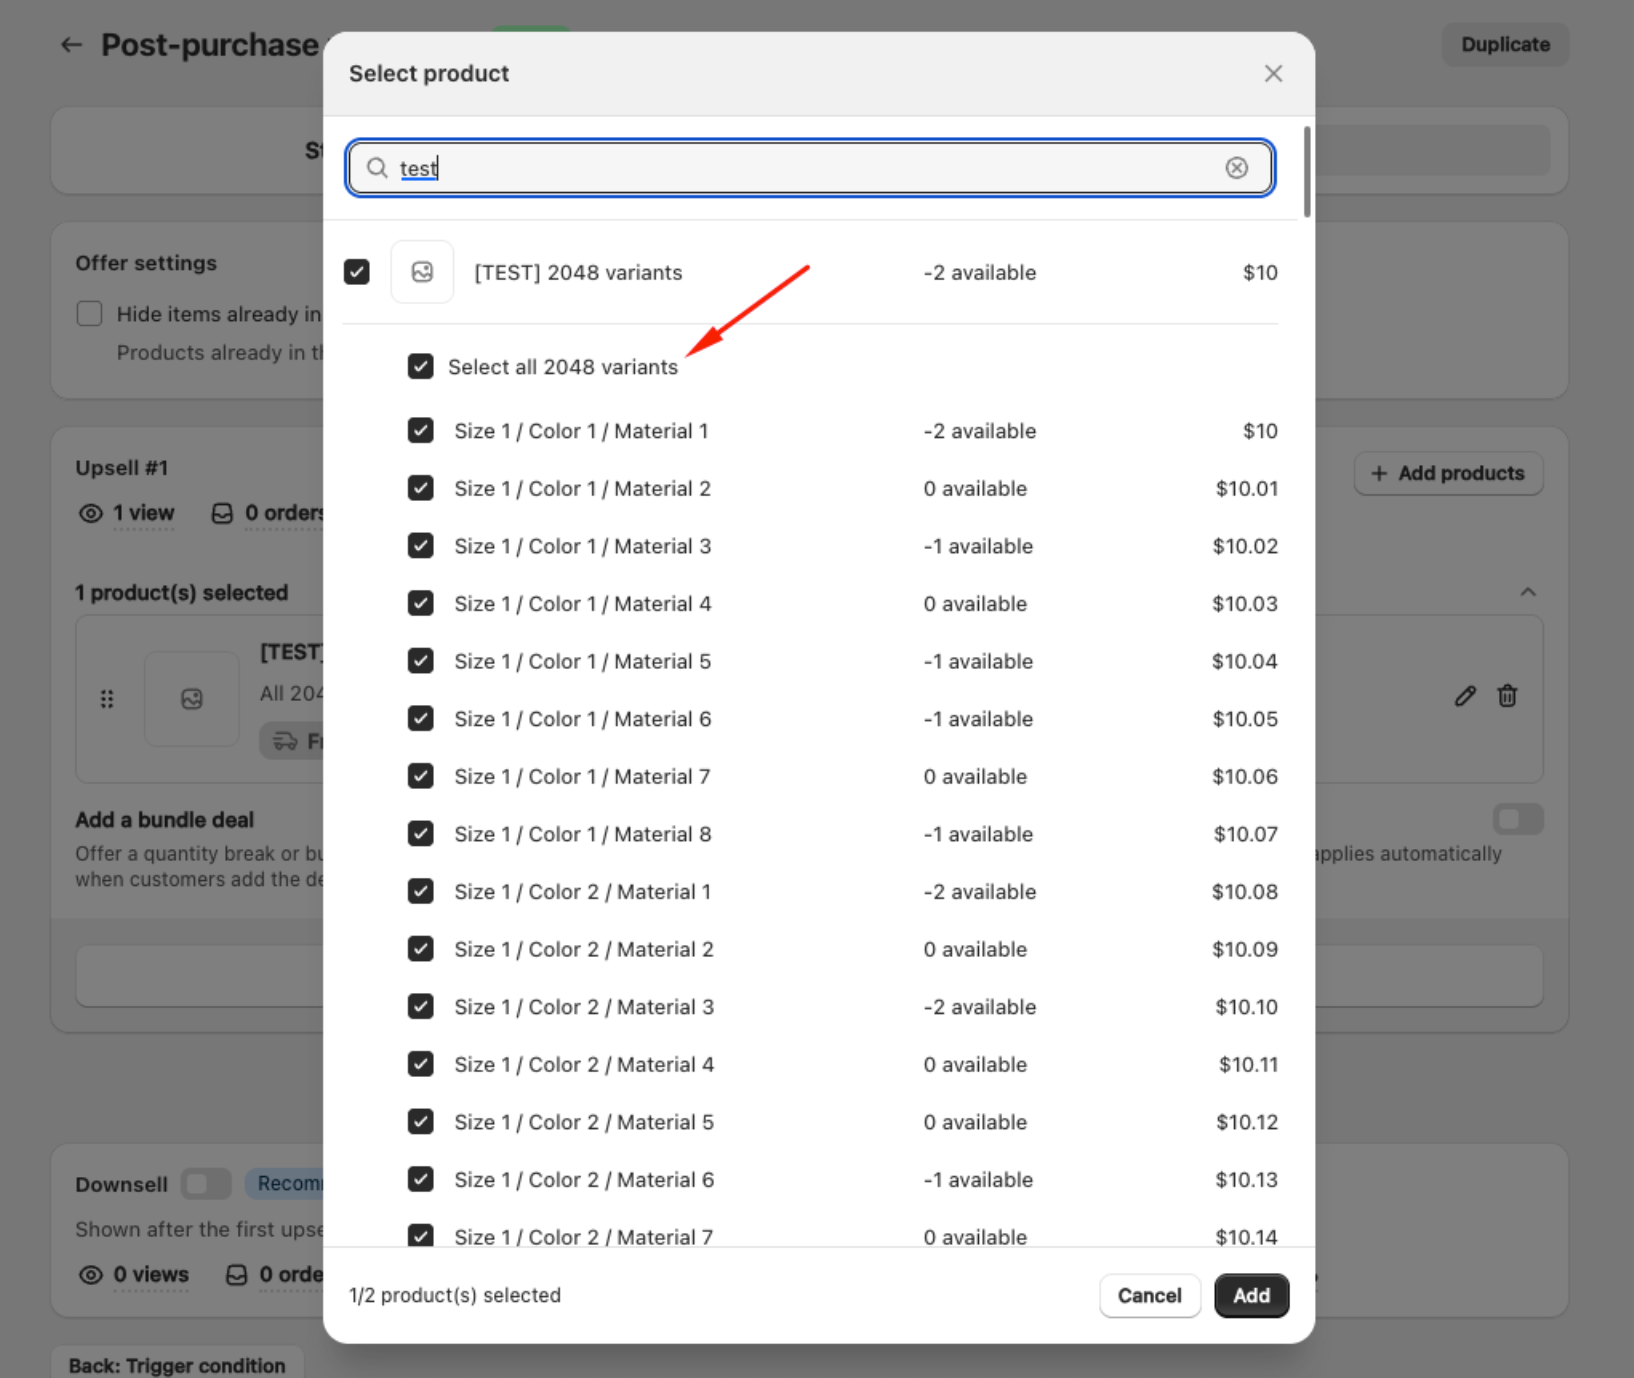
Once added, the product tile shows how many variants are included, for example All 2048 variants when the whole product is selected, or 110/2048 variants when only specific variants are selected.
Good to know
- Shopify allows up to 2,048 variants on a single product. This is a Shopify platform limit, not a cap set by AOV.ai.
- Using Select all on a product with more than 100 variants makes that product render with Multiple dropdowns on the storefront (one dropdown per option, for example Size, Color, Material), even if Variant Picker display is set to Single dropdown, so buyers can still reach every variant. To keep a single dropdown for a large product, tick its variants individually instead of using Select all, a single dropdown supports up to 2,048 manually selected variants. See Display settings for the exact banner that flags which products in the offer are affected.
After adding a product, click the pencil icon to edit its settings:
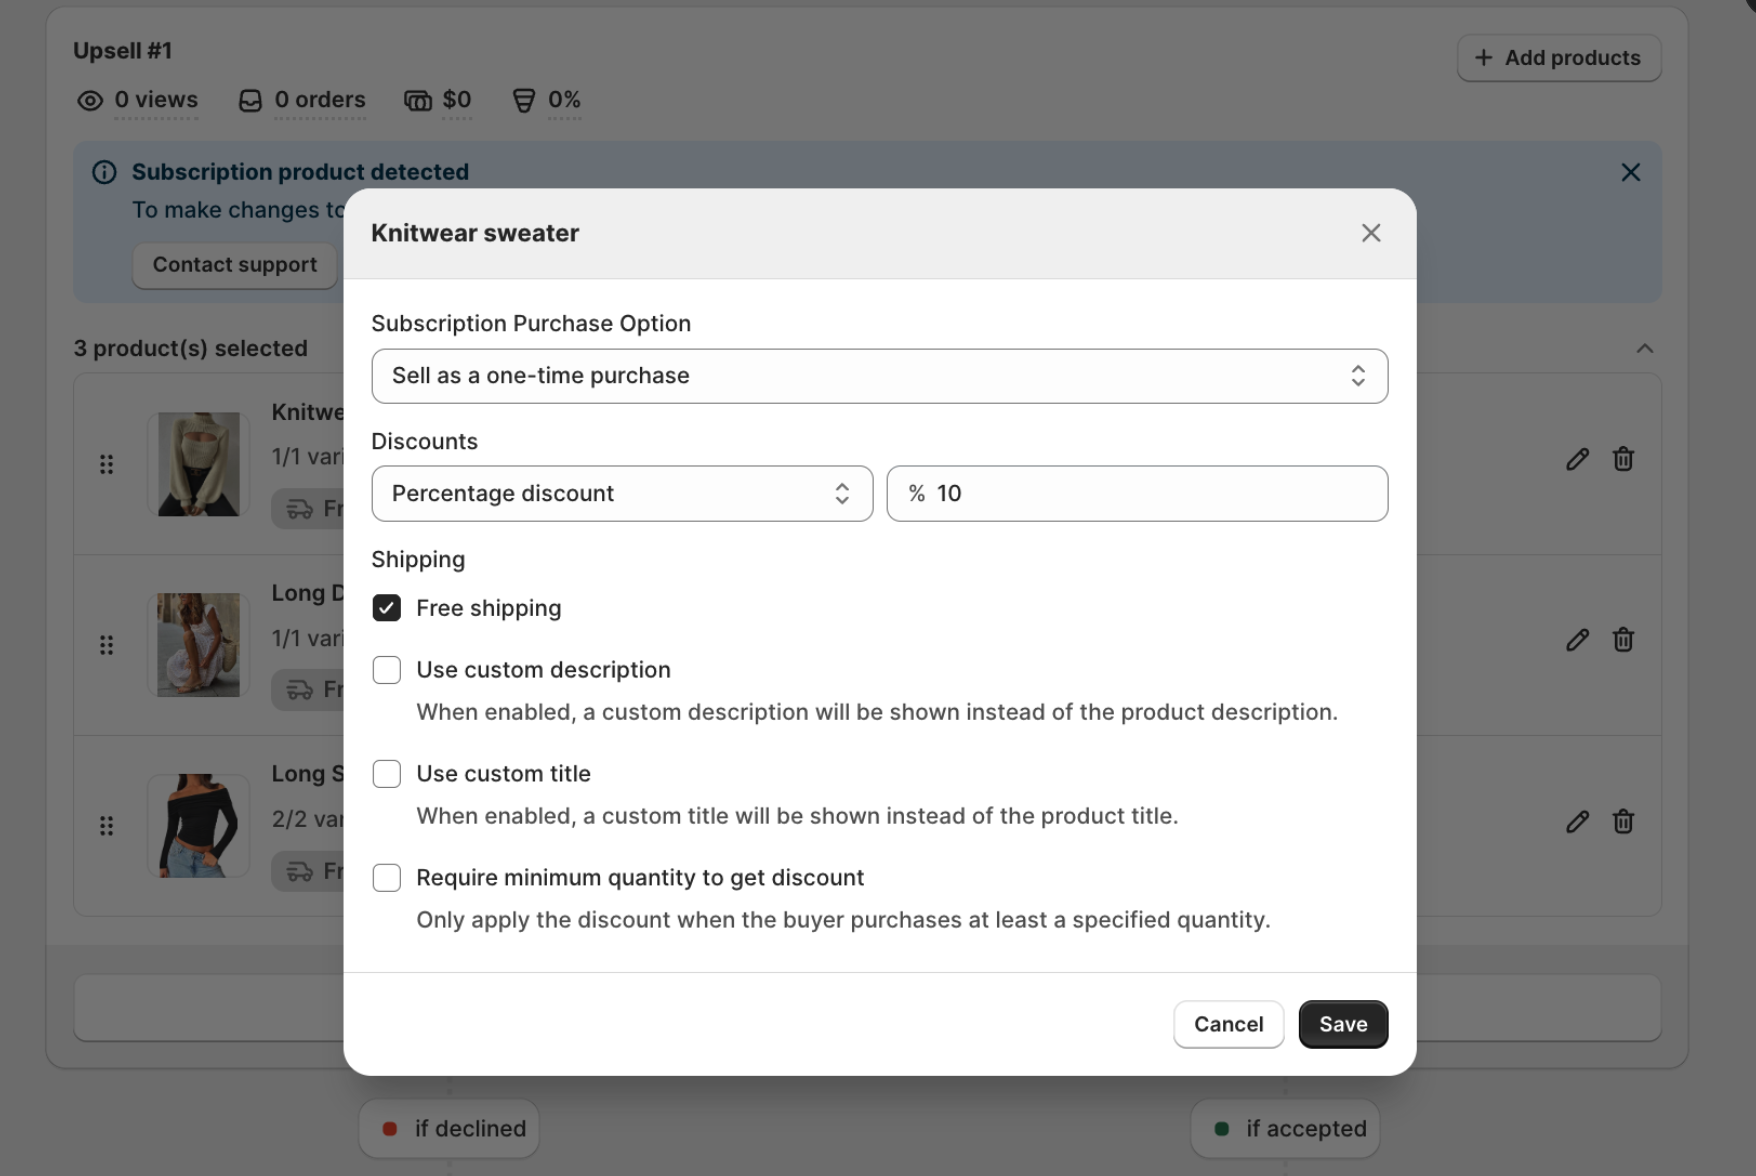
| Option | Description |
|---|---|
| Subscription Purchase Option | Choose how the product is sold: one-time purchase, subscription, or both. |
| Discounts | Set a discount type (Percentage, Fixed amount, or None) and value. |
| Free shipping | Check to offer free shipping on this upsell (on by default). |
| Use custom description | Replace the product description with a custom message in the widget. |
| Use custom title | Replace the product title with a custom title in the widget. |
| Require minimum quantity to get discount | Only apply the discount when the buyer purchases at least a specified quantity. |
Bundle deal: quantity break & buy X get Y
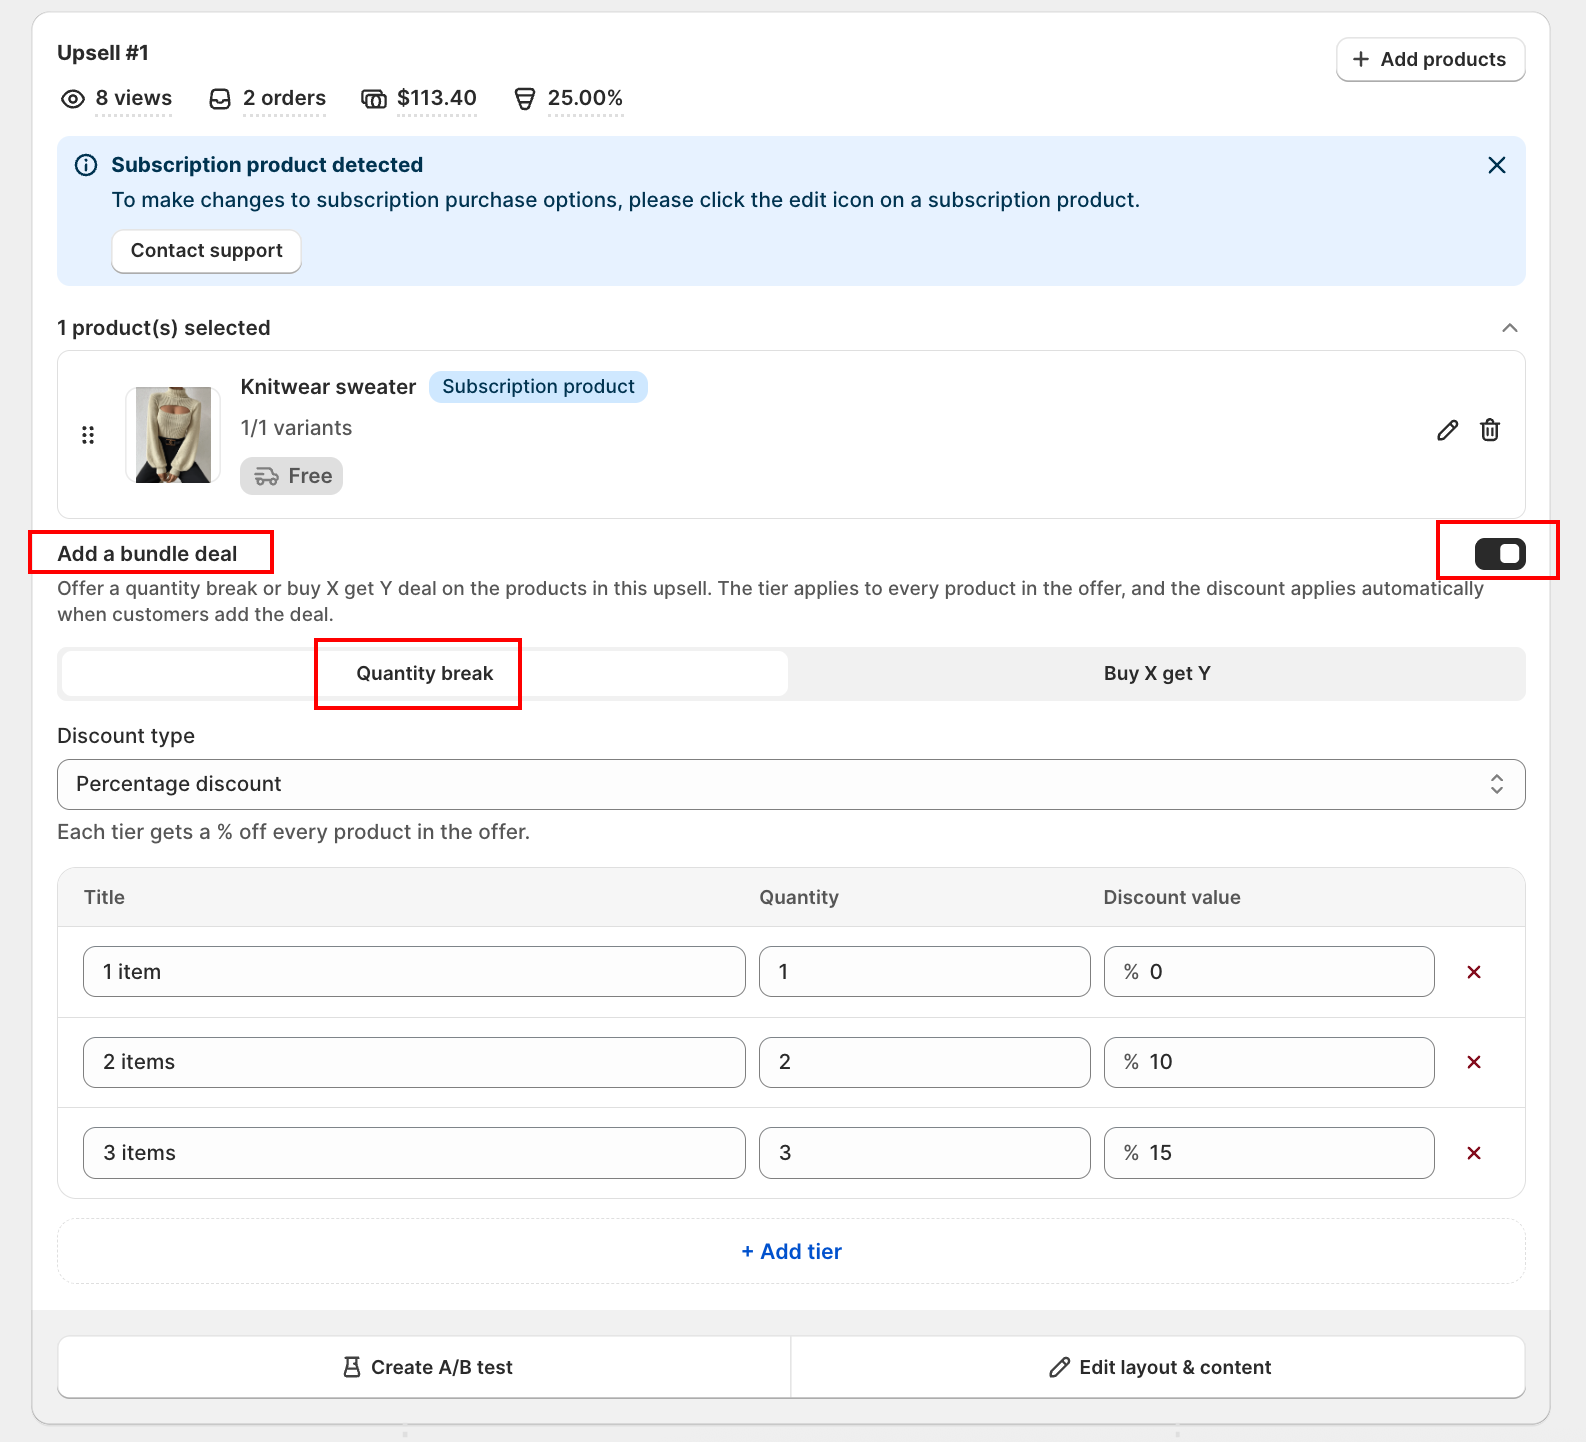
Bundle deal turns a post-purchase offer into a multi-buy deal instead of a single-unit discount. Turn on Add a bundle deal on any Upsell or Downsell card, choose Quantity break or Buy X get Y, and set your tiers. The deal applies to every product in that offer, and the discount is applied automatically when the customer adds the deal (no code needed).
Good to know
- Bundle deal is available on Post-purchase upsell offers only, on every funnel position: Upsell #1, Upsell #2, Upsell #3, Downsell, and Downsell #2. It also works inside A/B tests. Upsell #3 and Downsell #2 appear only when the level-3 funnel is enabled for your store.
- The section shows up once you add at least one product to the offer.
- Bundle deal replaces the per-product discount for that offer. While it is on, the per-product Discounts (Percentage / Fixed amount / None) in the product edit modal are hidden.
Step 1: Choose the bundle type
Switch on Add a bundle deal, then pick:
- Quantity break: the more units the customer buys, the bigger the discount.
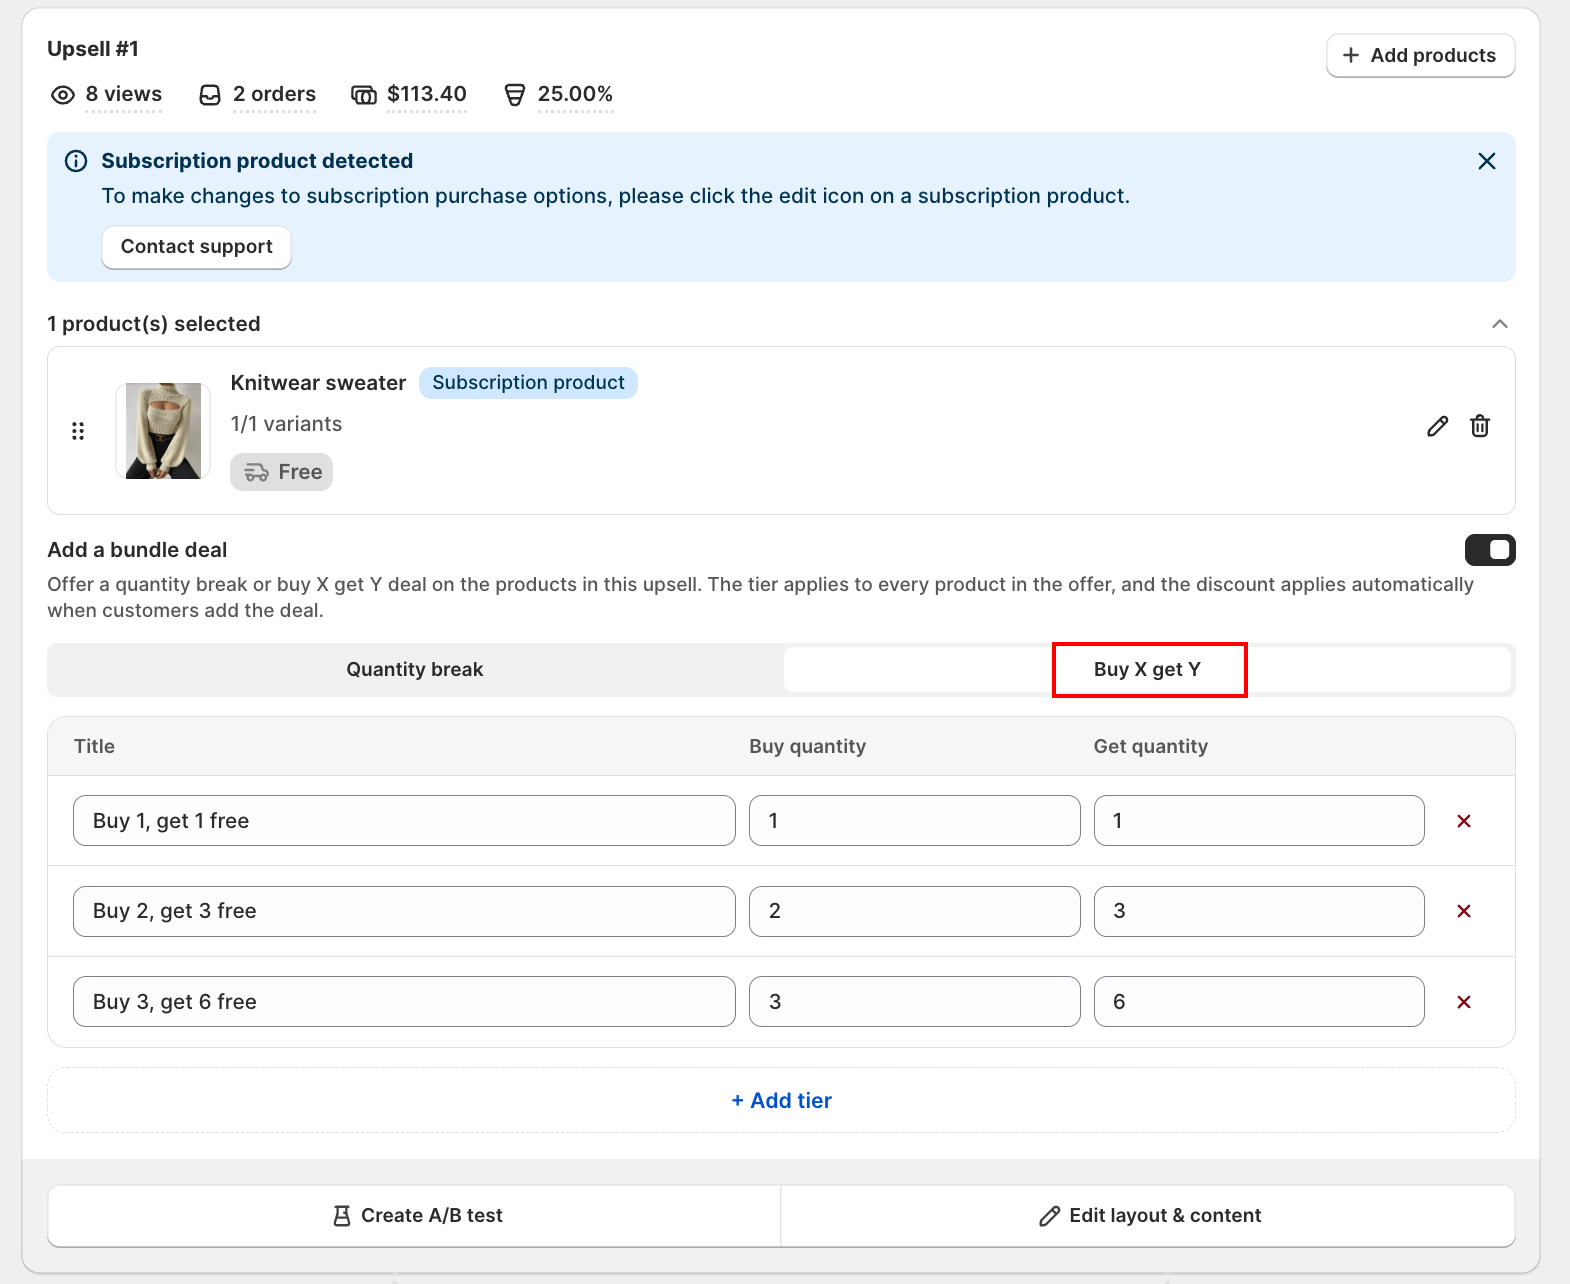
- Buy X get Y: the customer buys X units and gets Y units free.
Step 2: Set up the tiers
Each tier is one row in the tier table. Every tier has an optional Title shown to the customer; leave it blank and the app auto-labels it (for example, 2 items or Buy 2, get 3 free).
For Quantity break, first choose a Discount type, then fill each tier:
| Field | What it does |
|---|---|
| Discount type | Percentage discount or Fixed amount discount. Each tier gives that amount off every product in the offer. |
| Quantity | The number of units the customer must buy to reach this tier. |
| Discount value | The discount for this tier (a percentage up to 100, or a fixed amount in your store currency). |
Defaults: 2 items gets 10% and 3 items gets 15% (plus a base 1 item at 0%).
For Buy X get Y, fill each tier:
| Field | What it does |
|---|---|
| Buy quantity | How many units the customer buys. |
| Get quantity | How many extra units they get free. |
Defaults: Buy 1, get 1 free, Buy 2, get 3 free, and Buy 3, get 6 free.
Tier limits
- Use + Add tier to add a row. You can have up to 5 tiers; the button is disabled once you reach five.
- Use the remove icon on a row to delete it. At least one tier always stays.
- Quantities are whole numbers. If you clear a field, it restores to that tier's default when you click away.
Step 3: Preview and Save
The preview on the right shows the deal exactly as the customer sees it: each tier as a selectable option, the chosen tier highlighted, the original price struck through, the amount saved (for example, Save 15% or Save $5), and the real Total the customer pays. Click Save to publish; the deal takes effect right away.
Copy tiers from a Bundles deal
If you already run a Volume Discount deal in AOV.ai Bundles, you don't have to type its tiers again. Once Add a bundle deal is on, a card called Copy tiers from a Bundles deal appears above the tier table.
- On that card, click Choose a deal.
- A window opens listing your shop's Volume Discount deals from AOV.ai Bundles. Each deal shows a read-only tier table (title, deal type, quantity, and the discount or get value per tier) so you can check it before picking.
- Select a deal, then click Copy tiers.
Good to know
- Only the tiers and discount type are copied. Trigger conditions and advanced settings stay in AOV.ai Bundles; in this offer, the copied deal applies to this offer's own products, not to whatever products the original Bundles deal targeted.
- A deal that is currently paused in AOV.ai Bundles, or one that uses a discount type this app doesn't support yet, is left out of the list. When none of the deals in view are copyable, the picker explains how many were excluded and why.
- A deal with more than 5 tiers keeps only its first 5; a note appears above the tier table when this happens (for example, Only the first 5 of 8 tiers were copied).
- After copying, the card updates to Tiers copied from a Bundles deal with a Choose another deal button, so you can swap in a different deal later.
- If AOV.ai Bundles isn't installed yet, the card shows an Install AOV.ai Bundles button instead of Choose a deal.
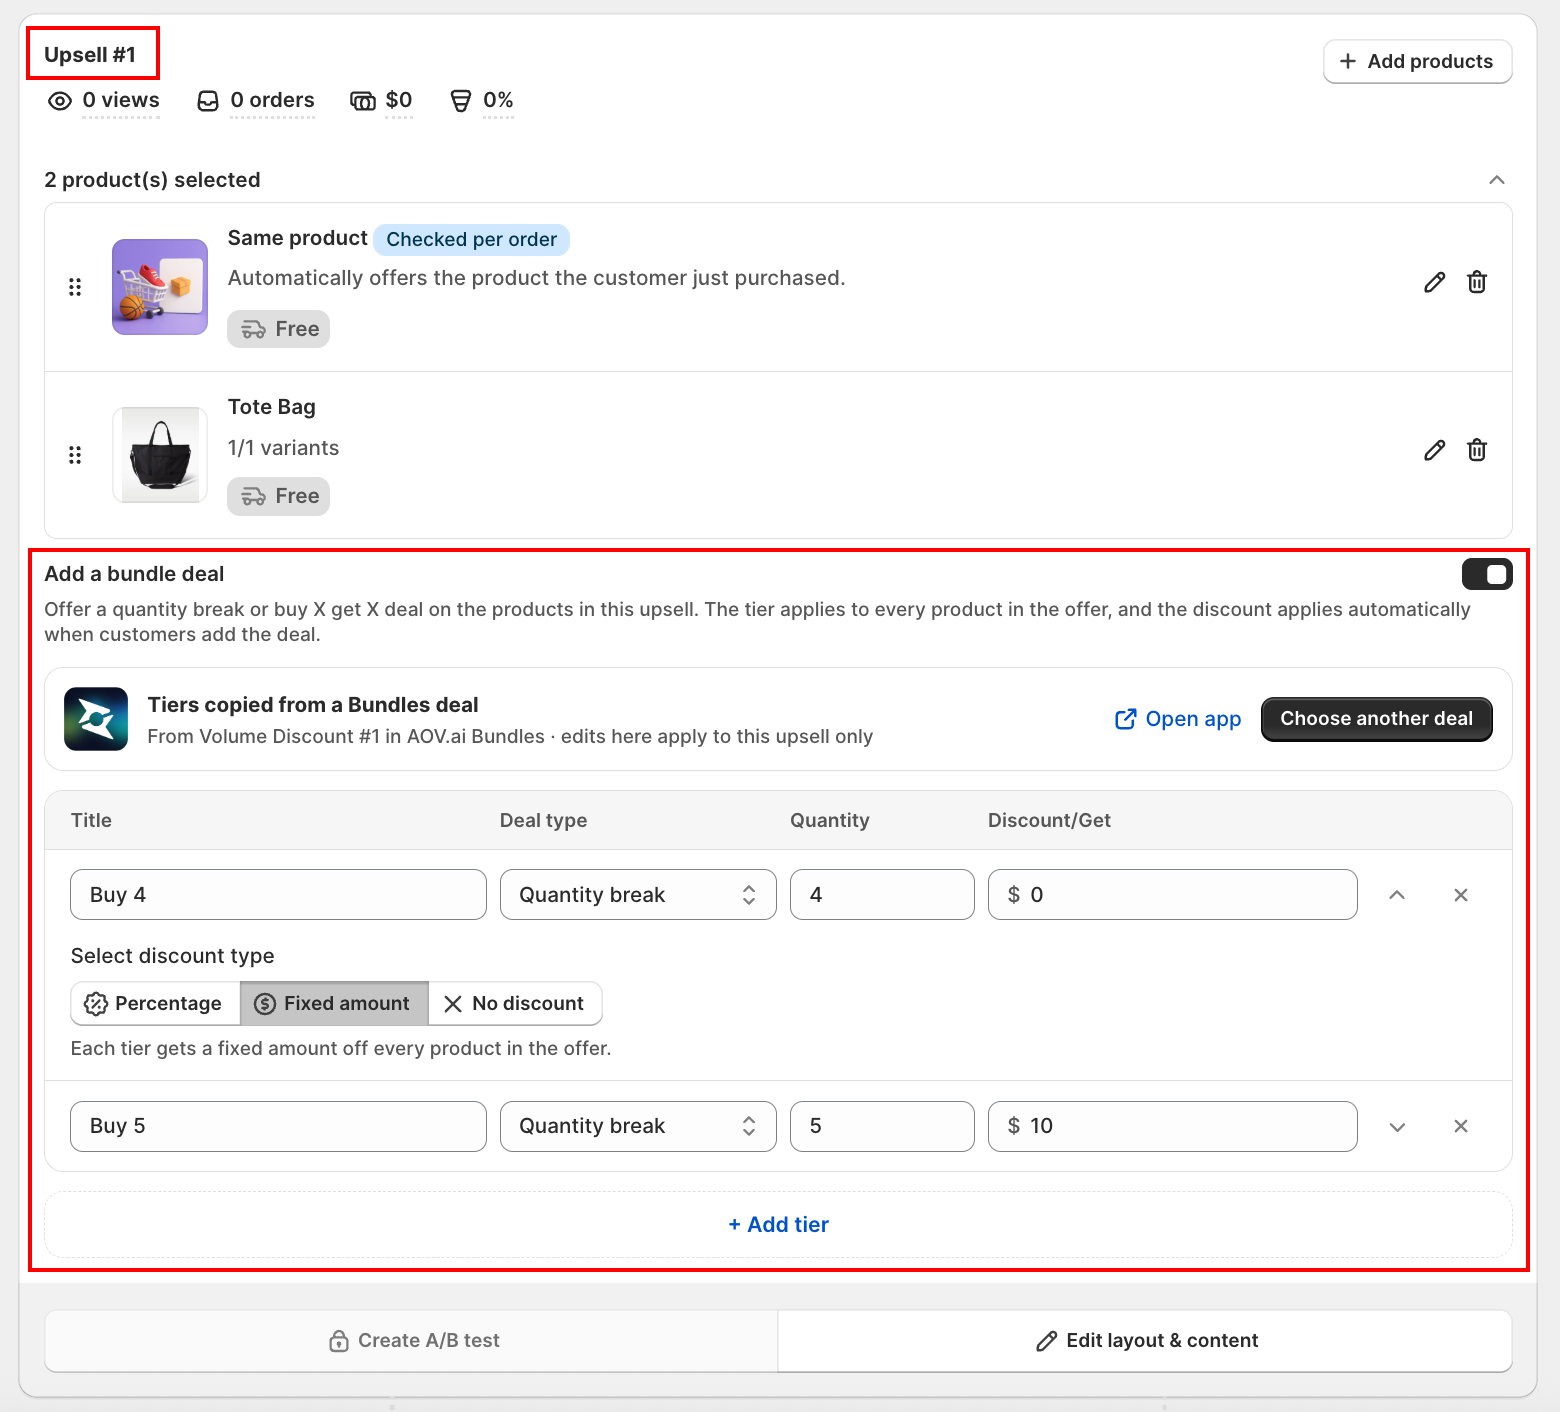
One-time snapshot, no auto-sync
- Copying tiers is a one-time snapshot. If you later edit the deal in AOV.ai Bundles (change a tier, its discount value, and so on), that change does not carry over to this offer automatically. Come back and click Choose another deal to copy it again.
- The Total price discount type only works while every product in this offer is set as a specific product. If this offer uses AI recommendation or a collection as its product source, any tier copied at Total price automatically switches to a Fixed amount discount and its value is reset. Re-enter the discount amount for that tier before saving.
Using Complementary product suggestions
Complementary product is a smart picker that finds products your customers often buy together with the trigger item(s) you set in Trigger conditions → Specific product. It replaces guesswork with real purchase data from your shop.
Prerequisites
- Offer type must be Post-purchase upsell.
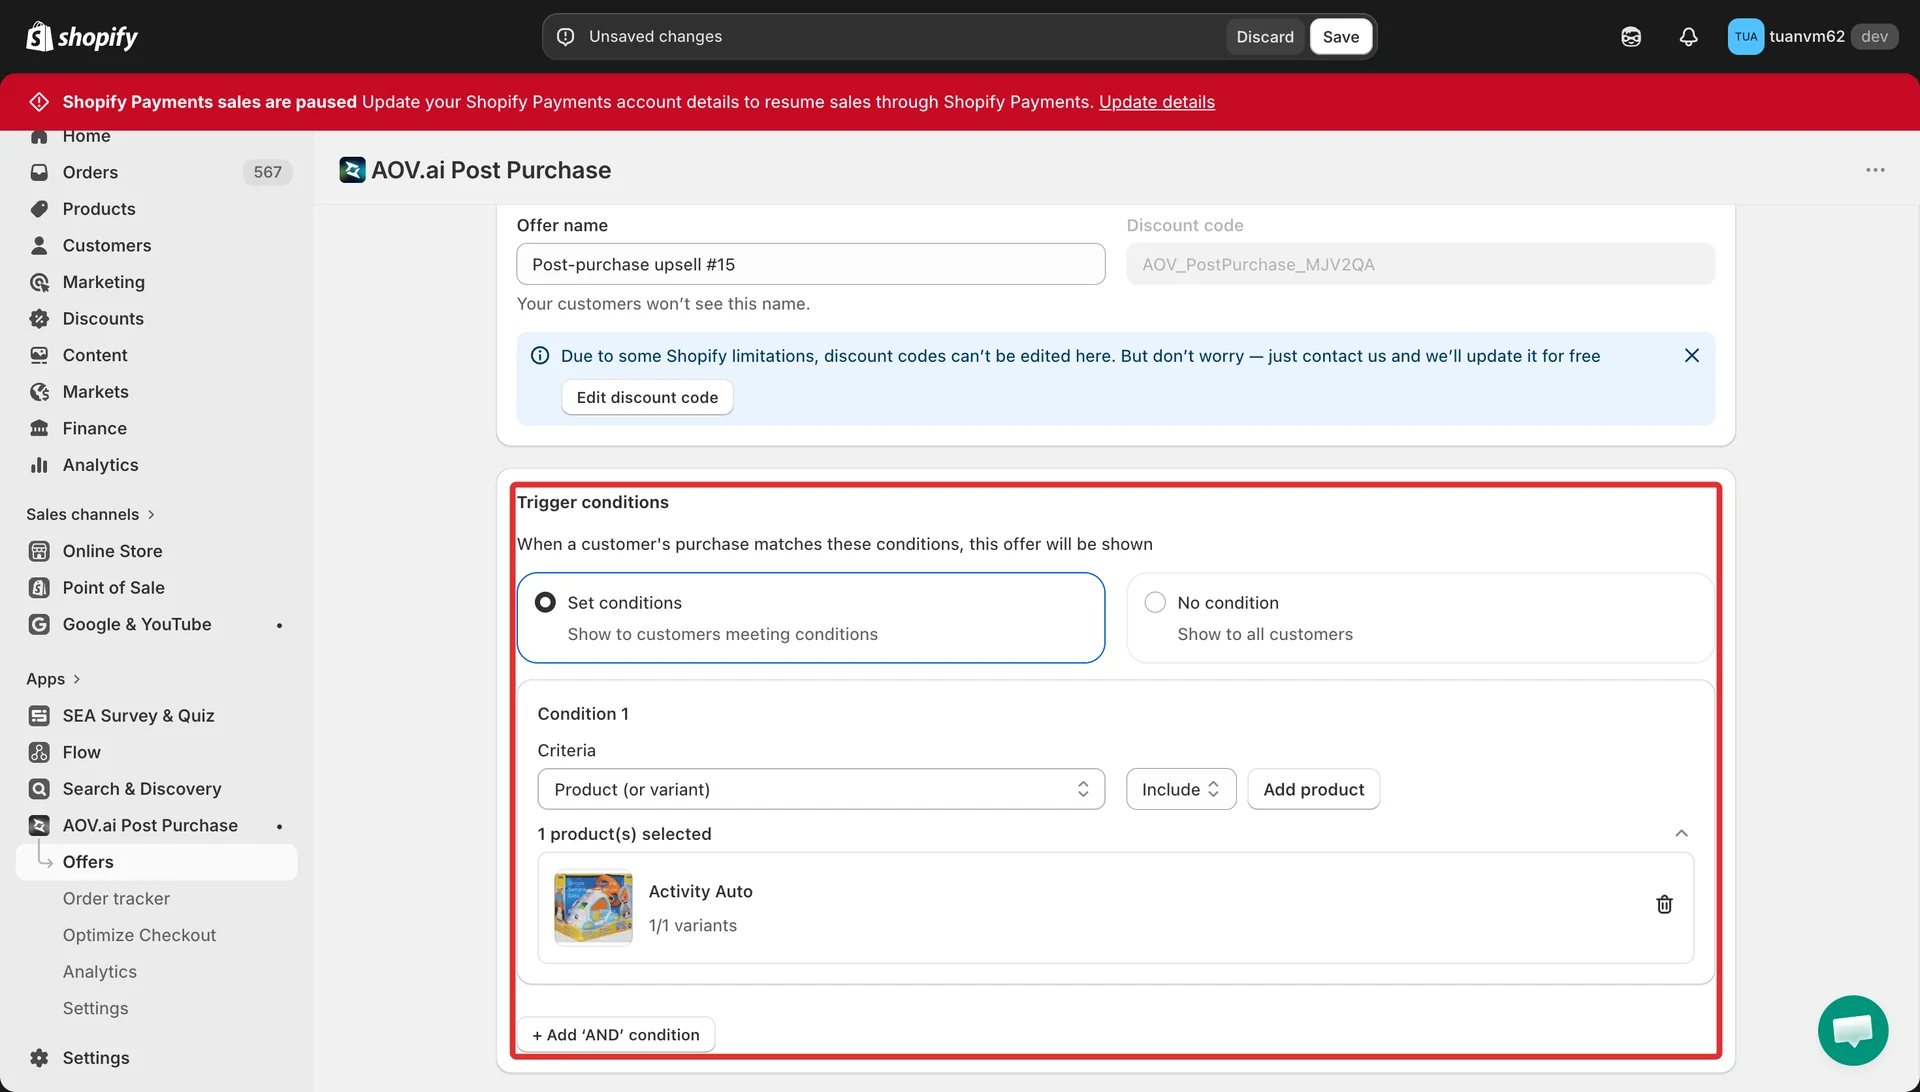
- Trigger condition must be Set conditions → Specific product (Include) with at least one trigger product.
First, set your trigger: in Step 1 → Trigger conditions, choose Set conditions → add a Product (or variant) → Include rule with at least one trigger product.
In Step 2 → Upsell offer, on any Upsell/Downsell card select Add products → Complementary product (badge NEW).
If the trigger is not yet set, a warning banner appears asking you to add a Specific product trigger first.
The app opens the Select complementary products modal and fetches suggestions. Behind the scenes it queries recent orders and ranks candidates by:
- Co-purchase orders with the trigger product (frequently bought together), sorted by how many orders contained both.
- Best-selling fallback with the same product type as the trigger, for stores or triggers that don't yet have enough co-purchase data.
Each trigger product has its own ranked list, so suggestions for "Coffee beans" and "Coffee grinder" come back sorted independently, you won't see a grinder ranked above beans just because it sells well globally.
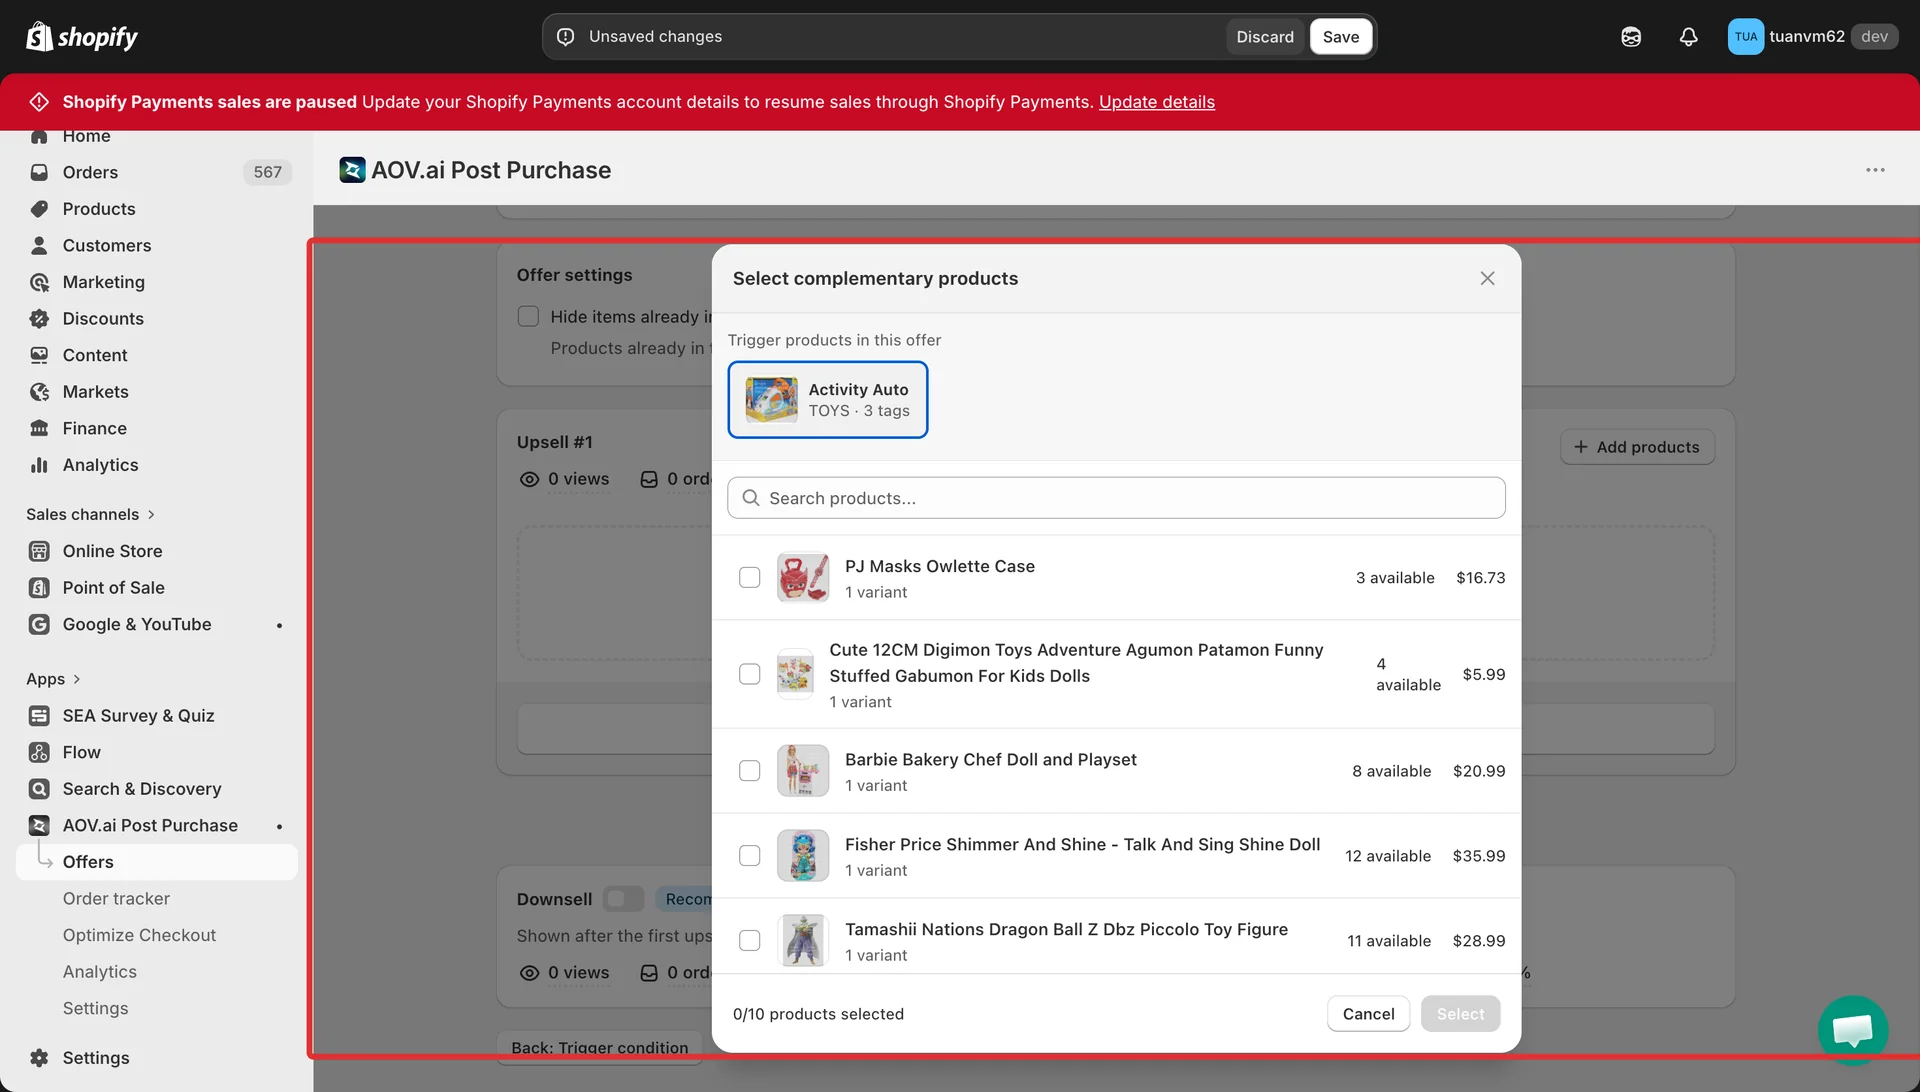
Review the suggestions
- For a single trigger, you see one list of suggested products.
- For multiple triggers, switch between triggers in the modal header to pick the right complementary item per trigger.
- Use the search box to filter by name.
- If the store has no co‑purchase or fallback data yet, the modal shows No complementary products found. Use AI smart pick or Specific product instead.
Tick the products you want and select Select. They merge into the card's product list with a Complementary badge; existing manual picks are preserved.
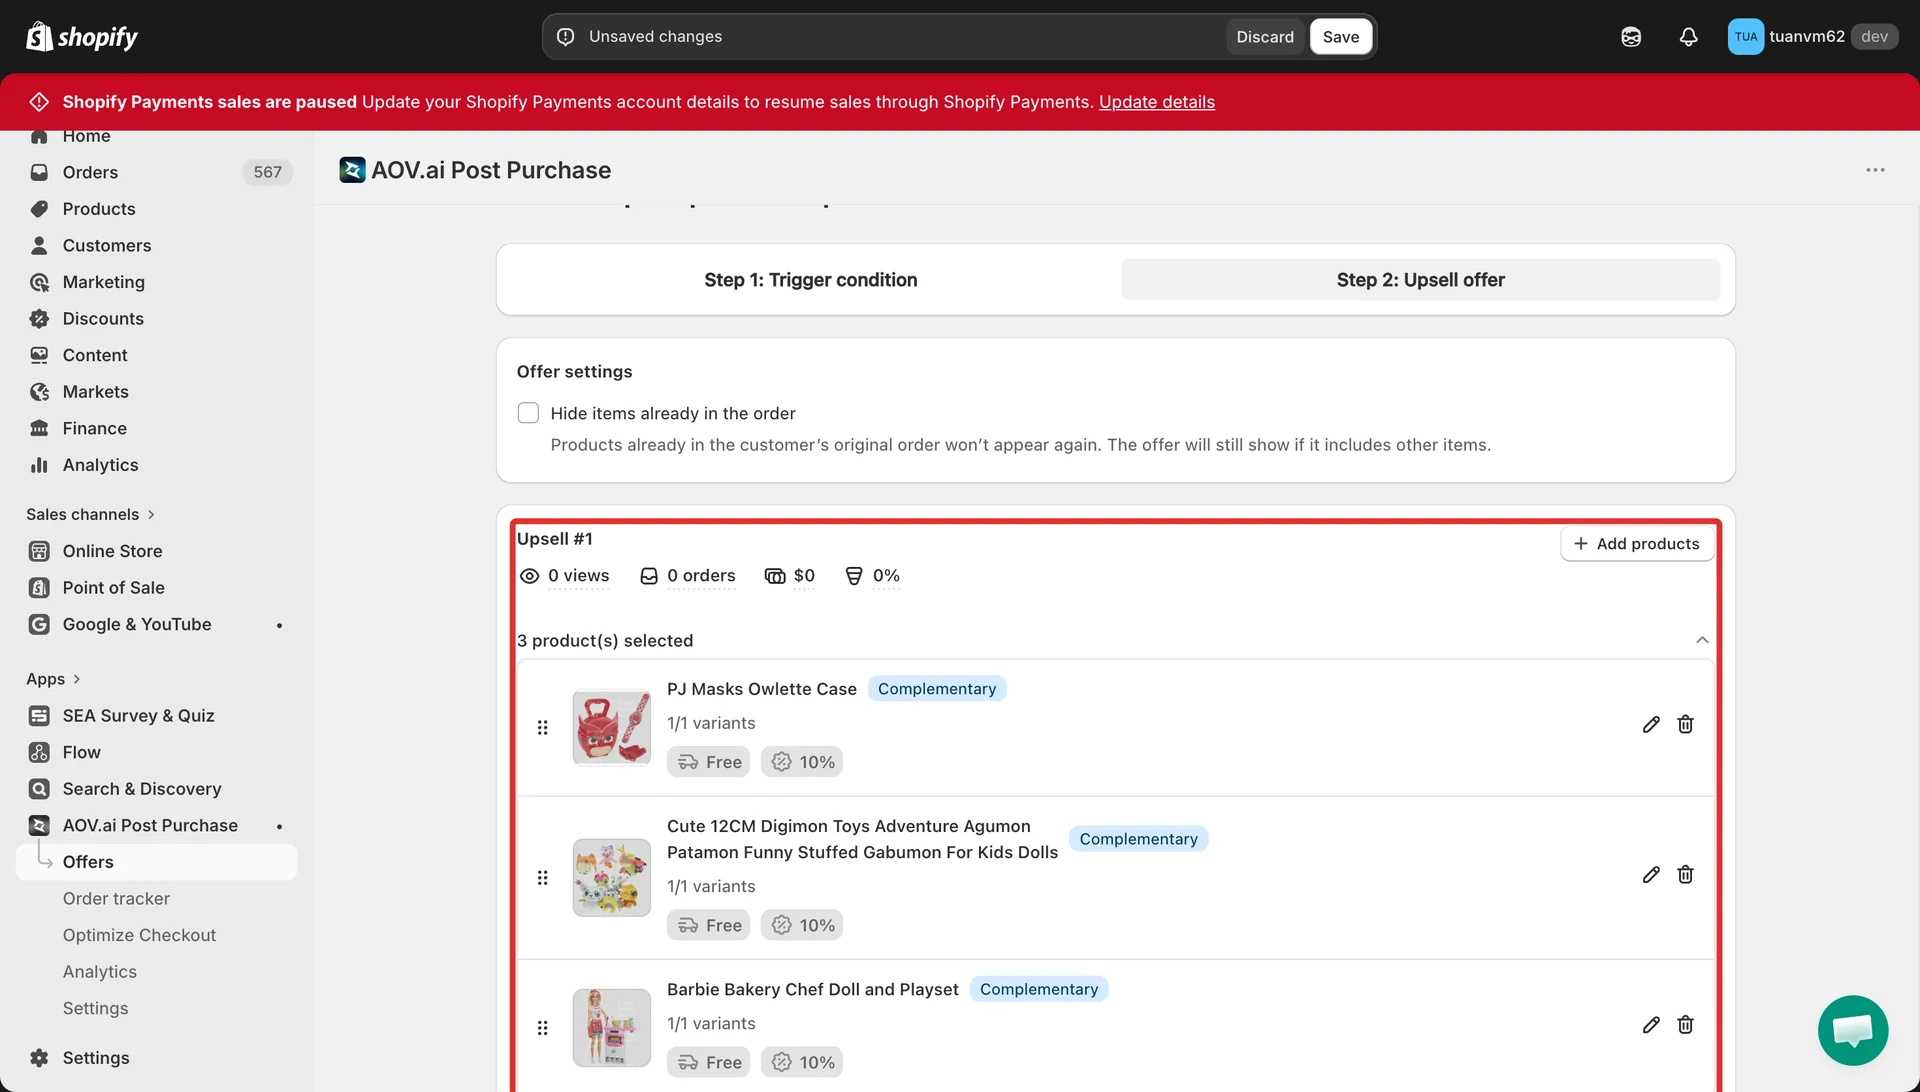
When to use each source
- Complementary product: You know which trigger items to target (for example, "anyone who buys a coffee machine"), and you want the app to find the highest-converting add‑ons automatically.
- AI smart pick: You want broad product suggestions based on store goals, without committing to a specific trigger.
- Specific product: You already know the exact add‑on and want full control.
Subscription and selling plan support
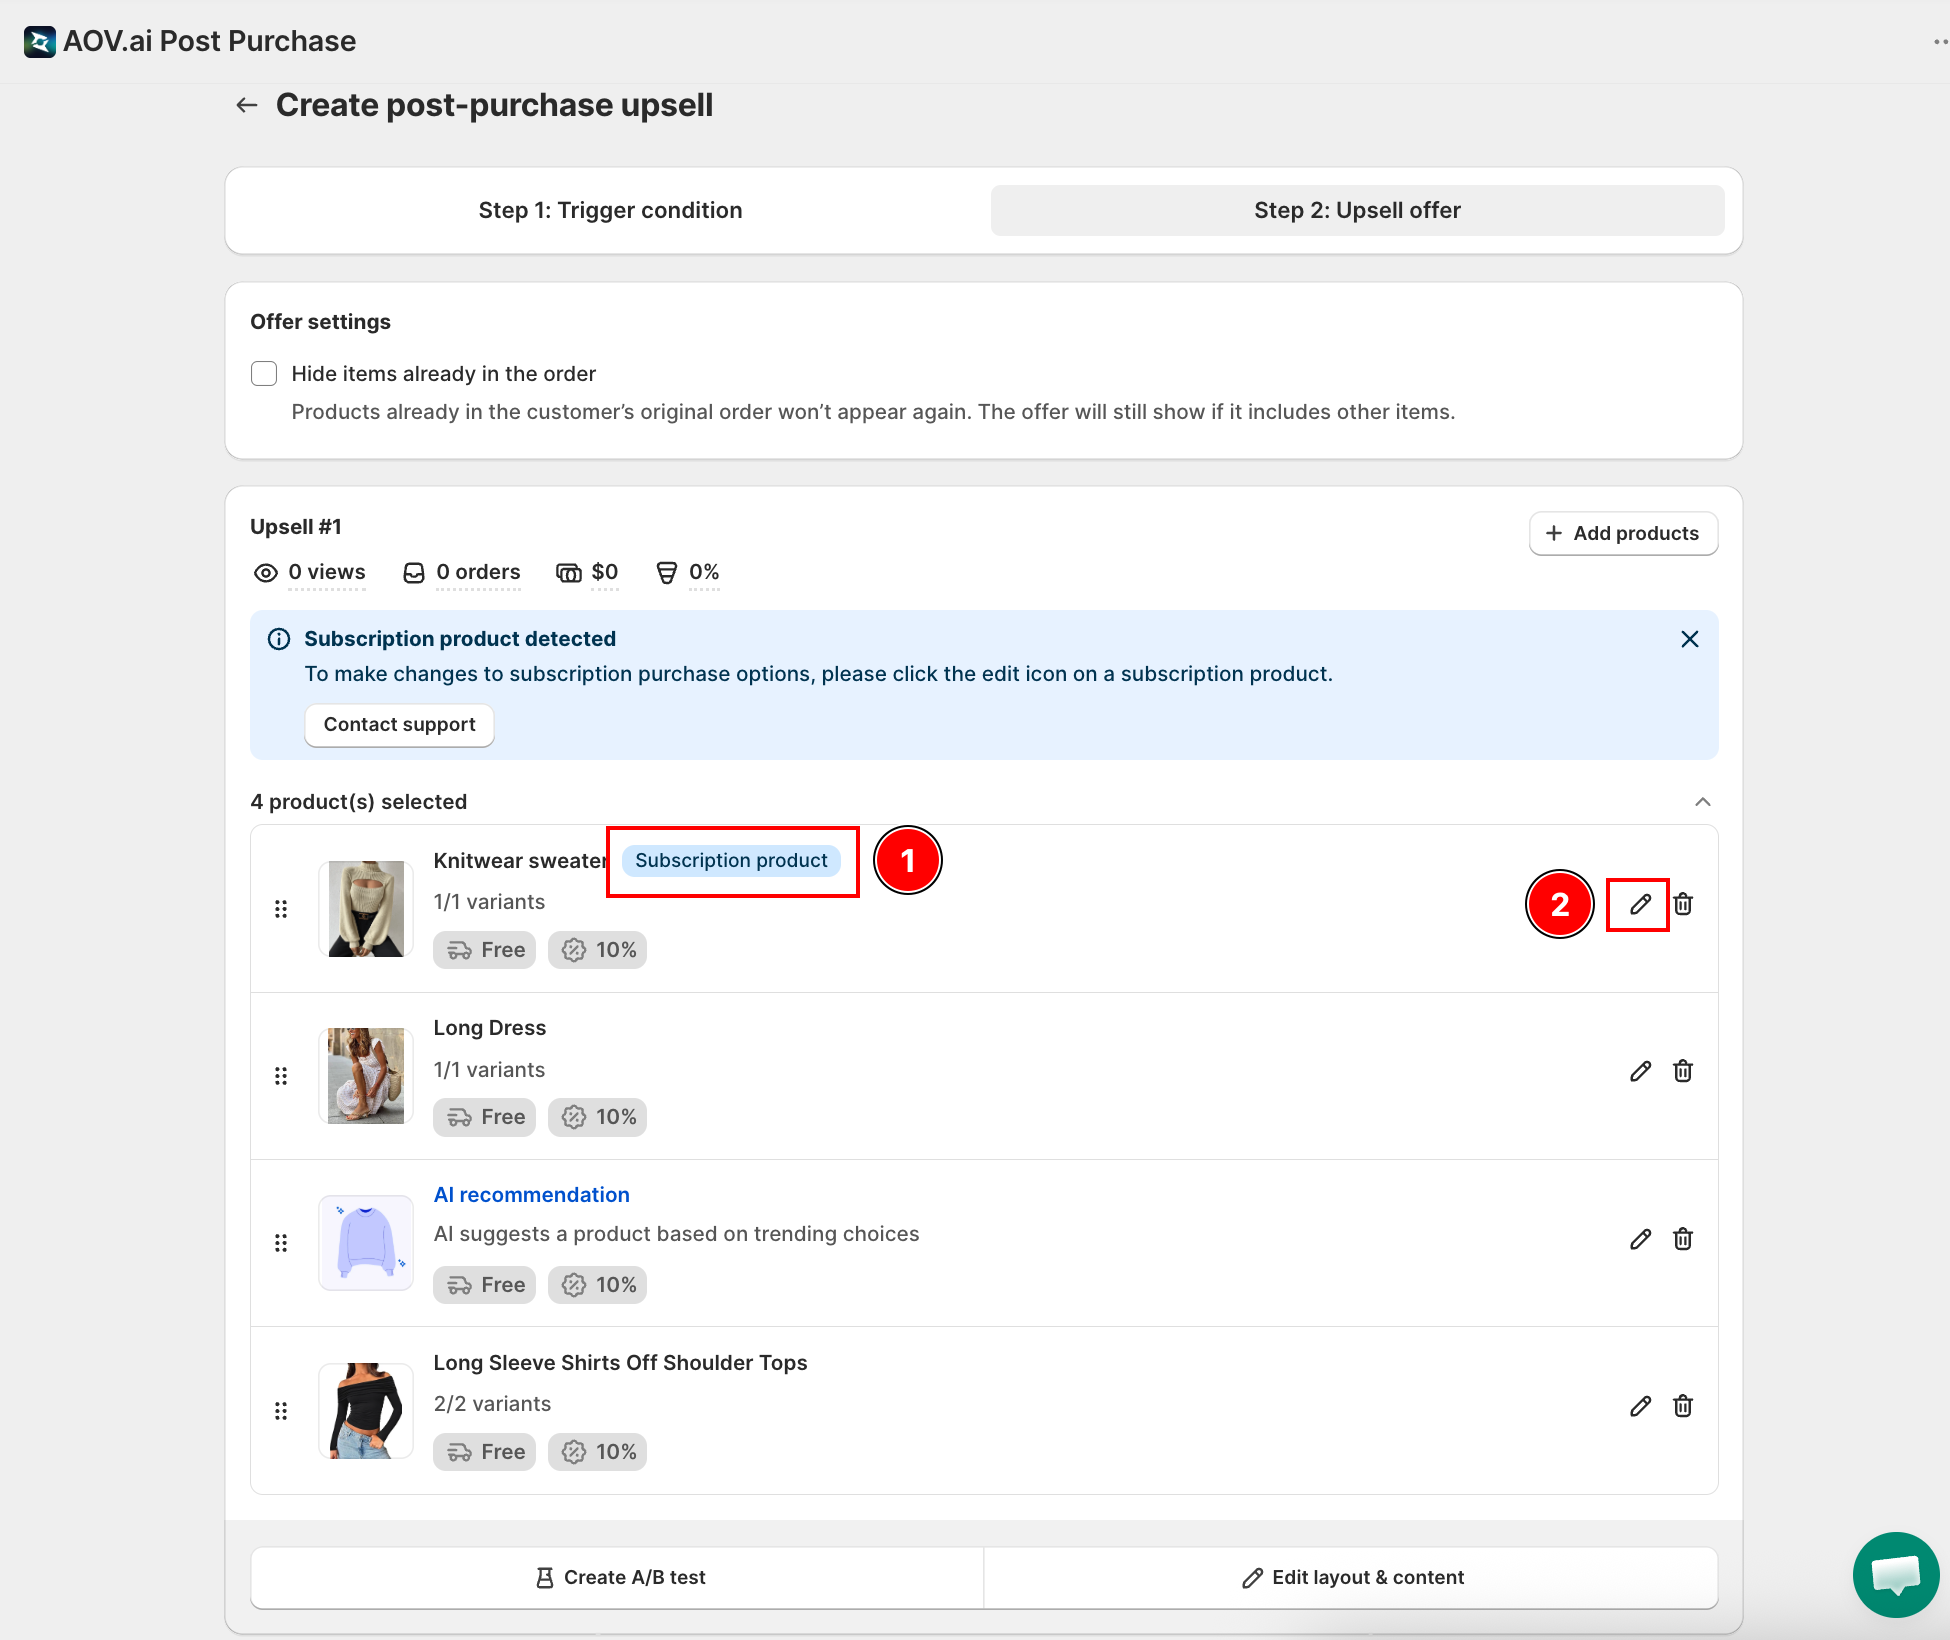
When configuring a product offer (Upsell #1, Upsell #2, or Downsell), you can control how the product is sold:
| Option | Description |
|---|---|
| One-time purchase | Customer buys the product with a standard one-off payment. |
| Subscription | Customer is enrolled in a recurring subscription selling plan. |
| Both | Customer can choose between one-time and subscription at the time of the offer. |
To apply the discount to a subscription selling plan, enable Apply discount to subscription selling plan in the product edit modal and select the selling plan to use.
Selling plans must be configured on the product in Shopify before they appear as options here.
Step 3: (Optional) Set up Downsell (if declined)
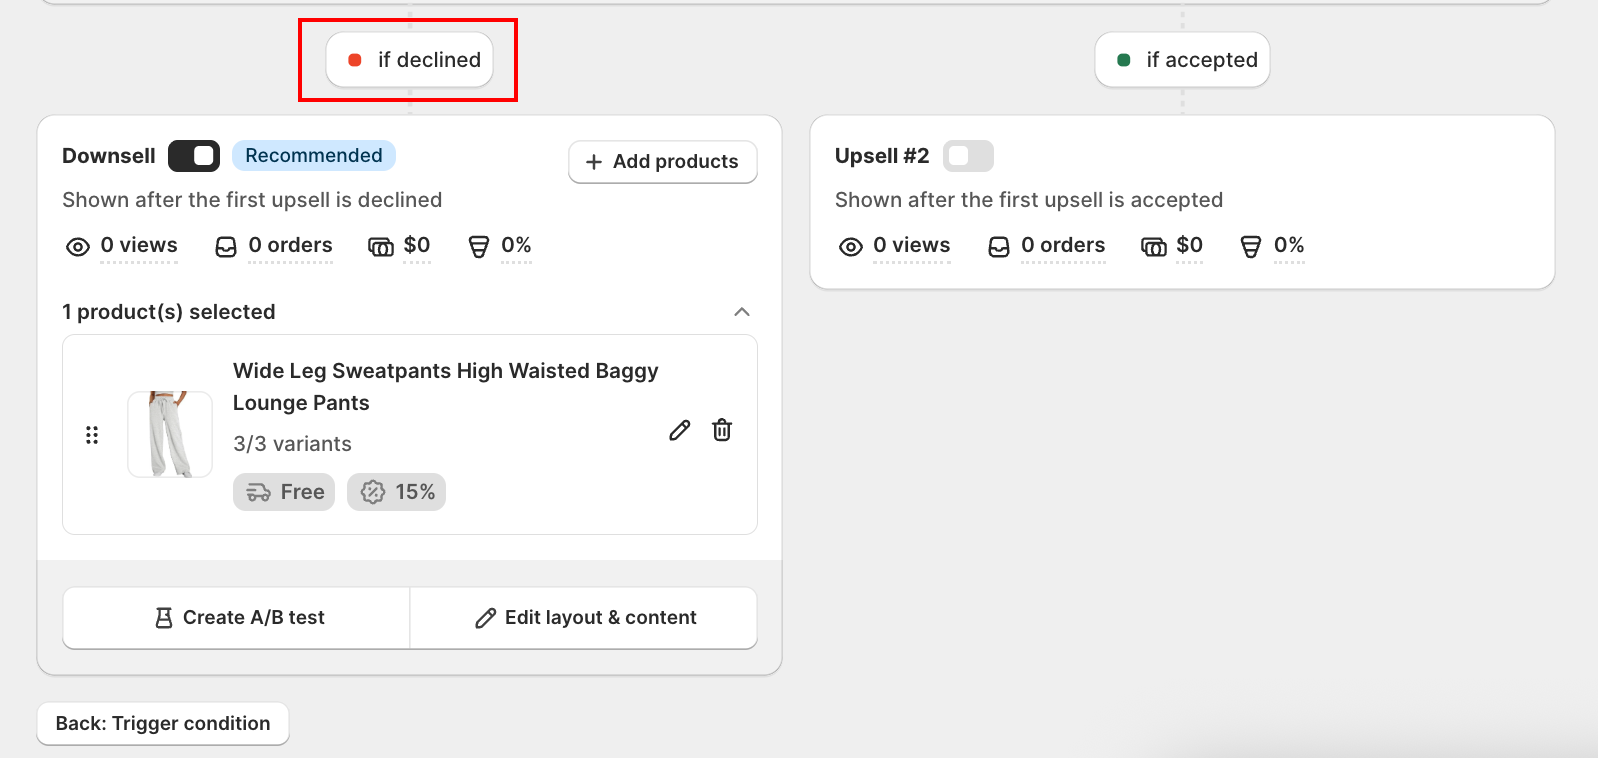
A secondary offer that appears only when the customer declines Upsell #1. It never shows when Upsell #1 is accepted.
- Turn on the toggle in the Downsell card (off by default).
- Click Add products and choose a source, same options as Upsell #1 (AI smart pick, Specific product, Specific collection, Complementary product).
- Click the pencil icon on the product tile to configure:
- Discounts: choose type (Percentage, Fixed amount, or None) and set the value.
- Free shipping: checked by default. Uncheck to set a custom shipping fee.
- Use custom description: replace the product description with a custom message.
- Use custom title: replace the product title with a custom title in the widget.
- Require minimum quantity to get discount: only apply the discount when the buyer purchases at least a specified quantity.
- Click Save.
Best practices
- Offer a smaller size, lower price, or fewer features than Upsell #1.
- Keep the decision easy: short copy, clear price/discount chips (15%, Free shipping).
Step 4: (Optional) Set up Upsell #2 (if accepted)
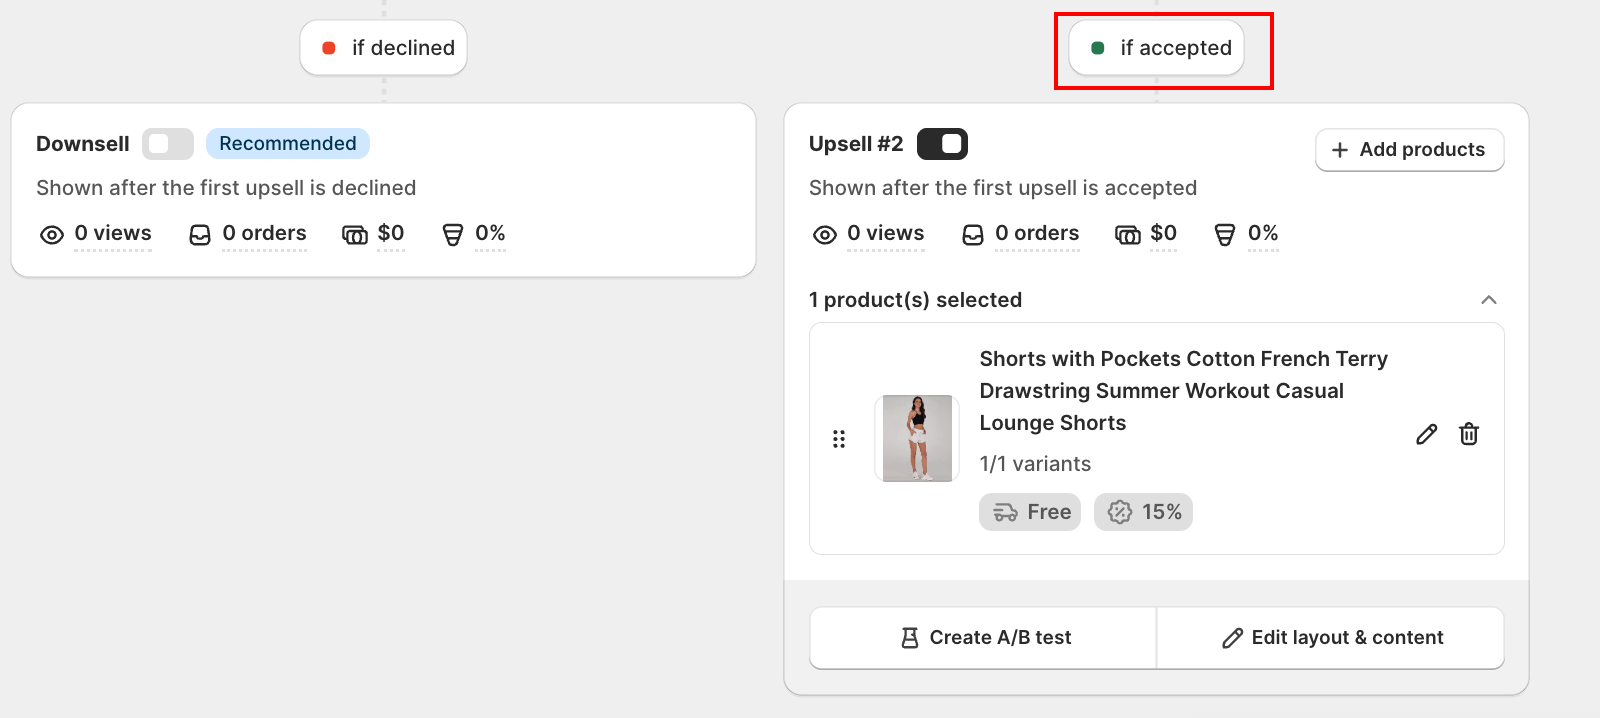
A follow-up offer that appears only when the customer accepts Upsell #1. It never shows when Upsell #1 is declined.
- Turn on the toggle in the Upsell #2 card (off by default).
- Click Add products and choose a source, same options as Upsell #1 (AI smart pick, Specific product, Specific collection, Complementary product).
- Click the pencil icon on the product tile to configure:
- Discounts: choose type and set the value.
- Free shipping: checked by default. Uncheck to set a custom shipping fee.
- Use custom description: replace the product description with a custom message.
- Use custom title: replace the product title with a custom title in the widget.
- Require minimum quantity to get discount: only apply the discount when the buyer purchases at least a specified quantity.
- Click Save.
Personalizing header text with variables
The offer header text supports dynamic variables that are replaced with real order data at the time the offer is shown:
| Variable | Replaced with |
|---|---|
{{first_name}} | Customer's first name |
{{last_name}} | Customer's last name |
To insert a variable, click the button in the header text field and select the variable from the list.
What happens when multiple offers qualify?
If more than one Post-purchase upsell offer matches the same order, the app shows only one, the offer with the highest priority (priority 1 wins). Newly created offers are automatically placed at priority 1; you can reorder at any time from the Offer list page via Manage priority.
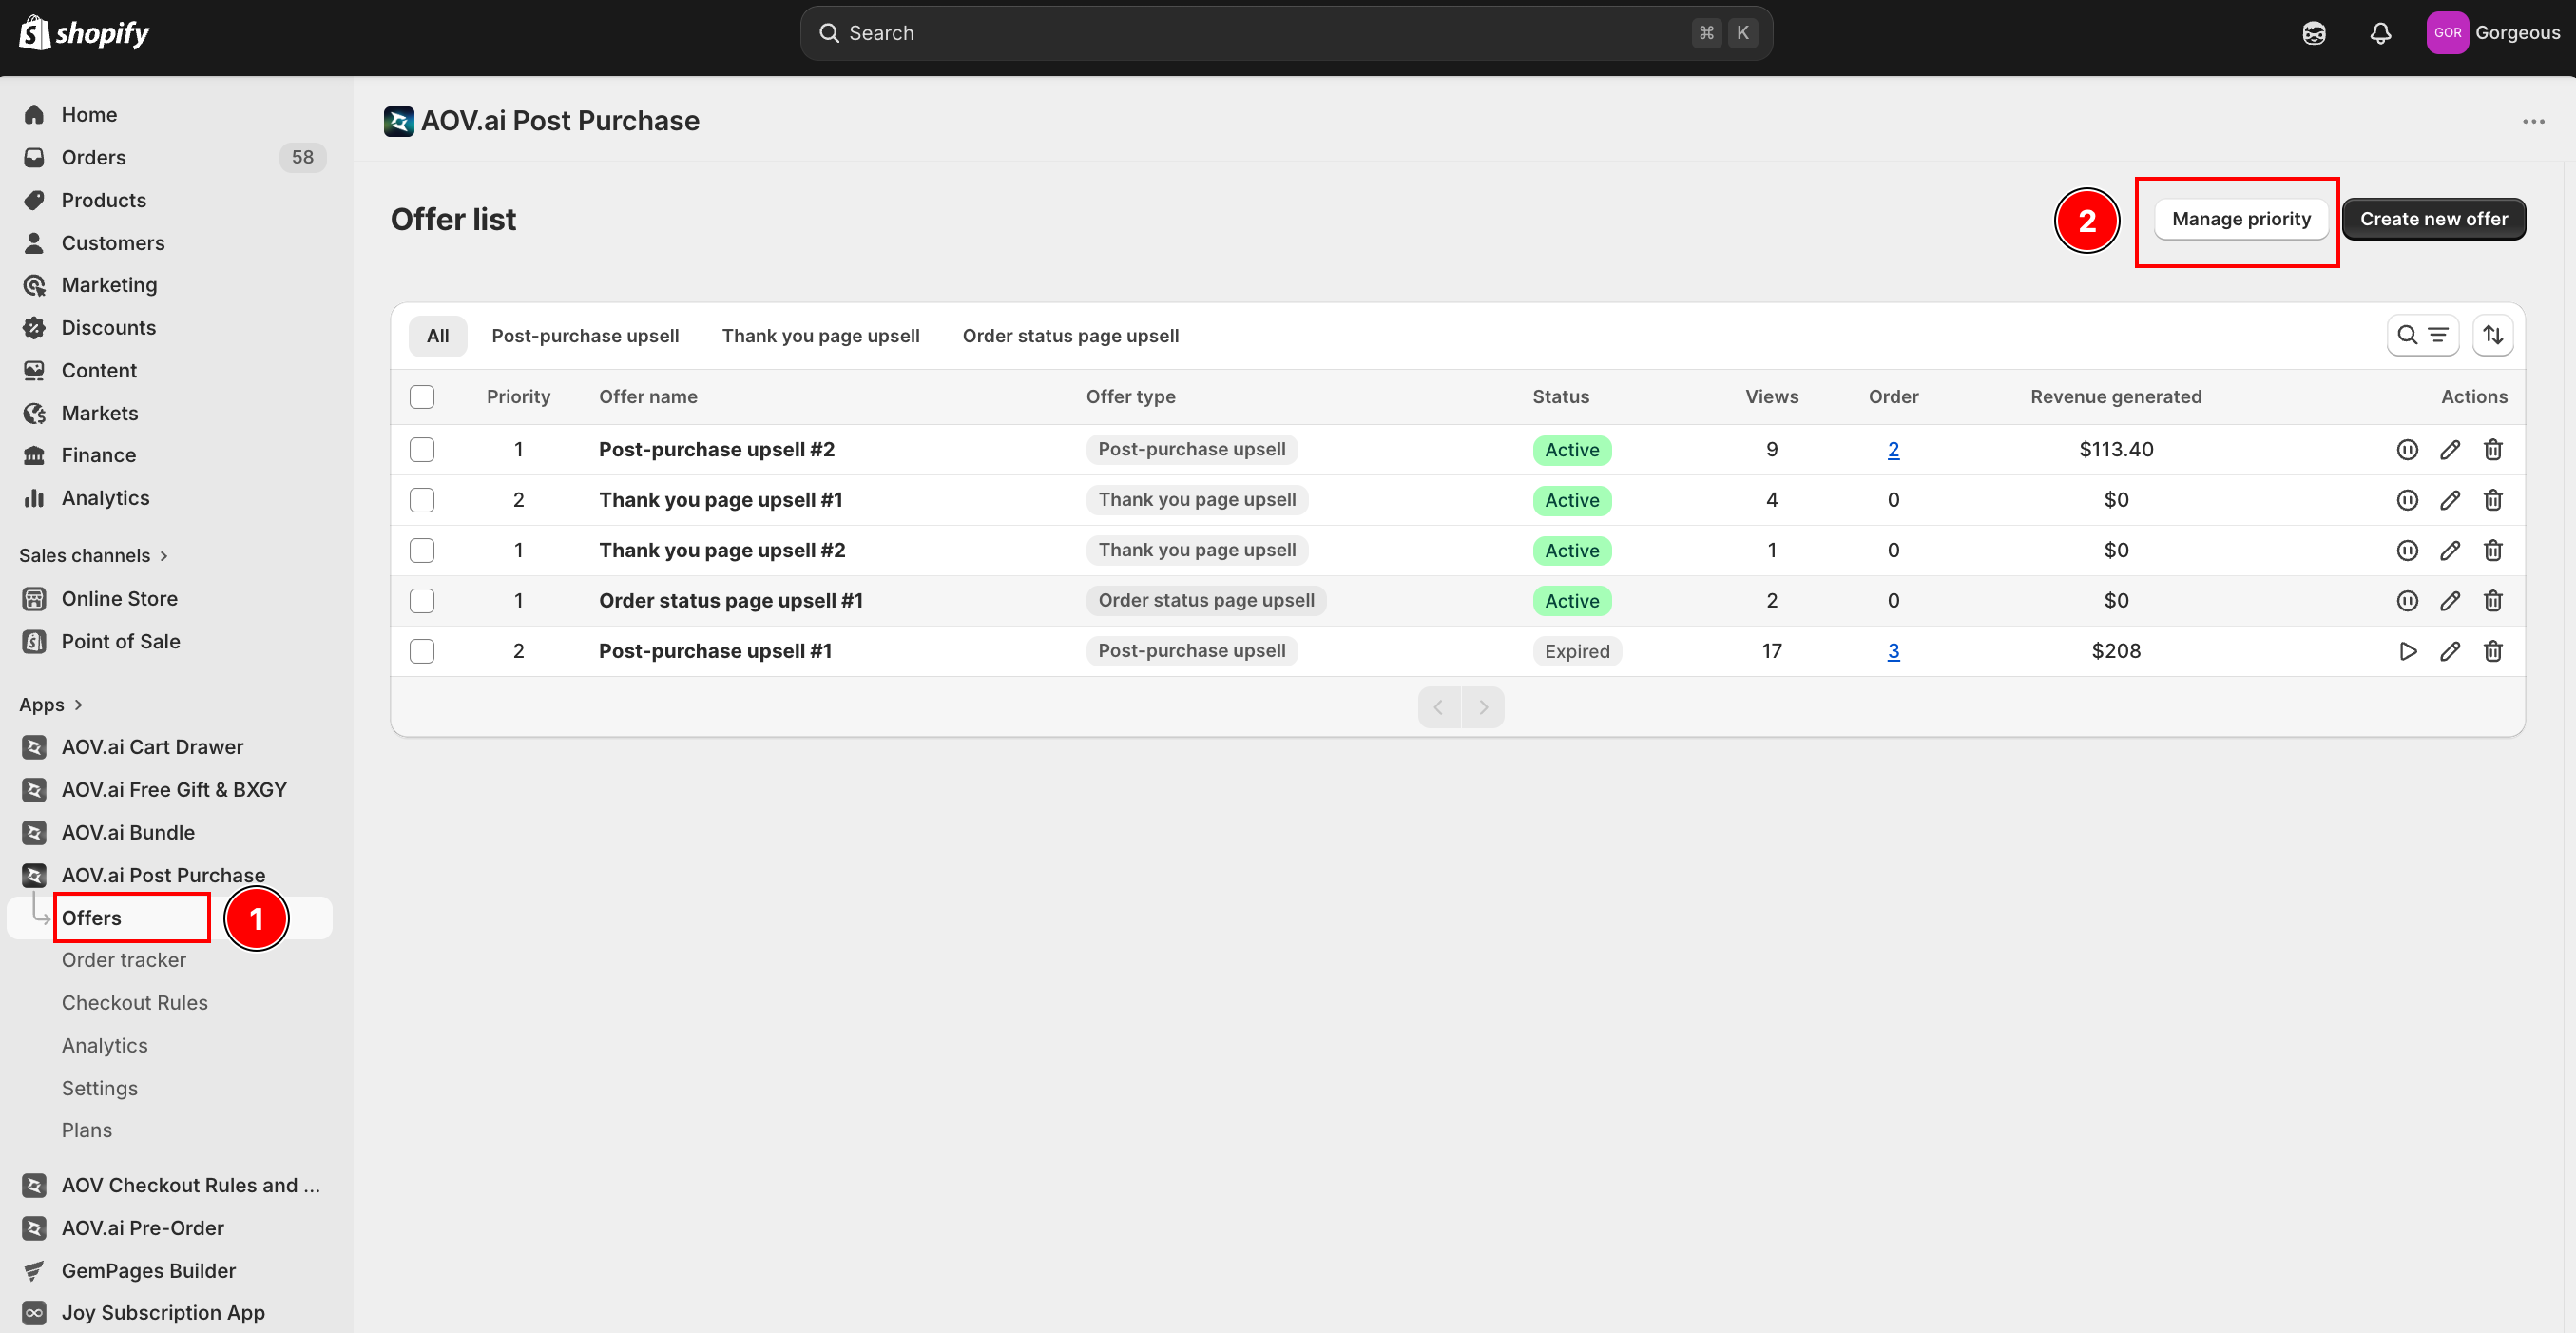
You've now learned how to set up and configure your Post Purchase Upsell offers. By combining these steps, you create an upsell flow that feels natural for customers and drives meaningful increases in Average Order Value.