How to set up
Learn how to create a Coupon offer that rewards customers with a discount code on the Thank You page, to use on their next order.
What is a Coupon offer?
A Coupon offer shows customers a discount code on the Thank You page, right after they place an order. It is now its own offer type, separate from the Thank you page upsell (product) offer, with its own setup screen, its own display block, and its own metrics.
Coupons used to be an Offer coupon toggle inside a Thank you page upsell offer. They are now a standalone offer type, so a coupon and a product upsell are two separate offers.
Why use a Coupon offer?
- Clear setup: coupons and product upsells are configured separately, so nothing gets mixed up.
- Accurate metrics: a Coupon offer is measured by claims (how many customers took the code), not orders or revenue.
- More coverage: because a Coupon offer and a Thank you page product upsell are separate offers, both can run on the Thank You page.
How to set up a Coupon offer
Requirement
The coupon shows inside the Thank You Page Upsell block. Add it once in Shopify Admin → Online Store → Customize Theme → Checkout and customer accounts → Thank You Page (the same block used by the Thank you page upsell).
Step 1: Create a Coupon offer
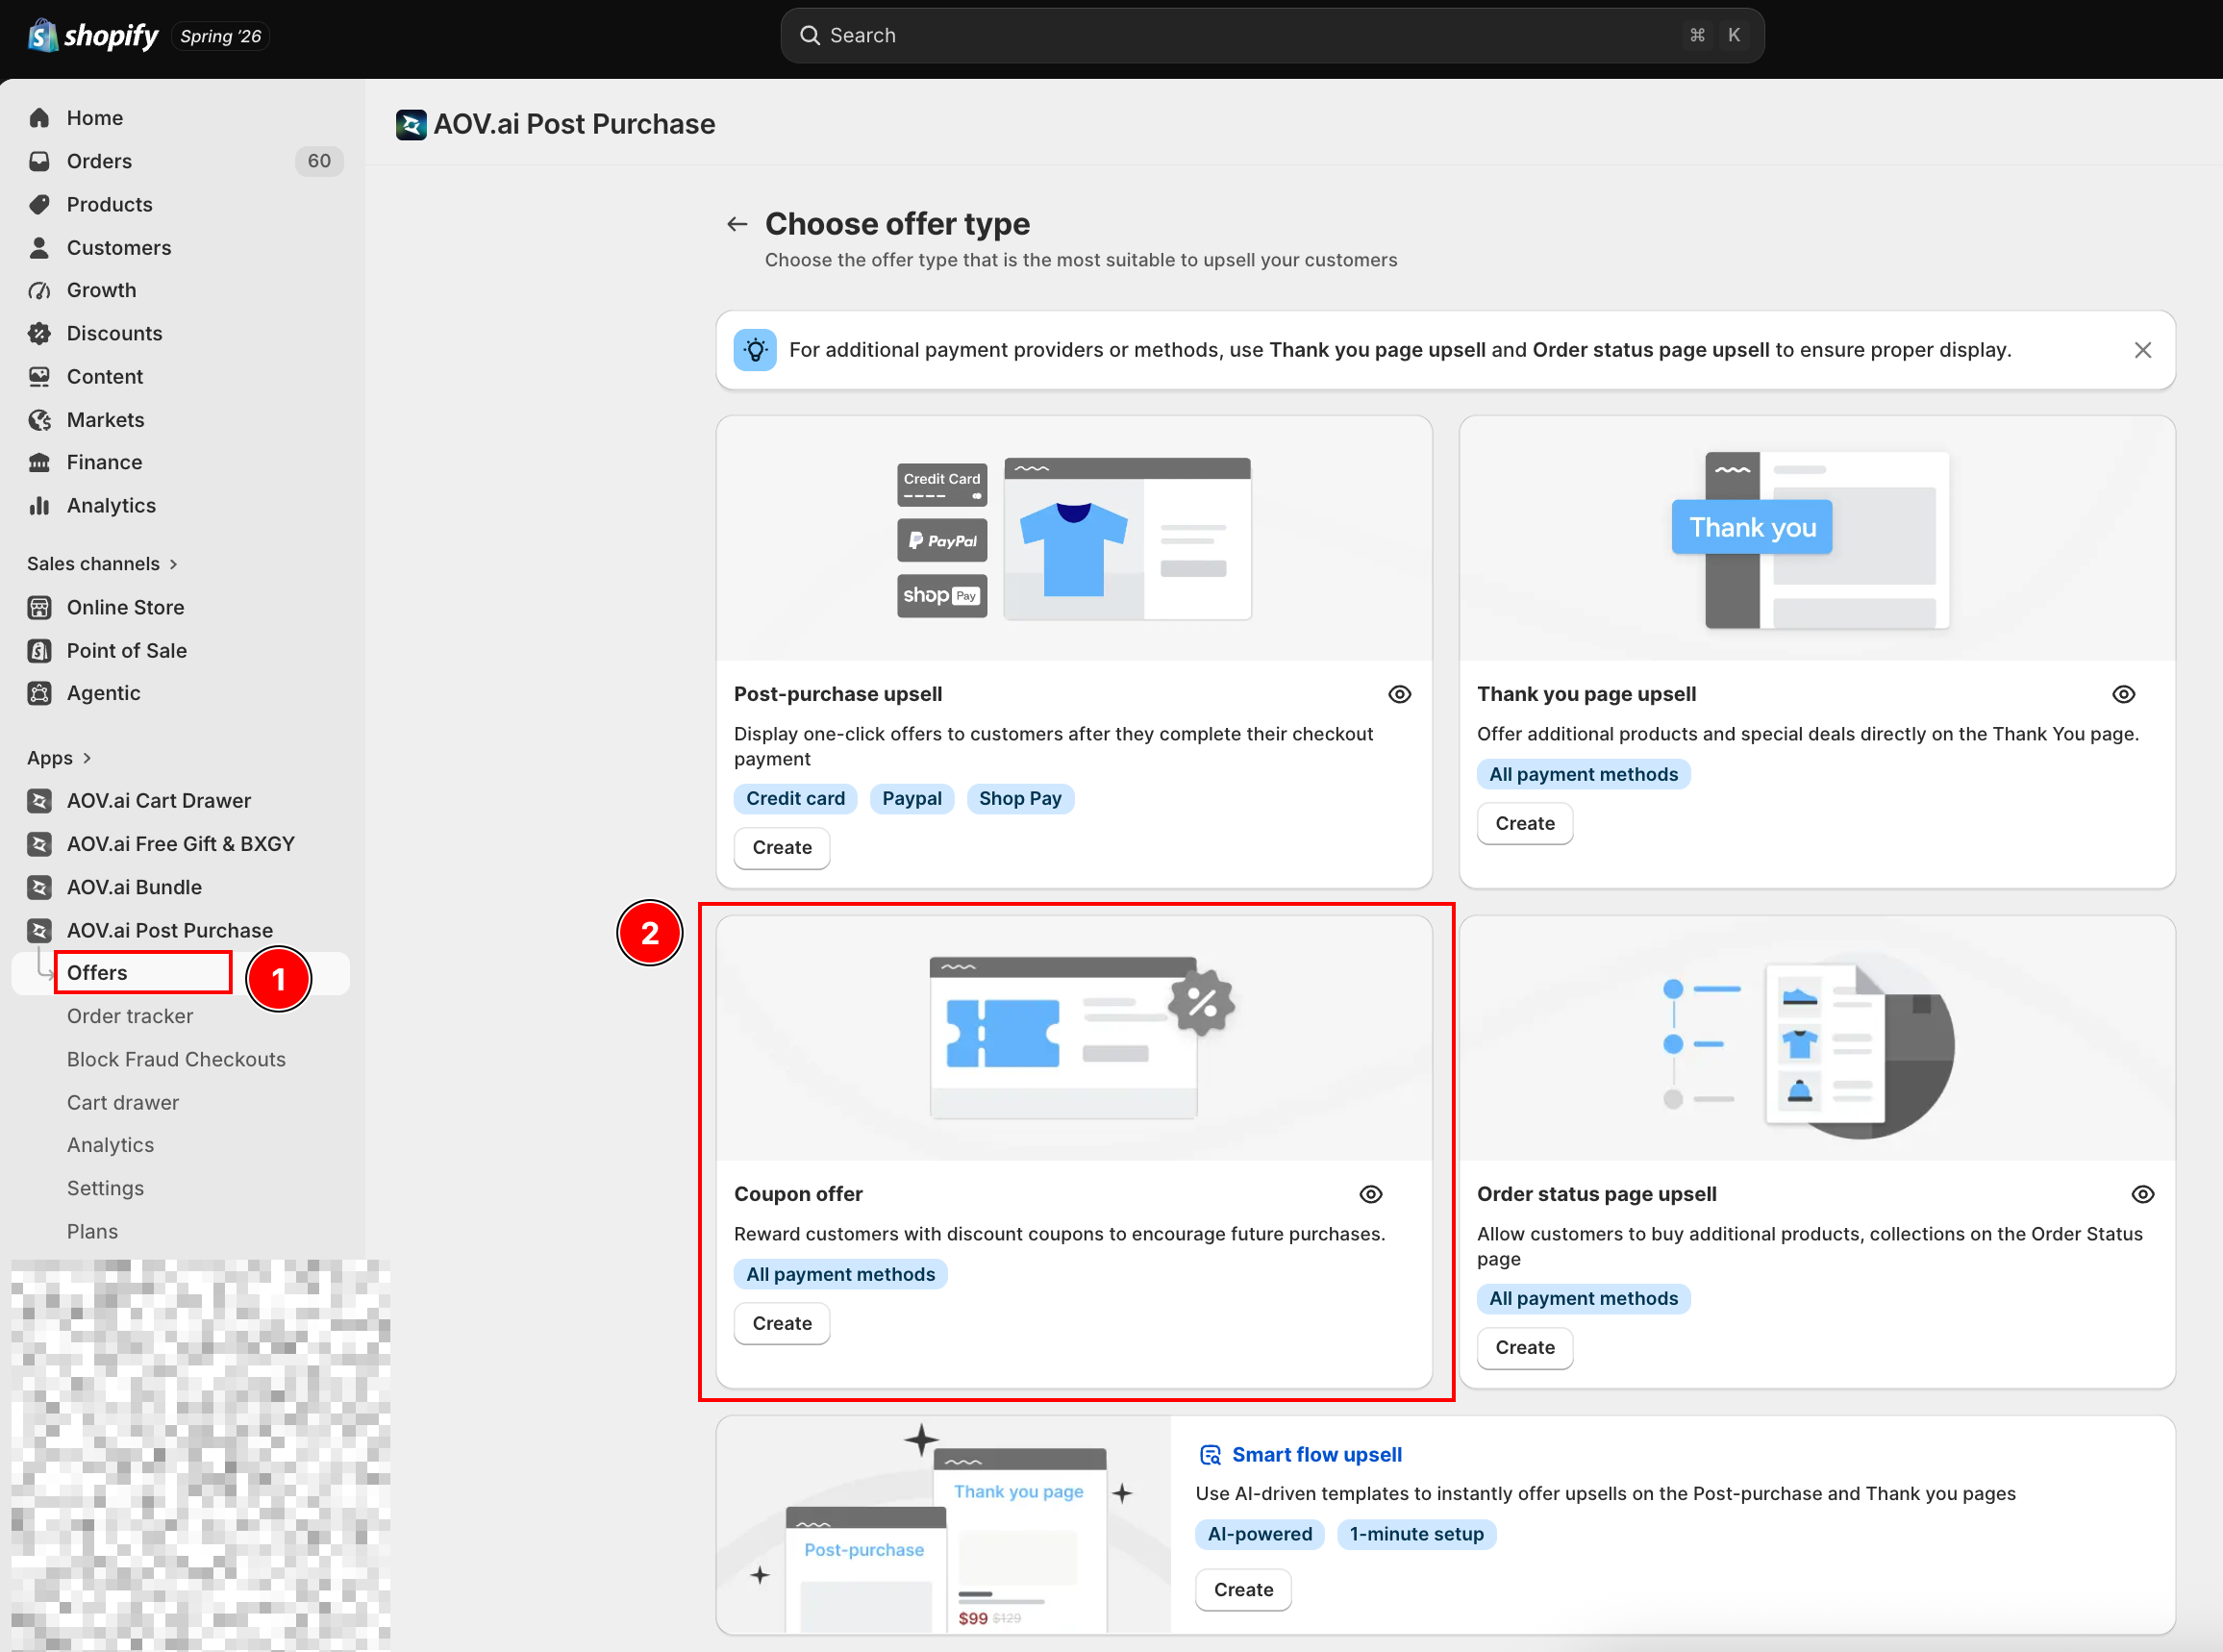
Go to Offers → Create new offer to open the Choose offer type page, then click Create on the Coupon offer card. The offer types are Post-purchase upsell, Thank you page upsell, Coupon offer, and Order status page upsell.
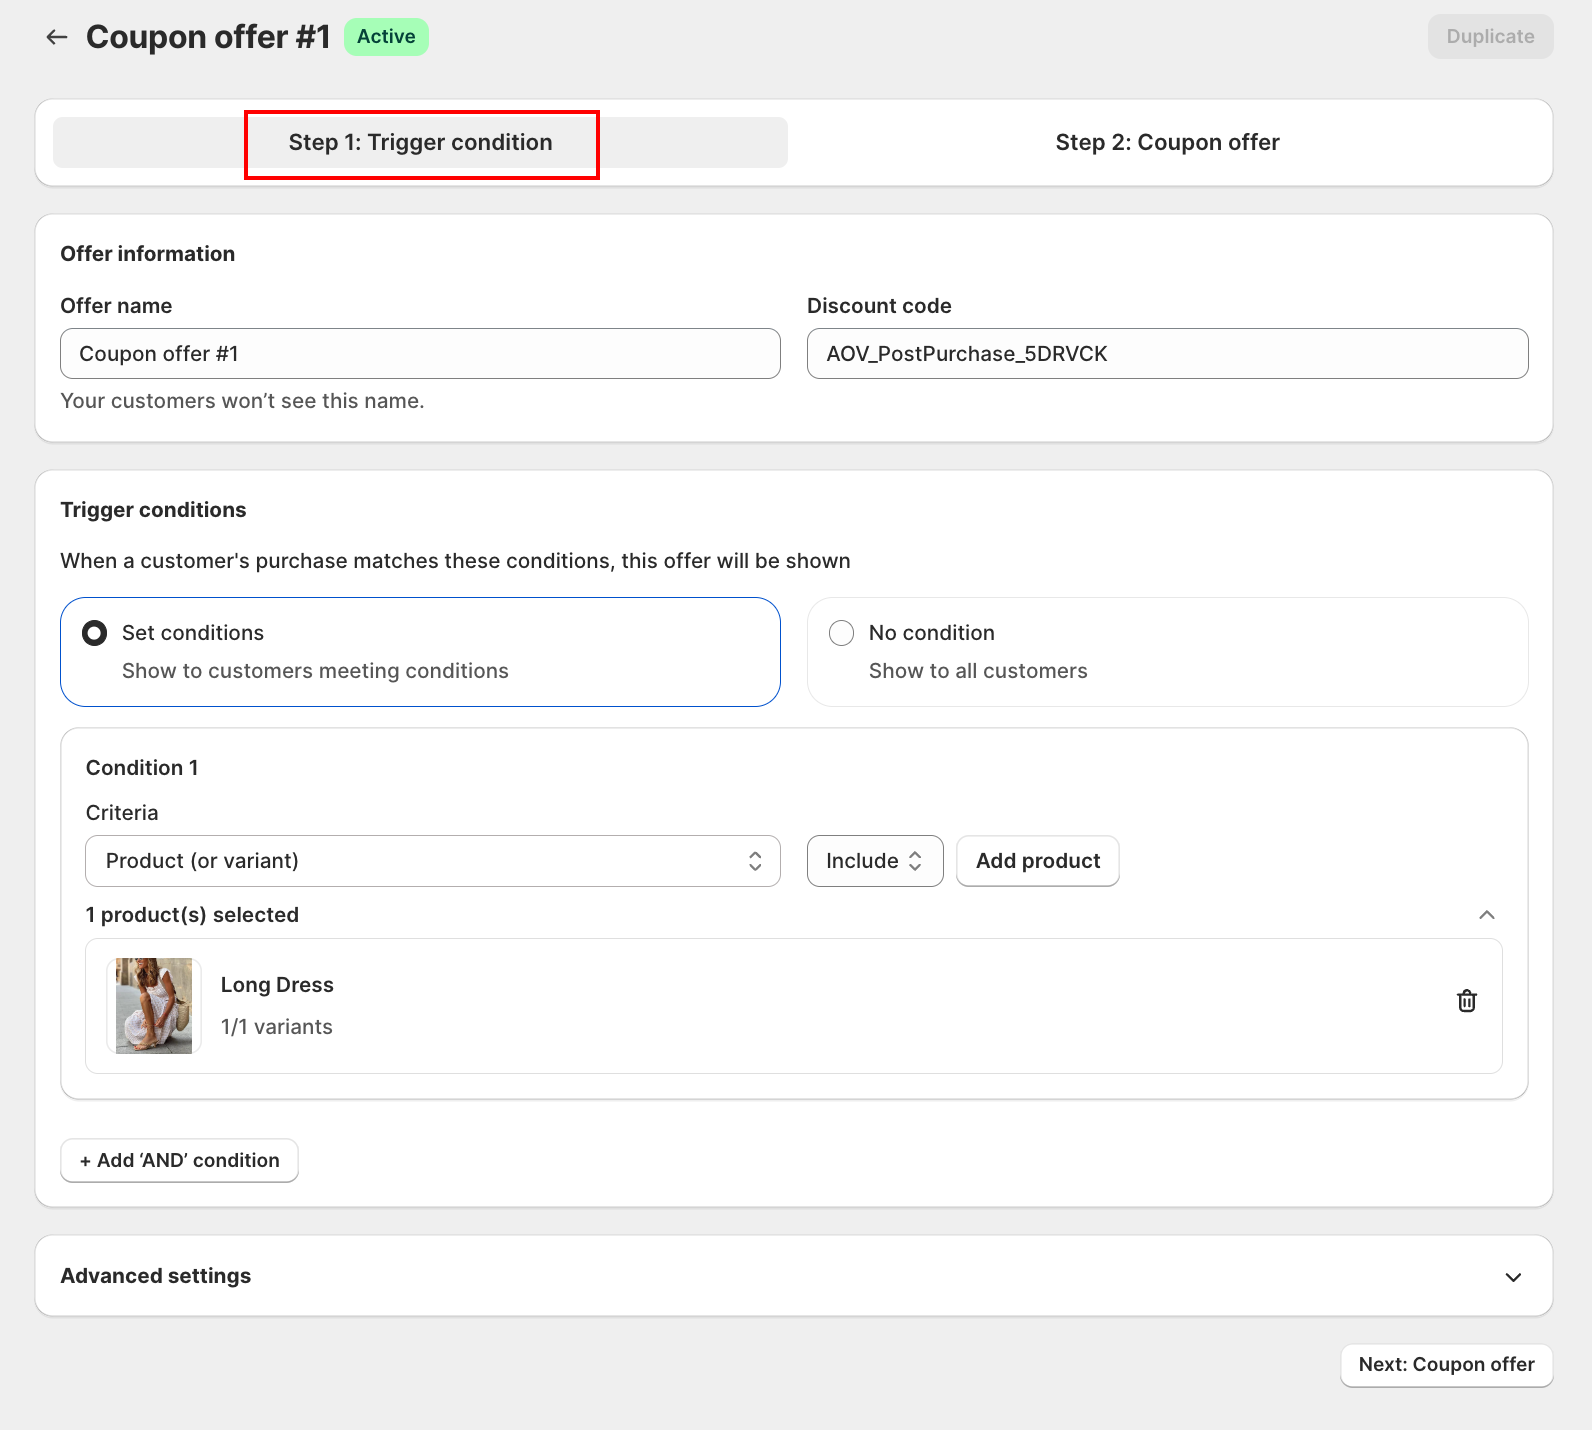
On the Step 1: Trigger condition tab, fill in the offer information and choose when the coupon shows.
Offer information
- Offer name: an internal name to identify the offer. Customers won't see it.
- The Discount code is generated automatically, so you don't need to type one.
Trigger conditions
Under Trigger conditions, choose one so that your coupon can be shown:
- Set conditions: show the coupon only to orders that match your rules.
- No condition: show the coupon to all customers.
If you select Set conditions, you can build rules using criteria:
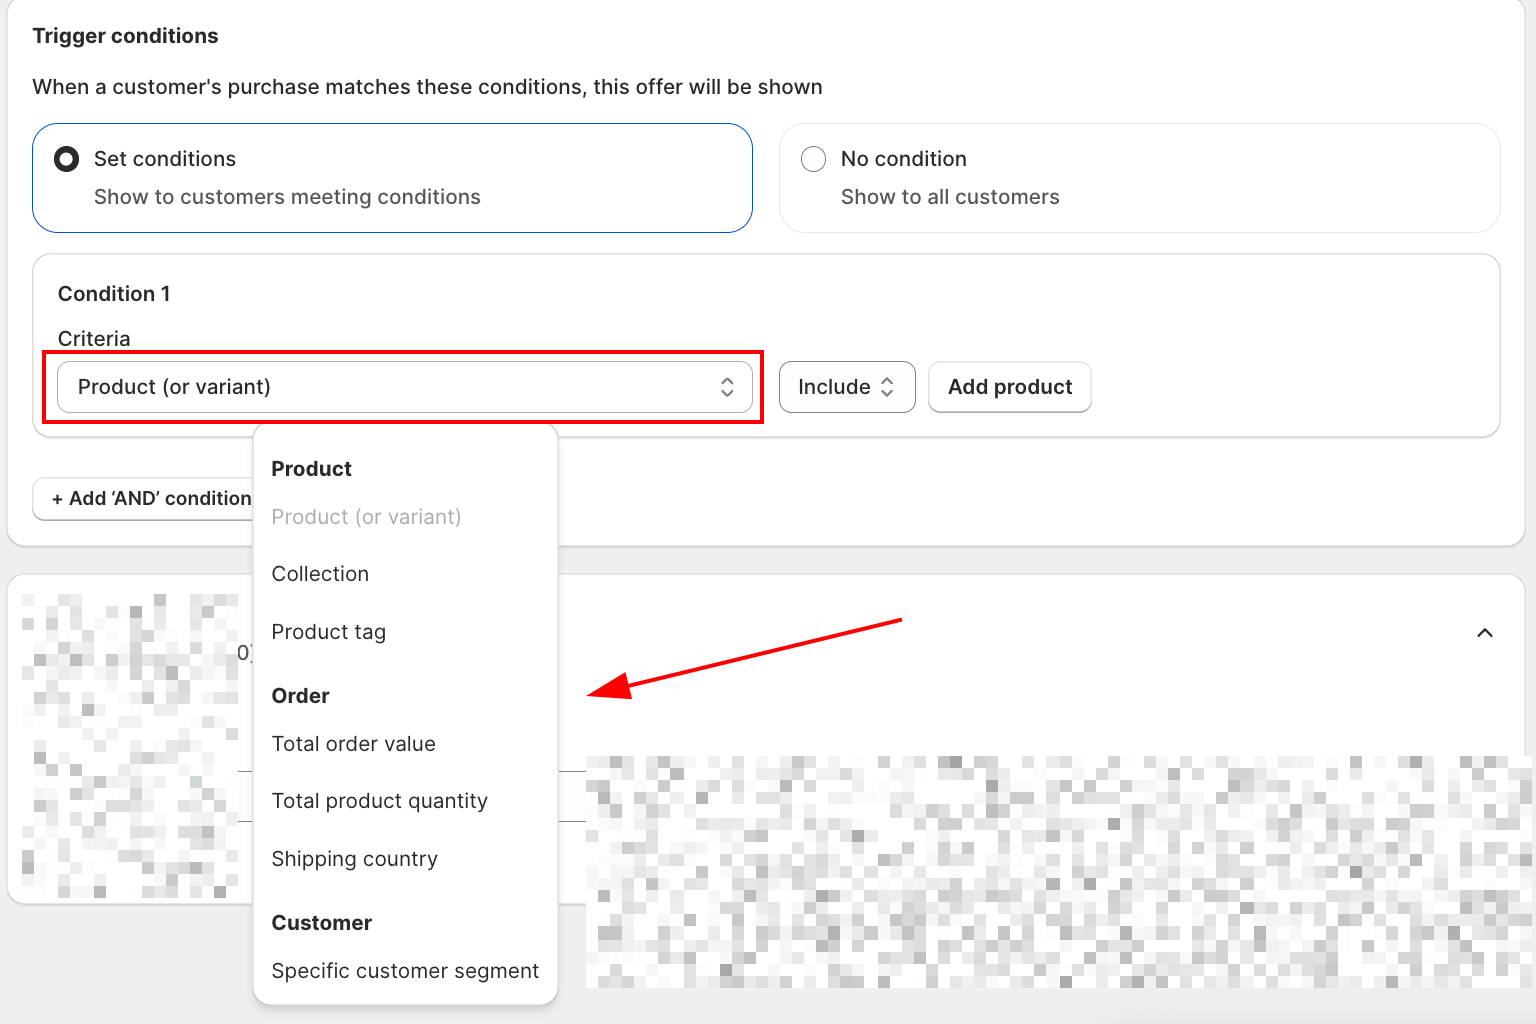
| Category | Condition | Description |
|---|---|---|
| Product | Product (or variant) | Show only if the order includes or excludes specific SKUs. |
| Collection | Target entire collections (e.g., "Winter Skincare"). | |
| Included product tag | Show only if products have ALL specified tags (AND logic). | |
| Excluded product tag | Hide the offer if any product in the order has one of the specified tags. | |
| Order | Total order value | Show only if cart subtotal reaches a threshold (e.g., orders above $50). |
| Total product quantity | Trigger based on the total number of items in the order. Supports ≥, ≤, and = operators. | |
Shipping fee NEW | Show only if the order's shipping fee is greater than, less than, or equal to a specific amount (≥, ≤, =). The amount field shows your store's currency symbol; enter 0 to target free-shipping orders. | |
| Shipping country | Restrict offers to customers shipping to specific countries. | |
| Customer | Specific customer segment | Target Shopify segments (e.g., returning buyers). |
For each condition:
- Select the Criteria from the dropdown.
- Choose an operator (Include / Exclude, or ≥ / ≤ / = for numeric fields).
- Add the value to match.
- Use + Add 'AND' condition to combine multiple rules.
Good to know: how Shipping fee is calculated
- Shipping fee is calculated after discounts are subtracted, so a free-shipping order reads as 0.
- Orders with no shipping fee at all (local pickup, digital products) also read as 0.
- A Less (≤) condition matches those orders too. Use Greater (≥) with a value above 0 if you want to exclude them.
- For multi-currency shops, the number you enter is compared directly against the order's amount, it is not converted, the same behavior as Total order value.
Decision help
- Start with No condition if you just want every customer to get the coupon.
- Use Set conditions when the coupon should only appear for certain orders (specific products, collections, order value, or customer segment).
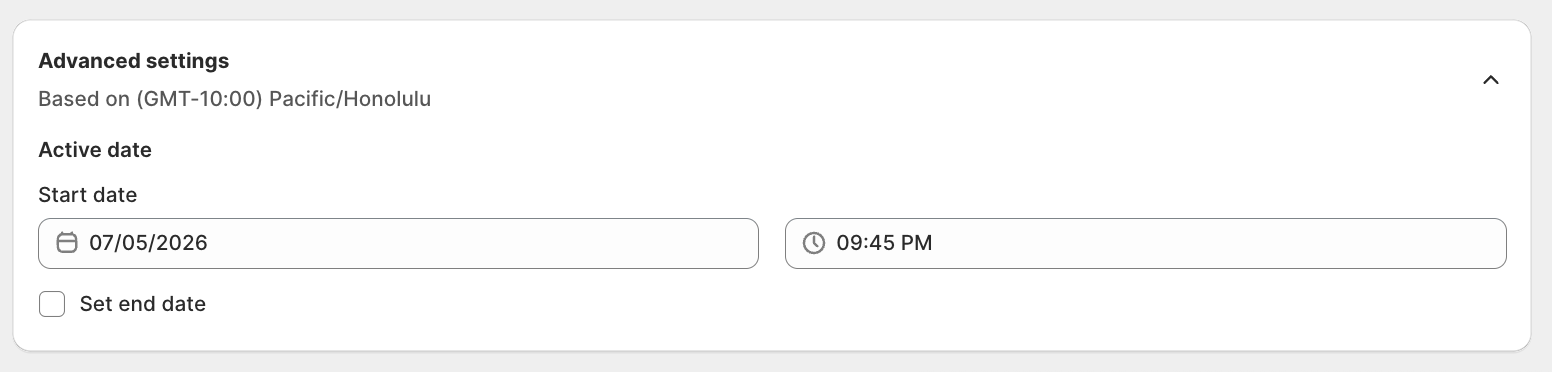
Advanced settings
Under Advanced settings, pick the Start date (and an optional end date).
Step 2: Configure the discount
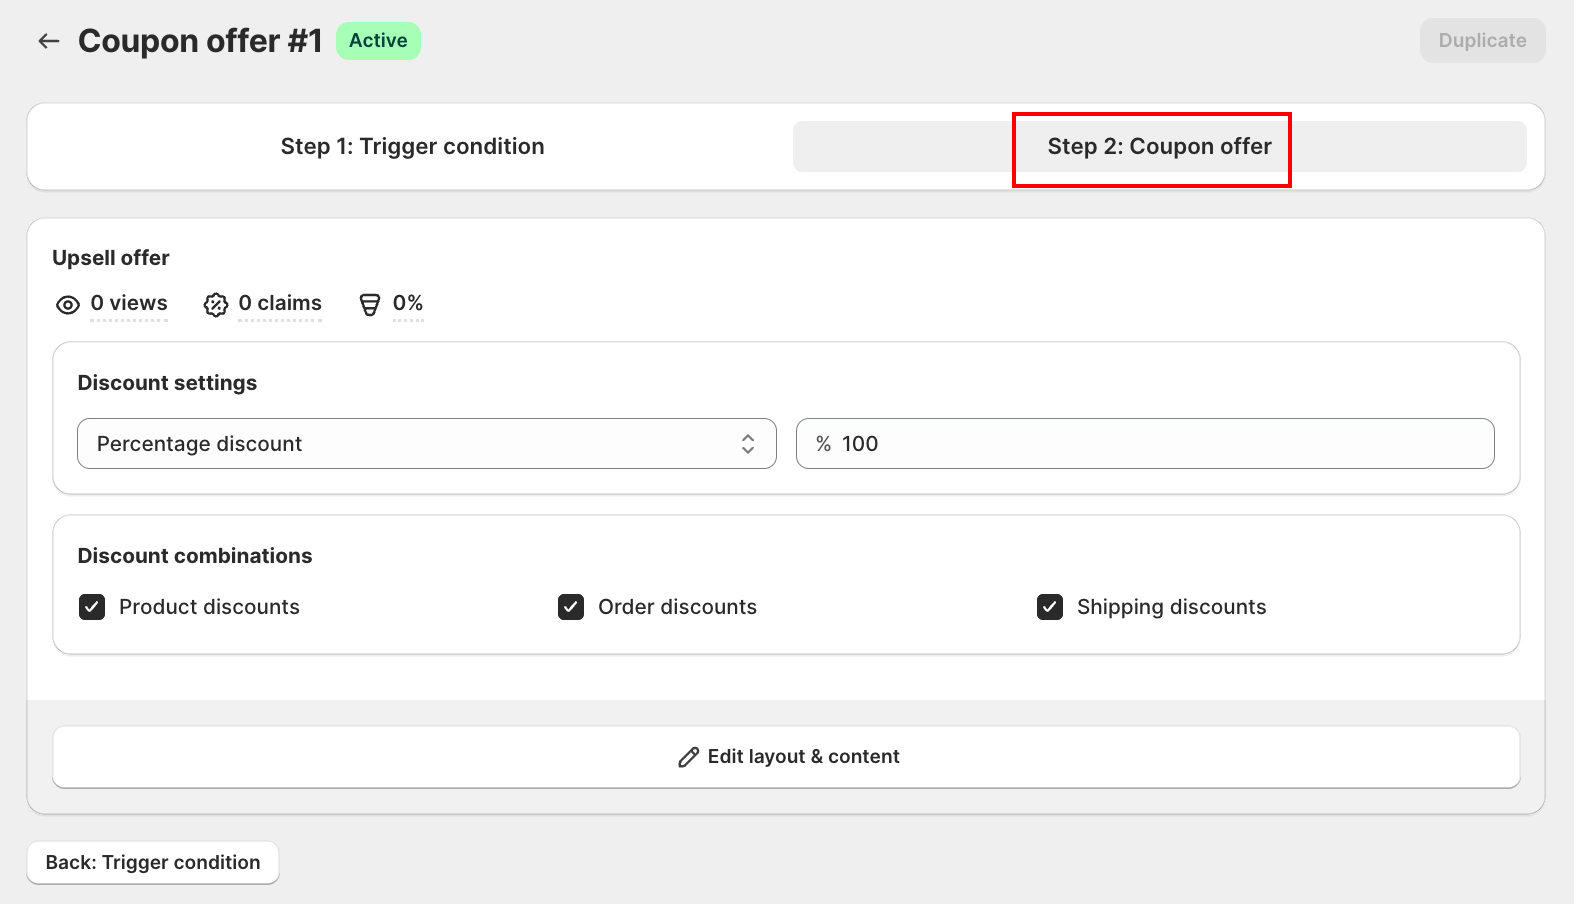
Open the Step 2: Coupon offer tab.
Under Discount settings, choose the discount type and enter the value:
- Percentage discount (for example, 10% off)
- Fixed amount discount (for example, $10 off)
Under Discount combinations, choose which other Shopify discounts this coupon can stack with: Product discounts, Order discounts, and Shipping discounts.
Step 3: Edit the coupon title and subtitle
Click Edit layout & content to open the layout editor. Under Title and Subtitle, edit the Content that customers see. By default:
- Title:
{{discount_value}} OFF ON YOUR NEXT ORDER! - Subtitle:
Copy and enter the code at checkout
Customers tap Copy discount code to claim it.
Step 4: Preview and Save
- The preview shows the coupon block as it appears on the Thank You page.
- Translated the coupon title or subtitle? Use the language button next to the Desktop/Mobile toggle to preview each language. See Preview translations in the editor.
- A Coupon offer is measured by claims (the number of times the code was claimed), so the Orders and Revenue stats are replaced by a claims count.
- Click Save. The offer takes effect right away.
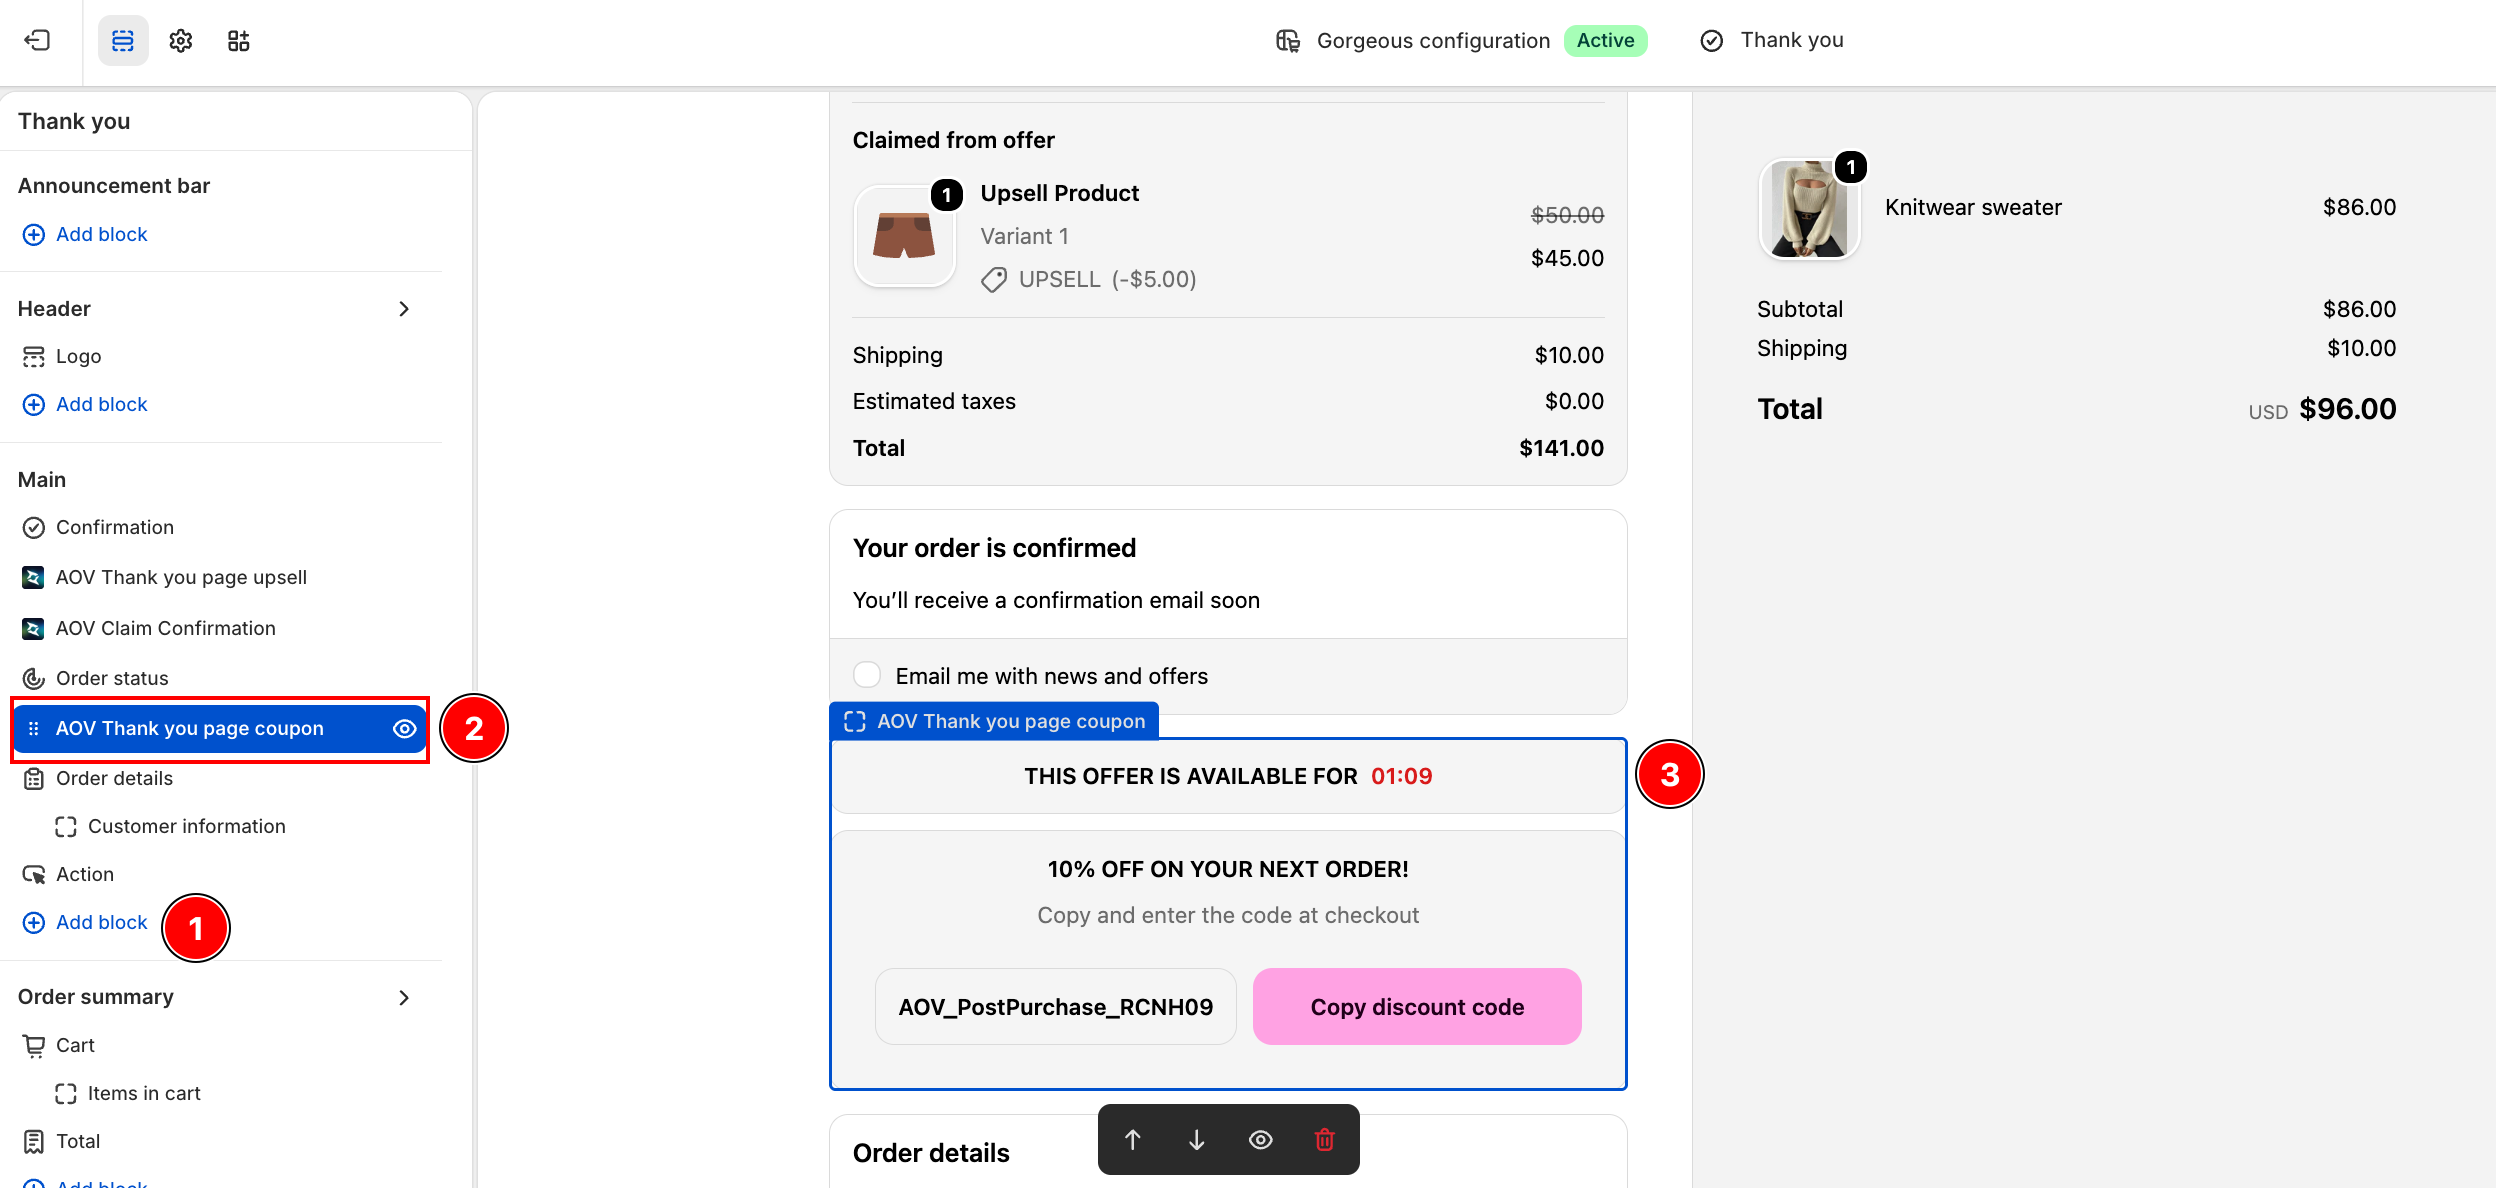
In the preview above, the coupon block shows on the Thank You page below a Thank you page product upsell, so both offers can run together.
Backward compatibility
Important
- Existing coupons keep working. Coupons set up the old way (the Offer coupon toggle inside a Thank you page upsell offer) still run as before. There is no migration and nothing to re-create.
- The old "Offer coupon" toggle is deprecated. On an older offer you will see a banner noting that coupons are moving to their own offer type and that turning the toggle off here cannot be undone. Turning it off is one-way: once off, the toggle is gone, and to use a coupon again you create a new Coupon offer.
- Discount code changes sync from Shopify. If you edit or delete the discount code directly in Shopify → Discounts, the change syncs back to the app automatically, so the offer stays consistent.