Import Blocks
What Is It?
Import Blocks lets you add pre-built conversion blocks into the cart drawer without writing any code. You browse a library of ready-made blocks, preview each one, and import the ones you want. Imported blocks become editable HTML blocks you can adjust later. You can also describe a block in plain words and let AI generate a new one or edit an existing one, matched to your brand.
When to Use It
- You want to add a conversion element quickly without building it from scratch
- You want a starting point you can then customize as an HTML block
- You want to see a live preview of a block before adding it to your drawer
- You want AI to build or tweak a block from a plain-language description
- You want a block's message to update live based on the real cart, like a free shipping progress message
Available Blocks
Custom HTML
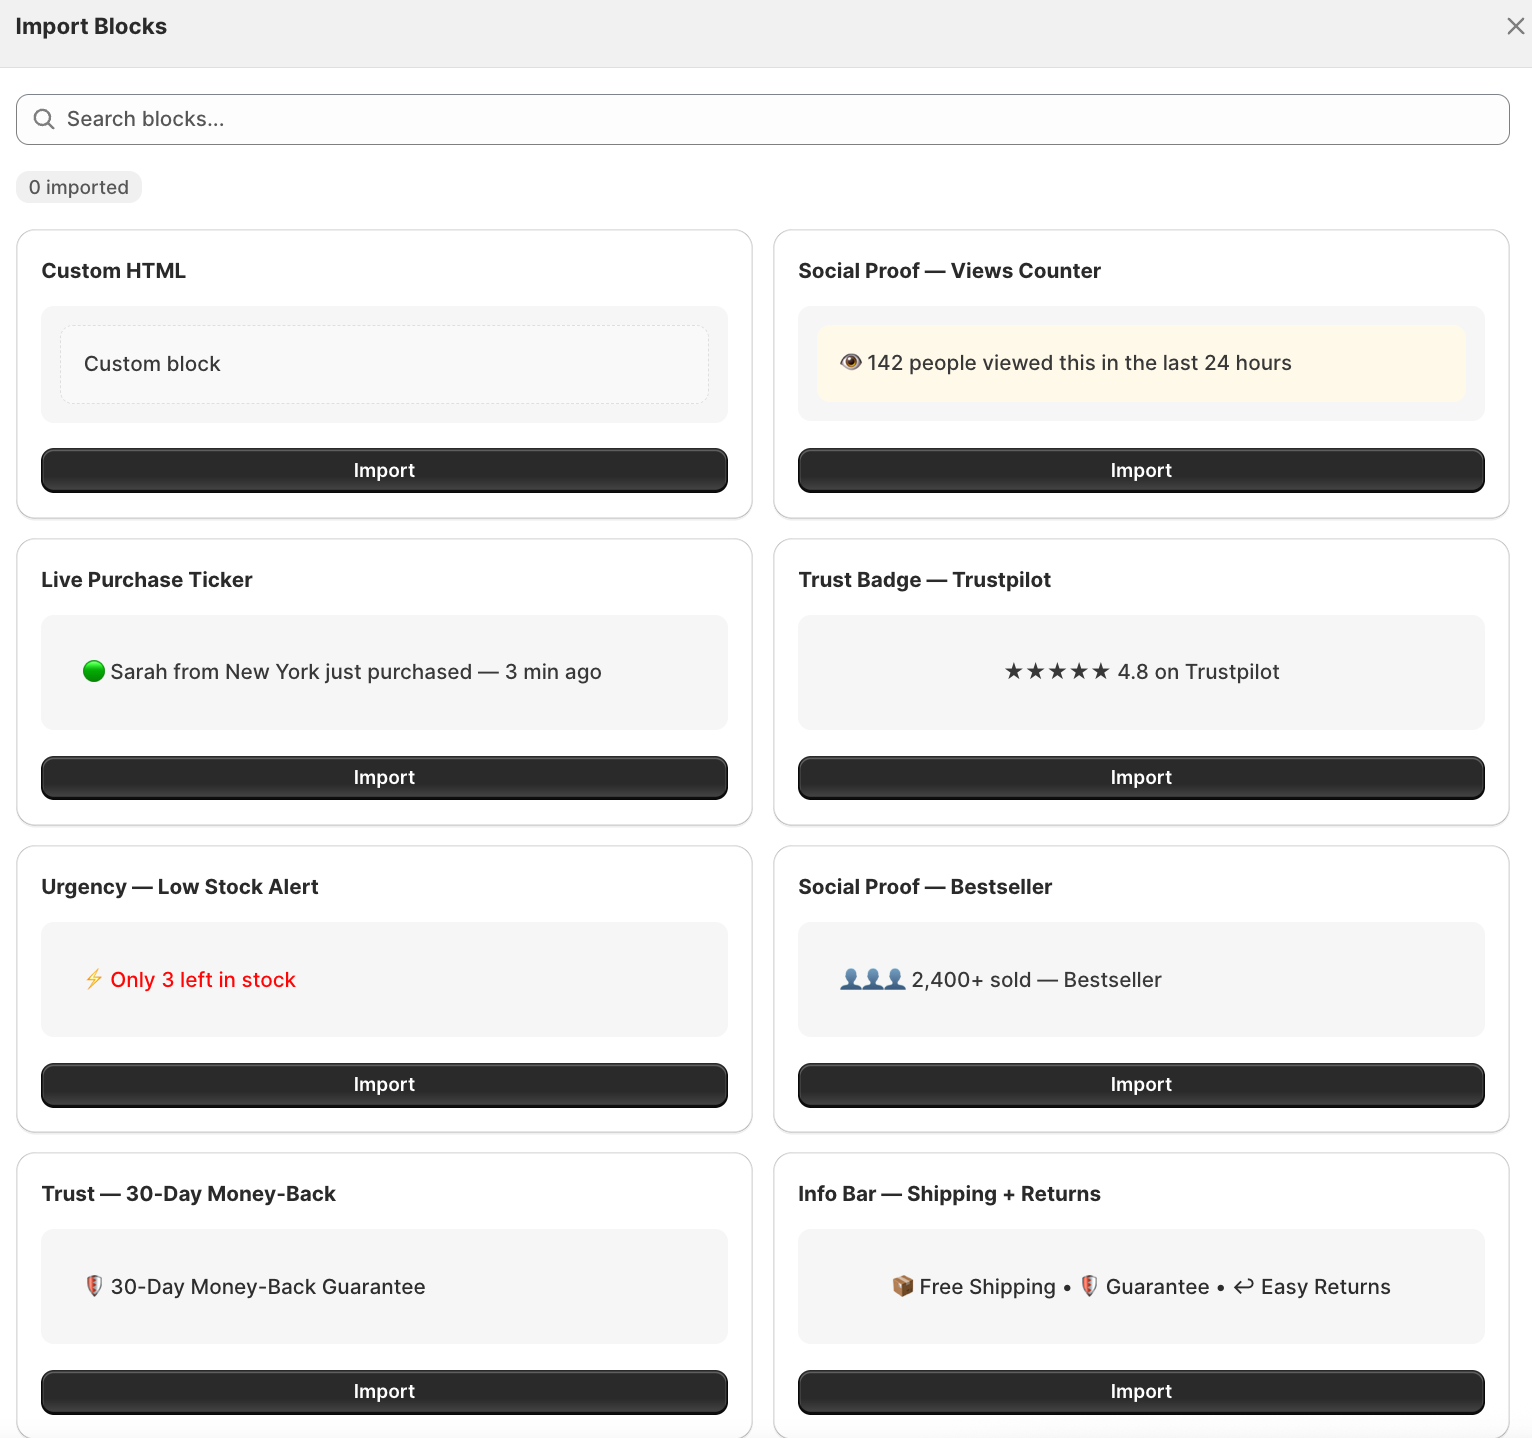
A blank editable block. Use it to paste in your own HTML snippet or build a custom element from scratch.
Social Proof: Views Counter
Displays a message showing how many people viewed the product in the last 24 hours (for example, 142 people viewed this in the last 24 hours).
Live Purchase Ticker
Shows a live-style notification of a recent purchase (for example, Sarah from New York just purchased, 3 min ago).
Trust Badge: Trustpilot
Displays your Trustpilot rating as a star badge (for example, 4.8 on Trustpilot).
Urgency: Low Stock Alert
Shows a low stock warning to create urgency (for example, Only 3 left in stock).
Social Proof: Bestseller
Highlights the number of units sold (for example, 2,400+ sold, Bestseller).
Trust: 30-Day Money-Back
Displays a money-back guarantee badge (for example, 30-Day Money-Back Guarantee).
Info Bar: Shipping + Returns
Shows a compact info bar with key policies (for example, Free Shipping · Guarantee · Easy Returns).
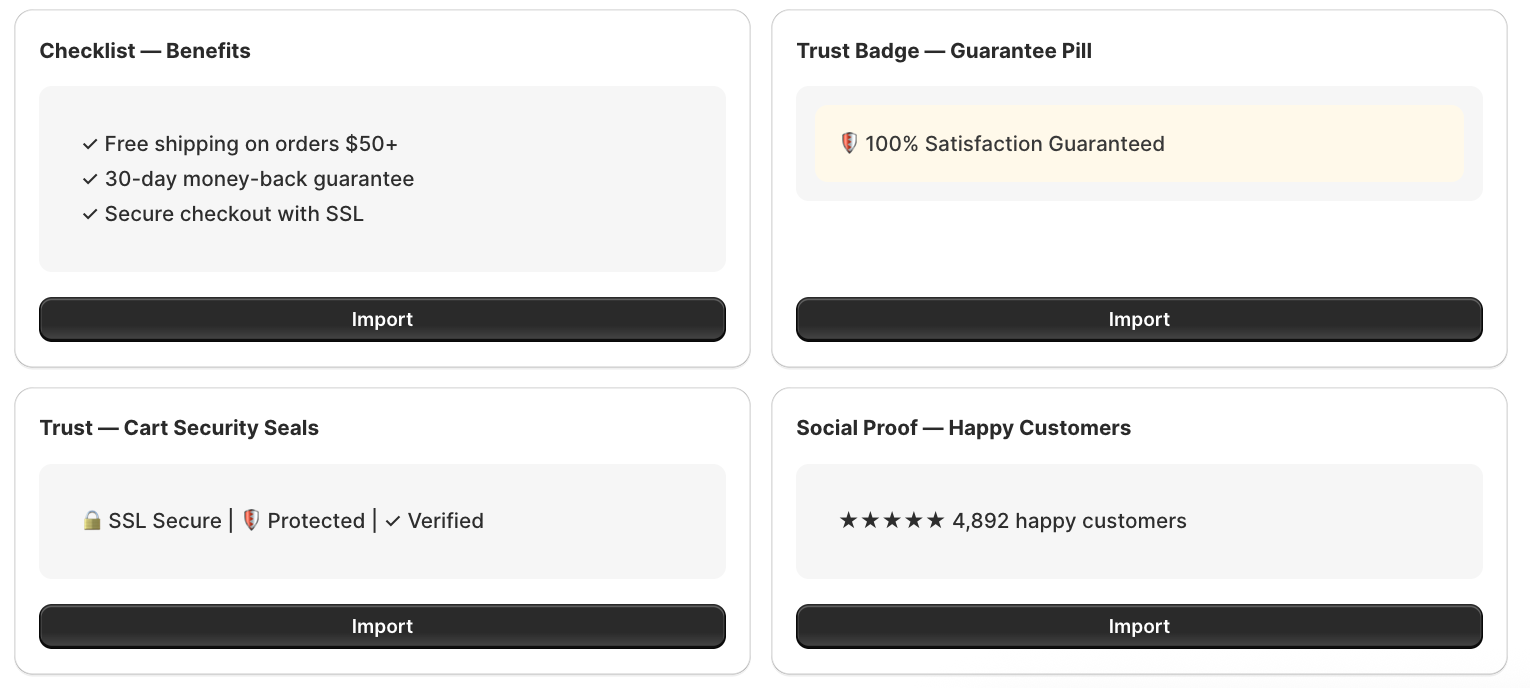
Checklist: Benefits
Displays a checklist of store benefits (for example, Free shipping on orders $50+, 30-day money-back guarantee, Secure checkout with SSL).
Trust Badge: Guarantee Pill
Shows a pill-style guarantee badge (for example, 100% Satisfaction Guaranteed).
Trust: Cart Security Seals
Displays security trust seals inline (for example, SSL Secure · Protected · Verified).
Social Proof: Happy Customers
Shows your total happy customer count with stars (for example, 4,892 happy customers).
How to Import a Block
Step 1: Open the Import Blocks Modal
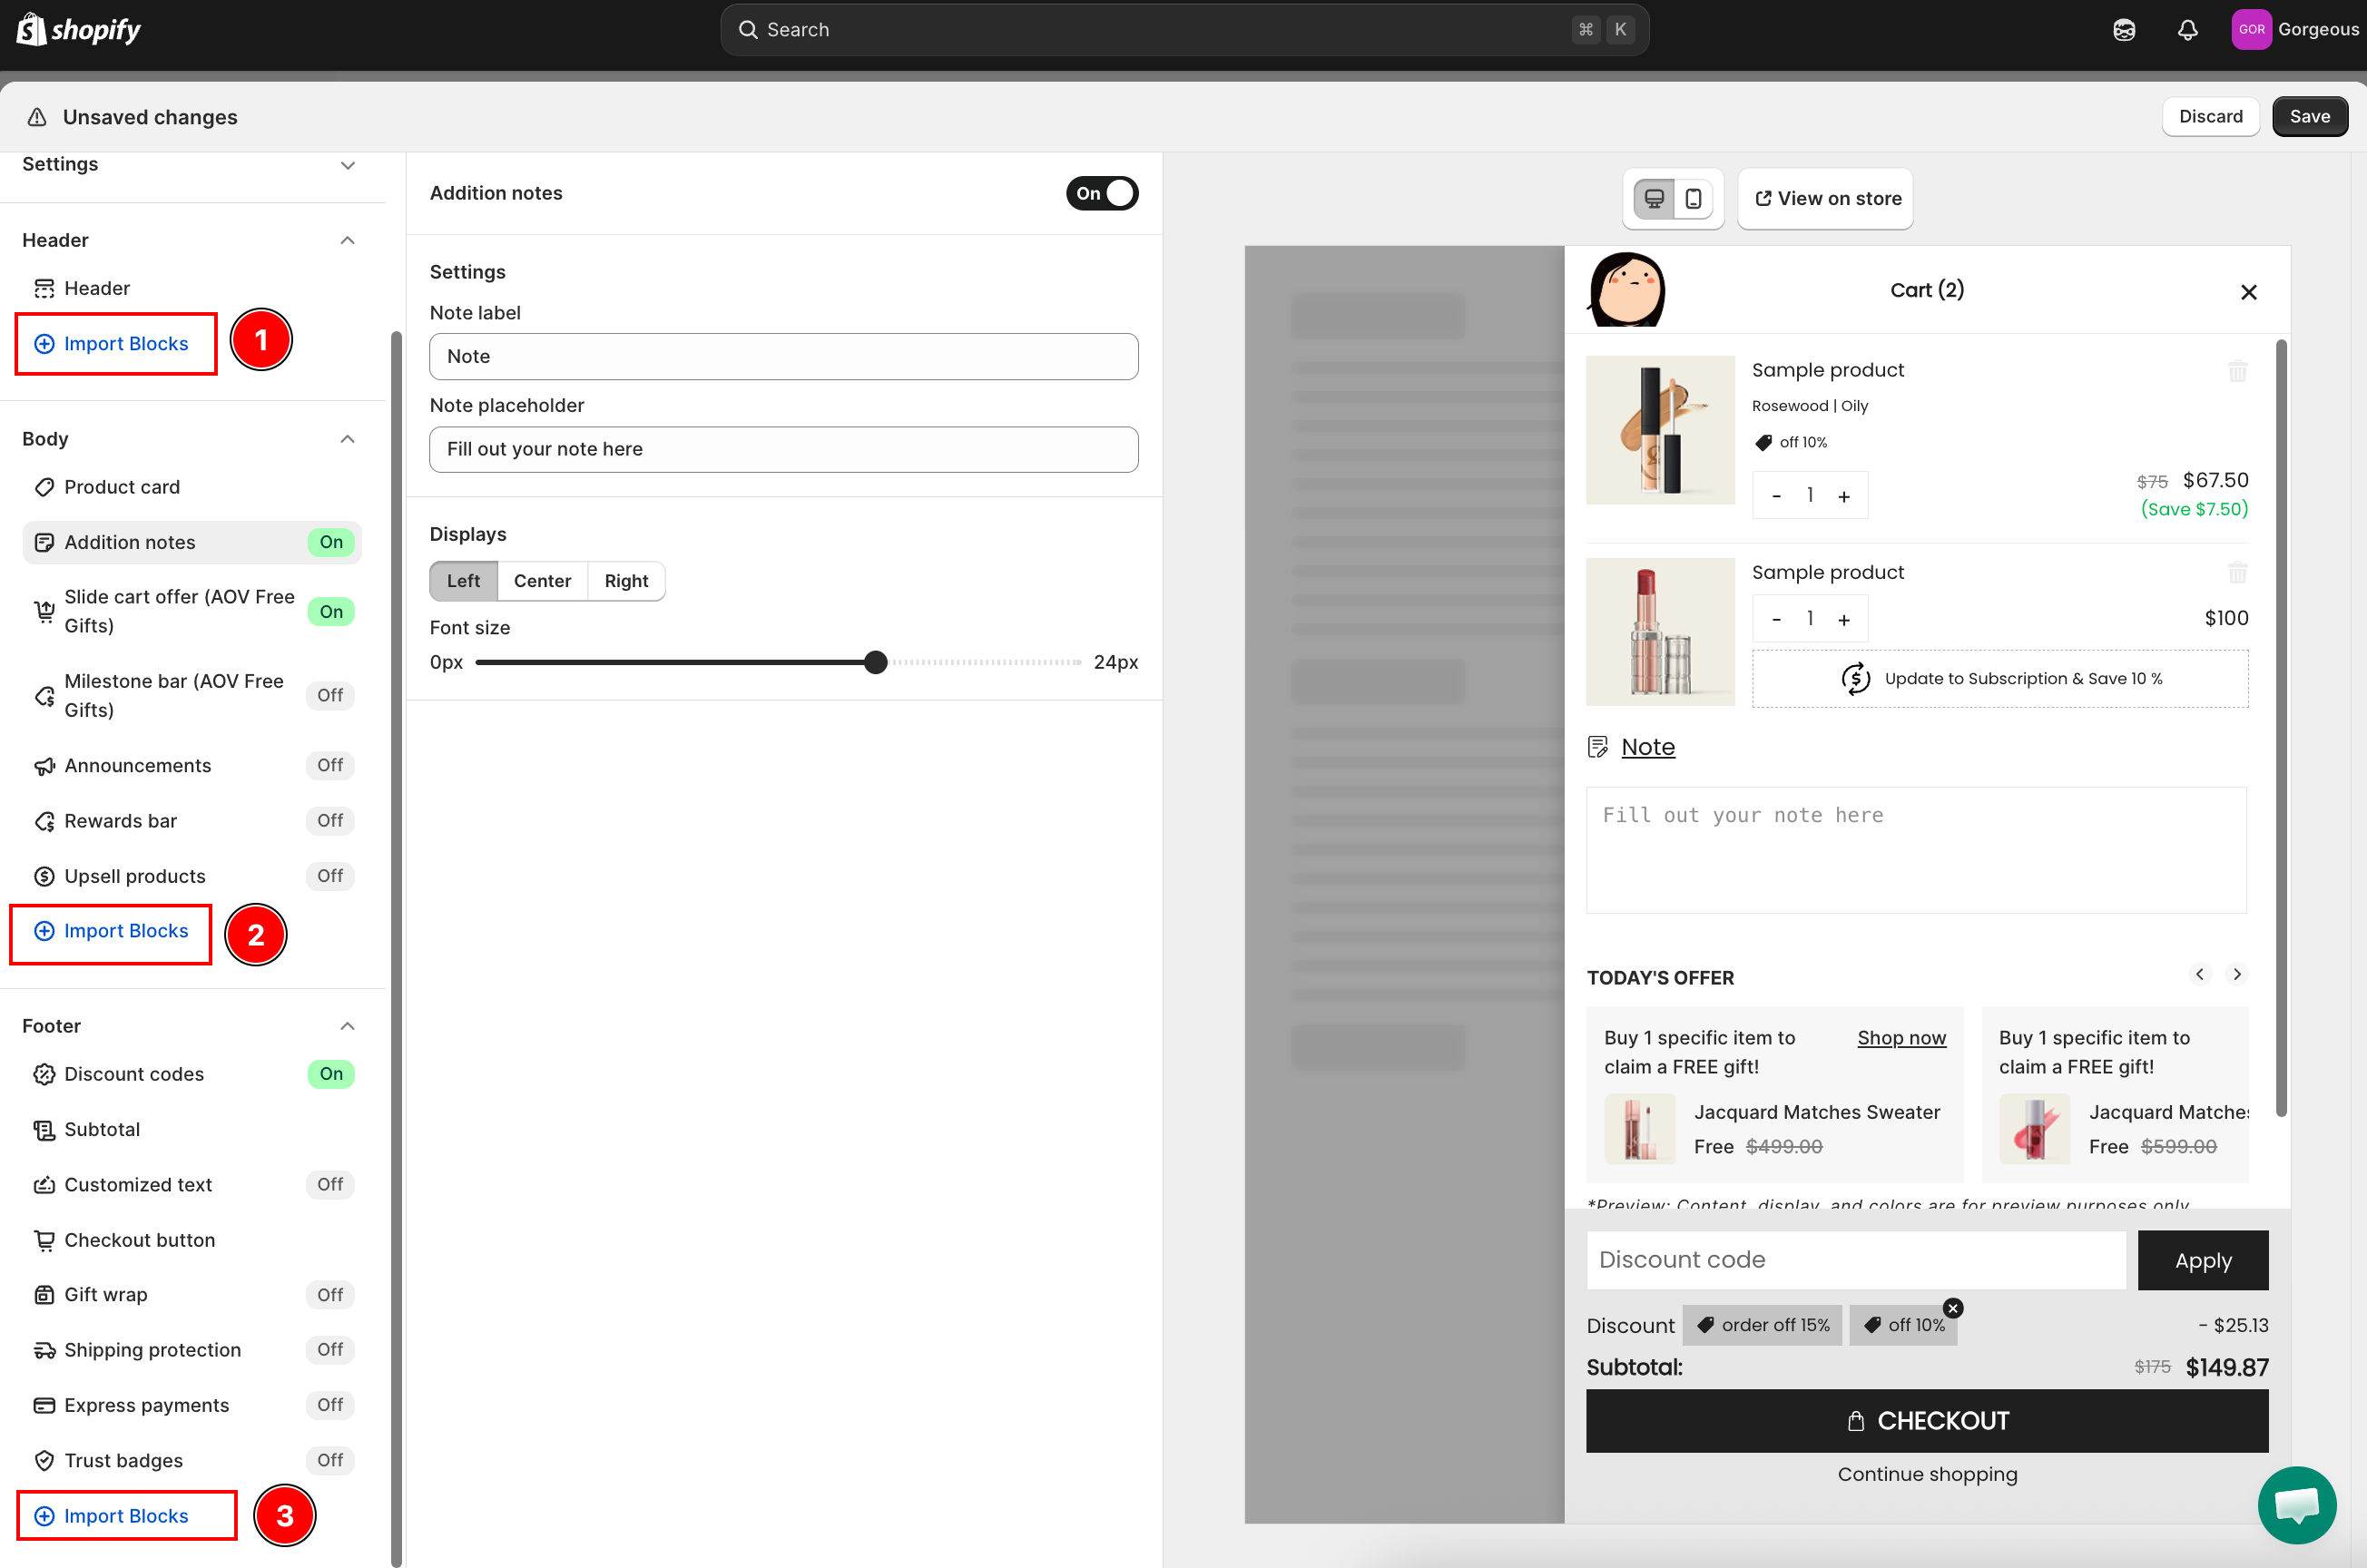
From the Cart Editor, expand a section in the left panel, then click Import Blocks. A modal opens with a Search blocks... field and the full block library.
Step 2: Find a Block
Use the Search blocks... field to filter by name, or scroll through the grid to browse all available blocks.
Step 3: Import
Click Import on a block card to add it to the section. The counter at the top updates (for example, 1 imported).
Step 4: Edit the Imported Block
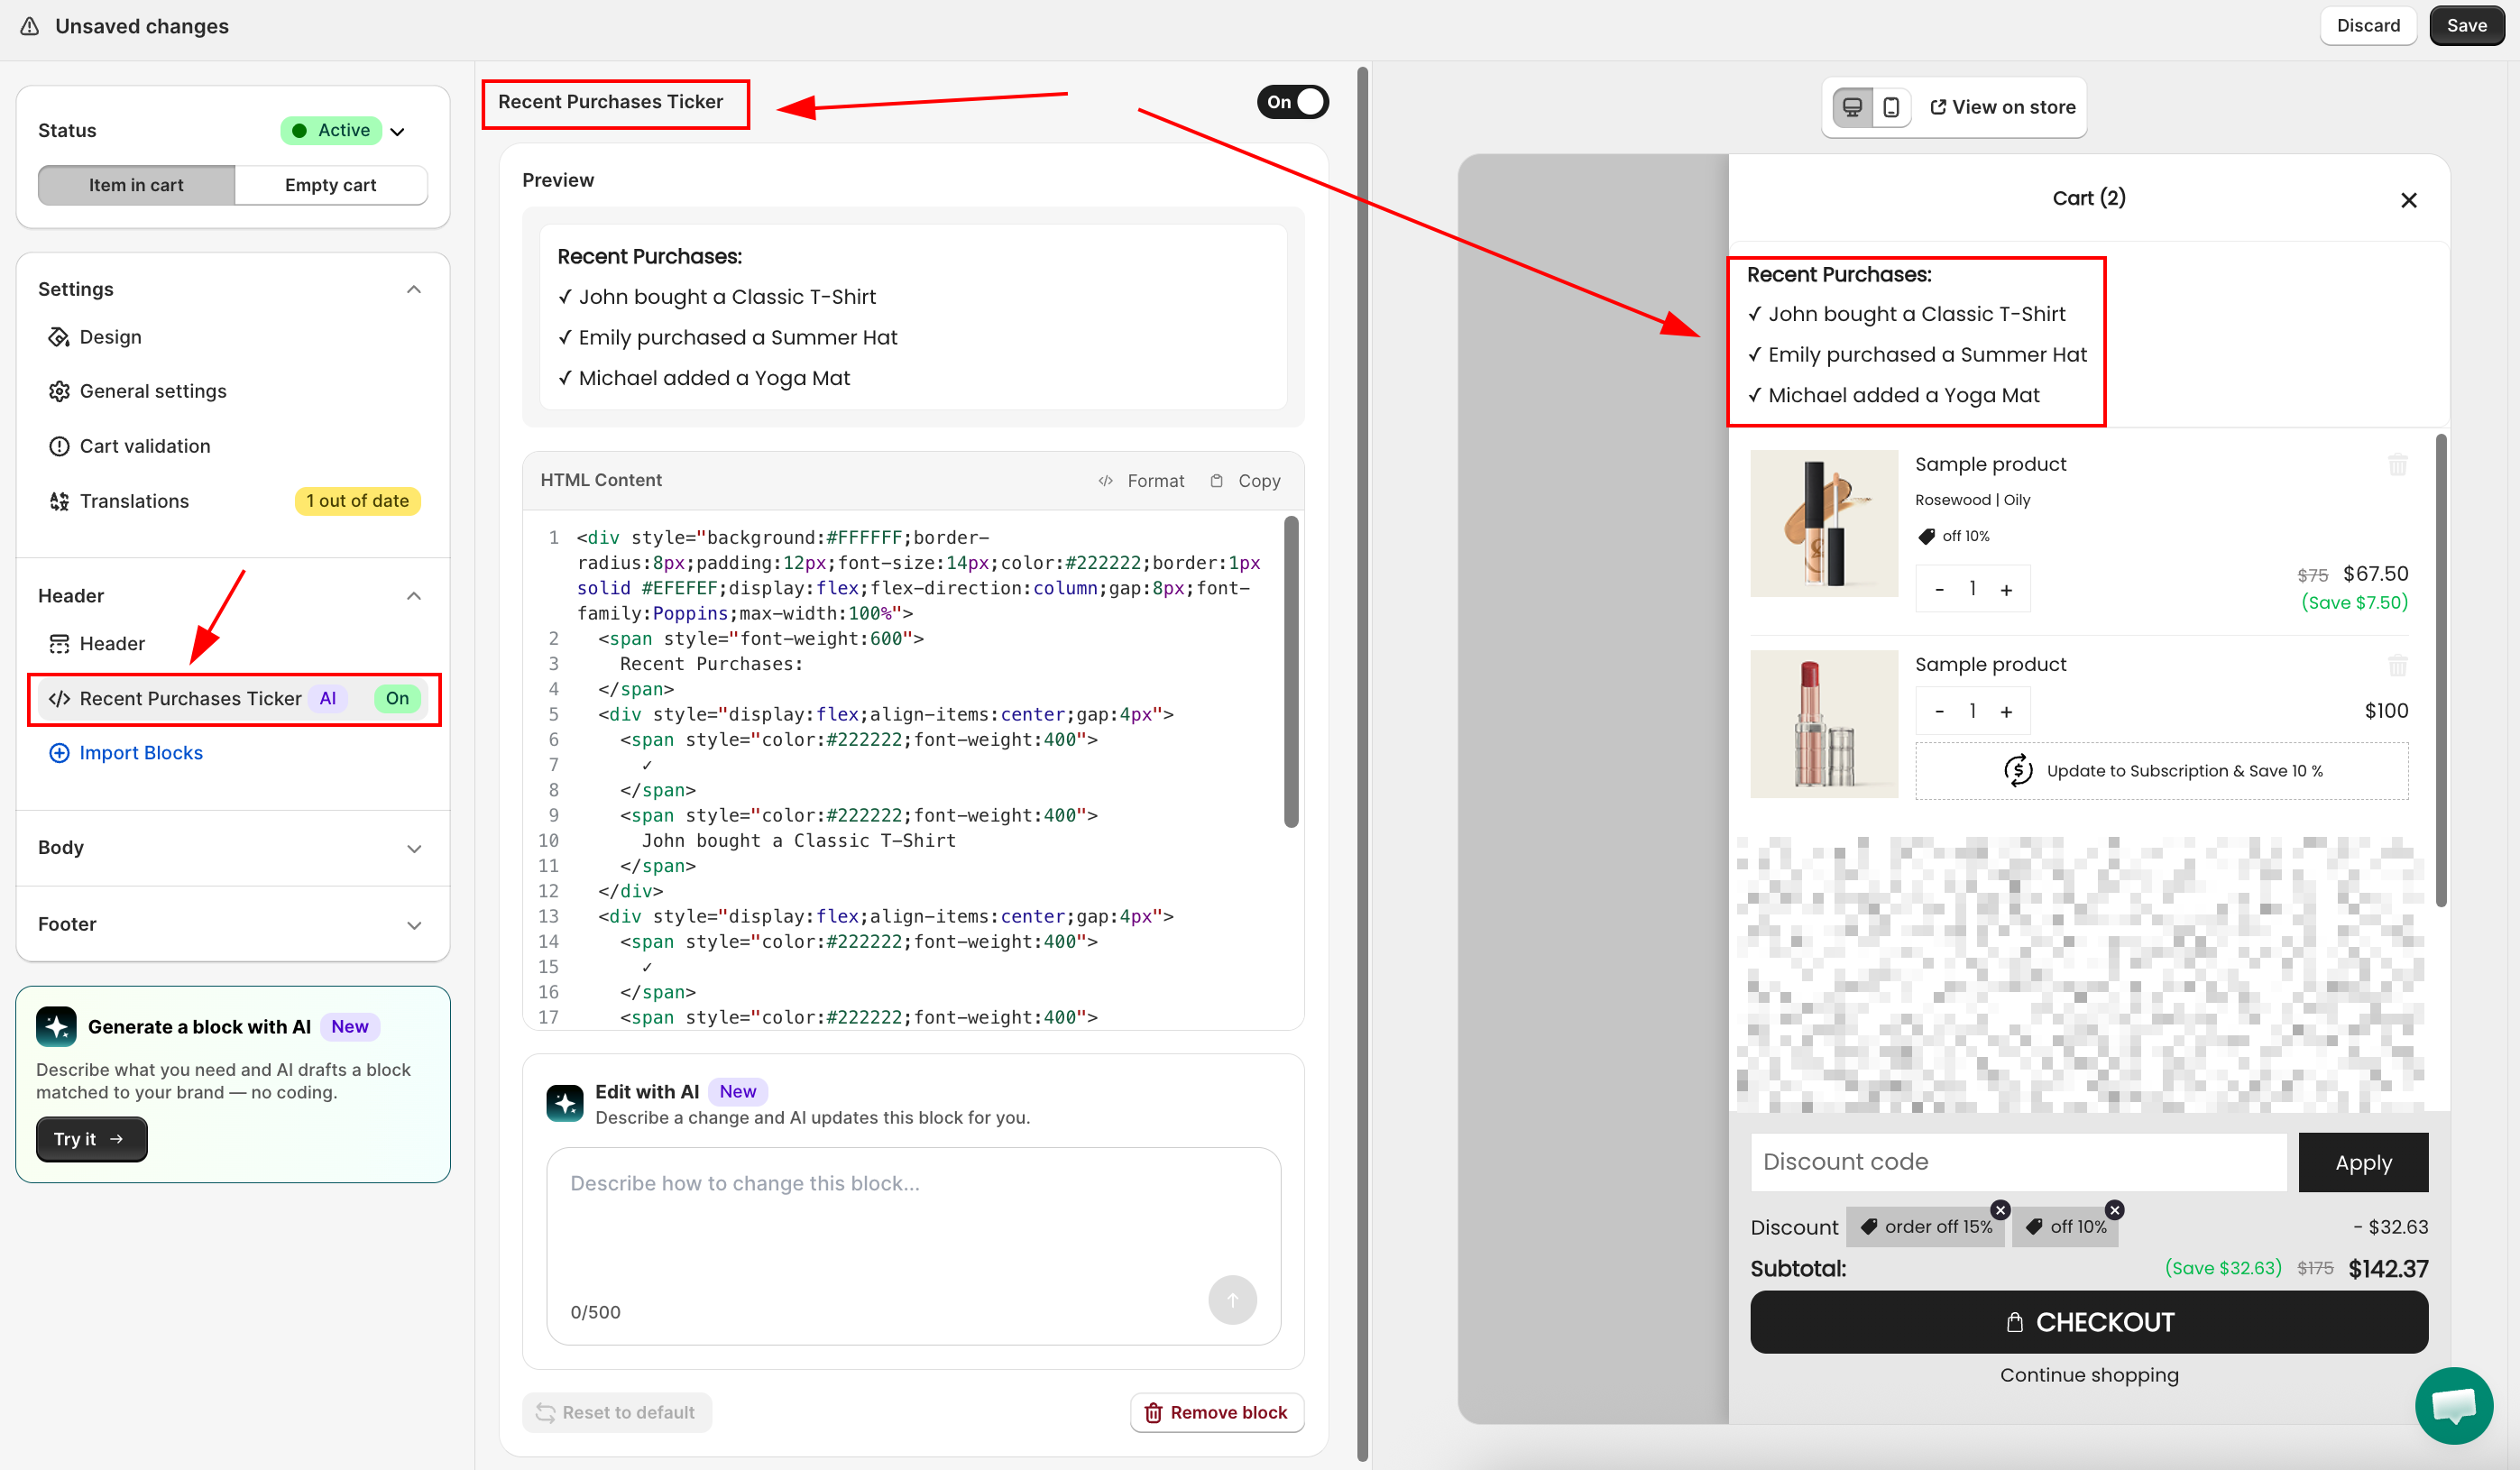
After importing, the block opens in the HTML editor. Adjust the HTML Content, check the Preview, and use the enable toggle to show or hide it.
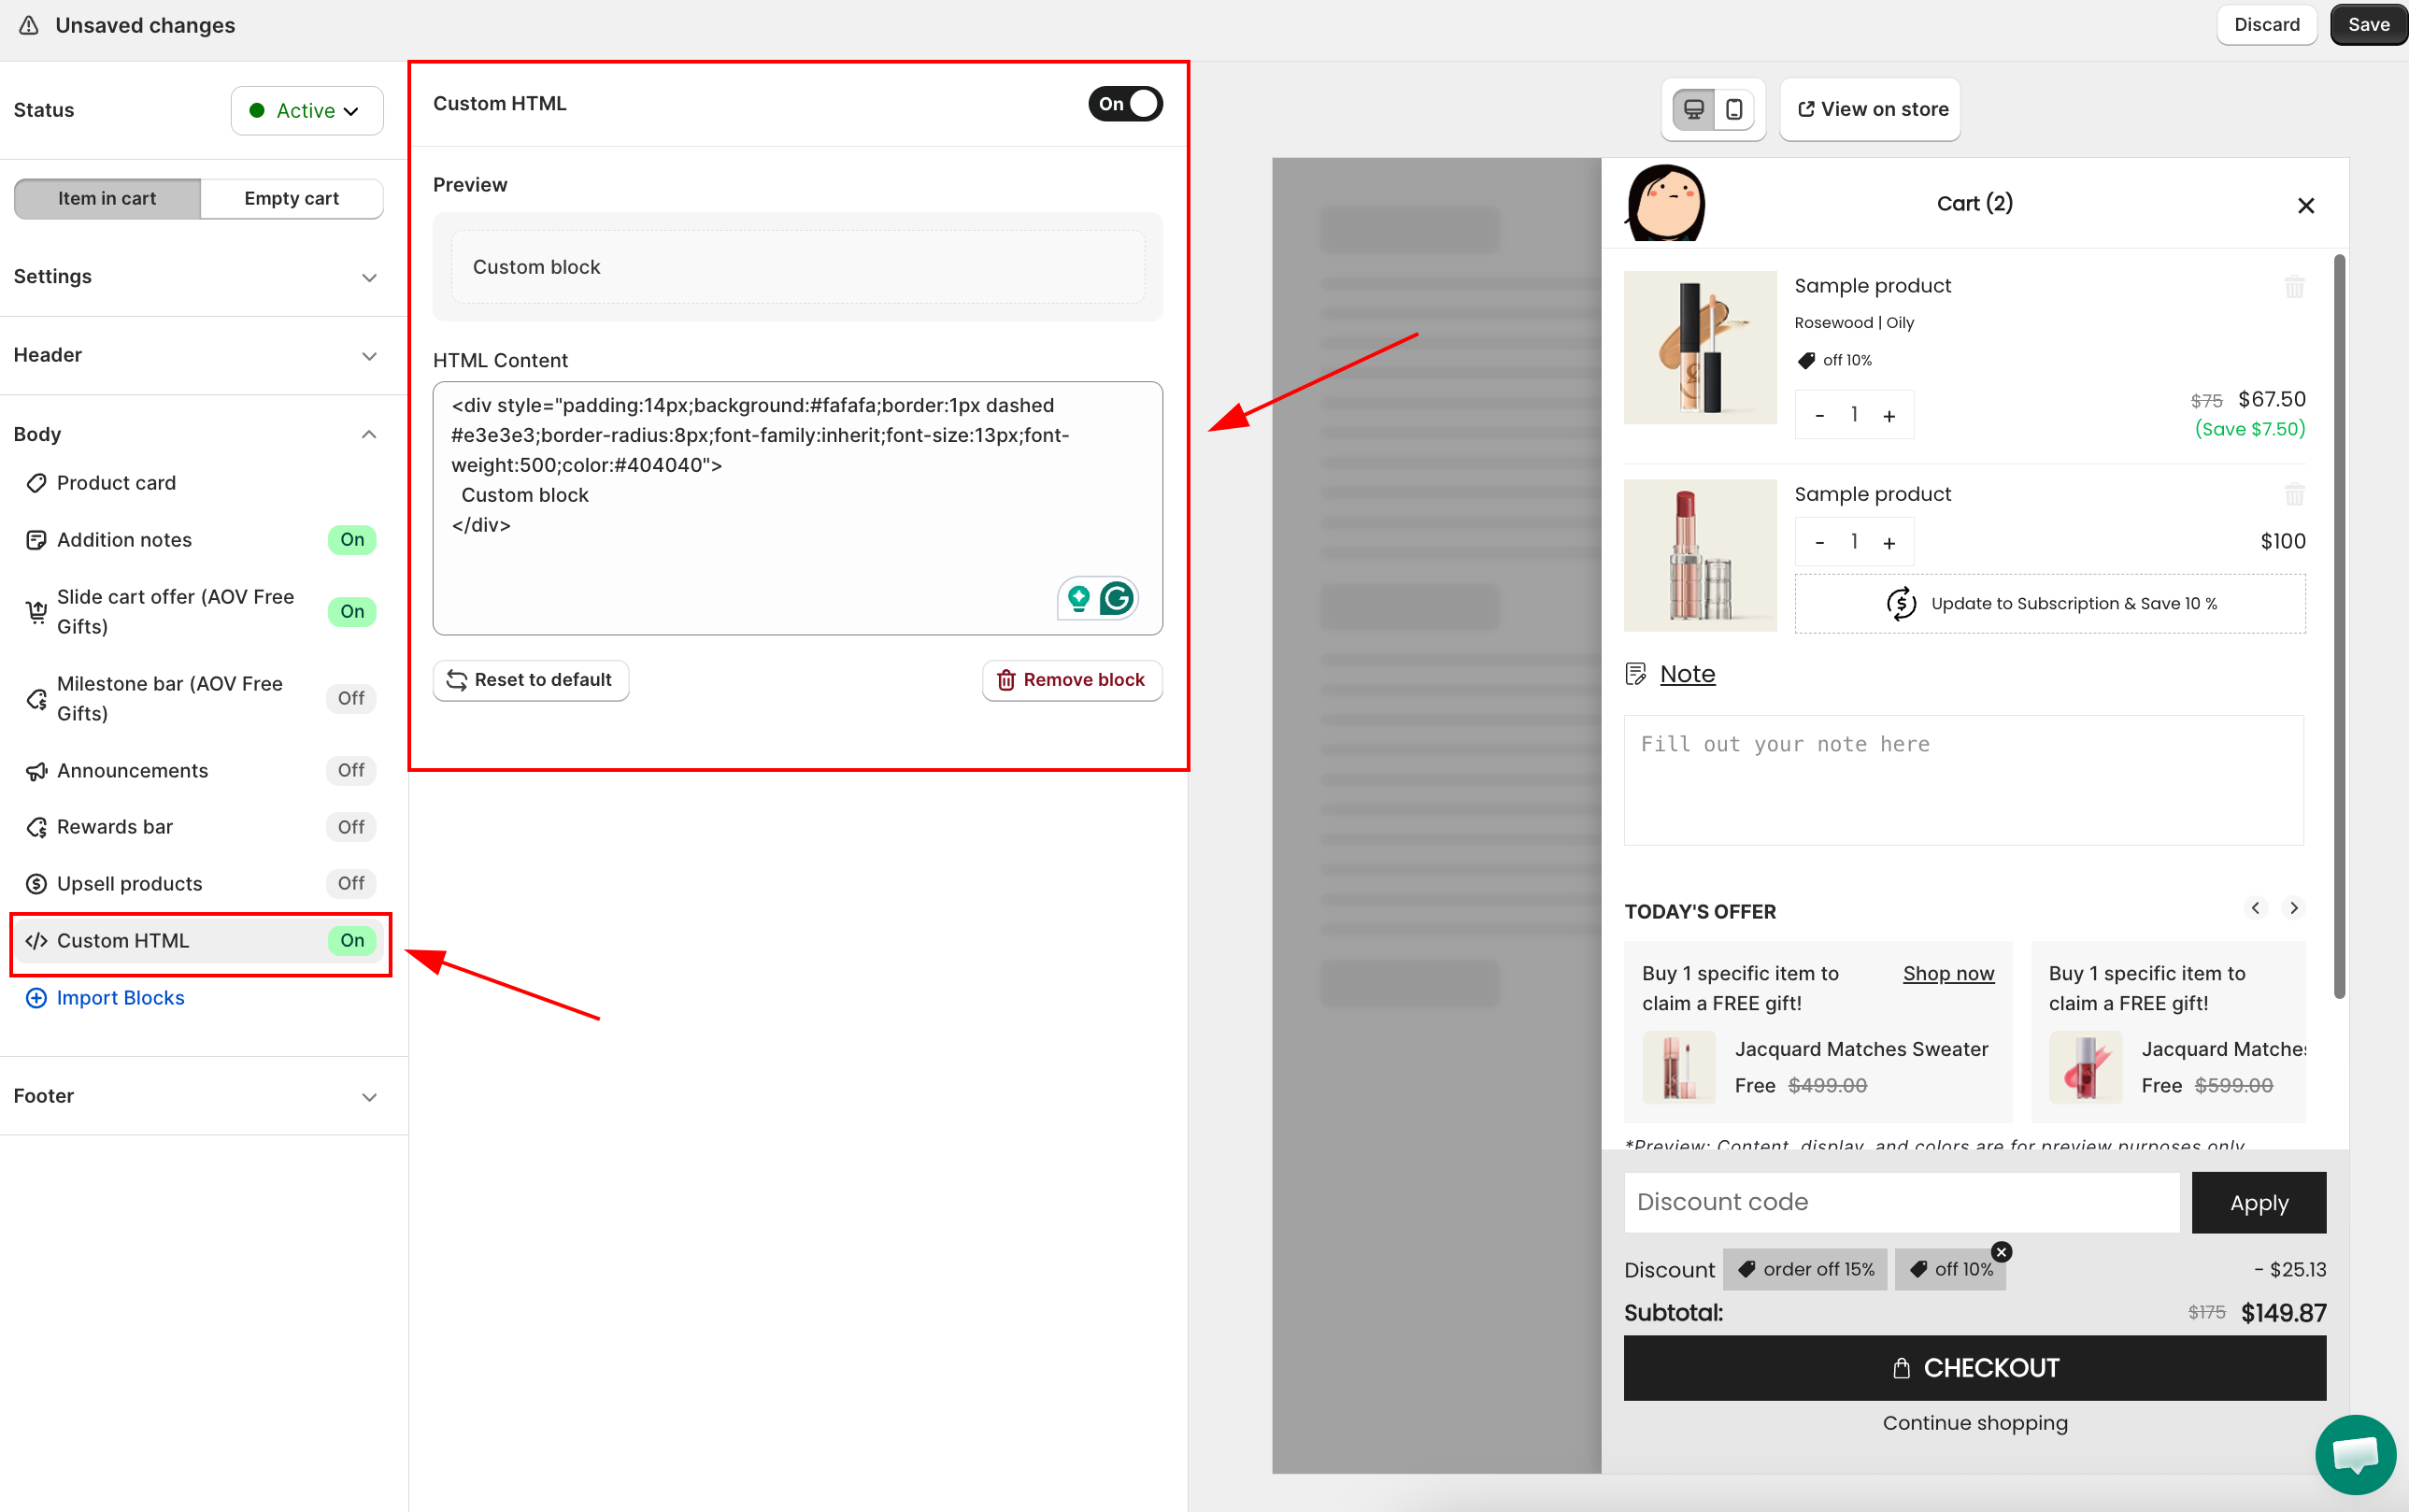
- Click Reset to default to restore the original imported HTML.
- Click Remove block to delete the block from the section.
Generate and Edit Blocks with AI
Instead of picking from the library, you can describe a block in plain words and let AI build it for you, matched to your cart's colors and fonts. There are two modes: Generate a brand-new block from a prompt, and Edit an existing block by describing a change. It works on all plans, and no coding is needed.
Generate a block
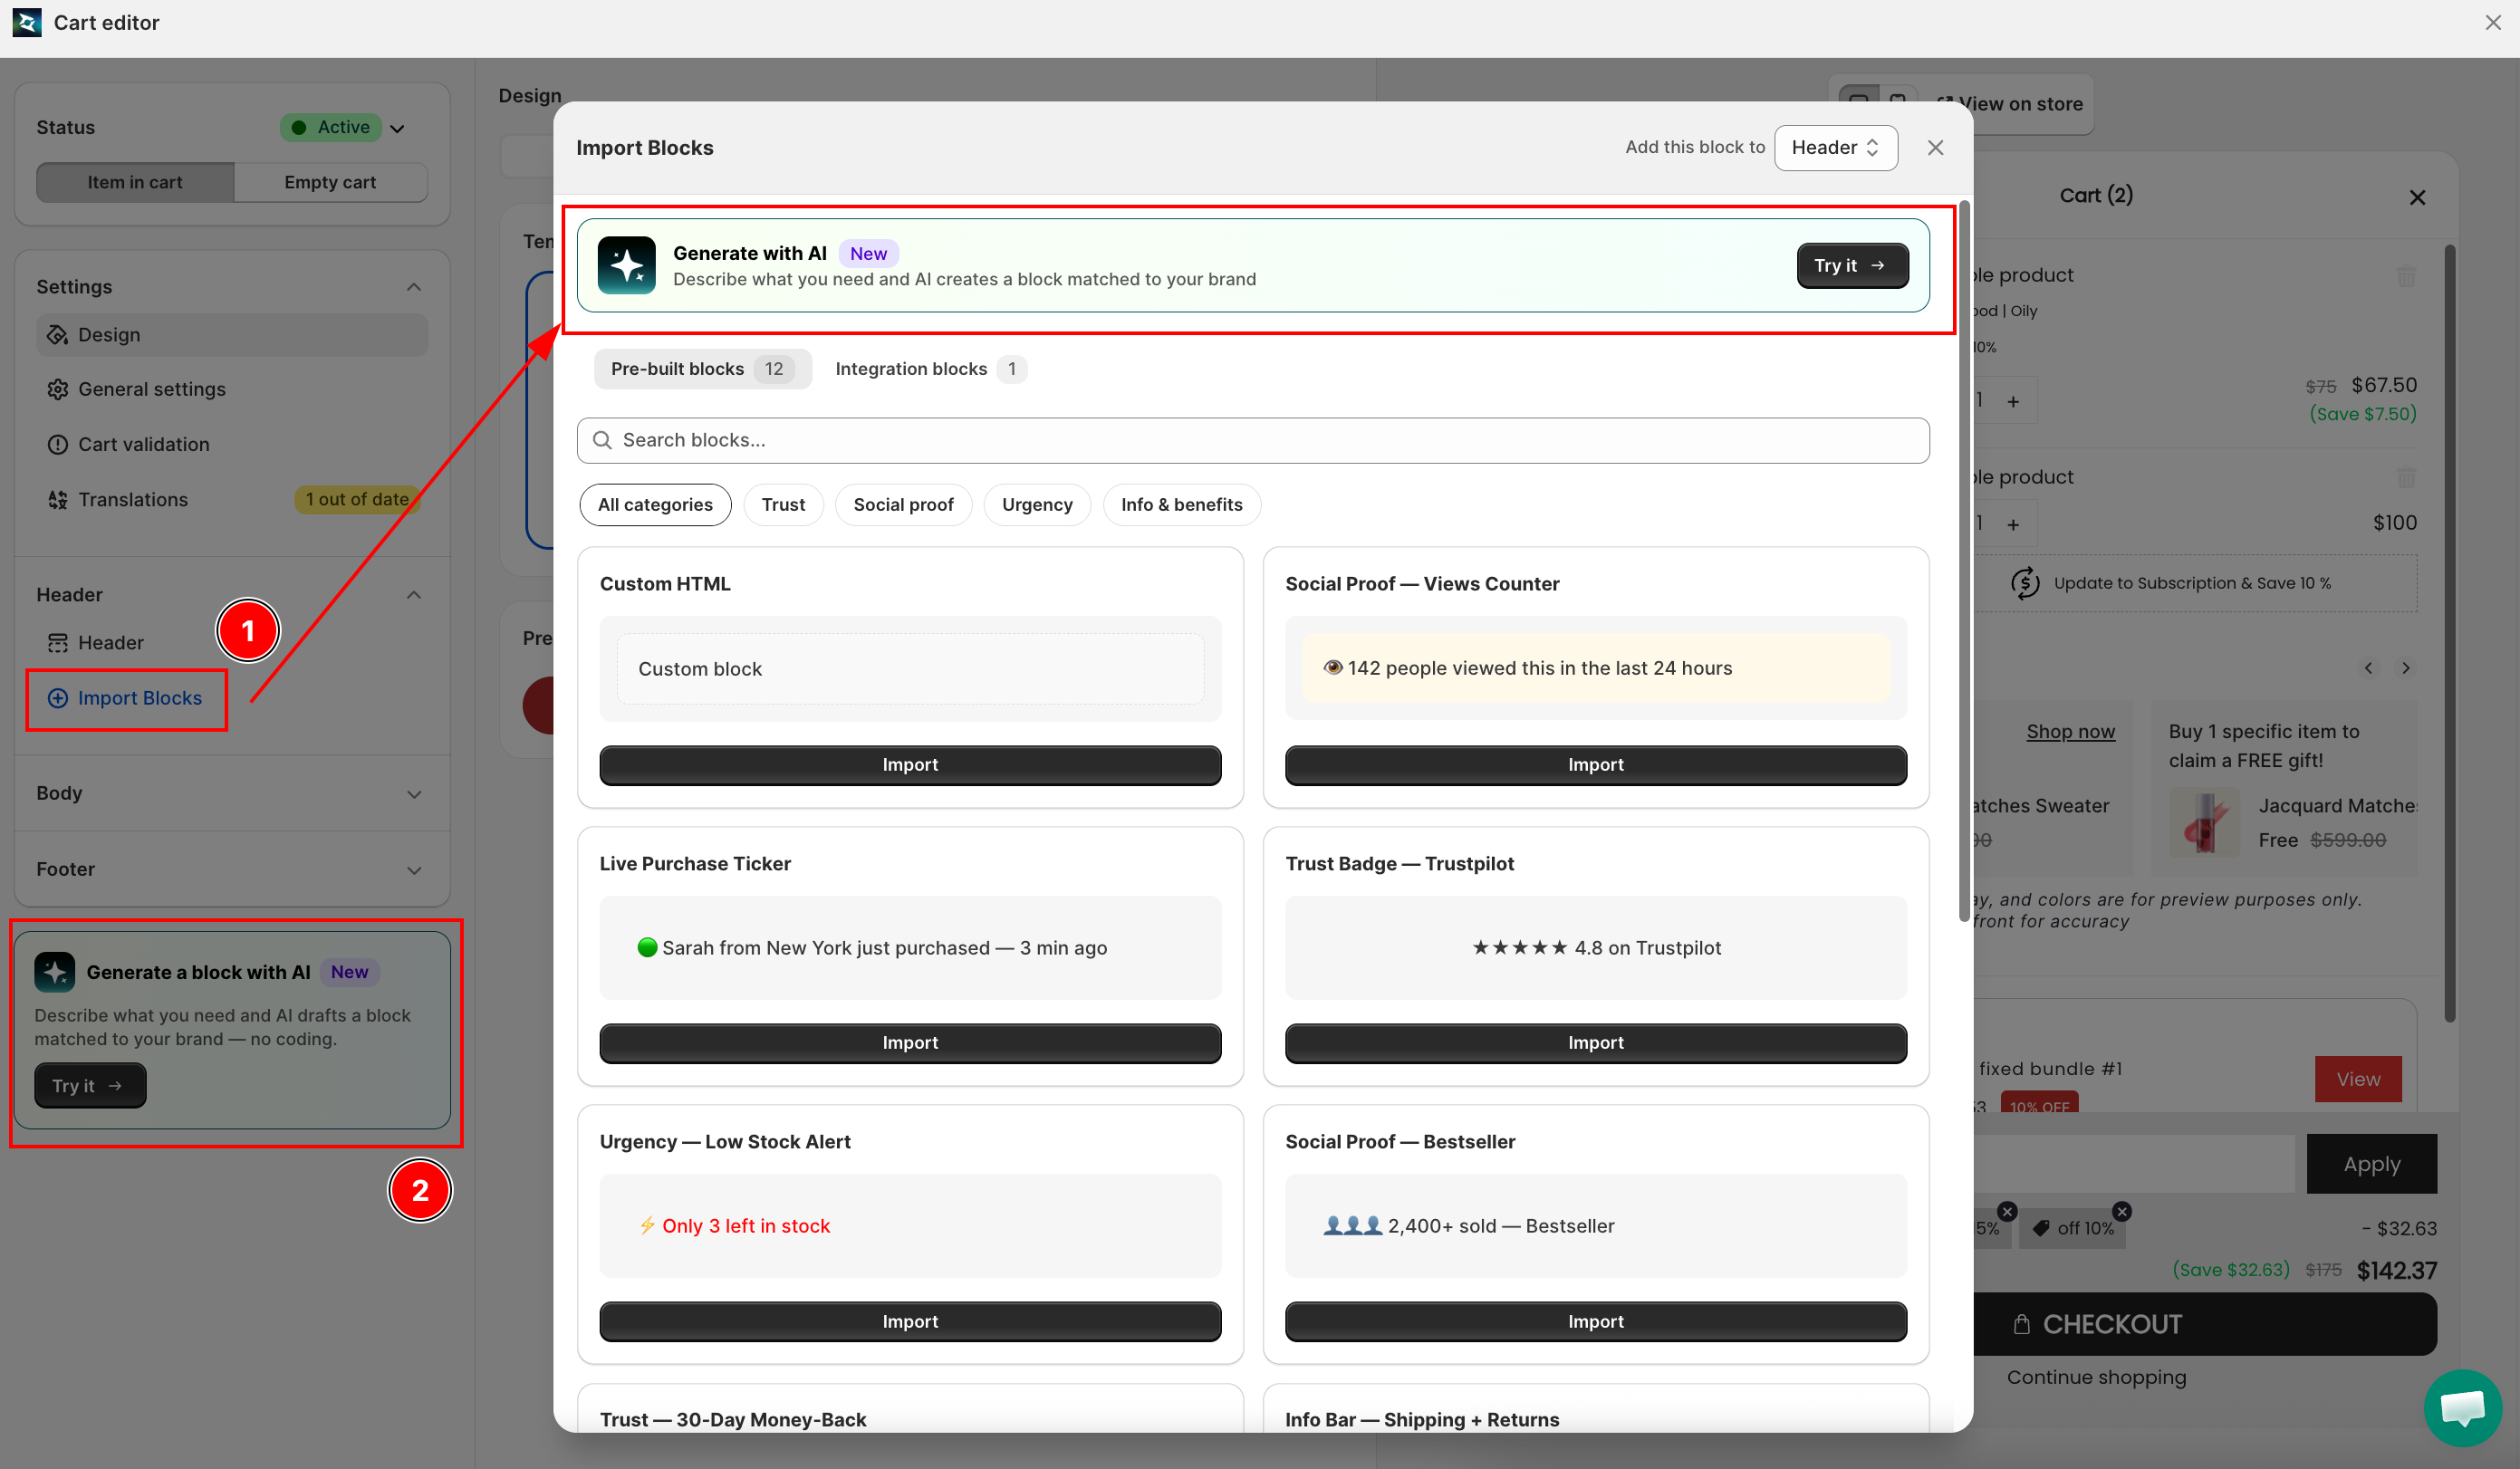
- In the Import Blocks area, open Generate with AI and click Try it.
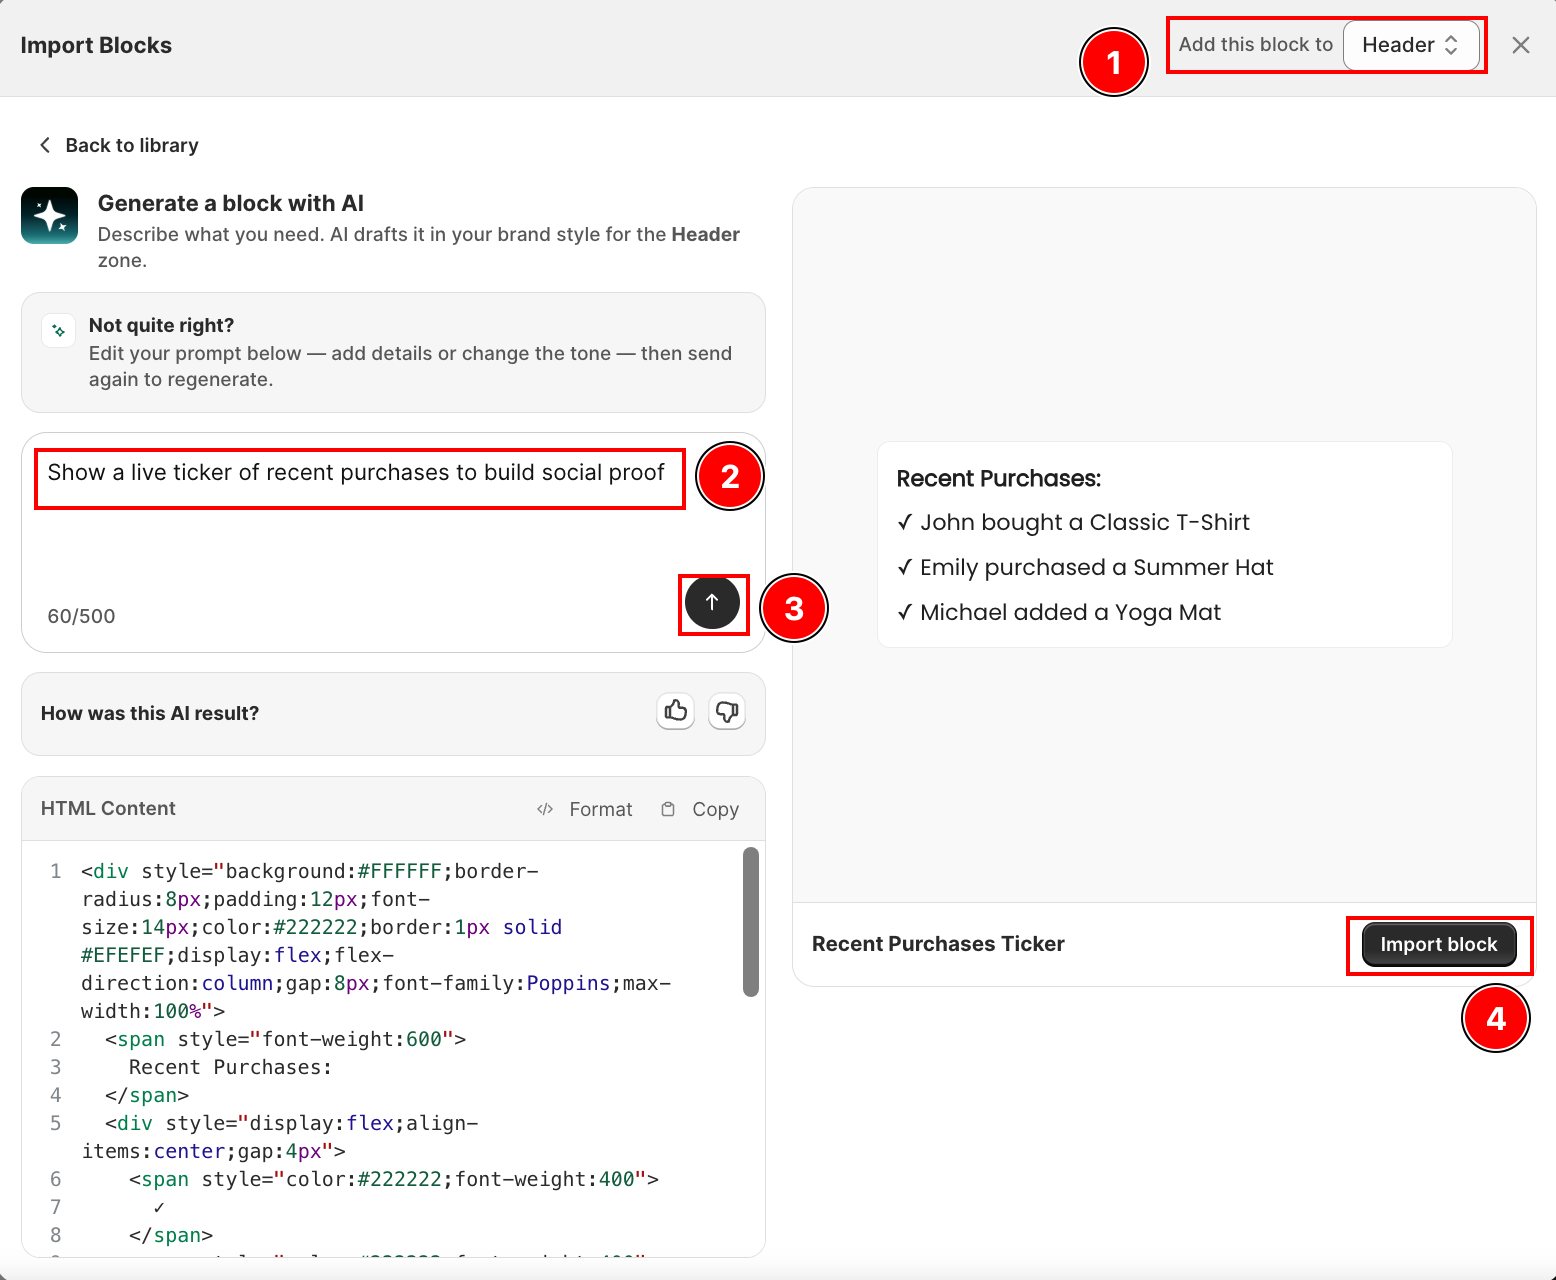
- Under Add this block to, choose where it goes: Header, Body, or Footer.
- Describe the block you want, then send it. For example, A free shipping bar that fills as the cart grows or Show a 5-star review badge with Trustpilot. You can also pick one of the Try one of these suggestions.
- AI drafts the block in your brand style and shows a Preview. If it is Not quite right?, send another prompt to refine it.
- Click Import block to add it to the section.
Edit a block with AI
- Click an imported block to open it.
- In the Edit with AI card, describe the change and send it. For example, change the background to yellow or add a checkmark icon.
- AI updates the block and refreshes the preview. Use Restore to before AI to undo the AI change.
How AI keeps blocks safe and on-brand
- Matched to your theme: AI reuses your cart's colors, fonts, and rounded corners, keeps the layout flat, and makes sure text stays readable, so the block looks native.
- Safety-filtered: the generated HTML is cleaned automatically. Scripts, event handlers, iframes, forms, and images from external sites are removed, so a block cannot break your storefront.
- Rate the result: after you generate or edit, give a thumbs up or thumbs down (with an optional reason) to help improve the AI.
AI badges
In the left panel, AI blocks are labeled so you can spot them:
- AI: the block was generated by AI.
- Edited by AI: a library block that you changed with AI.
Existing blocks and your theme are not affected, and on the storefront an AI block renders exactly like any other HTML block, so shoppers see no difference.
Make a Block React to the Cart (Logic)
What Is It?
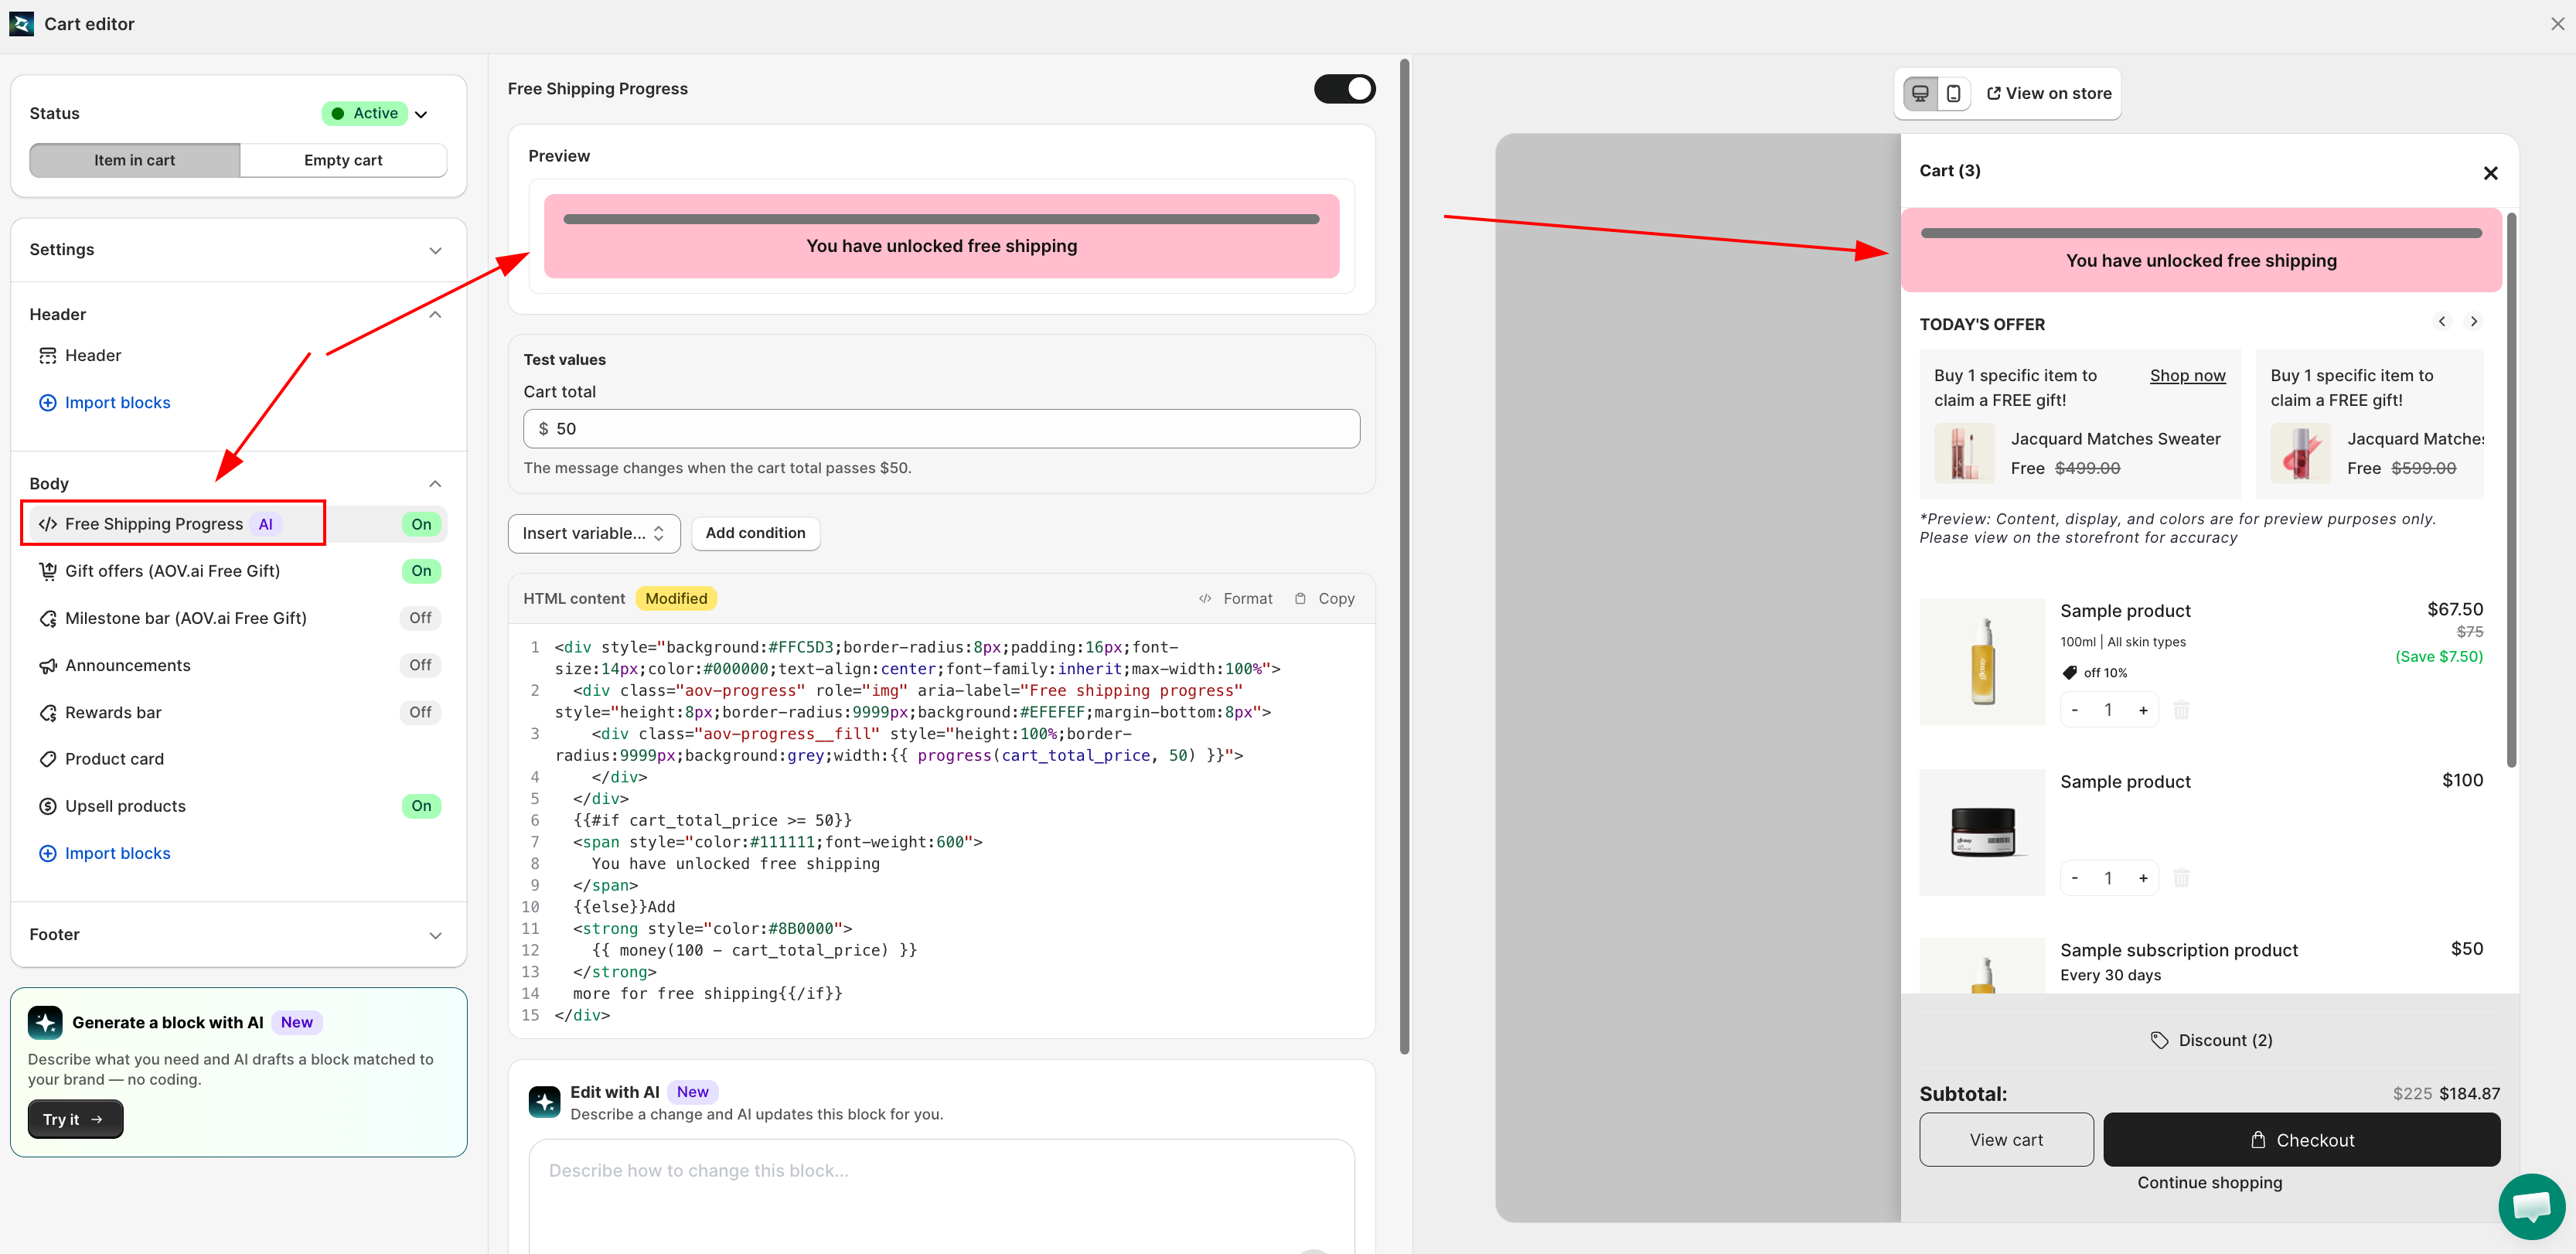
A block's HTML can include logic that reacts to the real cart, so it updates live the moment a shopper adds or removes an item, with no page reload. For example, a message that switches from "You're $9.00 away from free shipping" to "You unlocked free shipping!" the instant the cart total crosses your threshold.
This works in any block's HTML editor: the Custom HTML slot, a block you imported from the library, or a block AI generated for you. It is not available for Integration blocks, since their content is served by the connected app instead of your own HTML.
Available Cart Variables
A block can react to four cart values:
- Cart total, the order total after discounts
- Subtotal, the order total before discounts
- Discount, the total discount amount applied
- Item count, the number of items in the cart
Only these four are available. A block cannot react to customer details, specific products, or order history.
Add Logic with AI
The fastest way is to describe the dynamic behavior right in your prompt when you Generate or Edit a block with AI (see above). For example: A progress bar that fills up as the cart approaches $50 for free shipping, or Show one message under $75 and a different message once the cart reaches $75.
Add Logic Manually
You can also build or adjust the logic yourself in the HTML editor:
- Open a block's HTML editor: import a block, open the Custom HTML slot, or click an existing block.
- Click Insert variable and choose one of the four cart values. It's inserted into the HTML at your cursor.
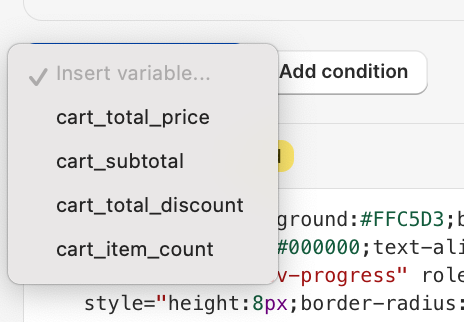
- Click Add condition to insert an if/then/else snippet, then edit the variable, the threshold number, and the message text to fit what you want.
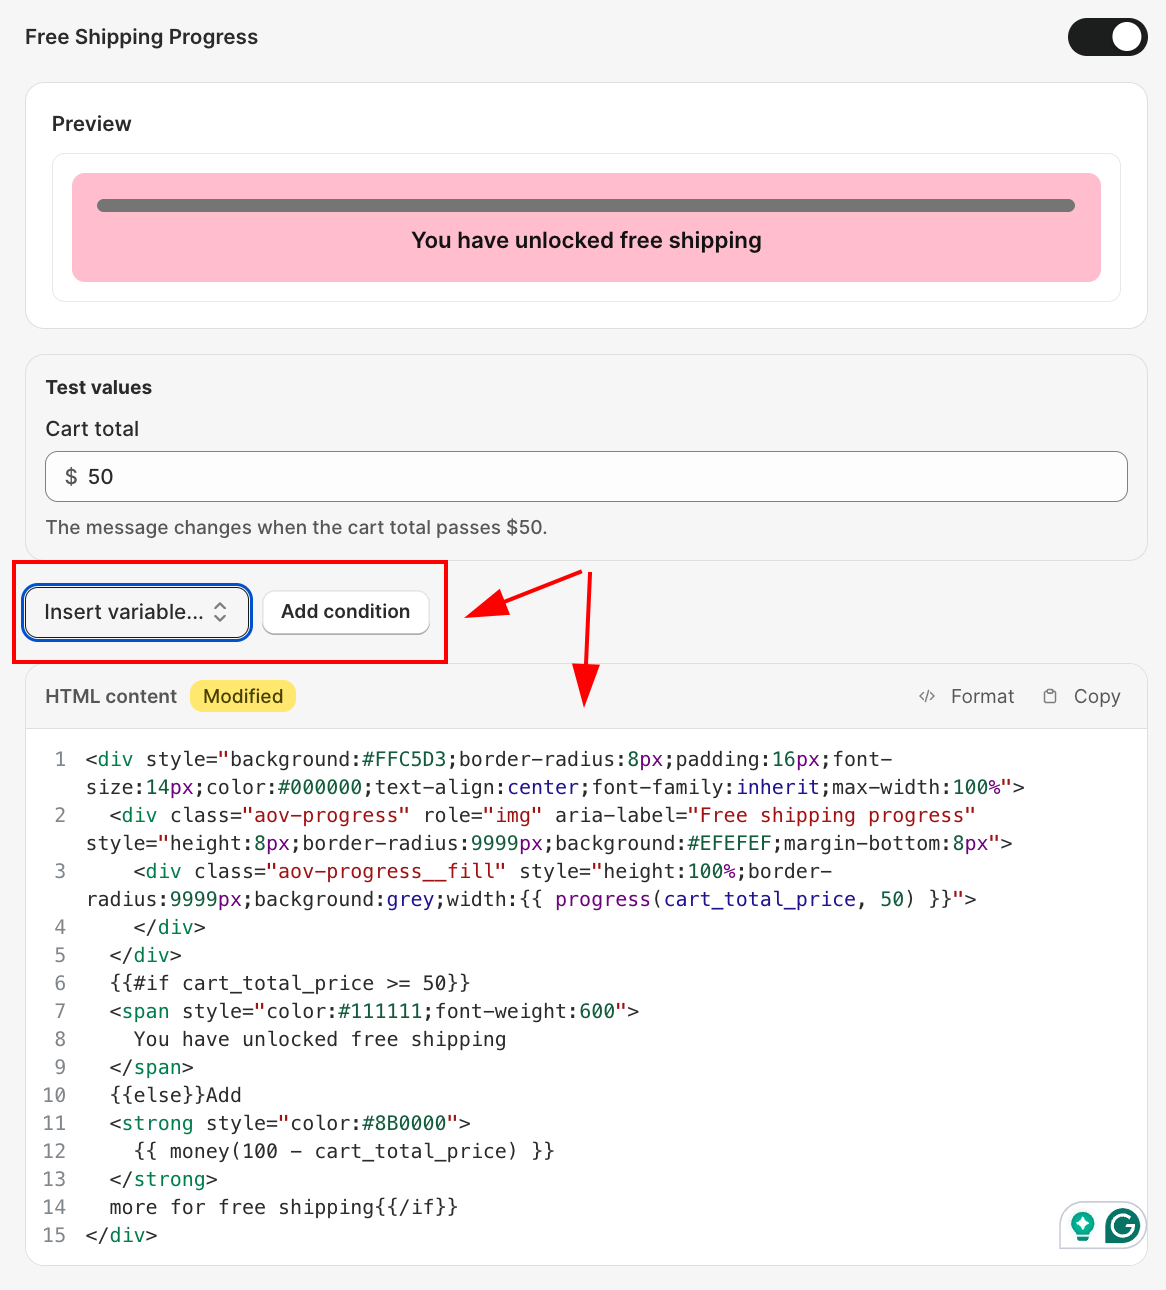
- To show a value as a price, wrap it in
money(...). For example,money(50 - cart_total_price)prints the remaining amount as a formatted price, like $9.00 (or the shopper's own currency). - Use the Test values fields above the code editor to type in sample cart numbers and preview how the block behaves before it goes live.
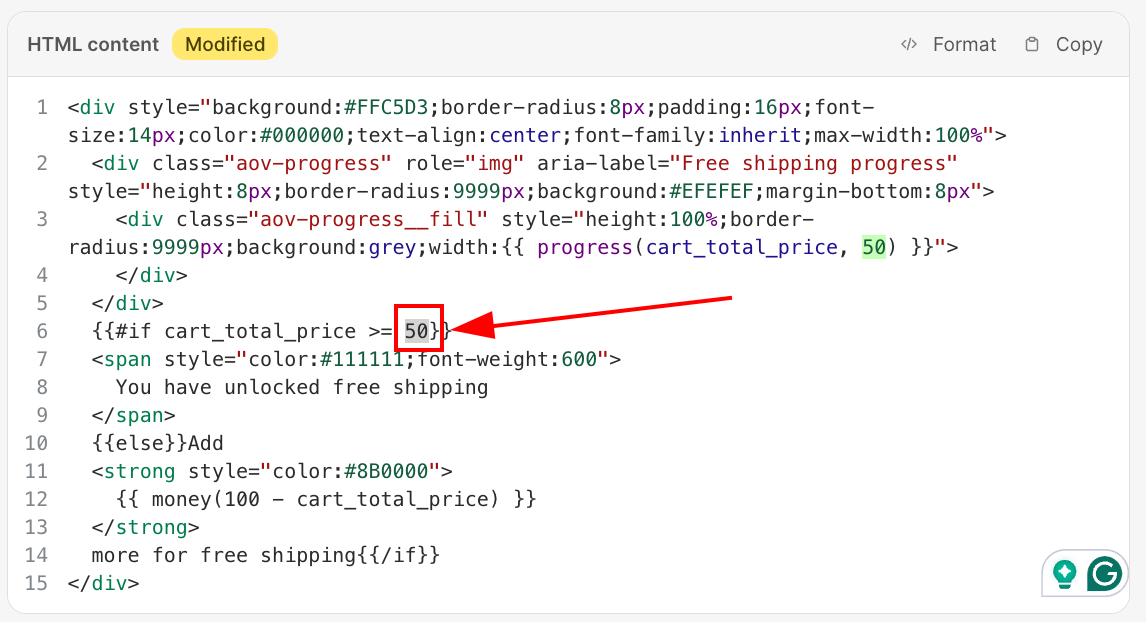
For example, the block above hits free shipping at $50: the number appears twice, once inside progress(cart_total_price, 50) and once inside {{#if cart_total_price >= 50}}. To change the threshold to $75, replace both 50s with 75 (and update the 100 - cart_total_price in the money(...) call if it references the same amount).
A finished logic block updates live on the storefront, matching what you see in Preview:
Integration Blocks
Besides the pre-built HTML blocks above, the Import Blocks modal has a second tab: Integration blocks. These blocks are not static HTML you edit yourself. They mount a live widget from a 3rd-party app you have installed, and that app fills in the real content on your storefront.
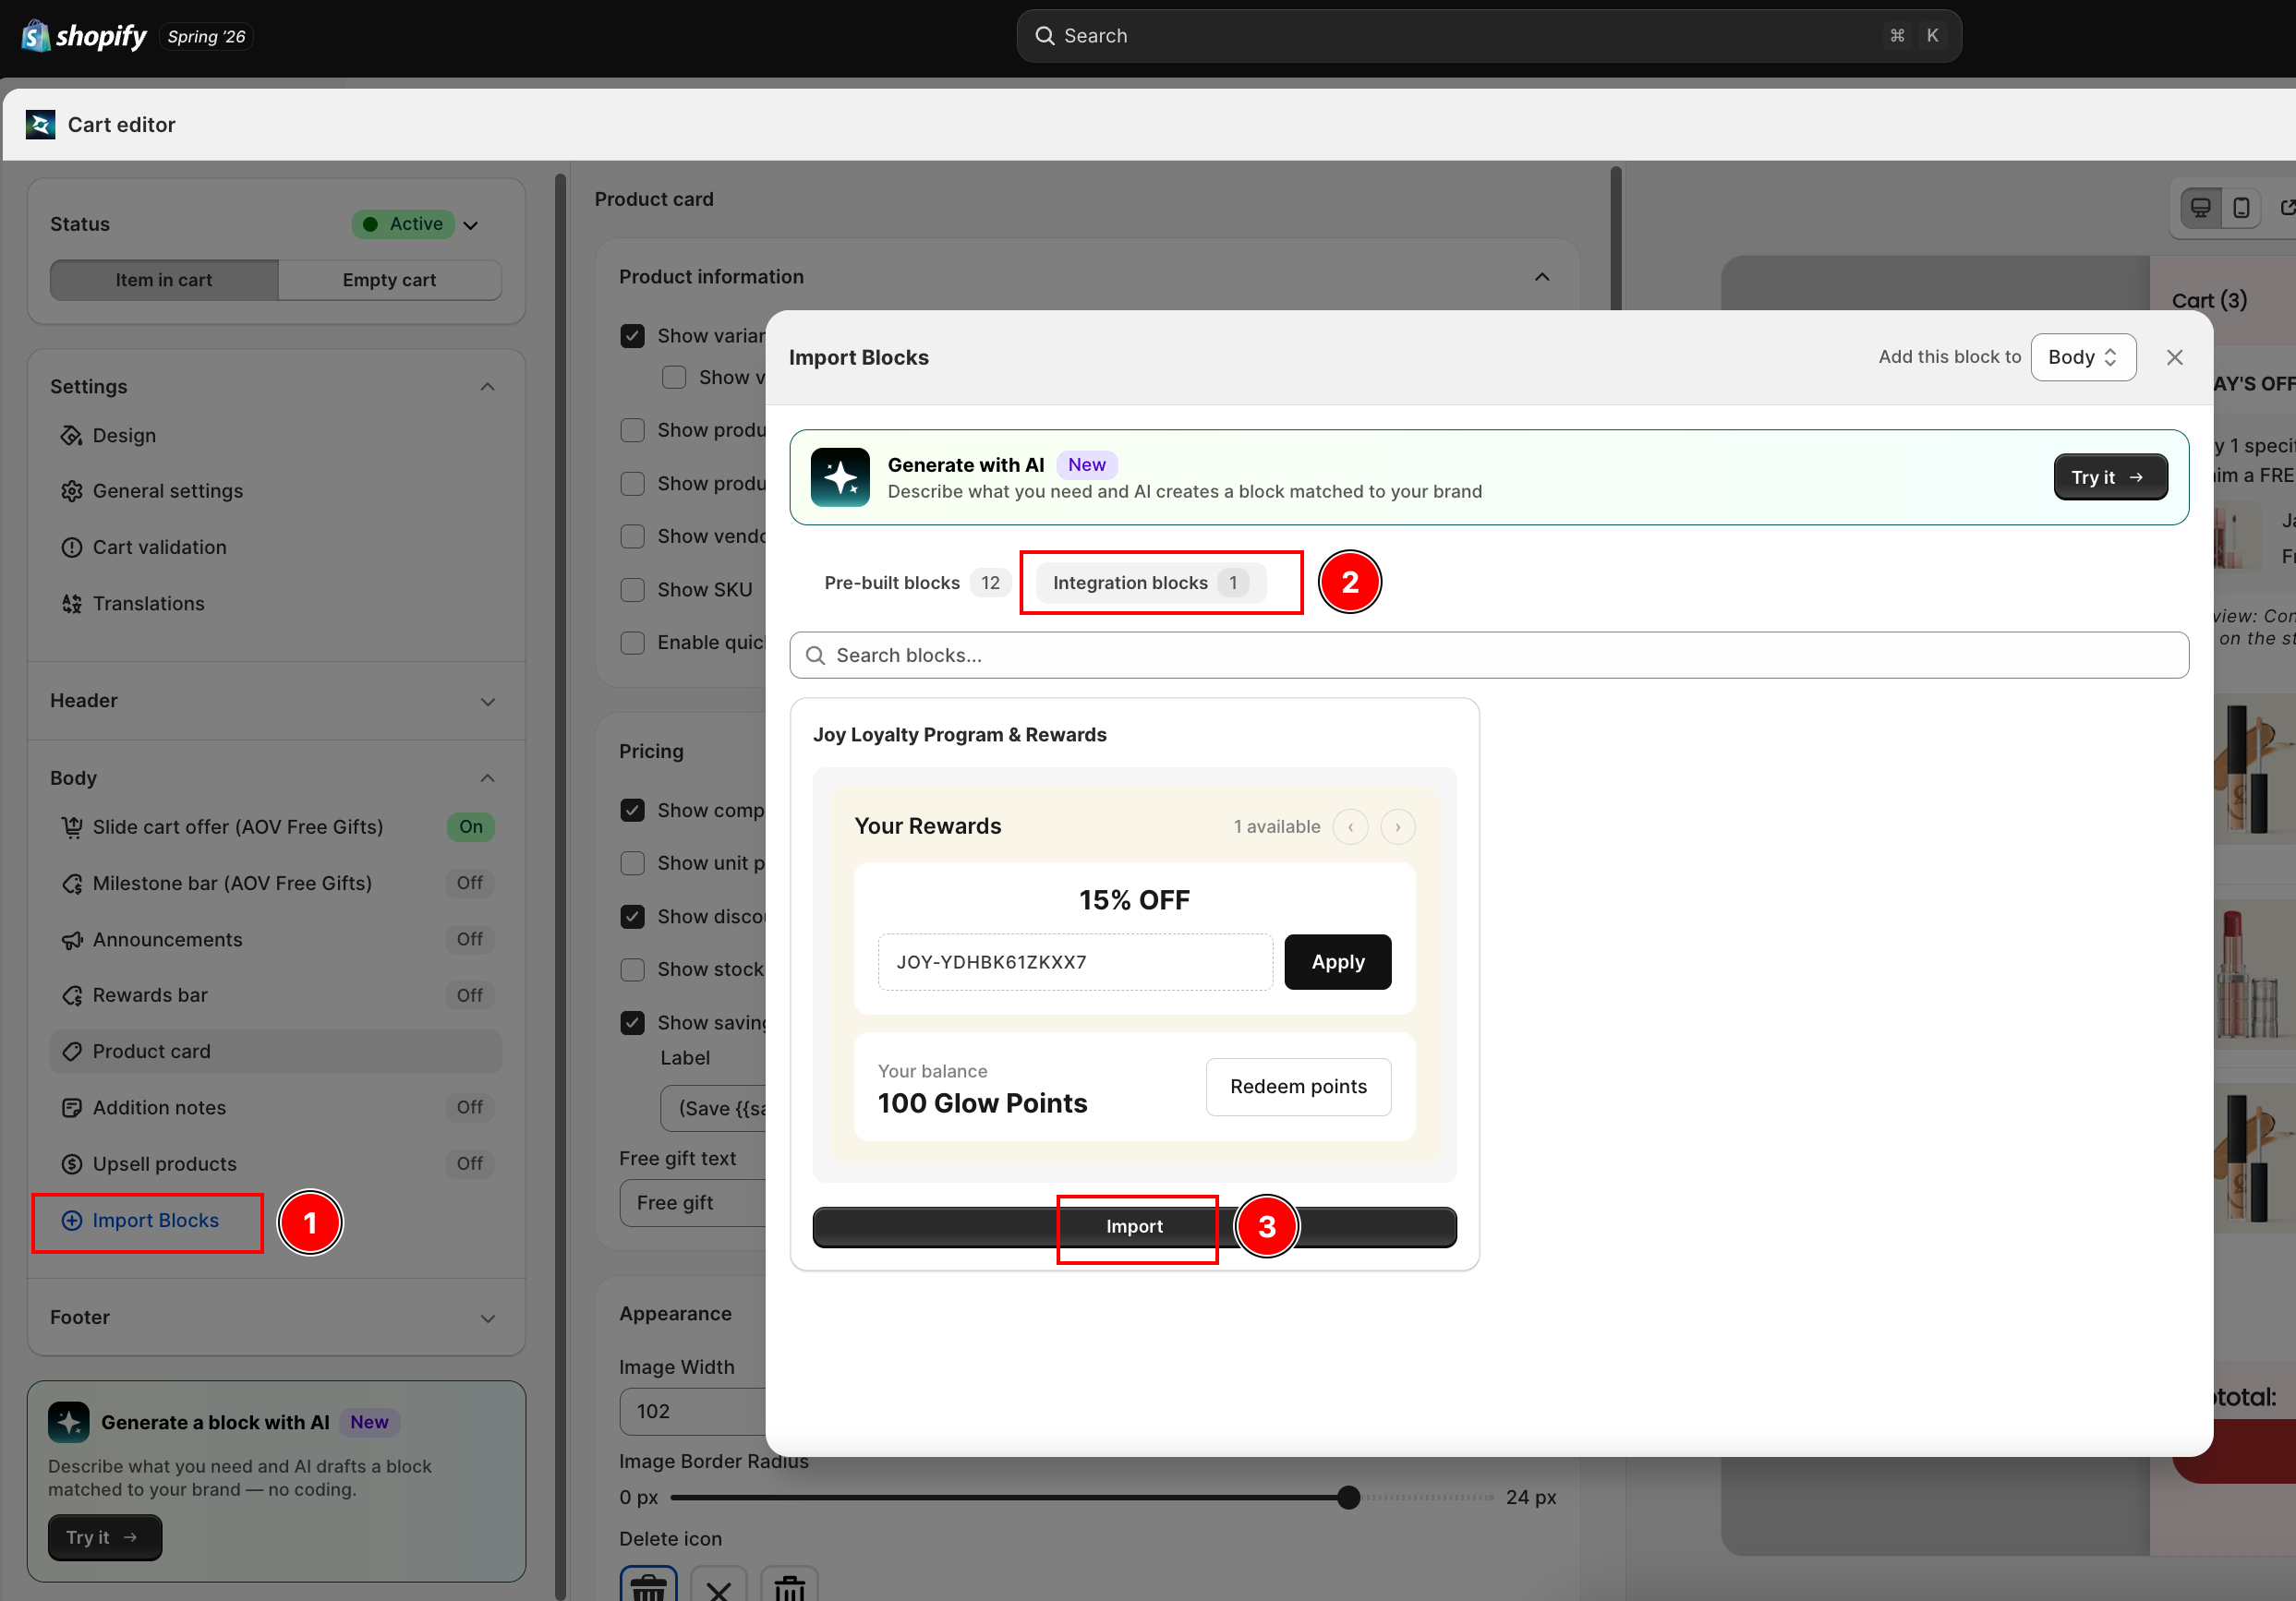
Currently, one integration block is available:
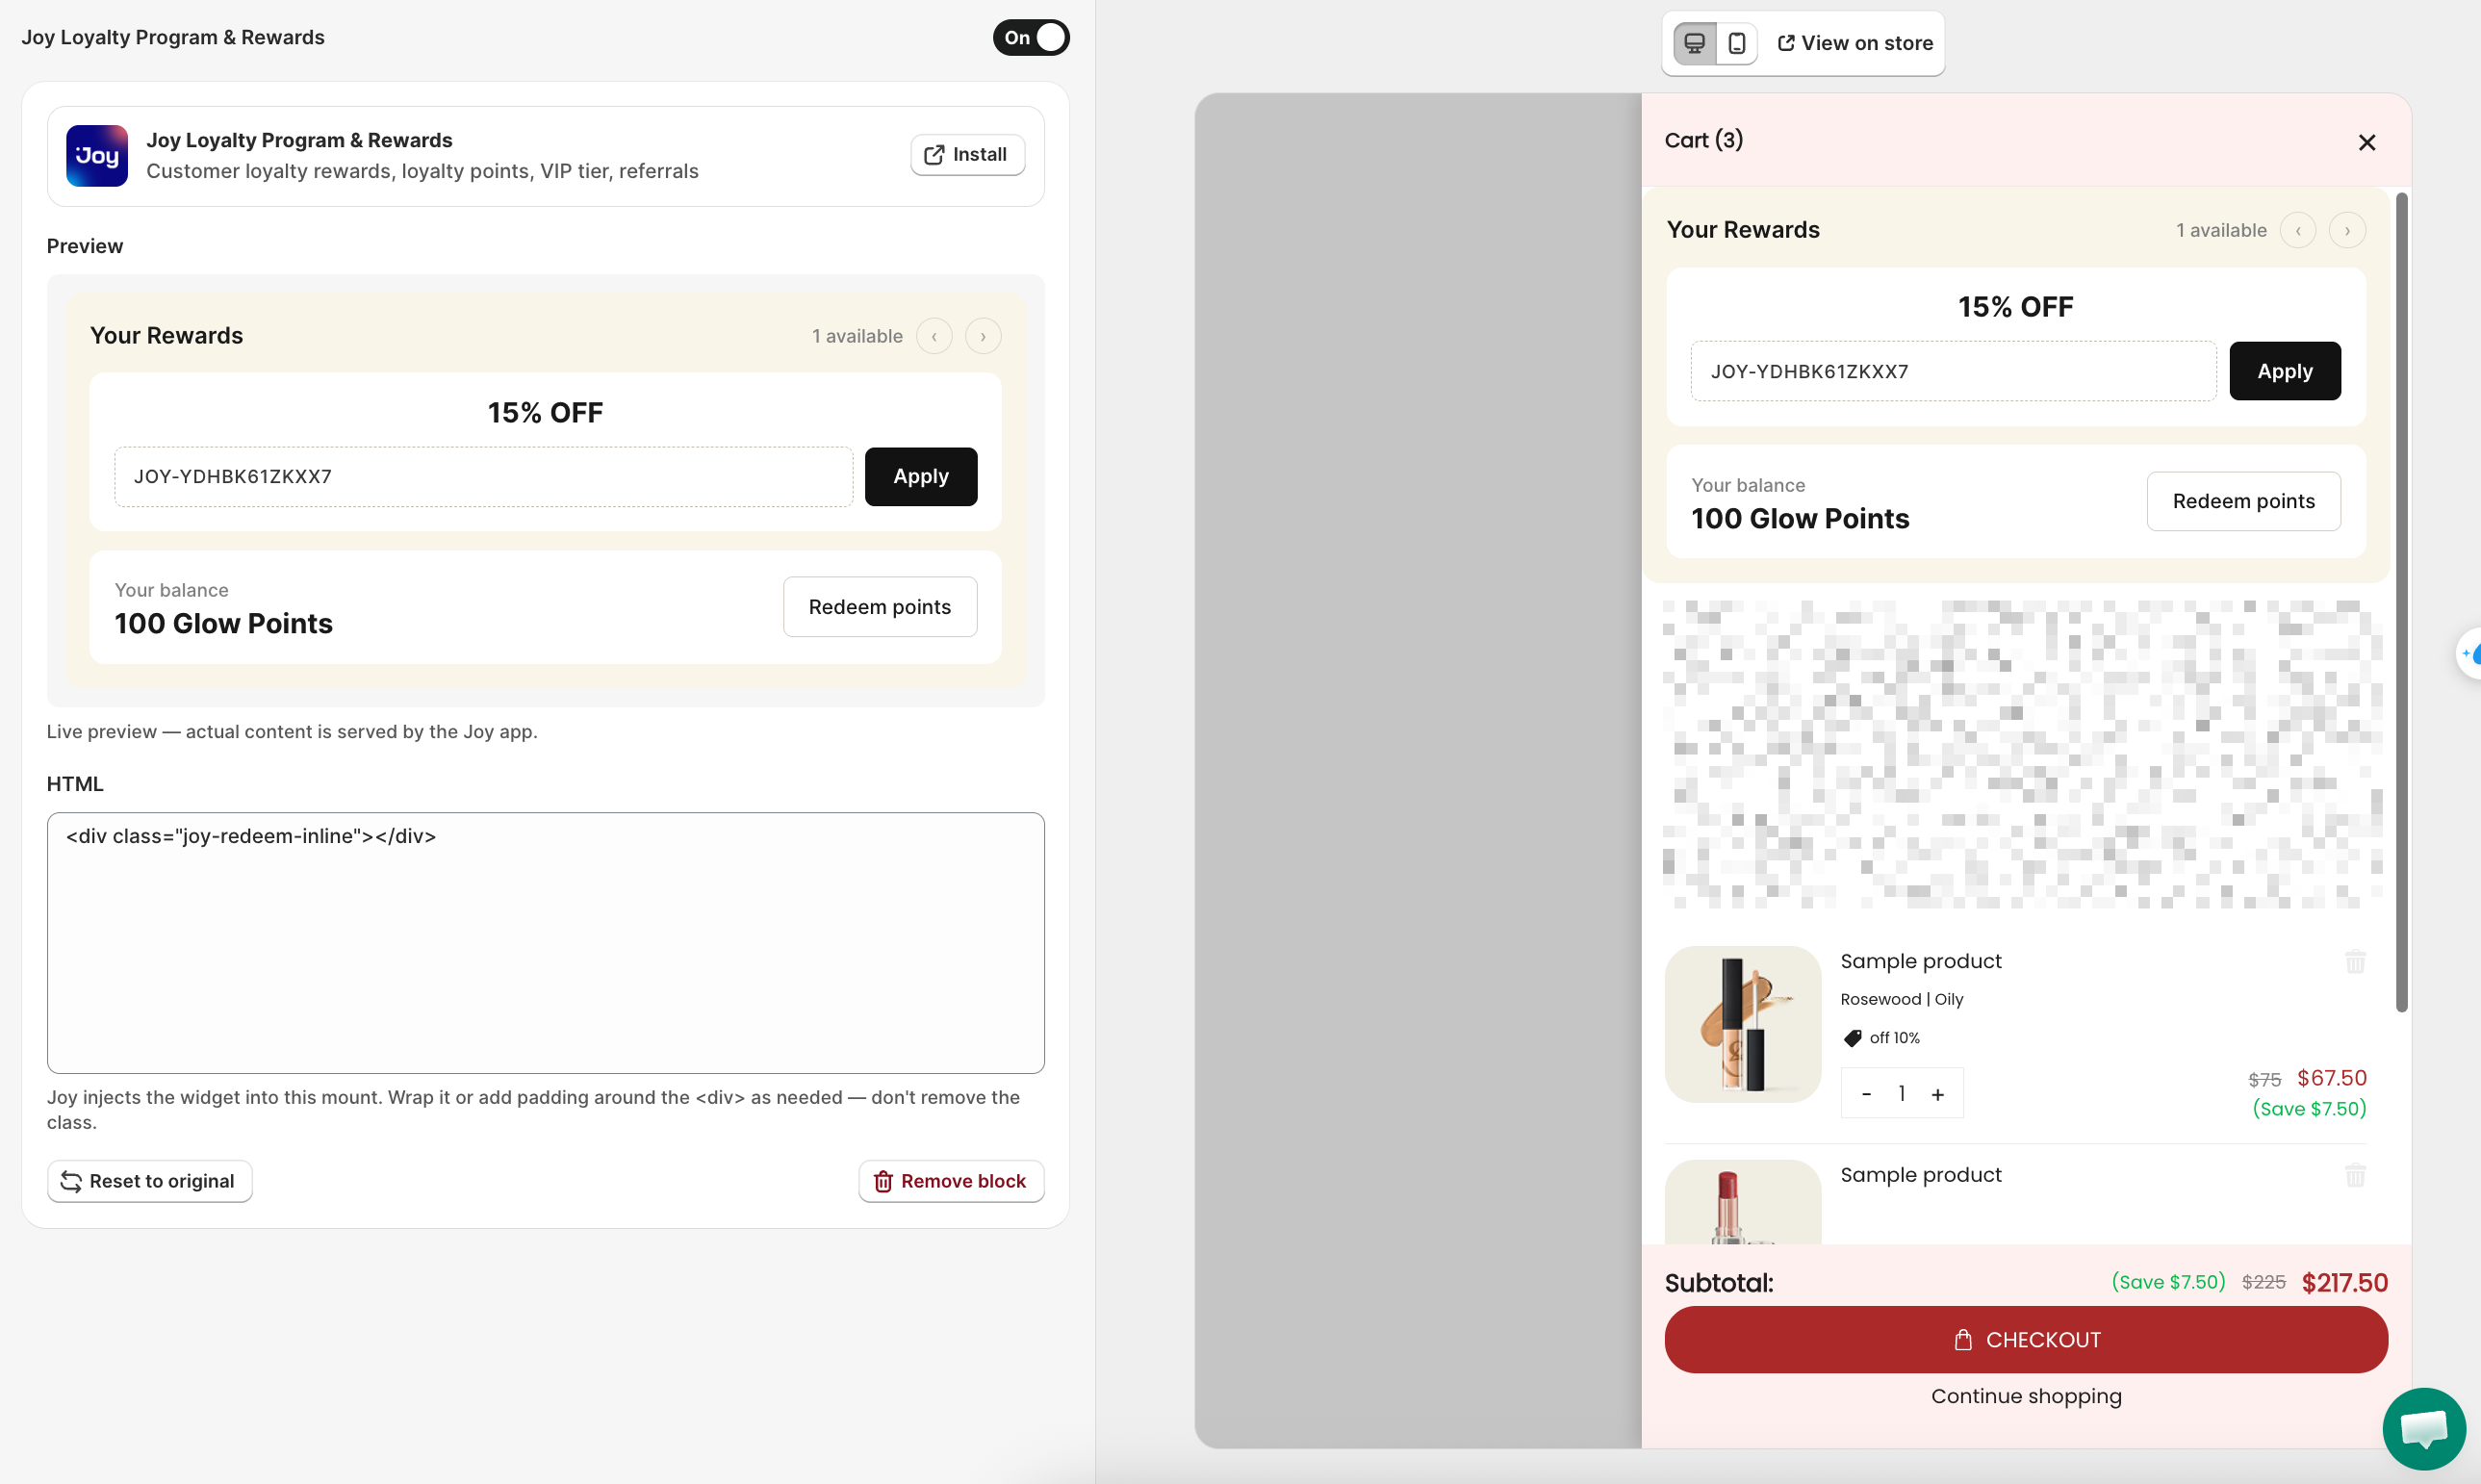
Joy Loyalty Program & Rewards
Shows a rewards widget in the cart: an available discount code with an Apply button, the customer's points balance, and a Redeem points button. The content is served live by the Joy Loyalty Program & Rewards app ("Customer loyalty rewards, loyalty points, VIP tier, referrals").
Editing an Integration Block
An imported integration block opens in a different editor than a pre-built block:
- A live preview with the note "Live preview — actual content is served by the Joy app." The preview shows sample content; the real widget only renders on your storefront.
- An app info card with the app's logo, name, and description. It shows an Installed badge and a View app button if Joy Loyalty Program & Rewards is already installed, or an Install button that opens its Shopify App Store listing if it is not.
- An HTML section with the note "Joy injects the widget into this mount. Wrap it or add padding around the
<div>as needed. Don't remove the class." You can adjust spacing around the mount, but thejoy-redeem-inlineclass itself must stay. - A Reset to original button instead of Reset to default, and no Edit with AI card. Integration blocks are app-rendered, so AI cannot generate or edit their content.
Troubleshooting
Q1: A block's button shows "Imported" and I cannot click it
That block is already in this section. To use it again, remove the existing one first.
Q2: My search shows no results
The library filters by block name. Clear the search field to browse the full list.
Q3: I imported a block but it does not appear in the drawer
Open the block in the editor and confirm the enable toggle is on, then click Save.
Q4: I want to undo changes to an imported block
Click Reset to default in the block editor to restore the original HTML. For a change you made with AI, click Restore to before AI instead.
Q5: AI says my prompt is unclear
Give a concrete description of the block you want, for example a free shipping progress bar or a trust badge with checkmarks. A vague prompt shows a short note instead of a block, and it does not count as an error. Rephrase and try again.
Q6: What do the "AI" and "Edited by AI" badges mean?
AI marks a block that AI generated for you. Edited by AI marks a library block that you changed with AI. They help you tell AI blocks apart in the section list.
Q7: The Integration blocks tab is empty
That tab only lists blocks from integration apps you have installed. If none are installed yet, it shows "No integration blocks yet" with a prompt to install an integration app. Install the app (for example, Joy Loyalty Program & Rewards), then reopen the modal.
Q8: My block doesn't change when I update the cart
Confirm the block's HTML actually uses one of the four cart values (Cart total, Subtotal, Discount, Item count) inside the logic. Use the Test values fields to confirm the logic itself works, then check that the block's enable toggle is on and your changes are saved.
Q9: AI says it can't build the logic I described
AI blocks can only react to the four cart values (cart total, subtotal, discount, item count), not to customer, product, or order details. Rephrase your prompt around a cart-value condition instead, for example show a different message once the cart total passes $75.