How to Set Up Volume Discount
What Is Volume Discount?
Volume Discount runs tier-based discounts that grow as customers buy more units of a product. The customer sees a tier table on the product page, for example:
- Buy 2, save 10%
- Buy 3, save 20%
The discount applies automatically the moment they hit a tier's quantity.
It's the most flexible offer type in the app. It has its own template gallery, supports gifts attached to tiers, custom tier images, badges, countdown timers, and subscription-app awareness.
When to Use It
- You want to reward customers for buying more units of the same product
- You sell consumables, refills, multi-packs, or anything where buying in bulk makes sense
- You want a tier table on the product page that visually nudges customers to the next tier
Before You Start
If you want to launch fast, follow the Quick setup walkthrough below. The Advanced configuration section that follows covers optional features (Customer eligibility, Pricing options, Discount combinations, Countdown timer, Subscriptions integration) you can layer in later.
Quick Setup Walkthrough
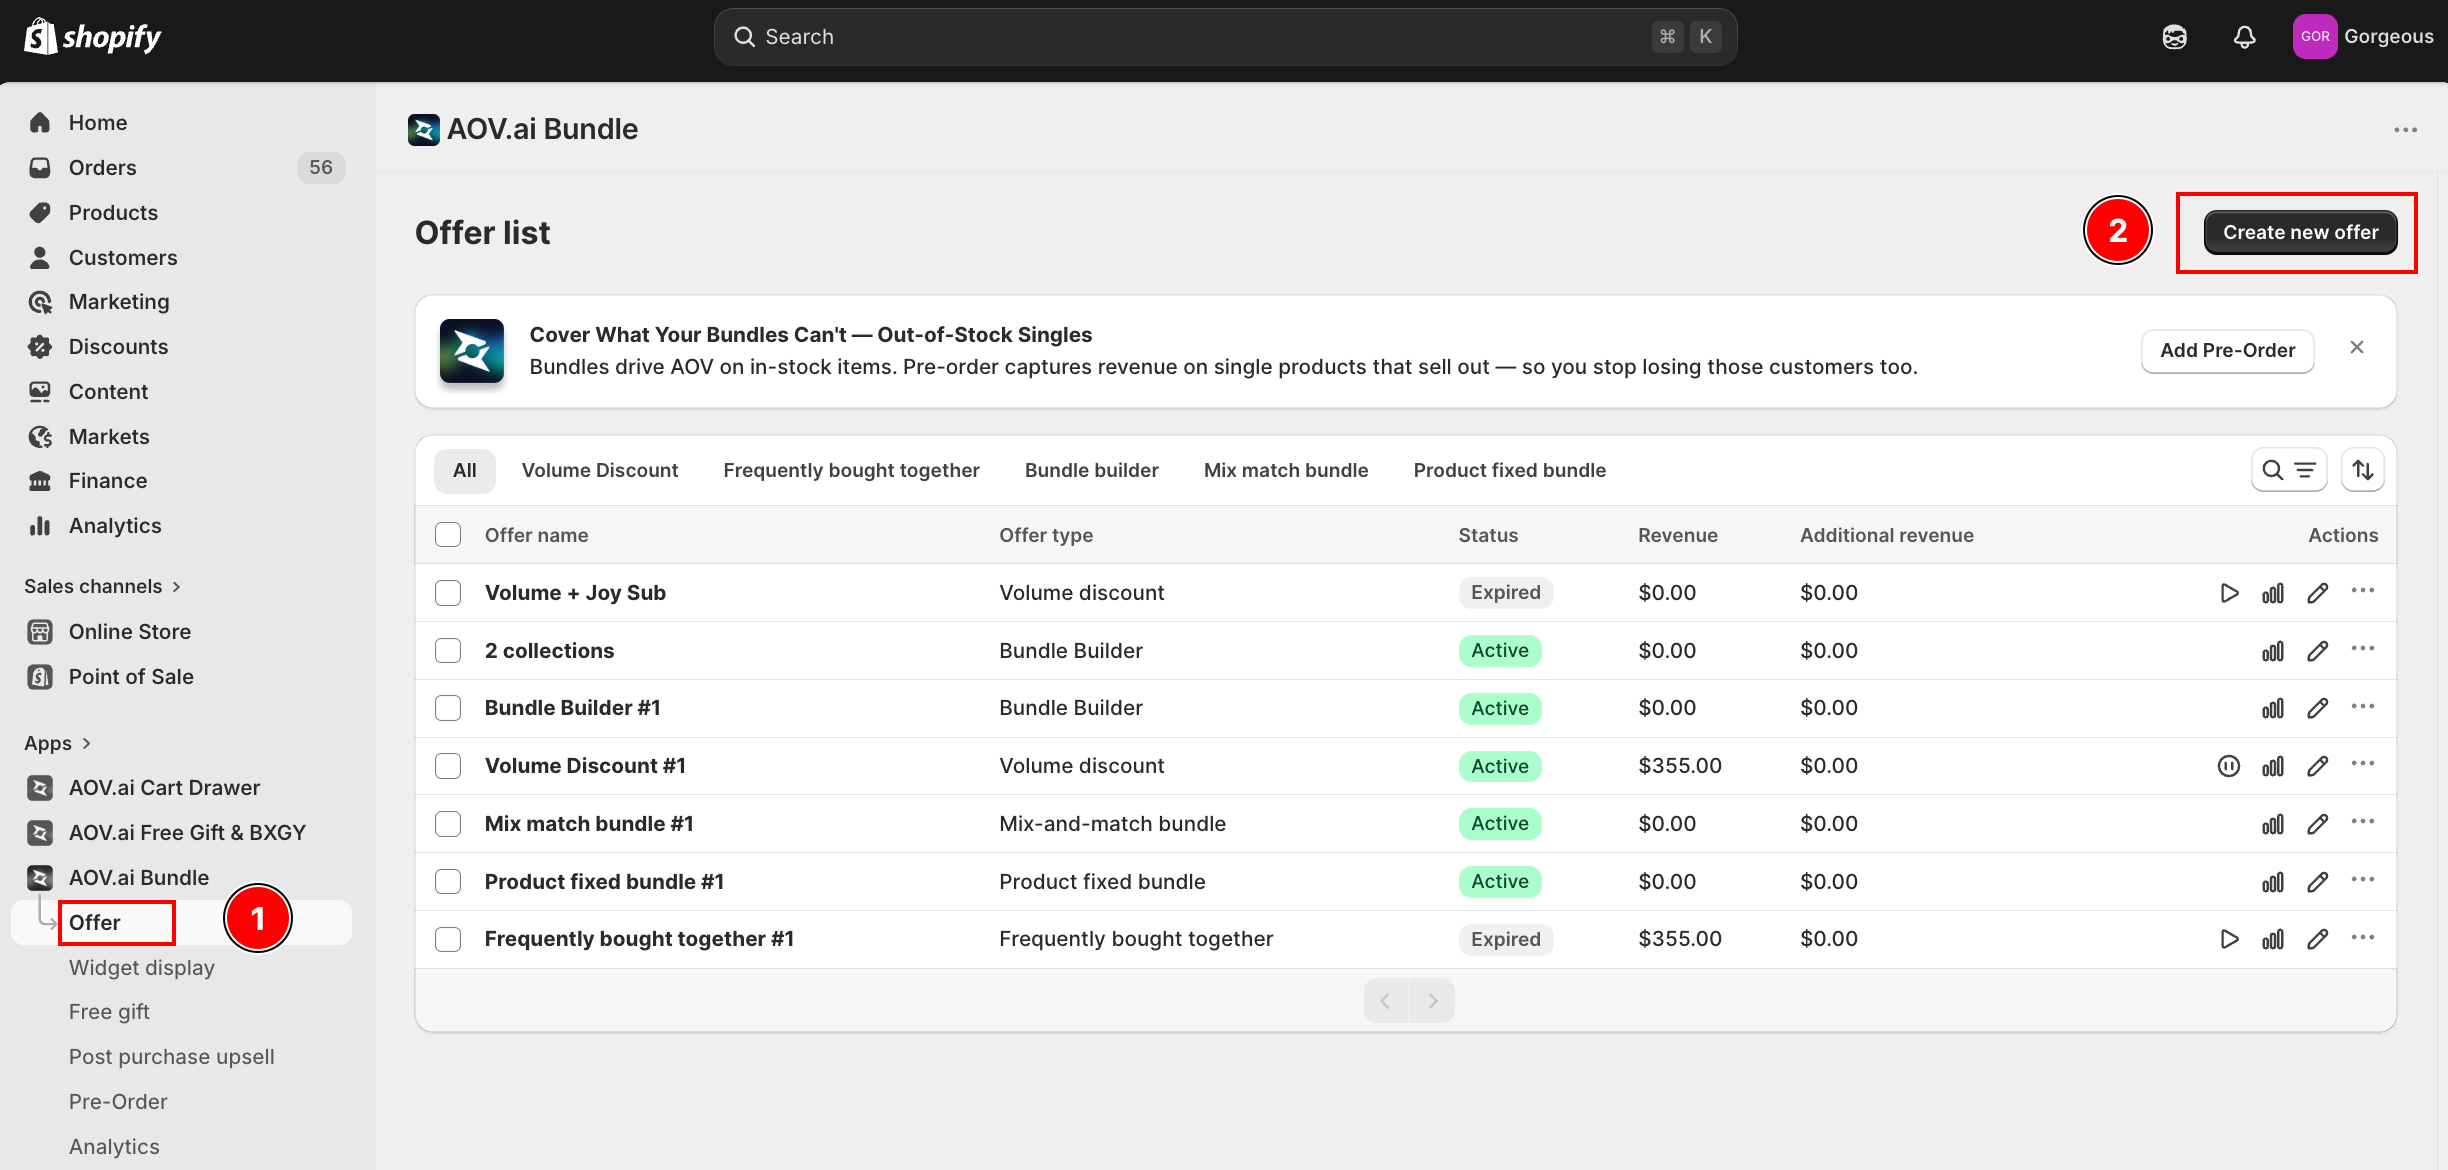
Step 1: Create Offer
From the Shopify admin, open AOV.ai Bundle Upsell in the left sidebar. Click Offer, then click Create new offer in the top-right.
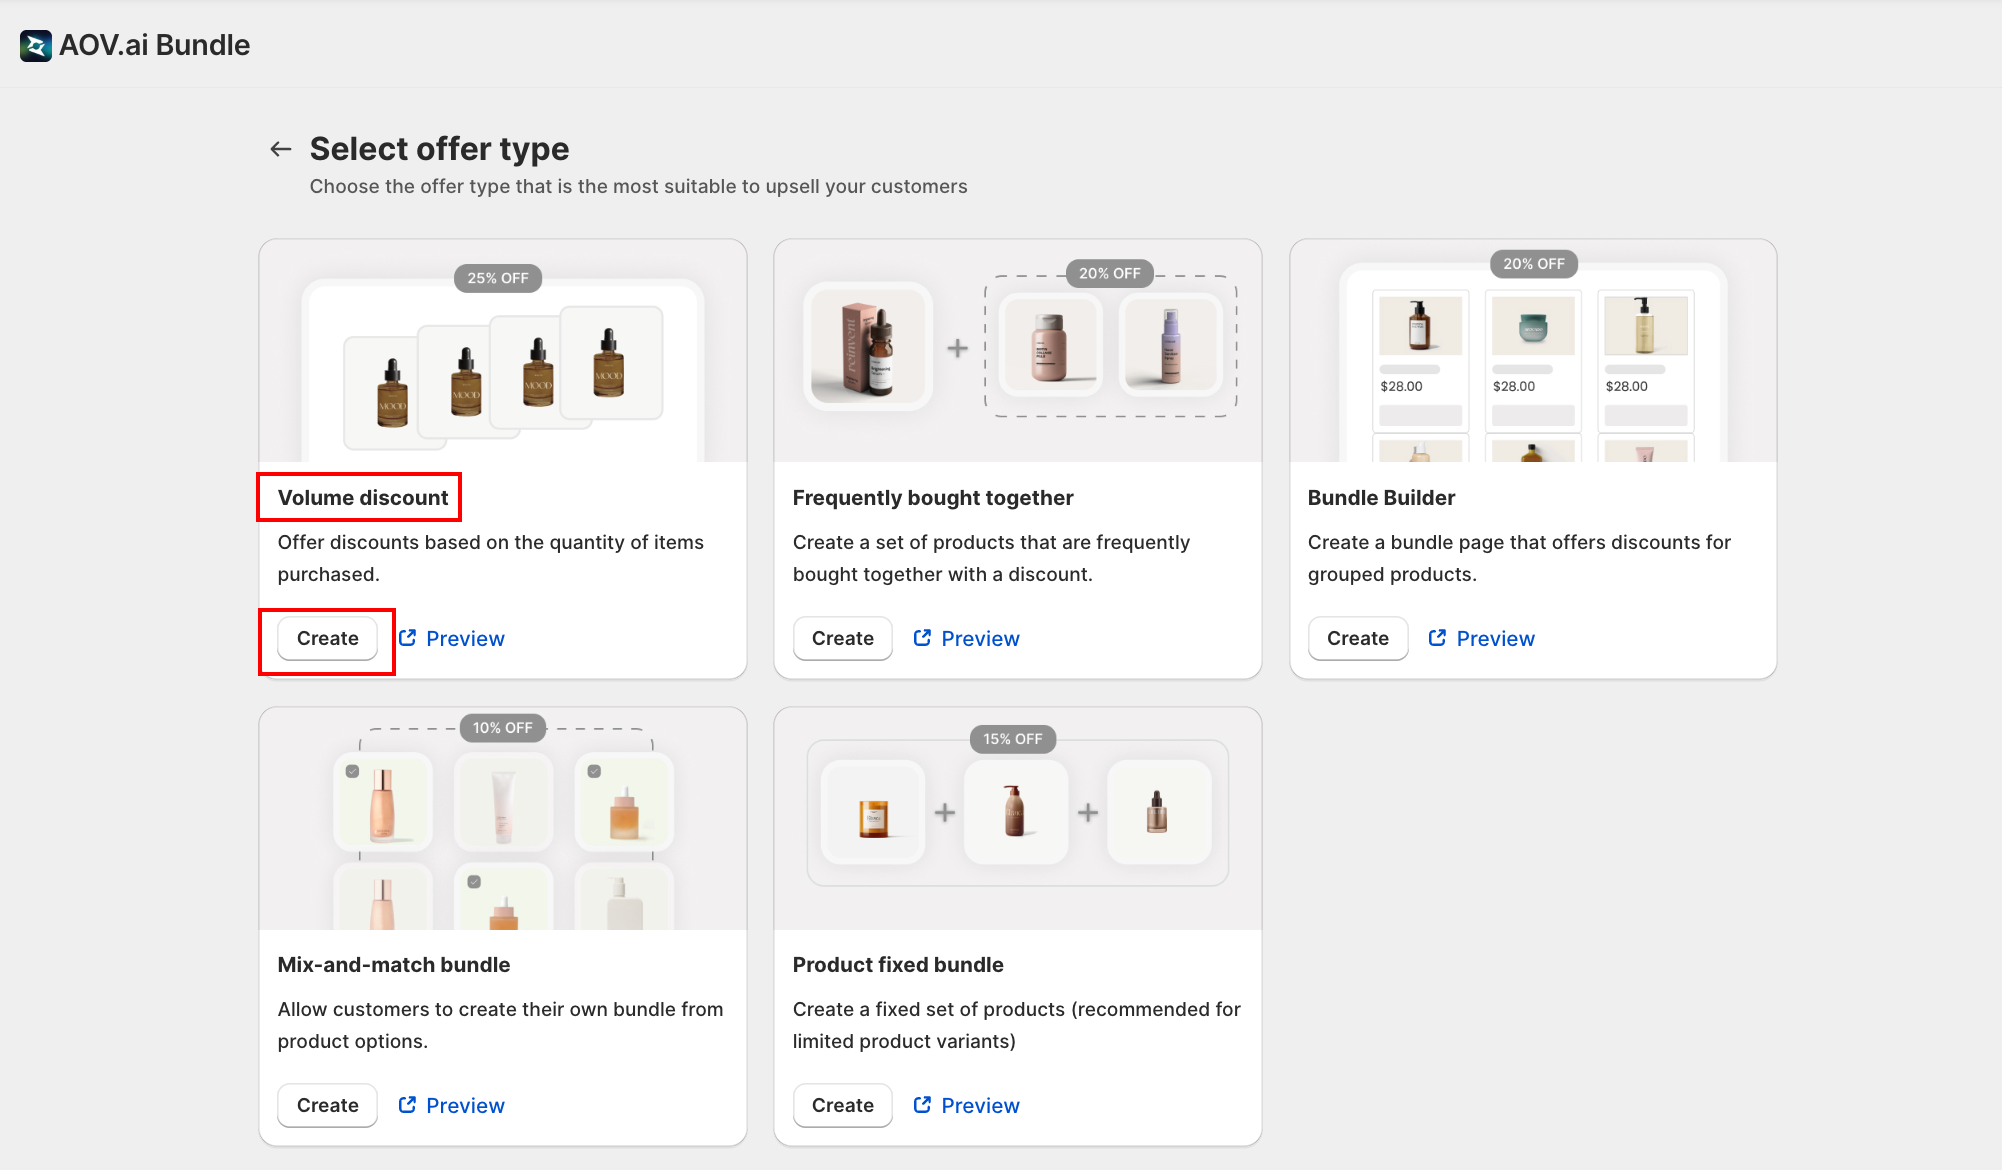
Step 2: Pick the Volume Discount Card
On the Select offer type screen, find the Volume discount card and click Create.
The card description reads: "Offer discounts based on the quantity of items purchased."
Step 3: Pick a Template
The Select template modal opens with 6 prebuilt layouts and a color scheme picker.
Recommended for first-time setup: pick the Classic Volume Discount template (it's pre-selected as the default). This is the layout most stores use, the one customers recognize, and the one this guide assumes from here on.
Pick a color scheme that matches your theme, then click Select. The configuration form loads pre-filled with the Classic layout's defaults.
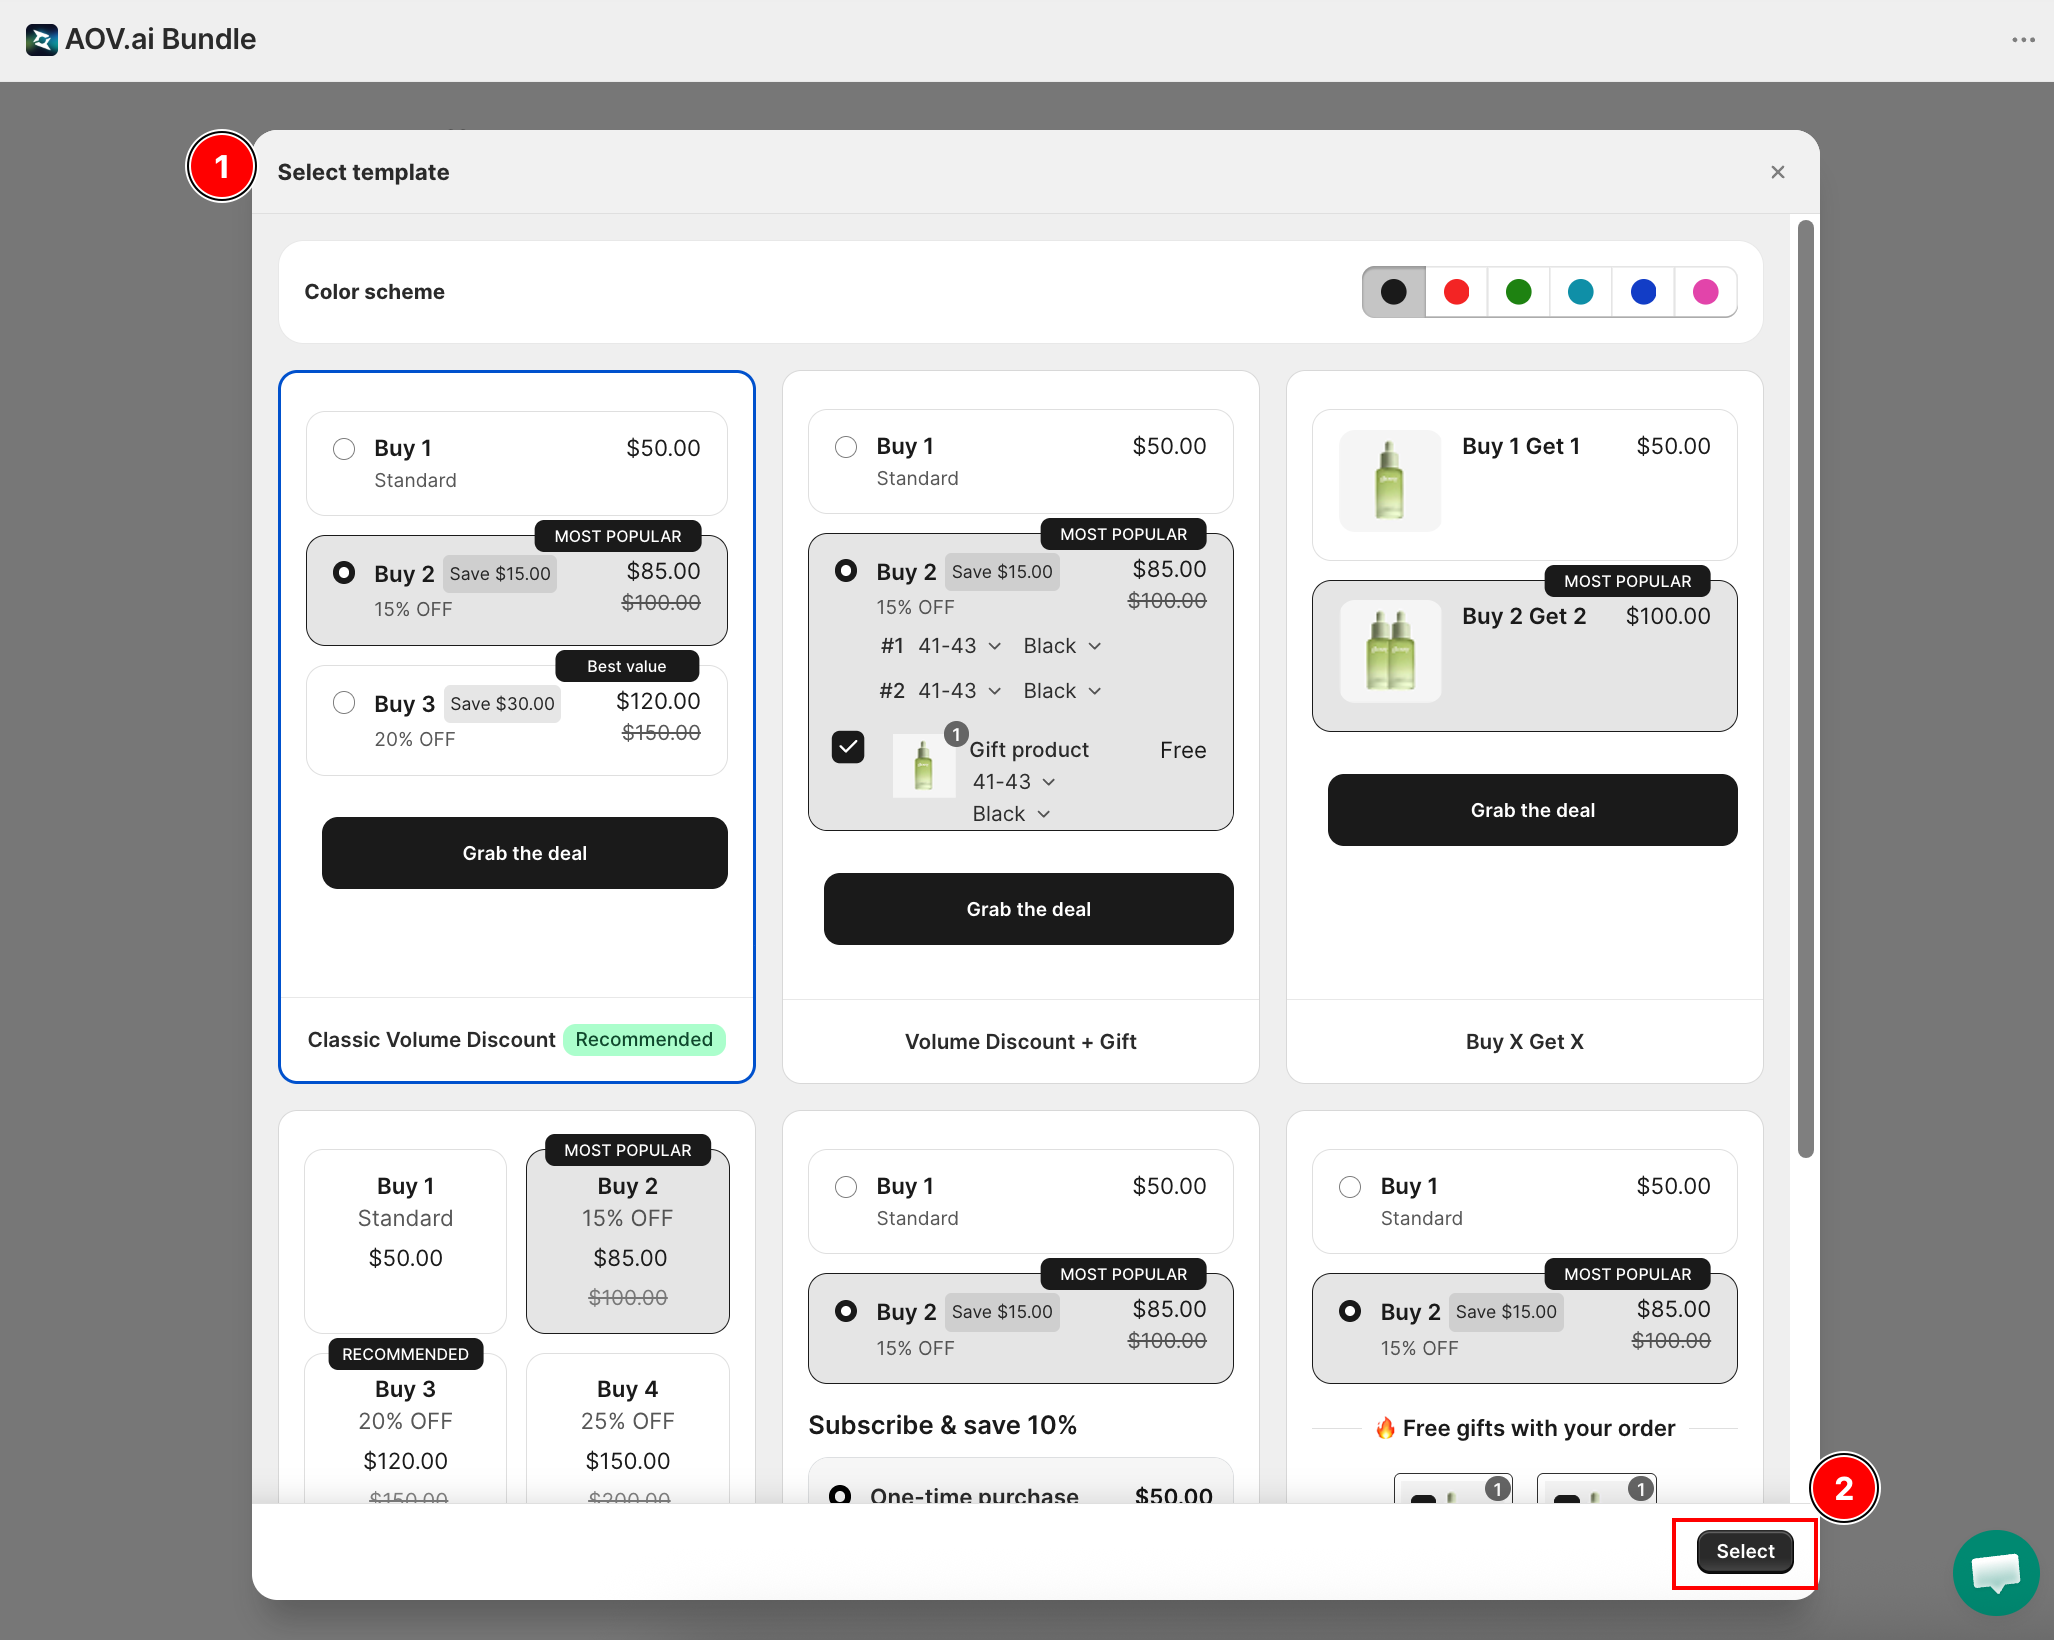
If you want a different look (Buy X Get X, Subscribe Volume, Progressive Gifts, etc.), see Volume Discount templates for the full breakdown of all 6 options.
Step 4: Fill in Offer Information
The form opens at Step 1: Offer setting. The first card is General.
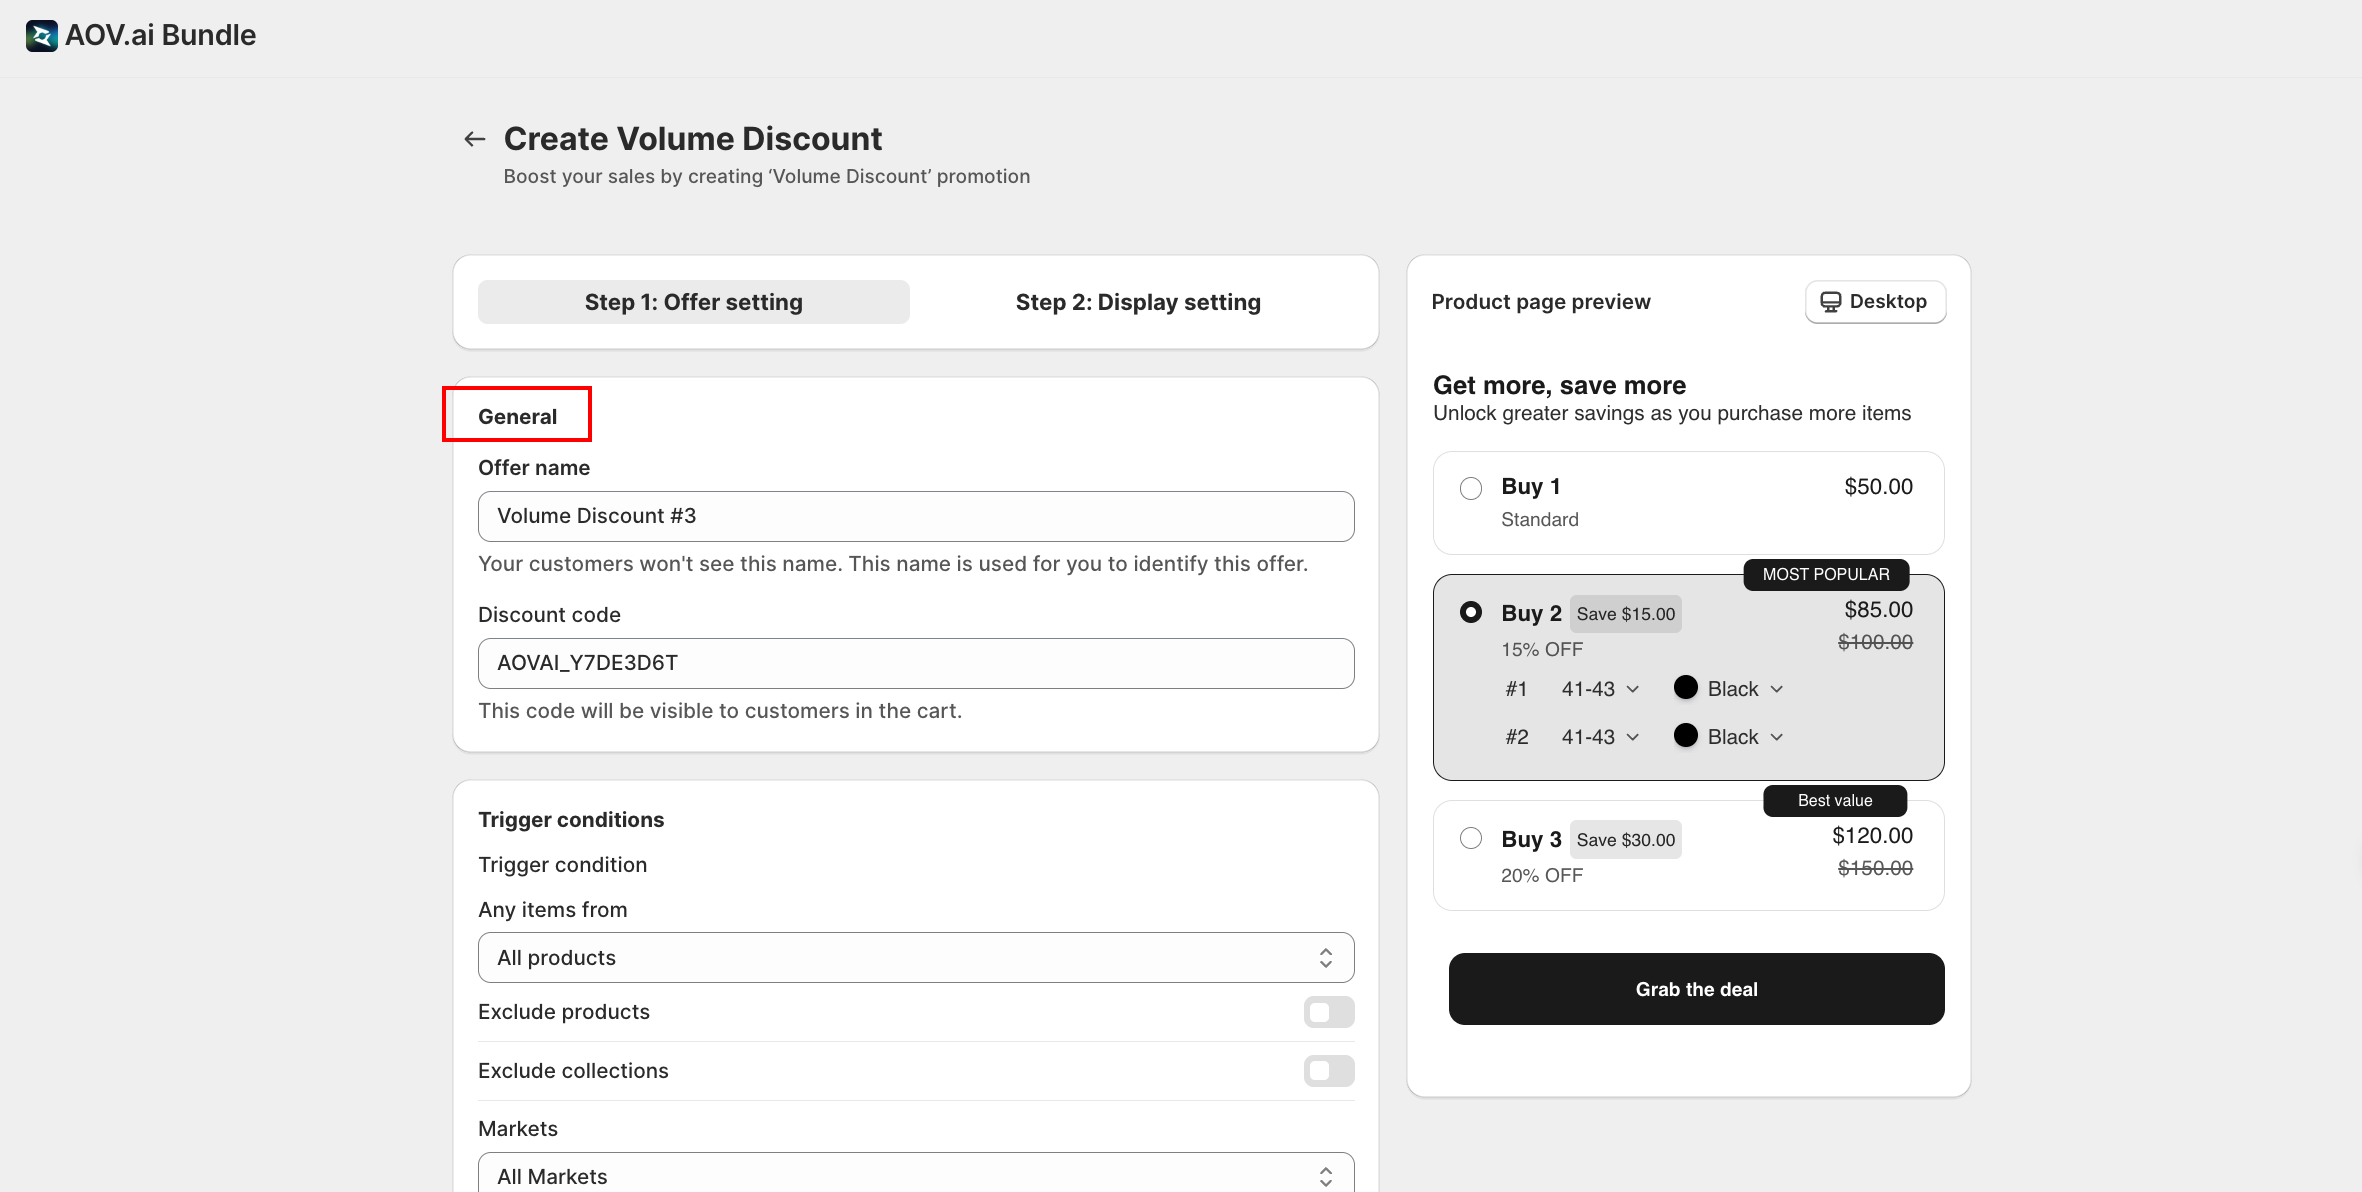
- Offer name: internal label only. Customers won't see it. A clear name helps you manage and identify campaigns in the Offer list, especially when you're running multiple offers at once (for example Spring 3-pack discount).
- Discount code: visible to customers in the cart. The app generates a code automatically.
Step 5: Set the Trigger Conditions
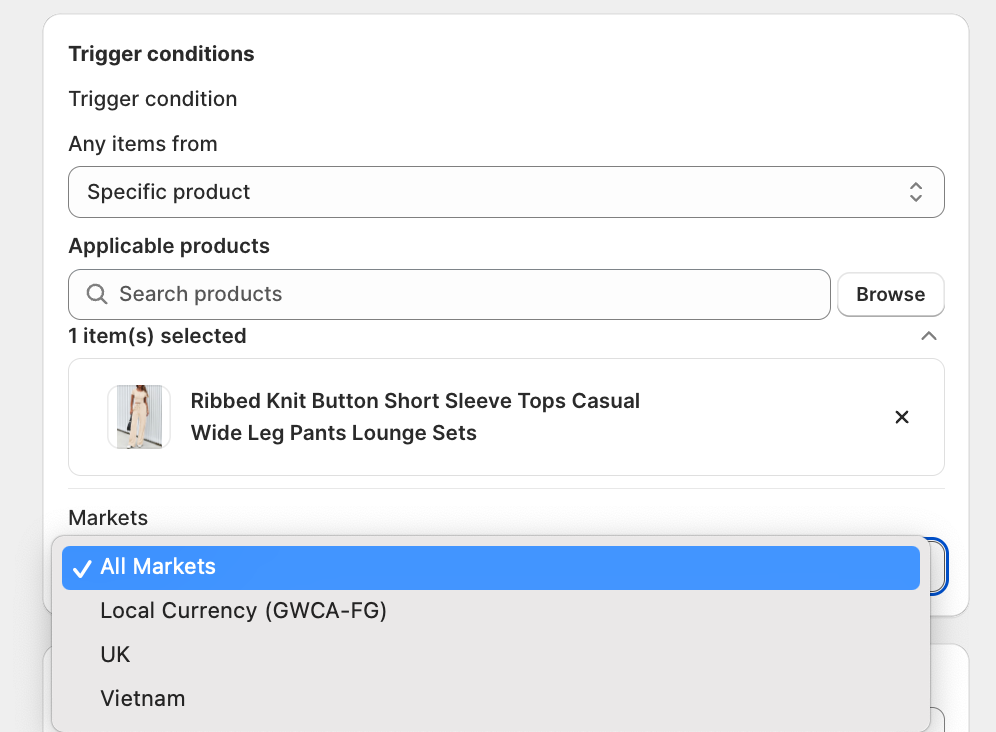
The Trigger conditions card decides which products trigger the discount when added to cart.
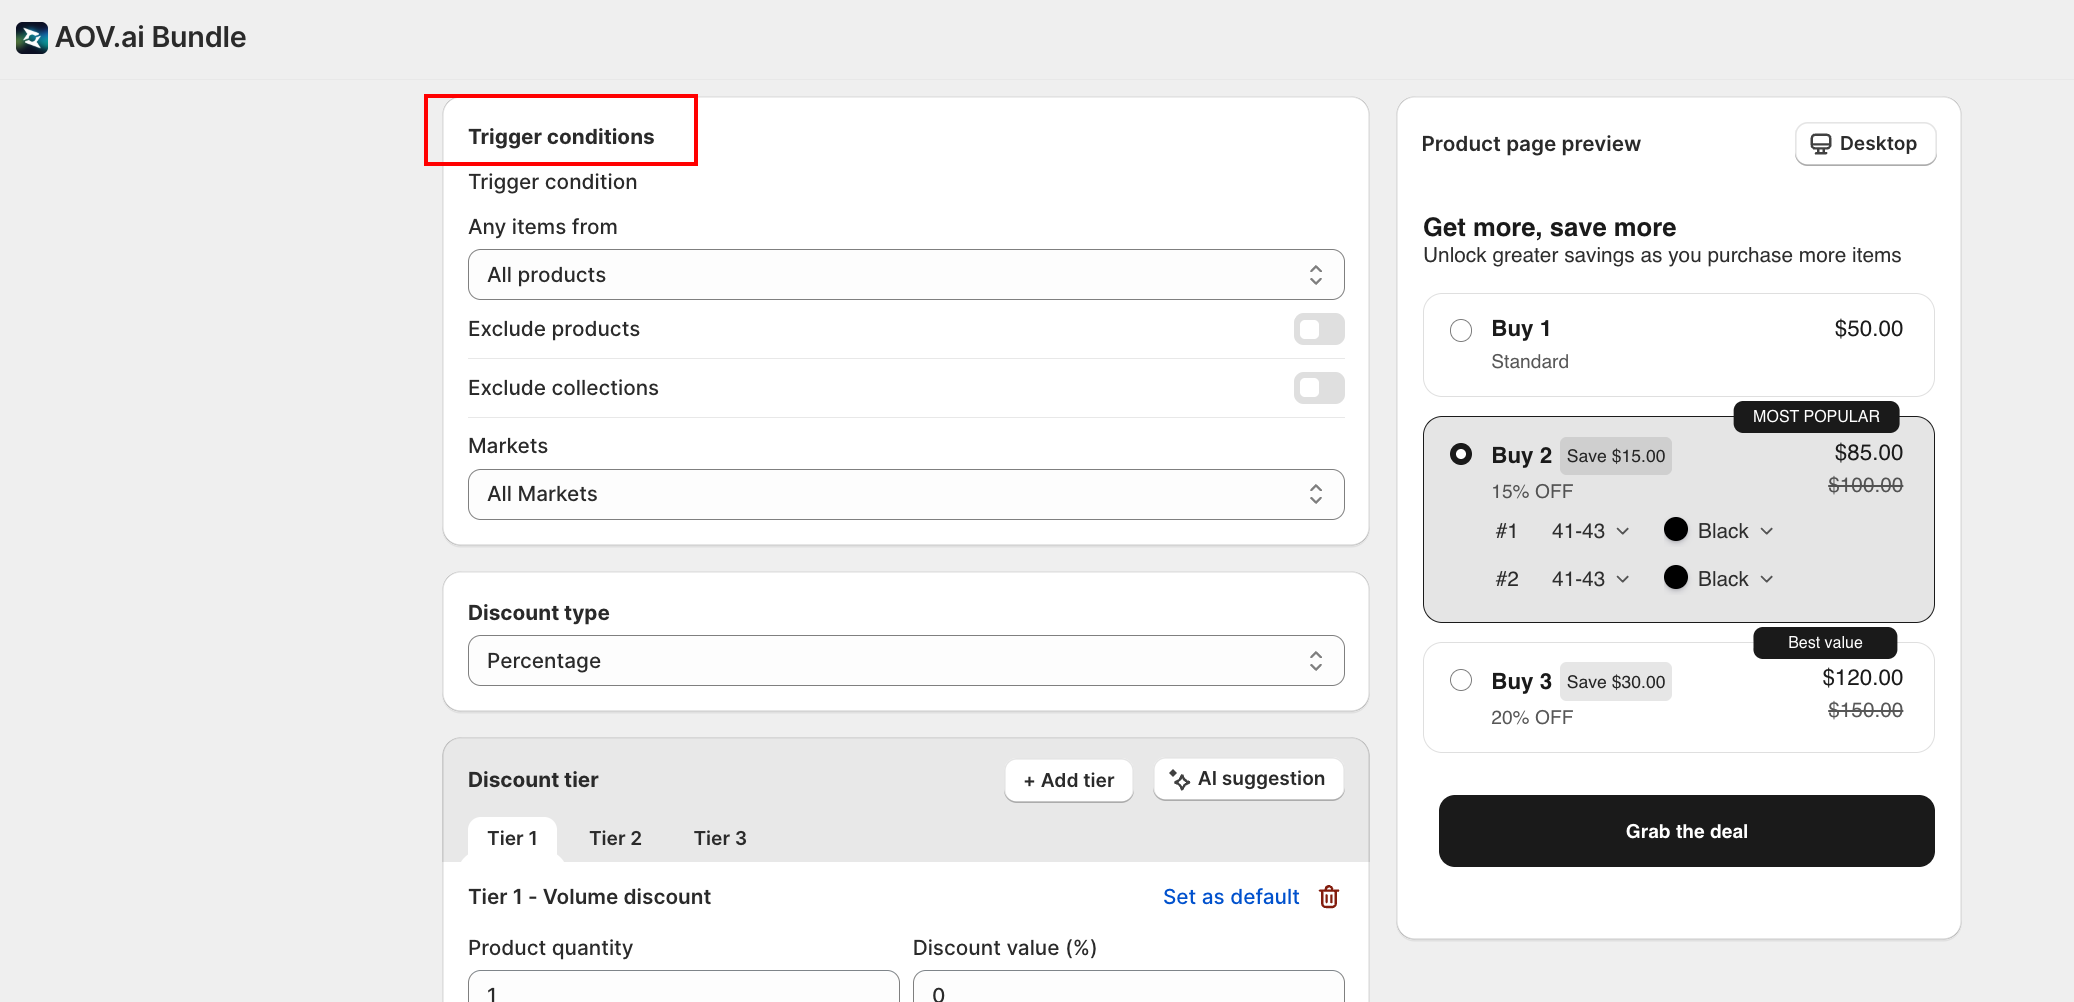
Scope: choose which products the discount applies to:
- All products: applies storewide
- Specific product: select individual products
- Specific collection: select one or more collections
- Exclude products / Exclude collections (optional): block specific products or collections from triggering the discount, even if they fall under your scope.
- Markets (optional): restrict the discount to specific Shopify markets. Default is All Markets.
Step 6: Choose the Discount Type and Build the First Tier
Pick the discount type, then set up at least one tier so the offer has something to apply.
In the Discount type section:
- Percentage: discount expressed as a % off (for example 20% off)
- Fixed amount: discount expressed as a flat amount (for example $5 off)
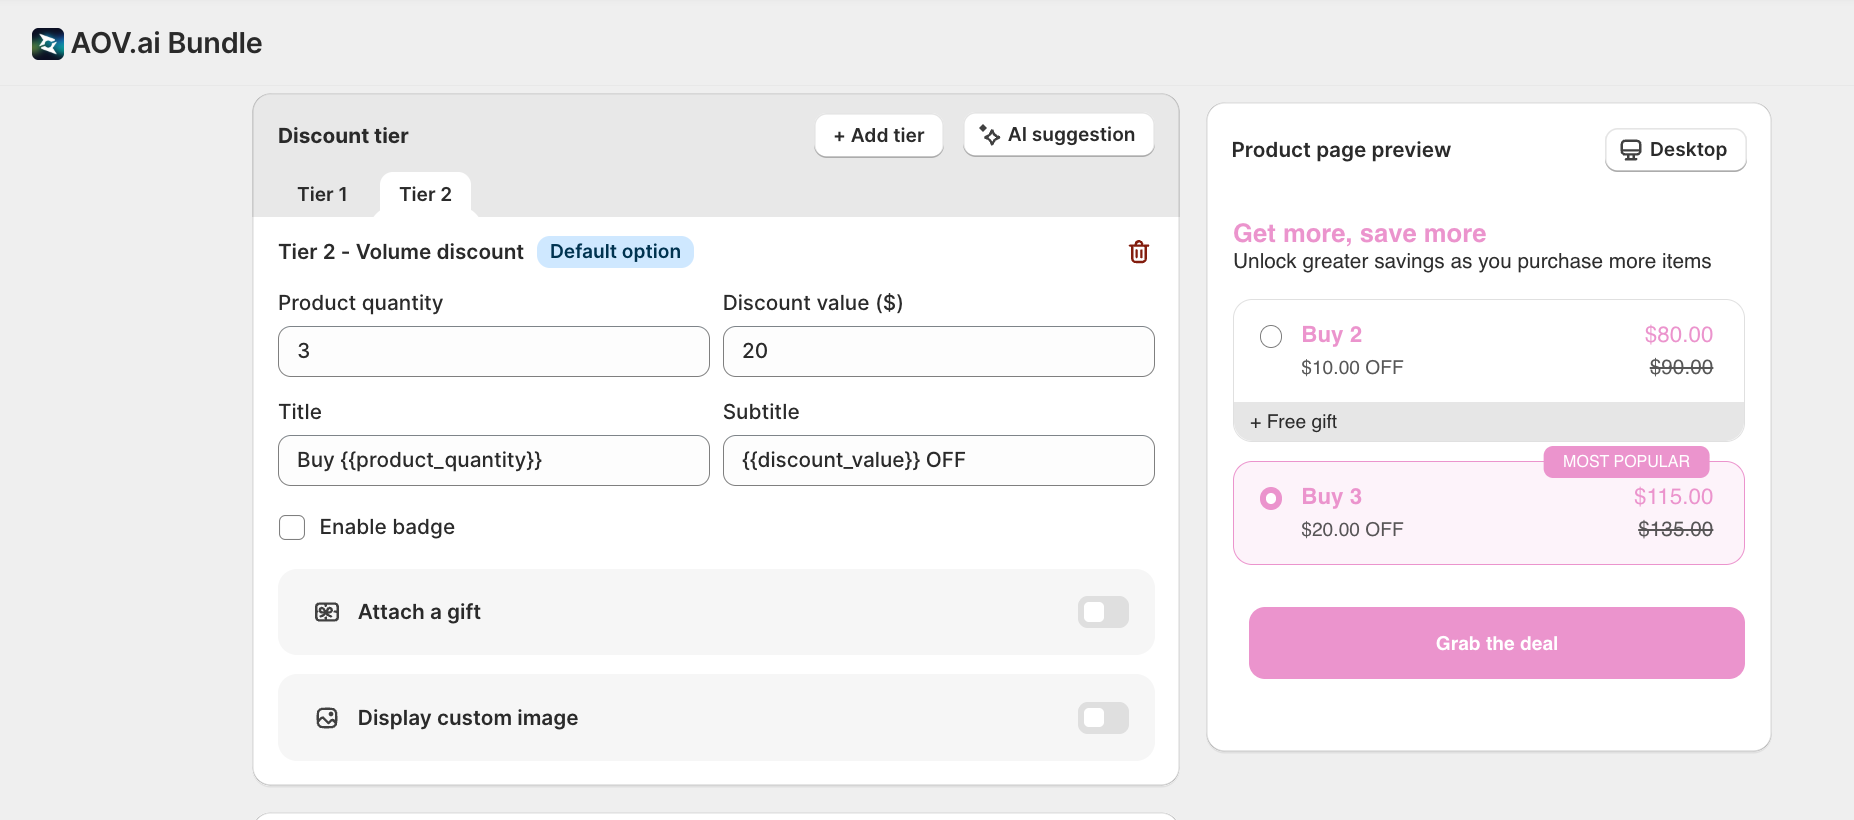
The Discount tier card is where you build the actual tier ladder.

- + Add tier: add another rung to the ladder. Each tier sets a quantity threshold and the discount earned at that threshold. Not sure what values to use? Click AI suggestion; the app proposes tier values based on your scope and discount type.
- Tier 1 / Tier 2 / Tier 3: tabs at the top of the card. Click a tab to edit that tier.
For each tier:
| Field | What it does |
|---|---|
Product quantity | Minimum units the customer must add to unlock this tier |
Discount value (%) | The discount they earn at this tier (% or fixed amount, matching the type above) |
Title | Customer-facing tier headline (for example Buy 2) |
Subtitle | Helper line under the title (for example Save $15.00) |
Enable badge | Toggle a badge on this tier (for example MOST POPULAR, Best value); the badge label is editable |
Attach a gift | Add a free or discounted product to this tier; when the customer hits the quantity, the gift is added automatically |
Display custom image | Upload an image (.gif, .jpg, .jpeg, .png; up to 5MB) shown next to the tier |
Example tier ladder:
| Tier | Quantity | Discount |
|---|---|---|
| Tier 1 | 1 (Standard) | 0% |
| Tier 2 | 2 | 15% |
| Tier 3 | 3 | 20% |
Set as default tier: in any tier's settings, toggle Set as default to pre-select that tier in the storefront widget so it loads highlighted. Use it to nudge customers toward the tier you want them on.
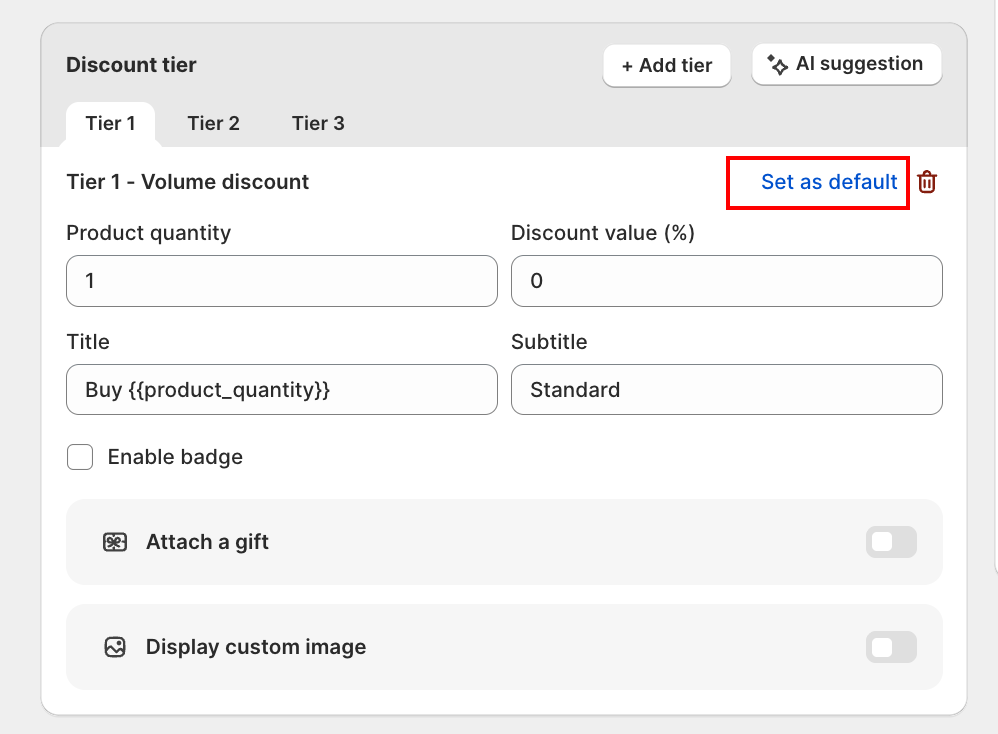
The tier set as default will automatically display the Most Popular badge on the storefront widget. Only one tier can be set as default at a time.
![]()
Step 7: Schedule
Scroll to the Schedule card.
- Start date / time: when the offer goes live
- End date (optional): tick Set end date to make this a limited-time campaign
Times use your store's timezone.
Step 8: Switch to Display Setting
Click Step 2: Display setting to choose how the widget looks on the product page.
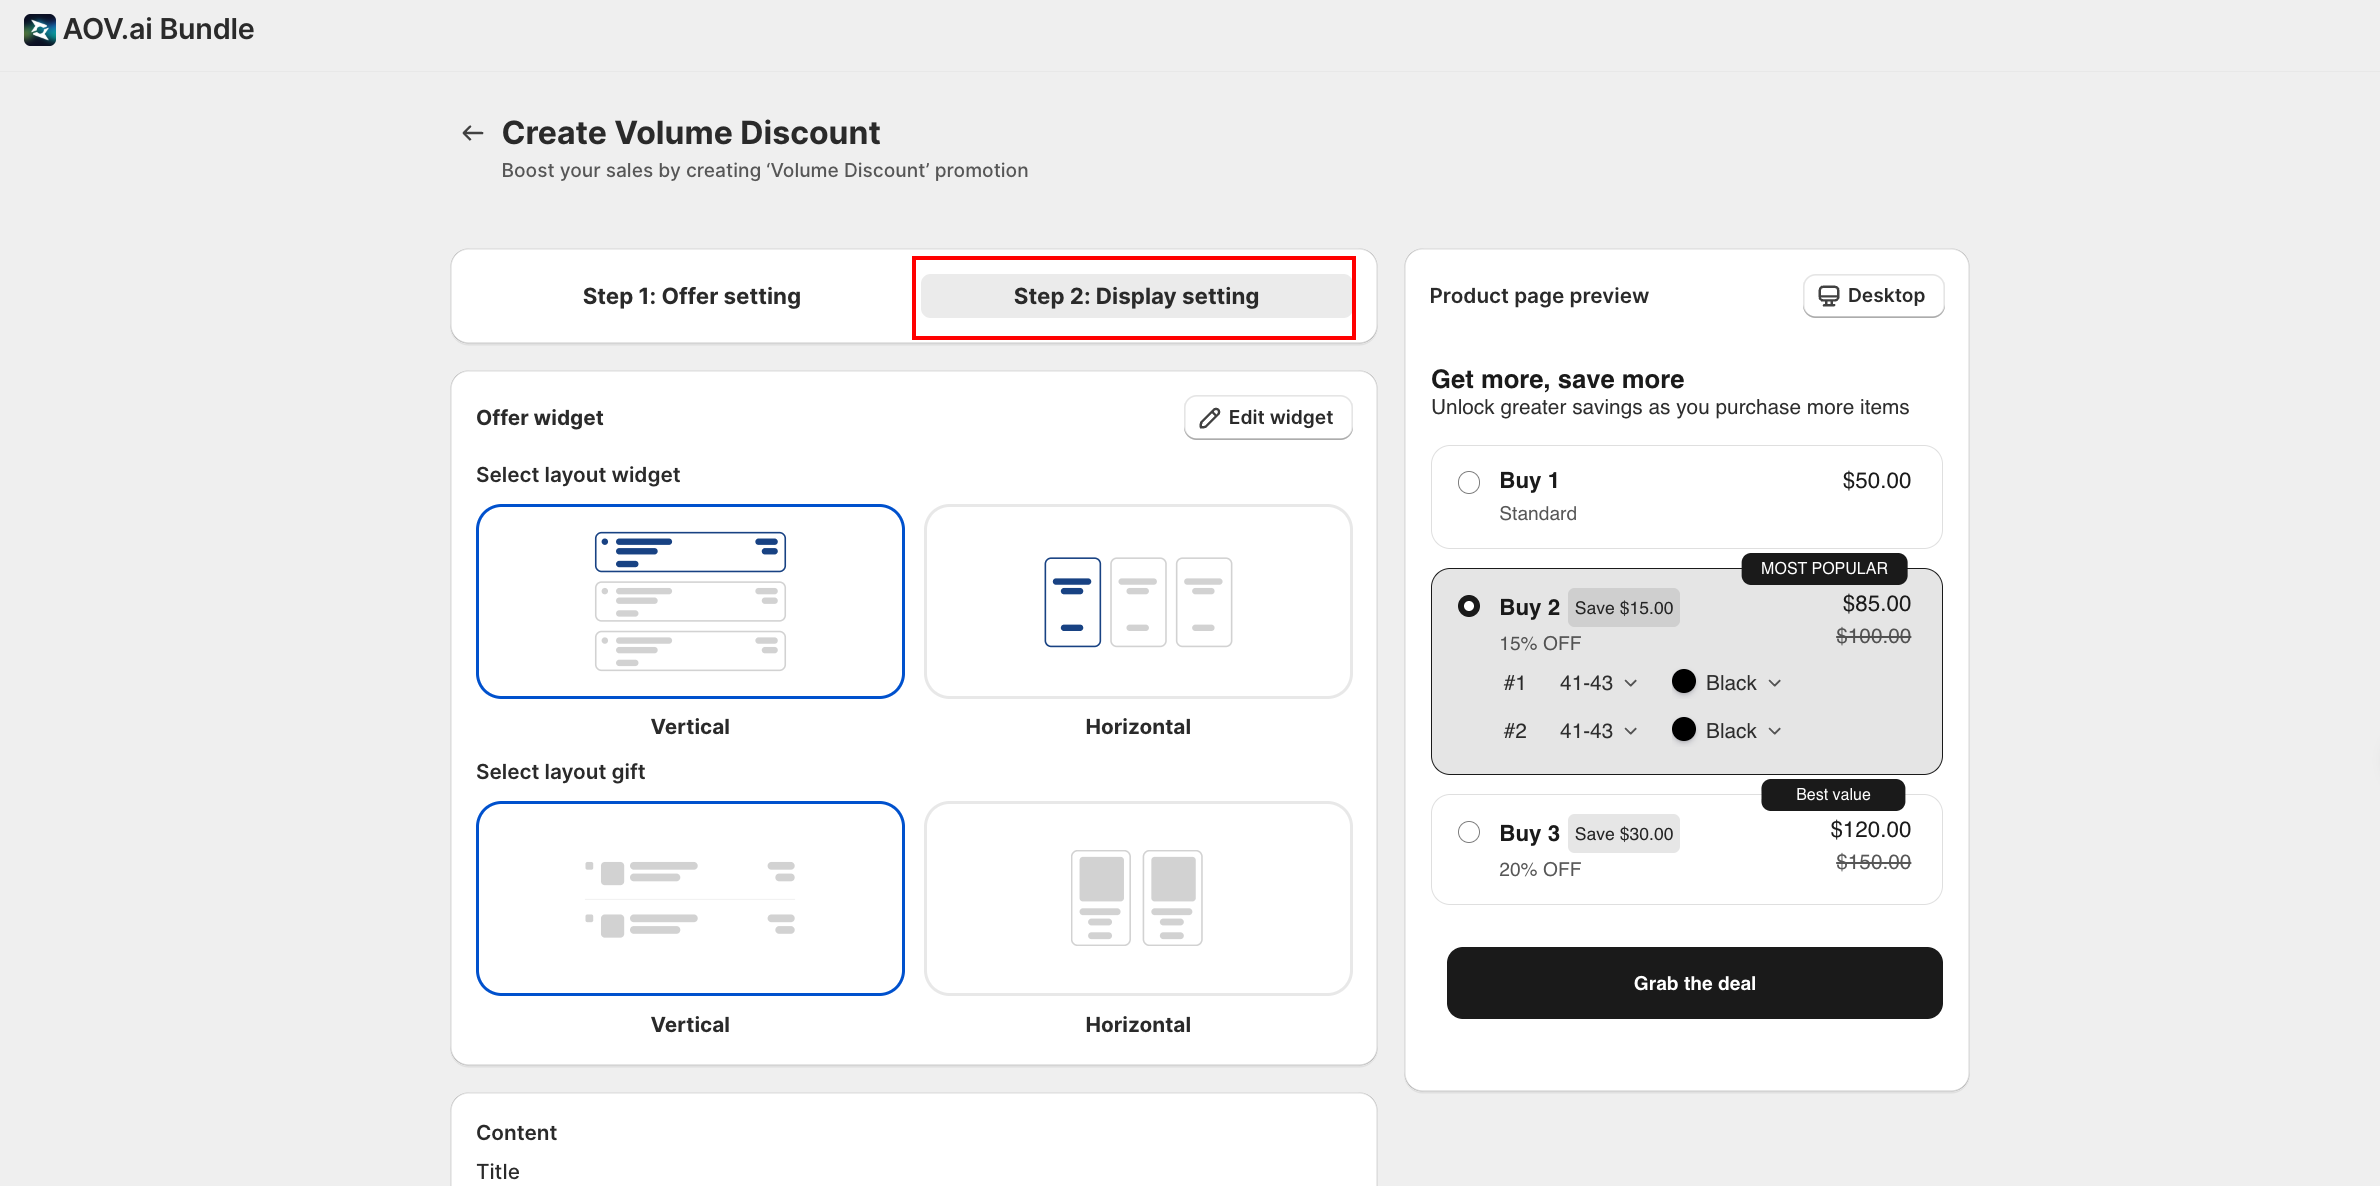
The display tab covers four things:
- Offer-level layout choice: vertical or horizontal arrangement of the tier rows. This is per-offer (each Volume Discount campaign can pick its own).
- Widget-level styling: colors, badges, fonts, save labels, etc.
- These settings live under Widget display → Volume table widget and apply to every Volume Discount on the store
- Click Edit widget in the Offer widget card to jump straight there
- See Volume table widget for the full styling guide
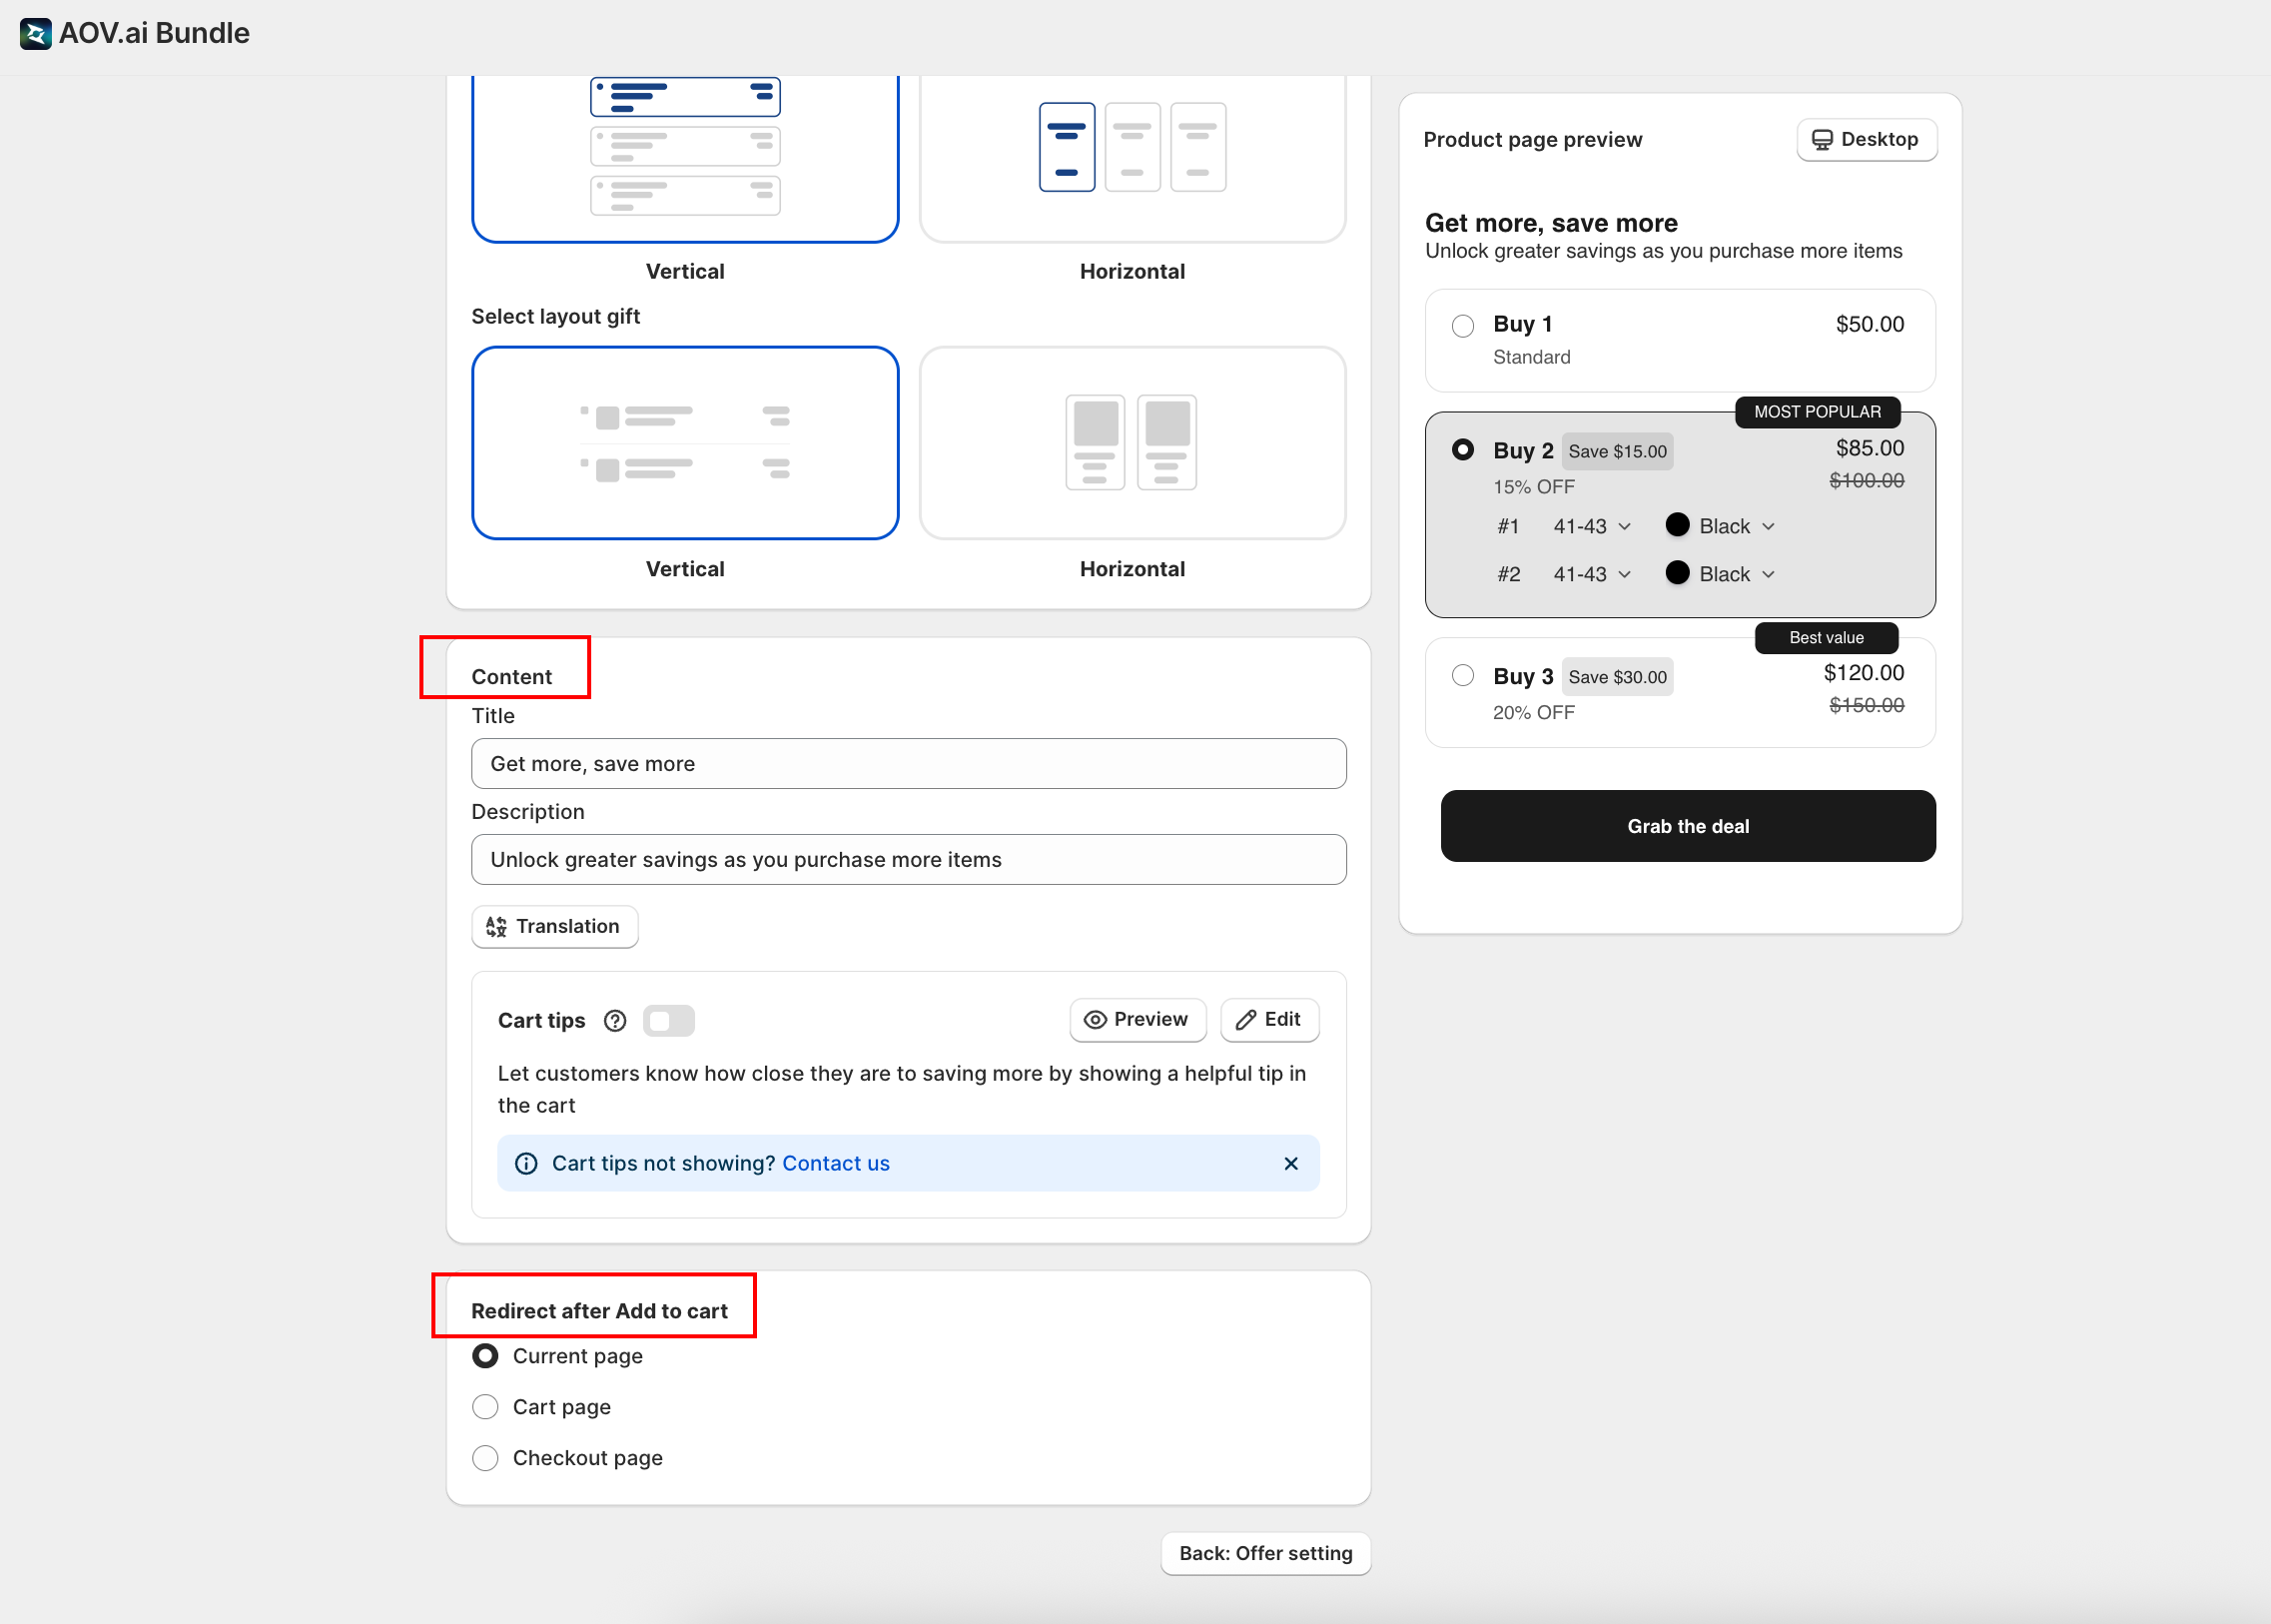
- Content:
- Title and Description: text shown above the tier table (for example "Get more, save more" / "Unlock greater savings as you purchase more items")
- Translation: click to add translations for the languages active in your Shopify Admin → Markets. This applies to all translation fields across the app.
- Cart tips (toggle): shows customers how close they are to the next tier while in the cart. Click Preview or Edit to configure the tip message
- Redirect after Add to cart: choose where customers go after clicking the bundle CTA: Current page (default), Cart page, or Checkout page.
Advanced Configuration (Optional)
The fields below all live on the same Step 1 form, below the tier ladder. Skip them on a first launch and come back later when you want to layer in promotional rules, eligibility scoping, or a countdown.
Step 1: Discount Combinations
Scroll to Advanced Configuration. The first sub-section is Discount combinations: choose whether this discount can stack with other Shopify discounts.
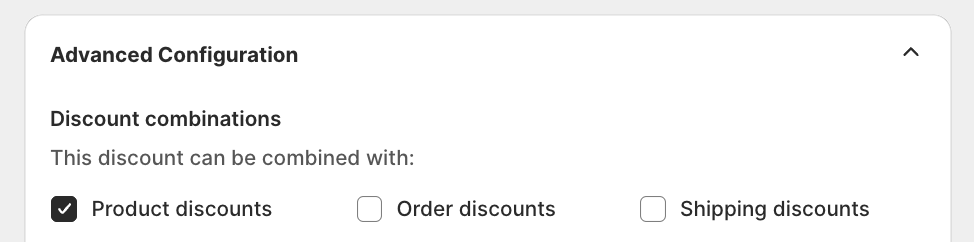
- Product discounts: stack with product-specific discounts
- Order discounts: stack with order-wide discounts (for example 10% off entire cart)
- Shipping discounts: stack with free or reduced shipping
Step 2: Pricing Options
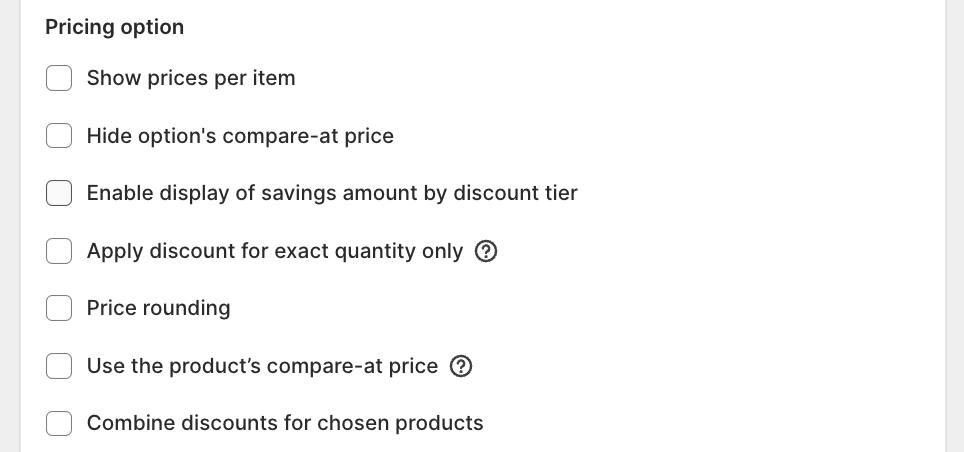
Pricing option controls how the discount and prices appear in the widget.
| Toggle | What it does |
|---|---|
Show prices per item | Display the adjusted per-unit price (for example $9.00 each when you buy 5) |
Hide option's compare-at price | Remove the crossed-out original price from the tier rows |
Enable display of savings amount by discount tier | Show the savings number next to each tier (for example Save $15.00) |
Apply discount for exact quantity only | Discount only applies if the customer's quantity exactly matches a tier (not "this tier or above") |
Price rounding | Round discounted prices to cleaner numbers (for example $9.97 → $10.00) |
Use the product's compare-at price | Use the product's existing Shopify compare-at price as the original price instead of recomputing |
Customer can see the compare to price in the offer | Show the compare-at price next to the discounted price inside the tier widget, so customers can see the original vs. sale price side by side |
Combine discounts for chosen products (NEW)
When enabled, quantities across all products in the offer are pooled together to reach a tier threshold — instead of each product needing to hit the threshold on its own.
Example with a "Buy 3, save 10%" tier:
- On: 1 shirt + 1 pants + 1 hat = 3 items total → discount applies
- Off: each product must independently reach qty 3 → no discount unless the customer buys 3 shirts, 3 pants, or 3 hats separately
Use this when your offer includes multiple products and you want customers to qualify by mixing them freely.
Step 3: Maximum Discount Uses
The Maximum discount uses card limits how often the discount can be redeemed:

- Limit number of times this discount can be used in total: global cap across all customers (for example only the first 100 redemptions)
- Limit to one use per customer: each customer can redeem only once
Step 4: Customer Eligibility
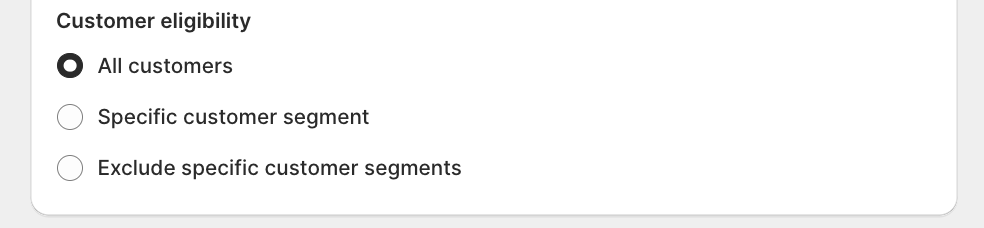
The Customer eligibility card decides who can use the discount:
- All customers: everyone can redeem
- Specific customer segment: only customers in a chosen Shopify segment (for example VIP customers, Wholesale)
- Exclude specific customer segments: everyone except the chosen segments
Step 5: Countdown Timer (NEW)
The Countdown timer card adds a live countdown next to the tier table. Useful for limited-time campaigns. Toggle on, then set the end date and time.
Step 6: Avada Joy Subscriptions (NEW) (optional)
Next Steps
Troubleshooting
Q1: The volume table doesn't show on my product page
The most common cause: the theme app embed isn't enabled. Open App Embed and Theme Integration and follow the 2-minute setup. Also confirm the offer Status is Active and the schedule covers the current date.
Q2: The discount doesn't apply at checkout
Check that the customer's basket meets the Tier 1 quantity threshold and the product is in your trigger scope (not on the exclusion list). If you have a subscription app, remember those discounts apply first and may change the final price.
Q3: My tier shows the wrong price
Check Pricing option. If Apply discount for exact quantity only is on, the discount only applies at exact-match quantities, not "this tier or above". Toggle it off if you want the standard tier-or-above behavior.
Q4: I want a custom discount code (for example SUMMER25)
Manual code editing is gated. Click Contact support in the Discount code field and the team can enable it for your store.
Q5: My subscription app and Volume Discount give a weird final price
Subscription discounts apply first, then your Volume Discount. To get consistent pricing, use only discounts created in AOV.ai Bundle Upsell (skip the subscription app's built-in discount).