How to Set Up Mix & Match Bundle
What Is Mix & Match Bundle?
Mix & Match Bundle lets customers fill predefined option slots to build a flexible pack. You define the slots (for example Pick a shampoo, Pick a conditioner, Pick a styling product). The customer picks one product per slot. The whole pack sells as one bundle at a discount.
It's the right offer type when the bundle structure is fixed (always 3 slots, always 1 product per slot) but the contents are flexible (customer chooses what goes in each slot).
When to Use It
- You want to offer a variety pack where customers pick the contents (a 3-pack where each slot picks a flavor, a haircare set where each slot picks a step)
- You want to merchandise complementary categories together (one moisturizer + one serum + one cleanser)
- You sell products where the structure is "one of each kind" rather than "any N items"
Before You Start
You'll need:
- The eligible products for each slot already in your Shopify catalog
- The AOV.ai Bundle Upsell app installed
- Theme app embed enabled so the Mix & Match widget can render on the product page. See App Embed and Theme Integration
Setup Walkthrough
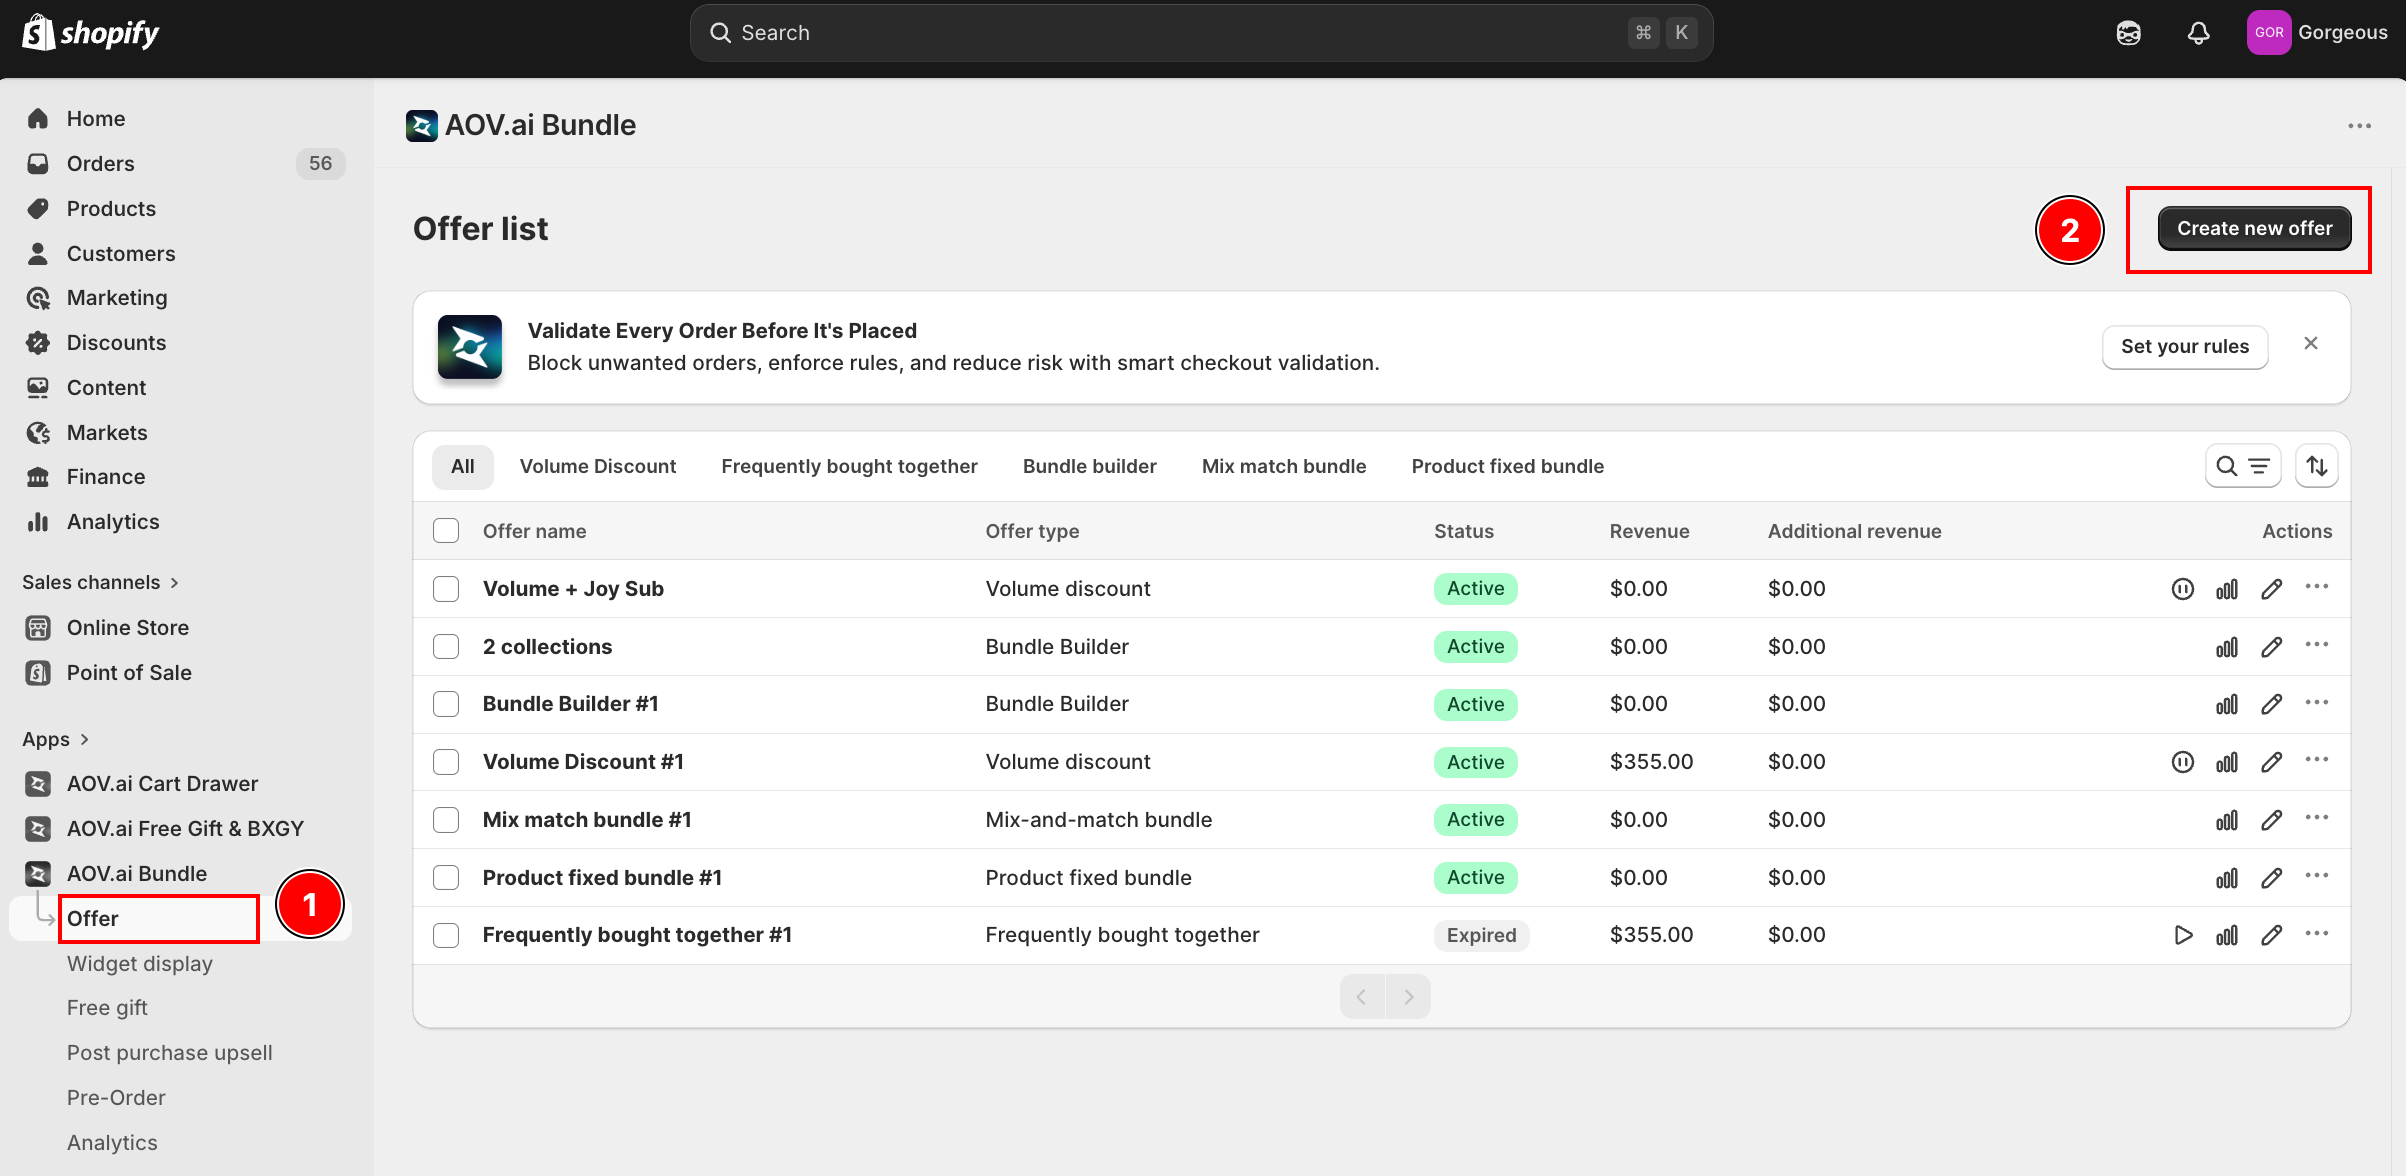
Step 1: Open the Offer Chooser
From the Shopify admin, open AOV.ai Bundle Upsell in the left sidebar. Click Offer, then click Create new offer in the top-right.
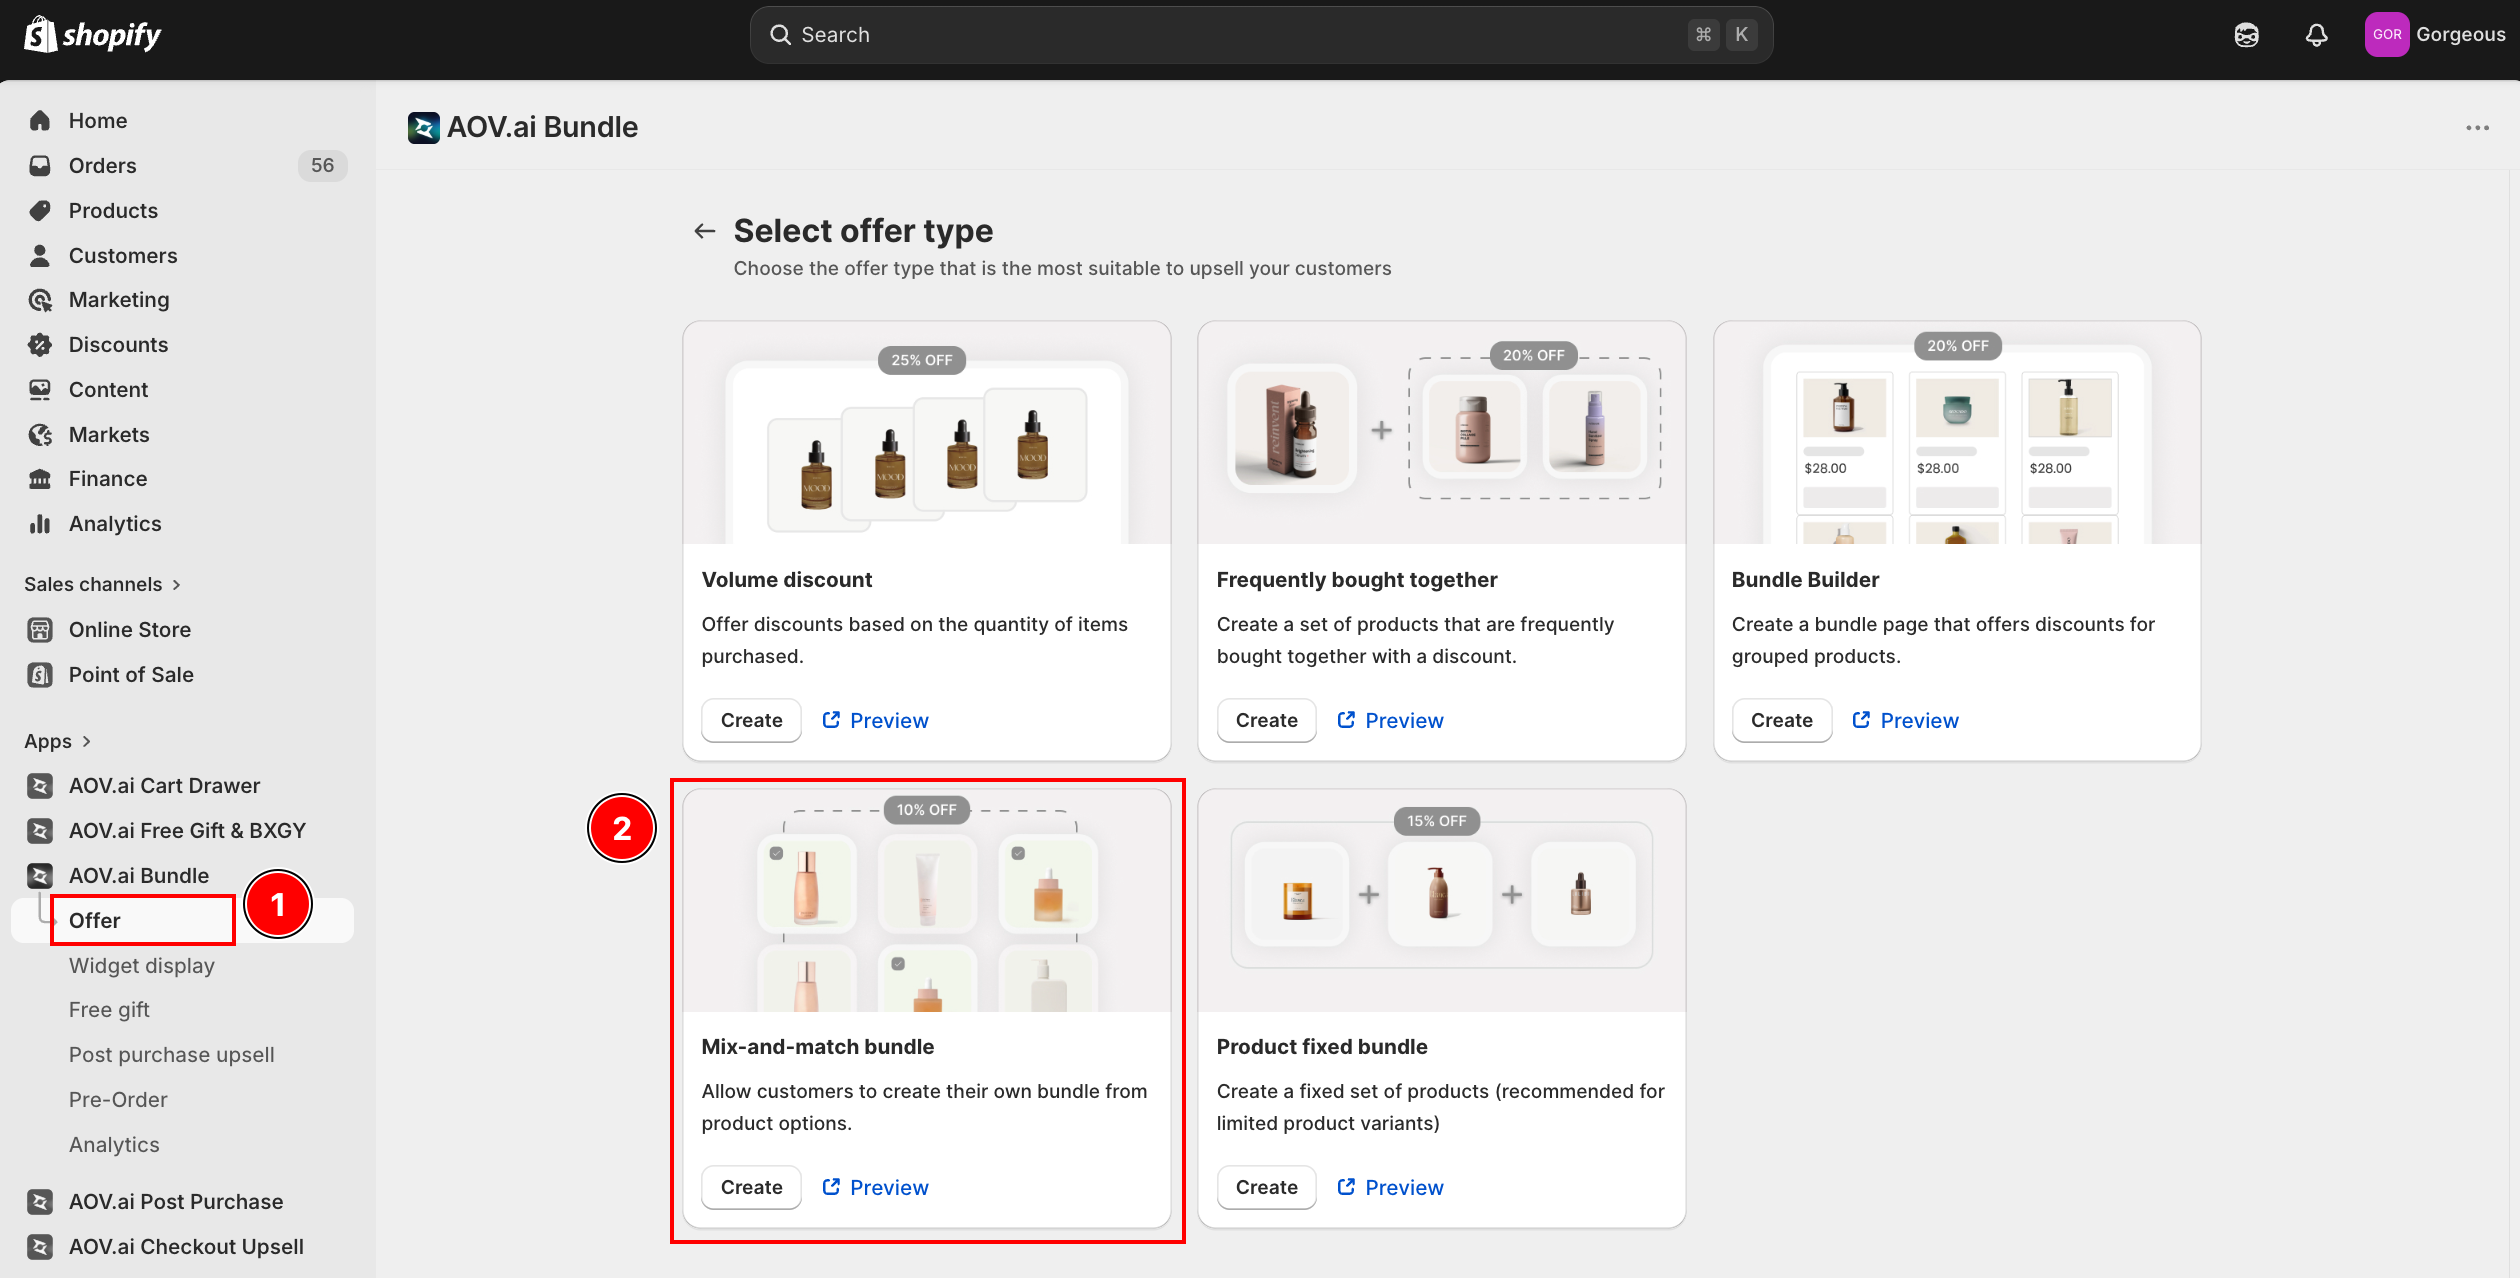
Step 2: Pick the Mix-and-Match Bundle Card
On the Select offer type screen, find the Mix-and-match bundle card and click Create.
Step 3: Enter the Offer Title
The form opens with Offer information at the top.
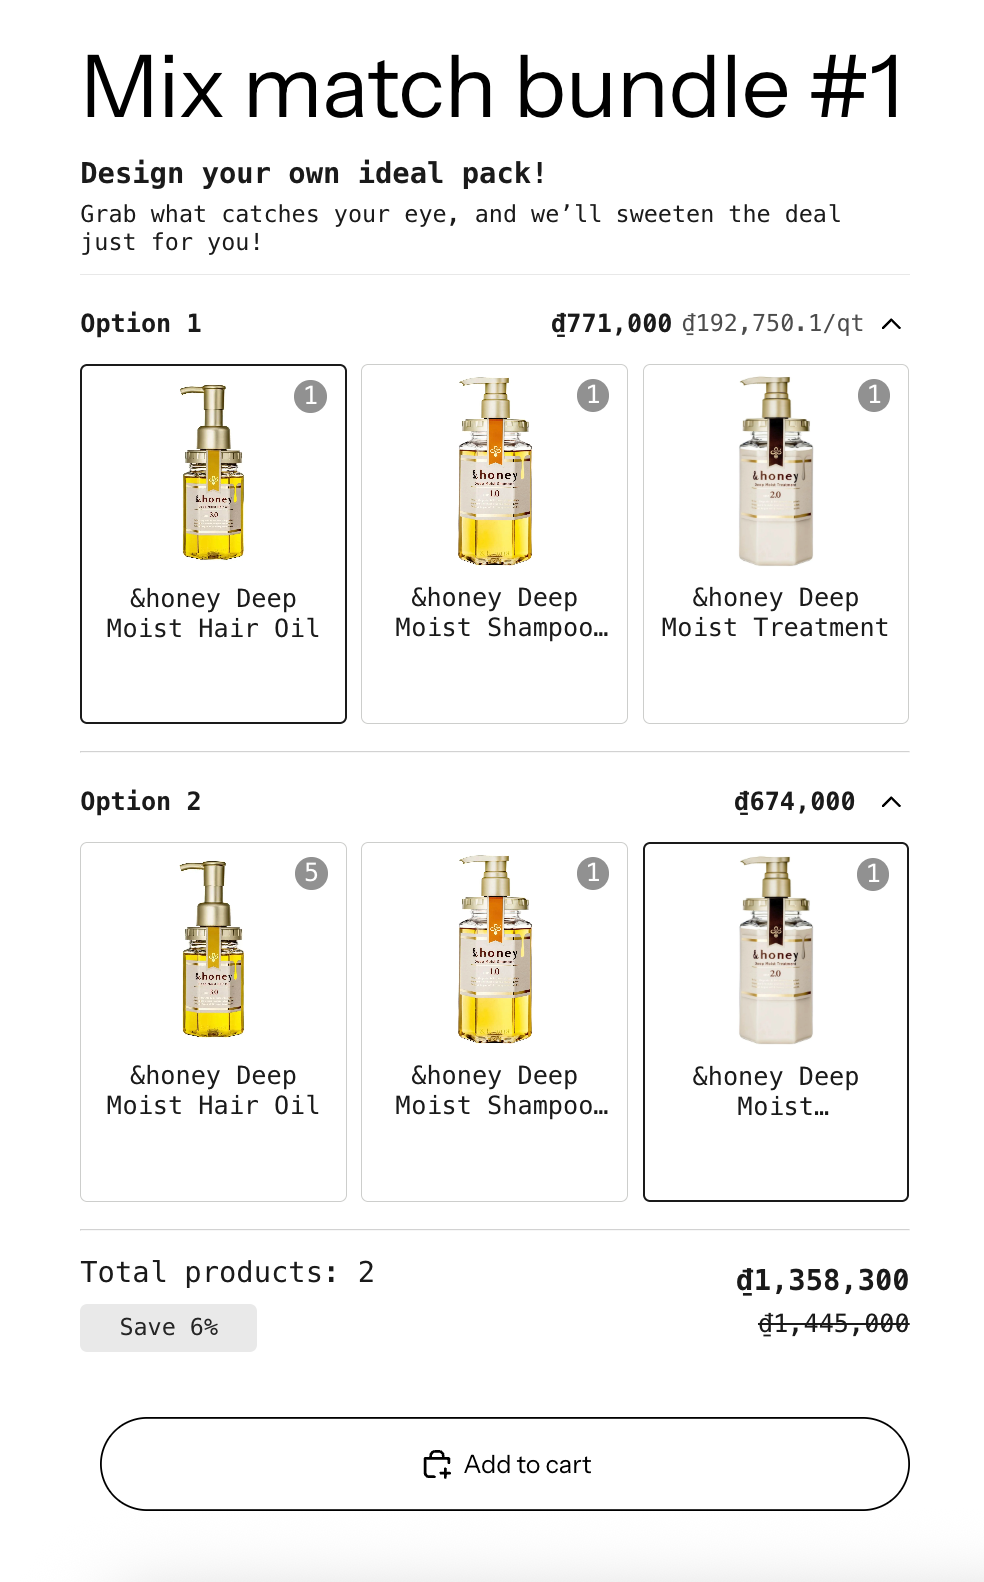
- Offer title: this is the customer-facing bundle name that appears on the storefront (for example Build Your 3-Pack). Choose something clear and descriptive. Unlike the other offer types, where Offer name is internal-only, customers will see this title.
Step 4: Build the Bundle Options
In the Bundle option card, you define the slots customers will fill. The card explains: "For each option added, your customers can select one value (a product) corresponding to the quantity you have set."
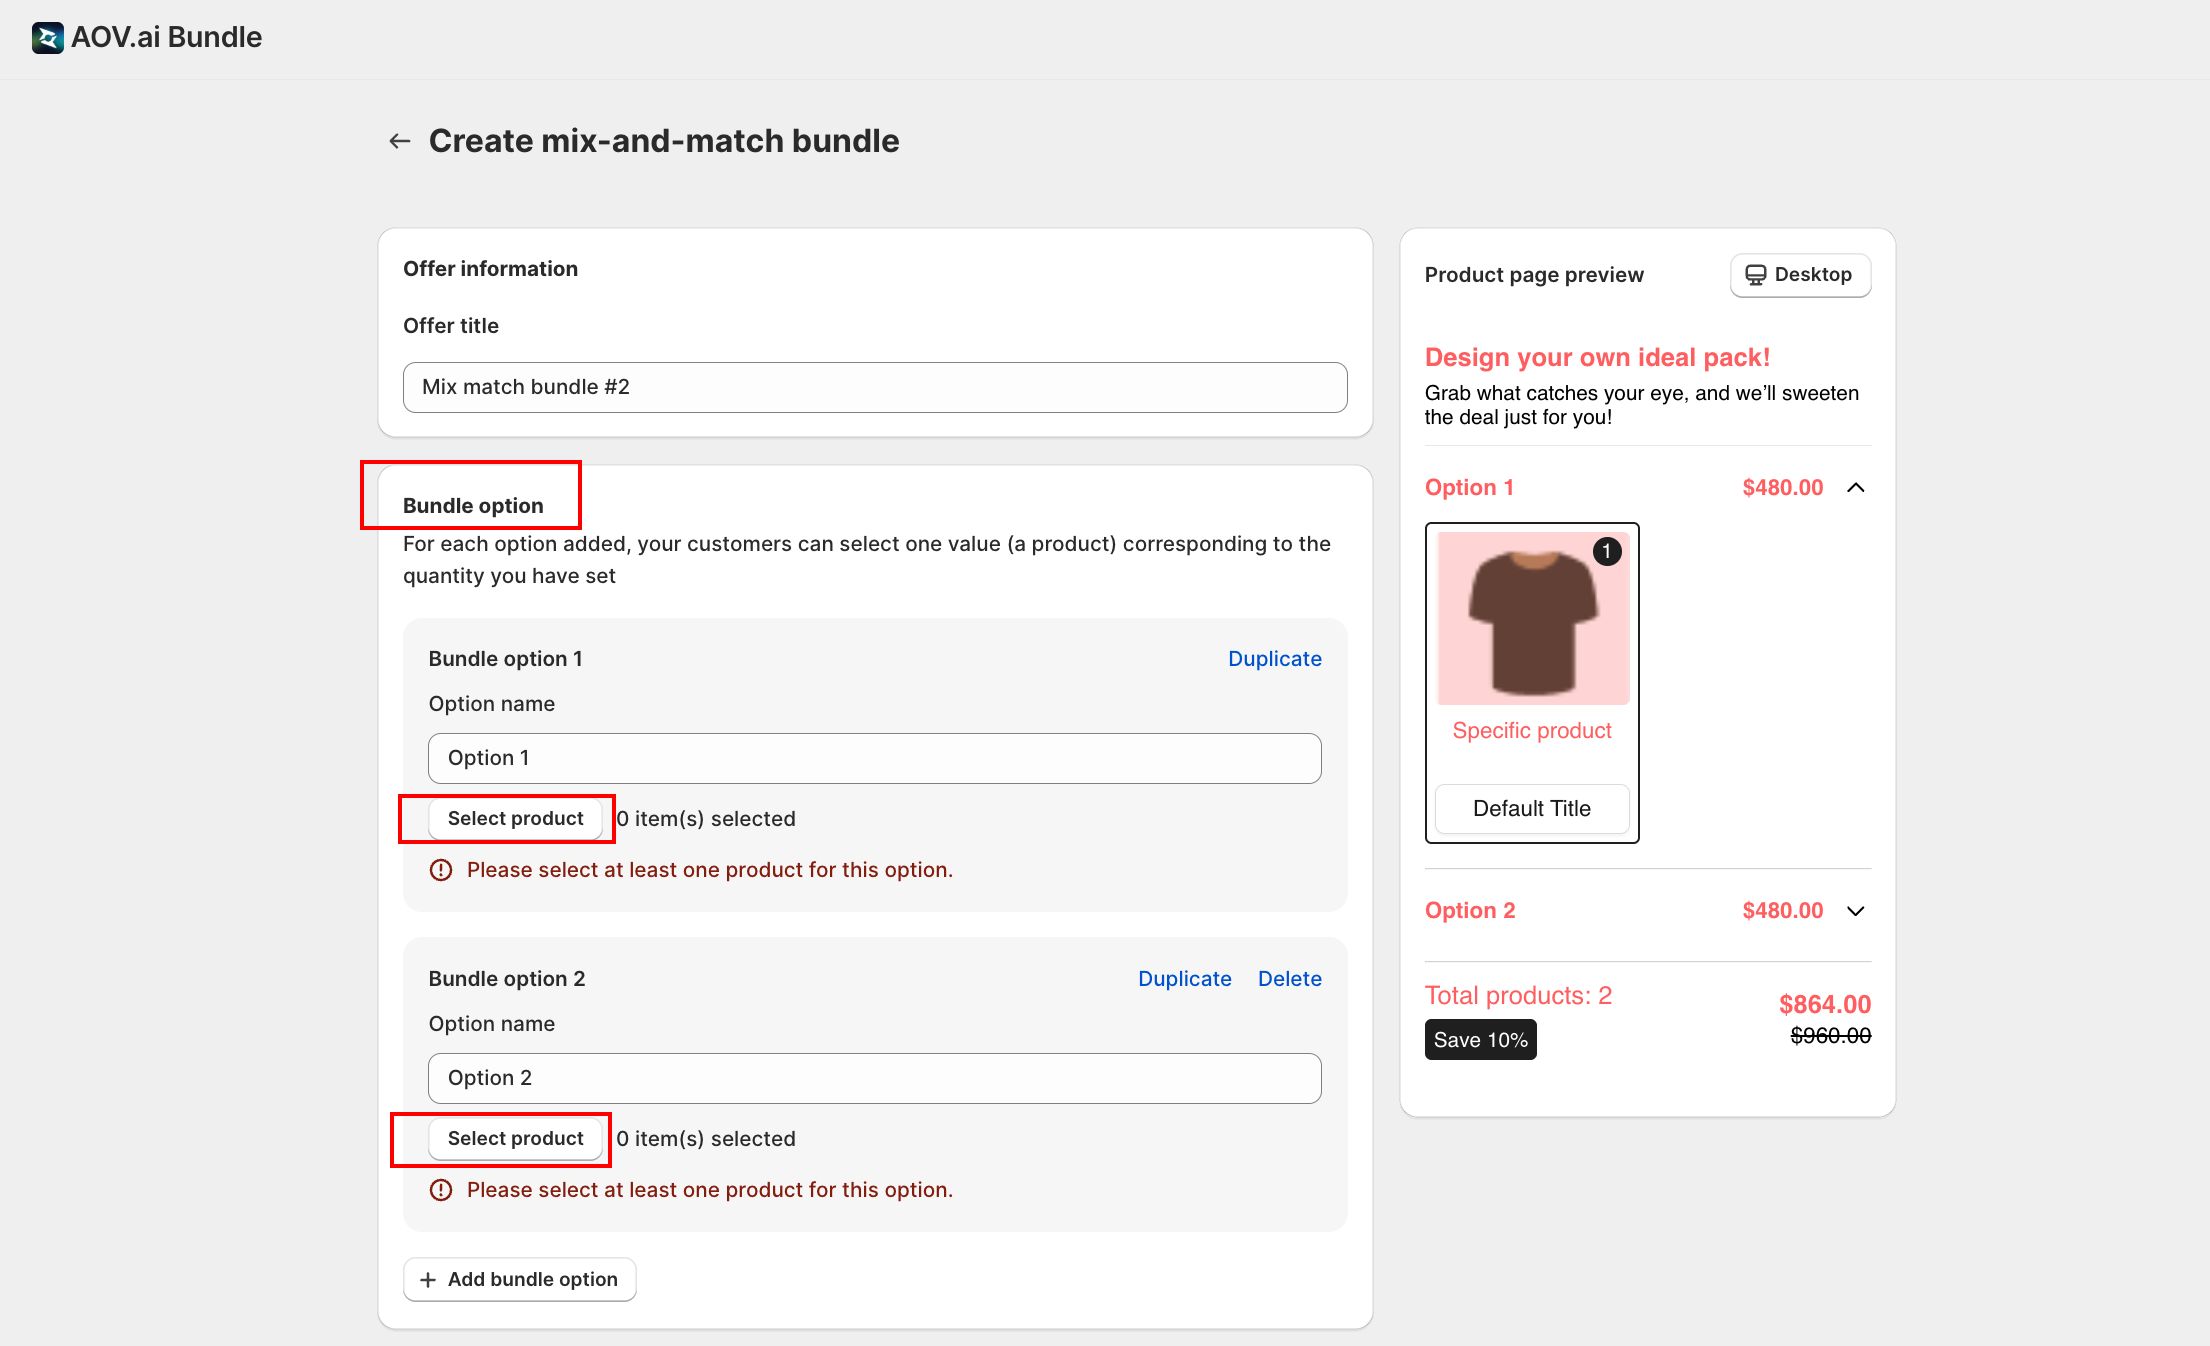
For each Bundle option card:
| Field | What it does |
|---|---|
Option name | Customer-facing slot name (for example Pick a shampoo); appears in the widget as the slot header |
Select product | Click to open the product picker; pick the products customers may choose for this slot |
Duplicate | Clone the option (keeps the name and product set; you can edit both) |
| Delete | Delete this option |
If a slot has no products selected, you'll see a warning: "Please select at least one product for this option." The slot must have at least one product before you can save.
Click Add bundle option to add another slot. Repeat for as many slots as you need (a 3-pack uses 3 slots).
Step 5: Set the Discount
Scroll to Discount settings.
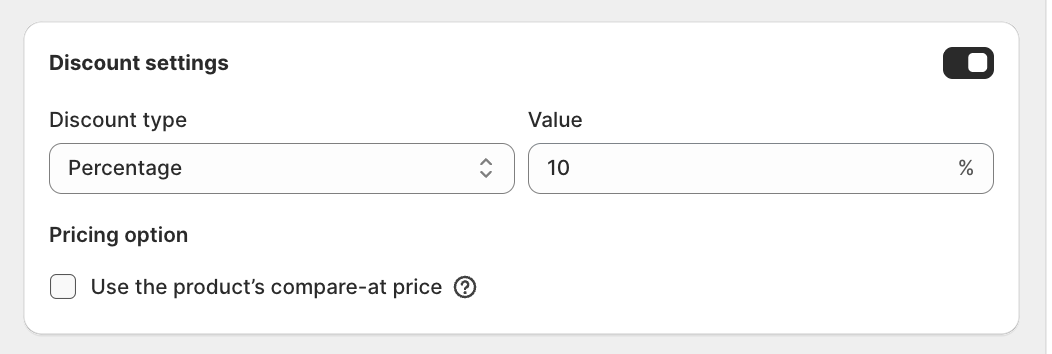
- Discount type: pick one:
- Percentage: discount expressed as a % off (for example 15% off the bundle)
- Fixed amount: discount expressed as a flat amount (for example $20 off the bundle)
- Fixed price (NEW): set a fixed bundle price (for example Buy any 3 for $99); the system computes the discount needed to hit that price
- Value: enter the discount value (or fixed price)
Pricing option:
- Use the product's compare-at price (NEW): use each product's existing Shopify compare-at price as the original price reference, instead of recomputing from the cart. Useful when your products already have a "was $X" price set in Shopify.
Step 6: Configure the Widget Display
Scroll to the Widget display card.
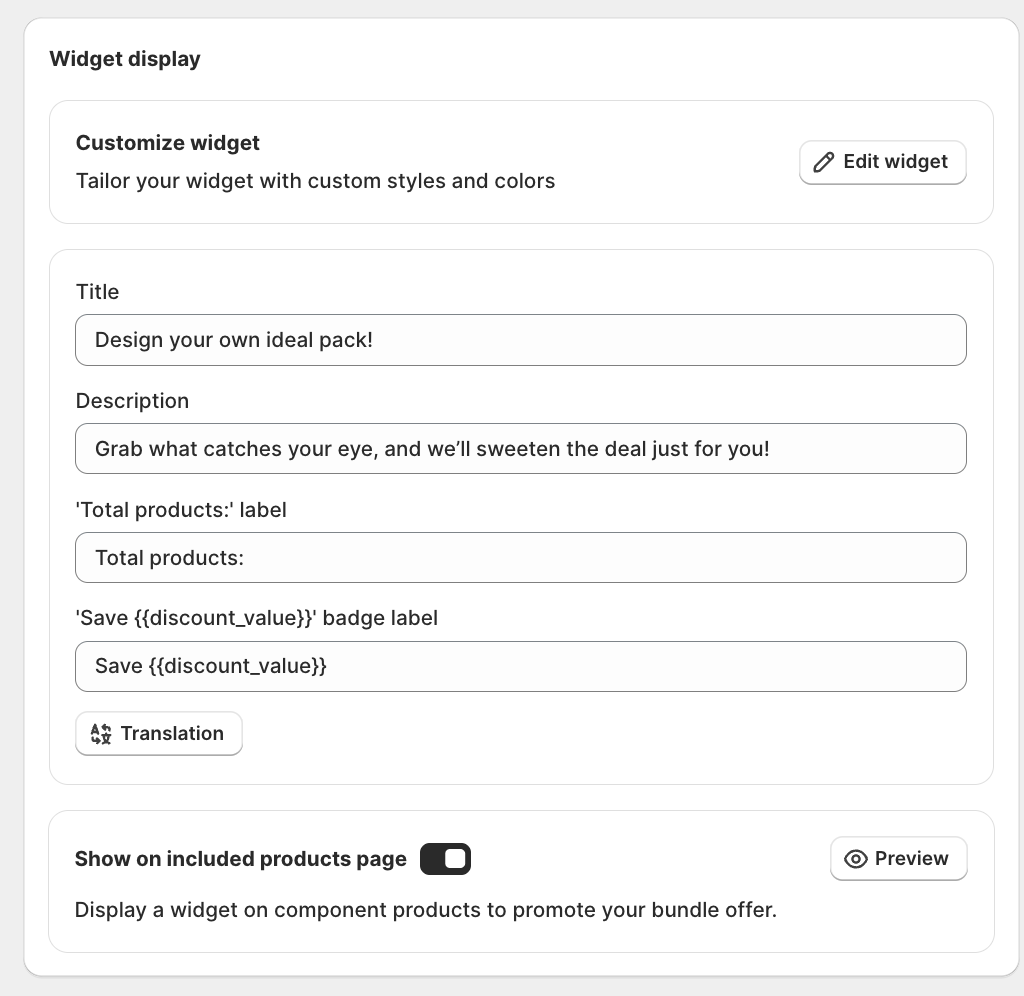
Below the callout:
1. Customize widget
Click Edit widget to open the visual editor where you adjust theme colors and label styles. You can also edit the content labels shown in the widget:
- Title: headline above the option slots (default: Design your own ideal pack!)
- Description: short helper line under the title (default: Grab what catches your eye, and we'll sweeten the deal just for you!)
- 'Total products:' label: caption shown before the counted number of items in the bundle
- 'Save
{{discount_value}}' badge label: text used for the savings badge; keep{{discount_value}}as a placeholder so the live discount renders dynamically
2. Show on included products page
Toggle on to display a small promo widget on each component product's own page, promoting the bundle. Useful for cross-selling: a customer browsing one of the eligible products sees that they could buy the whole pack and save.
3. Preview
Live preview of the widget on the right panel.
Step 7: Pick the Redirect After Add to Cart
The Redirect after Add to cart radio buttons decide where the customer goes once they add the bundle:

| Option | Behavior |
|---|---|
| Current page | Stay on the current product page (good if you want to keep shopping flow) |
| Cart page | Redirect to /cart |
| Checkout page (NEW) | Redirect straight to checkout (highest conversion if the customer is ready to pay) |
Step 8: Schedule the Offer
Scroll to the Schedule card.
- Start date / time: when the offer goes live
- End date (optional): tick Set end date to make this a limited-time campaign
Times use your store's timezone.
Example Setup
"Build Your 3-Pack" for a haircare store:
| Slot | Option name | Eligible products |
|---|---|---|
| 1 | Pick a shampoo | Products from the Shampoo collection |
| 2 | Pick a conditioner | Products from the Conditioner collection |
| 3 | Pick a styling product | Products from the Styling collection |
- Discount type: Percentage, 15%
- Pricing option: Use the product's compare-at price
- Redirect after Add to cart: Cart page
Customers pick one product per slot and watch the savings badge update automatically.
Next Steps
- Mix-and-match widget: customize colors, labels, and the bundle summary panel
- Discounts: how discount codes, combinations, and max-uses work across all offer types
Troubleshooting
Q1: I can't save the offer; one of my options shows a red warning
The warning "Please select at least one product for this option" means a slot has no eligible products. Open the option card and click Select product to add at least one.
Q2: The widget doesn't show on my product page
The theme app embed isn't enabled. Click Add widget in the Widget display callout to open the theme editor with the block ready to drop in. Or follow App Embed and Theme Integration.
Q3: The bundle price seems wrong
Check the Pricing option. If Use the product's compare-at price is on, the original price comes from each product's Shopify compare-at value, not the live price. If your products don't have compare-at set, the savings badge may show $0 or look off.
Q4: Customers add the bundle but get sent to the wrong page
Check Redirect after Add to cart. It controls whether they stay on the page, go to cart, or go straight to checkout.