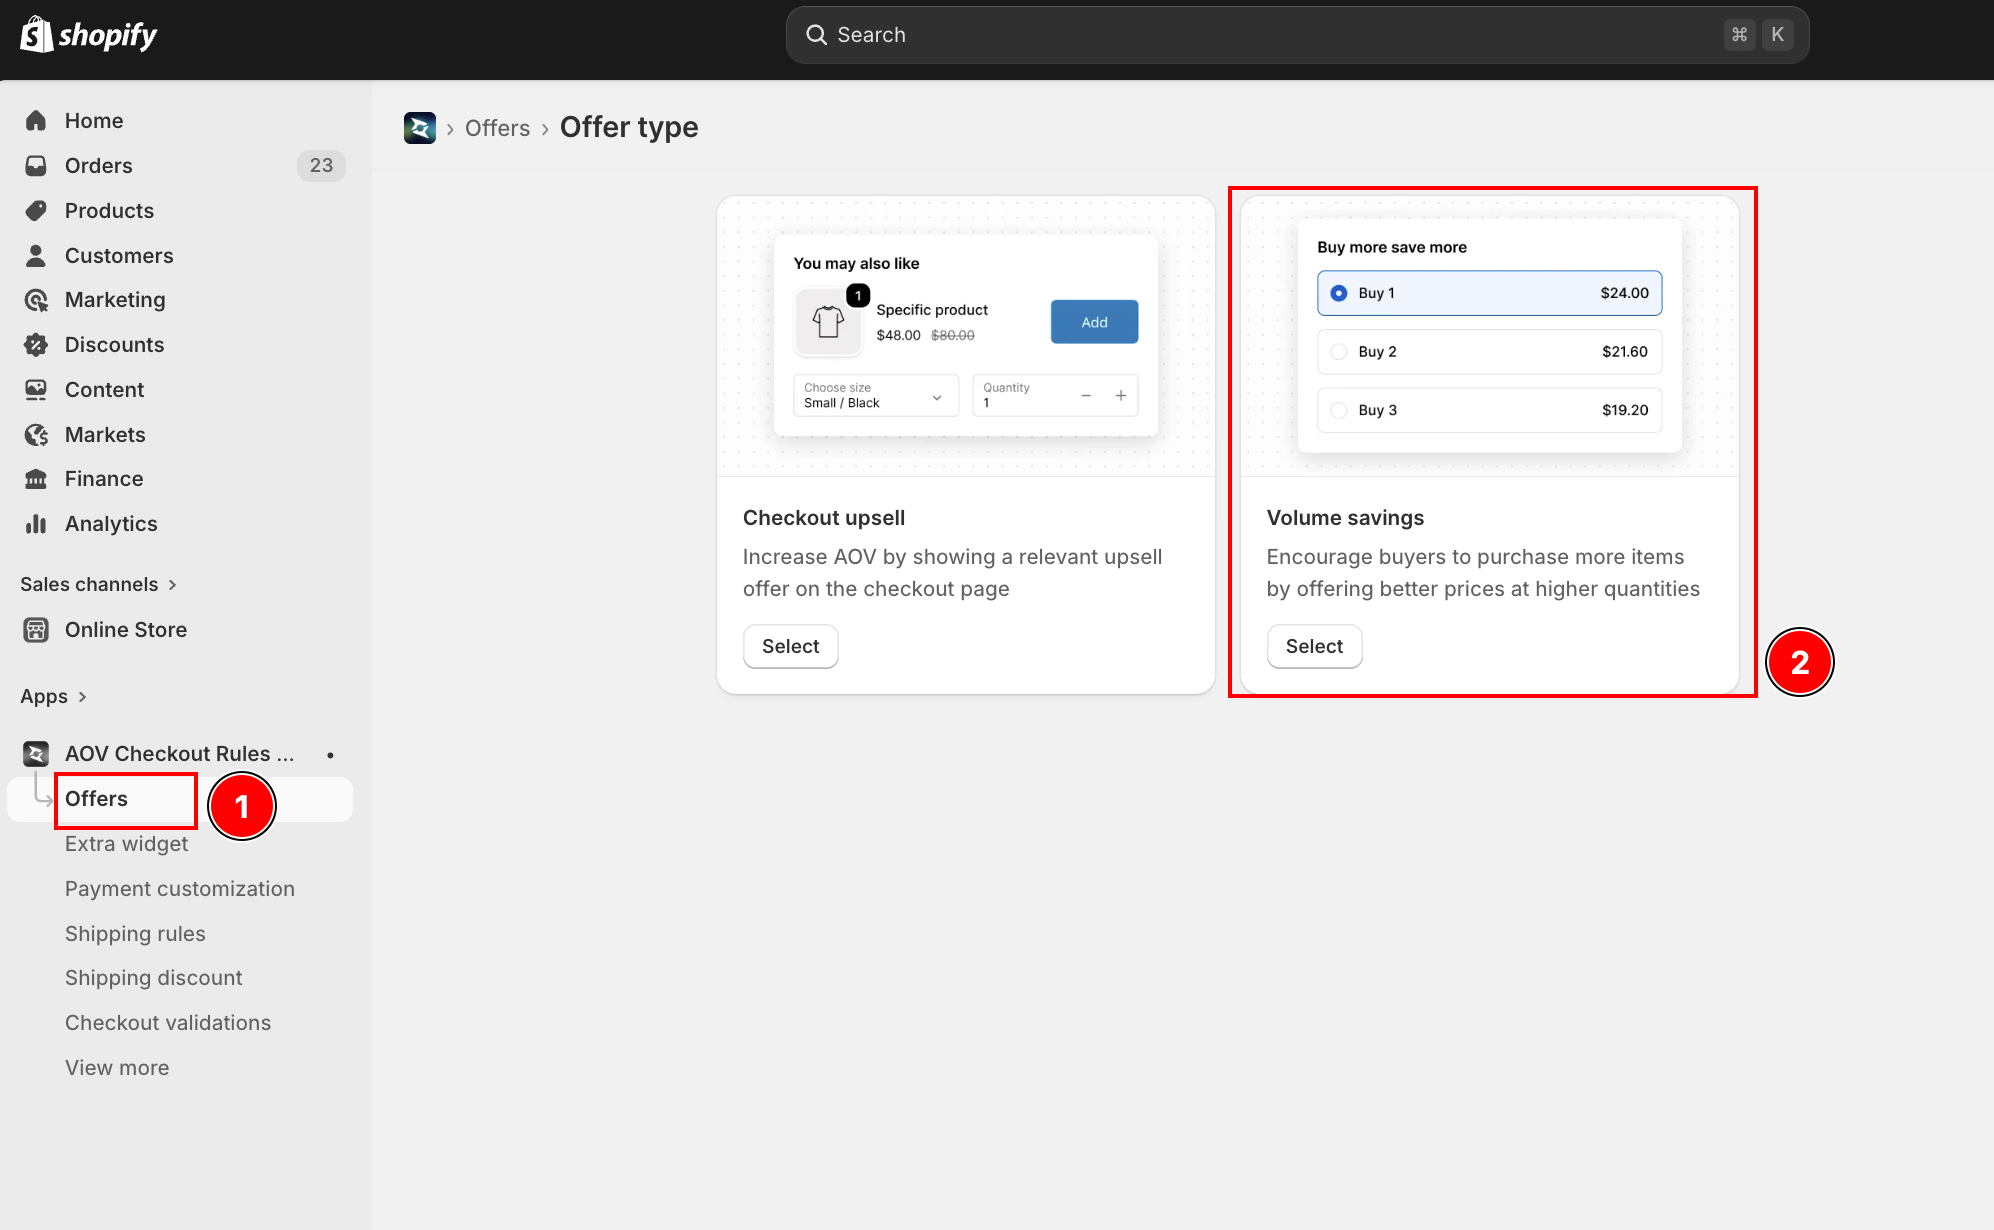
Volume Savings
Encourage buyers to purchase more items by offering better prices at higher quantities. Volume Savings shows a "Buy more, save more" tier widget under each eligible product at checkout — buyers pick a quantity tier and the matching discount is applied automatically.
Requires Shopify Plus. Volume Savings uses Checkout UI Extensions, which are available on Shopify Plus plans.
Where it lives: Volume Savings is an offer type, not an Extra Widget. You create it from the Offers section of the app (alongside Checkout Upsell) — not from the Extra Widgets list.
What it does
Volume Savings adds a quantity-tier selector beneath each matching product in the Order Summary at checkout:
- Quantity tiers — define thresholds like "Buy 1", "Buy 2", "Buy 3" with a discount per tier.
- Automatic discount — when a buyer selects a tier, the line quantity updates and the matching discount code is applied automatically — buyers never type a code.
- Per-tier pricing — each tier shows its discounted price (and an optional "Save X%" / "Save $X" badge).
- Product targeting — apply to all products, specific products, or products in selected collections.
The widget appears as a collapsible link under each eligible product. Buyers click to expand and choose a tier — the cart updates instantly without page reload.
Step 1: Create a Volume Savings offer
In the app sidebar, open Offers, then create a new offer and choose the Volume savings offer type.
| Offer type | Description |
|---|---|
| Checkout upsell | Increase AOV by showing a relevant upsell offer on the checkout page |
| Volume savings | Encourage buyers to purchase more items by offering better prices at higher quantities |
The editor opens with a two-column layout: settings on the left and a live preview on the right.
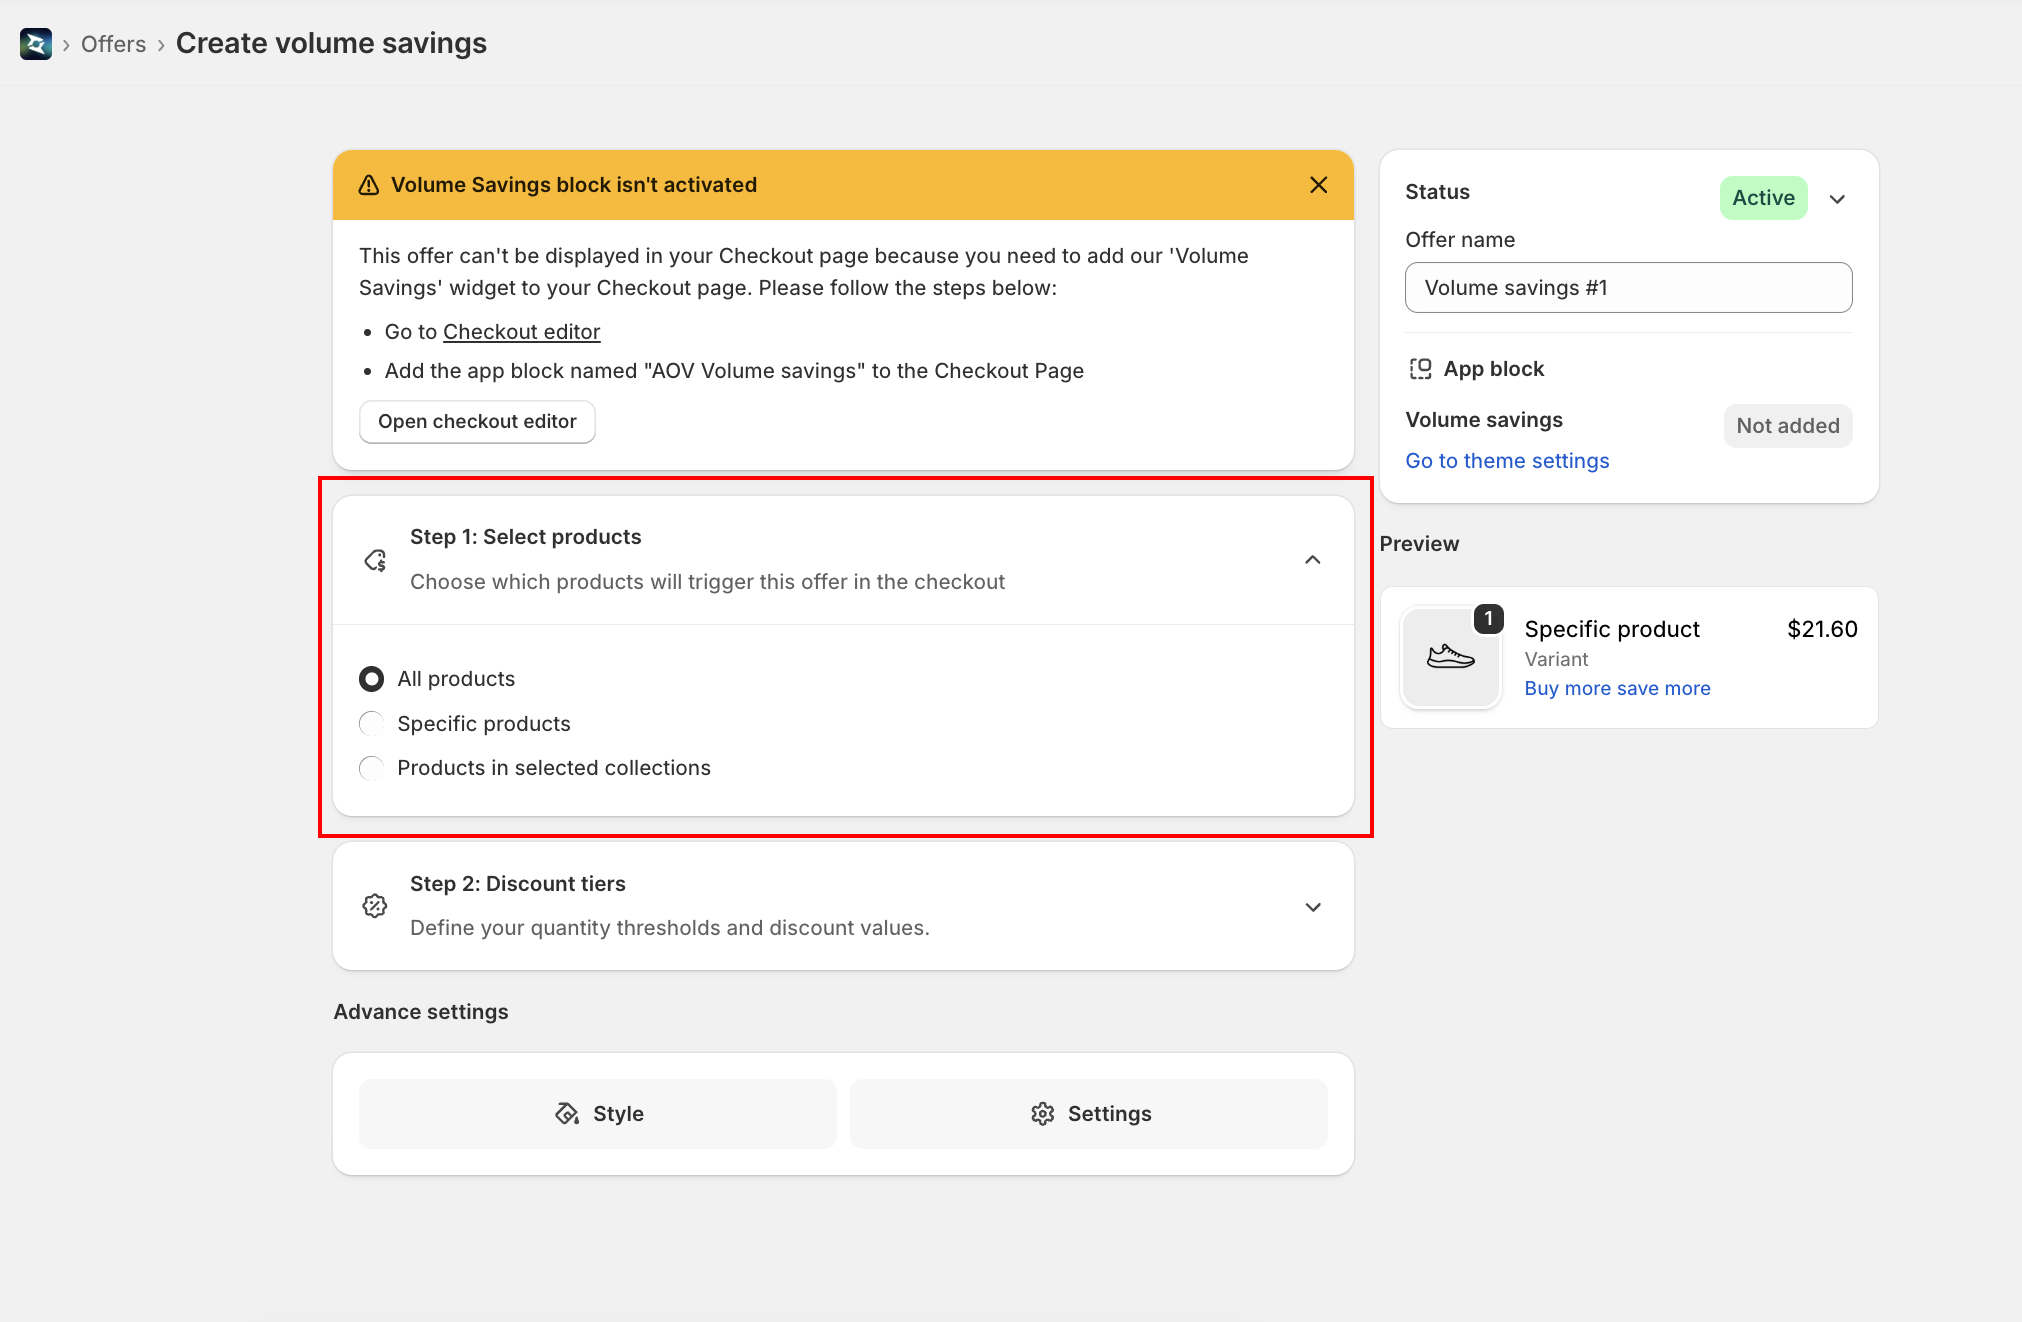
Step 2: Select products (trigger)
Under Step 1: Select products, choose which products will trigger this offer at checkout.
| Option | Description |
|---|---|
| All products | The volume widget shows under every product in the cart |
| Specific products | Only the products you select trigger the widget |
| Products in selected collections | Only products belonging to the collections you select trigger it |
For Specific products or Products in selected collections, a browse button appears so you can pick the products or collections.
Step 3: Set discount tiers
Under Step 2: Discount tiers, define your quantity thresholds and discount values. Each offer has one or more tiers, shown as tabs (Tier 1, Tier 2, …). Click Add tier to add another.
Each tier has these fields:
| Field | Description | Default |
|---|---|---|
| Quantity | The quantity threshold for this tier (minimum 1). Tiers are kept sorted by quantity. | 1 |
| Discount type | No discount, Percentage, or Fixed amount | Percentage |
| Value | The discount amount. Shown only when discount type is Percentage or Fixed amount. Suffix is % for percentage or your store currency for fixed amount. | 10 |
| Title | The tier label. Use {{quantity}} to insert the quantity — e.g., Buy {{quantity}}. | Buy {{quantity}} |
| Badge (optional) | A small badge next to the title. Use {{value}} to insert the discount — e.g., Save {{value}}. | Save {{value}} |
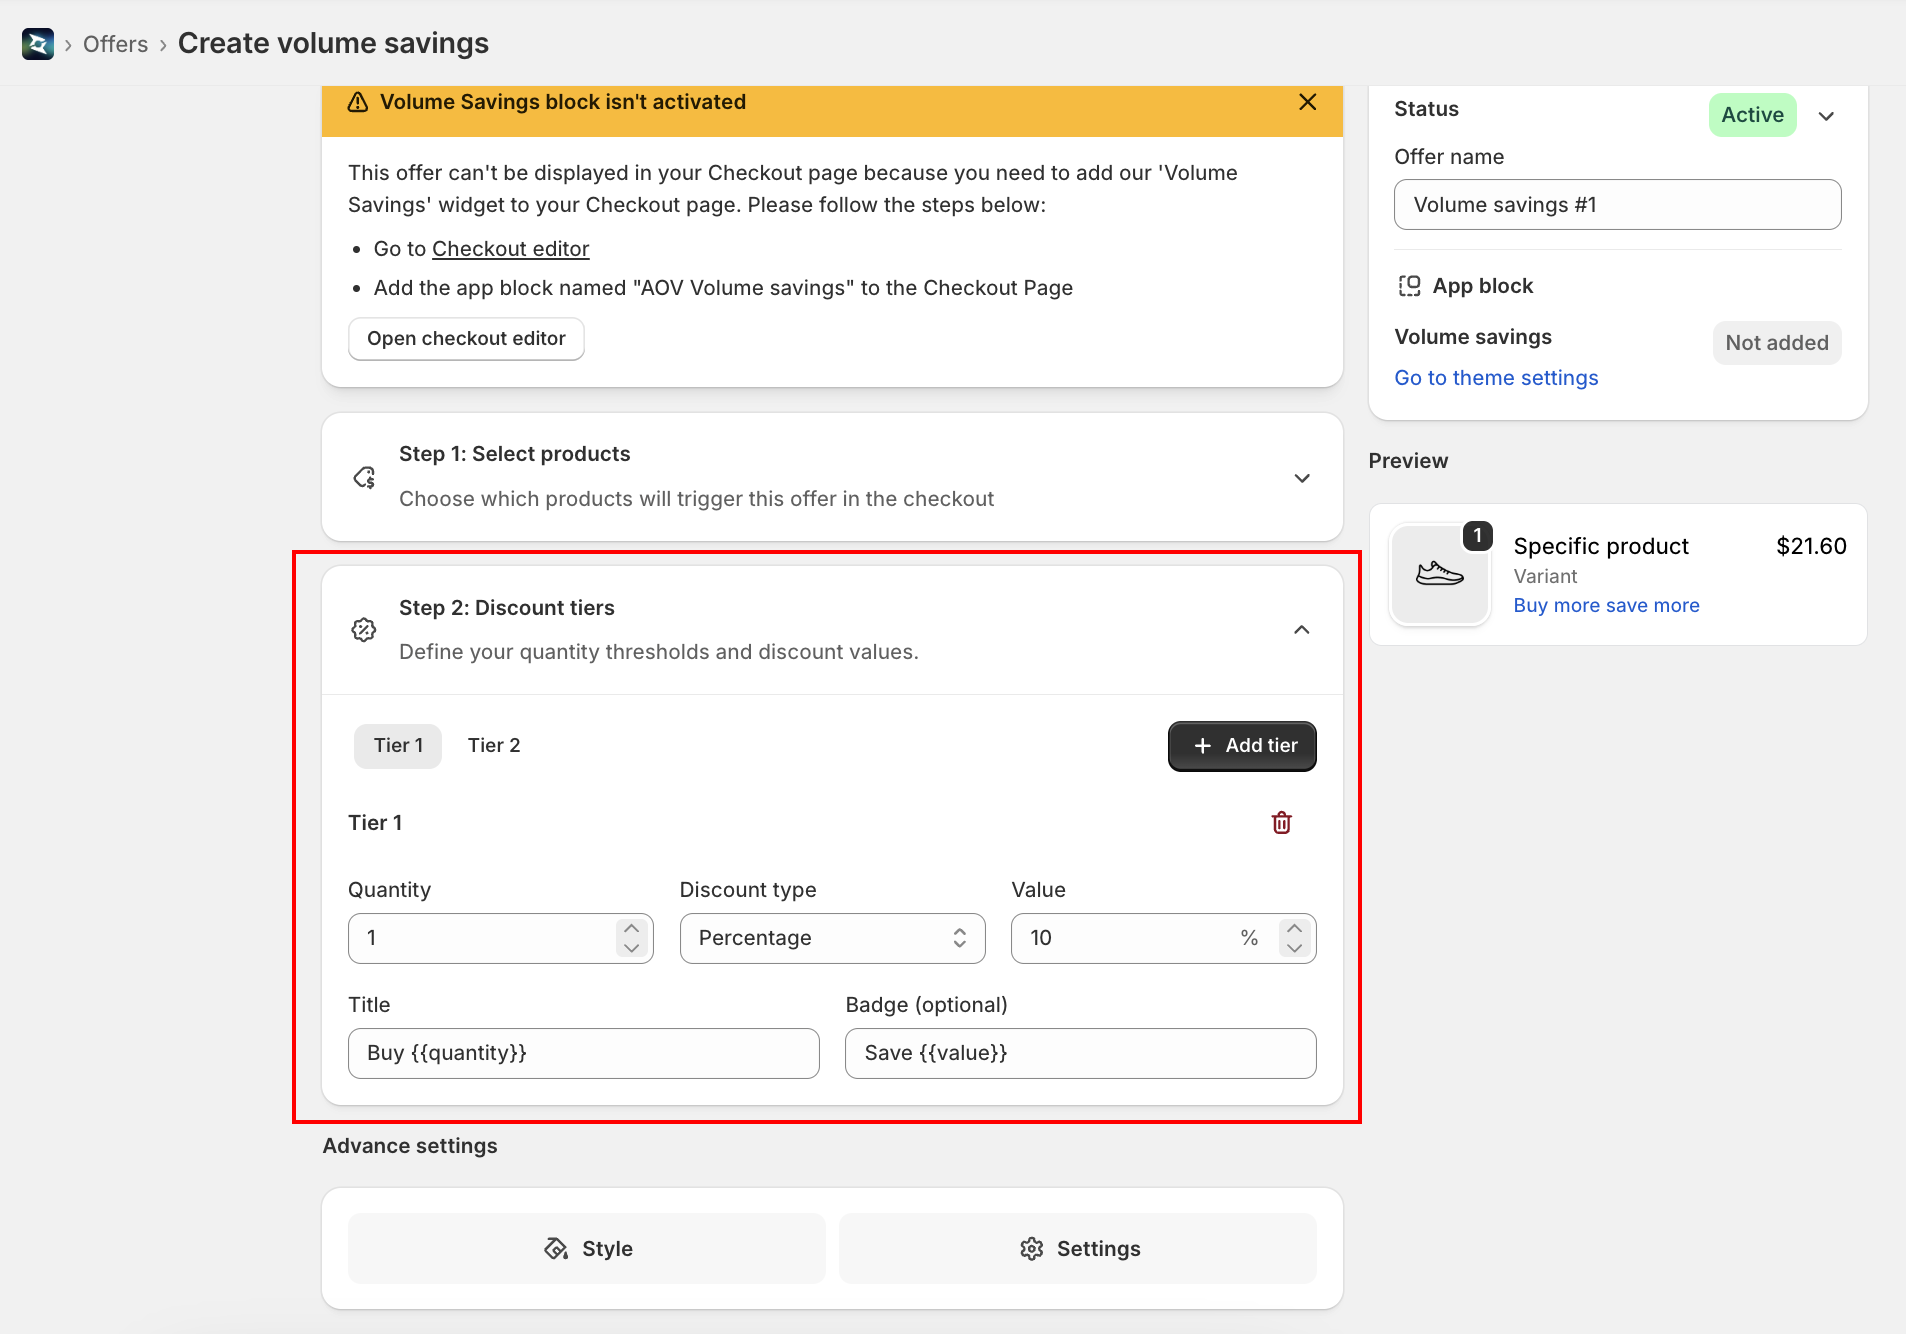
Tier defaults: When you add a tier, its quantity is one more than the previous tier and its discount value steps up by 5%, capped at 40%. You can change any of these freely. Up to 4 tier tabs show inline — additional tiers appear in an overflow menu.
Template placeholders
| Placeholder | Replaced with | Used in |
|---|---|---|
{{quantity}} | The tier's quantity (e.g., Buy 3) | Title |
{{value}} | The discount value — 20% or $5 | Badge |
Step 4: Advance settings
The Advance settings section has two tabs: Style and Settings.
Style tab
| Setting | Description | Default |
|---|---|---|
| Title | The widget heading shown at checkout (and the collapsed-state link text) | "Buy more save more" |
| Collapse | "Hide the volume savings widget by default and let buyers expand it." When on, buyers see the title as a link and click to expand. | On |
| Badge color | Color of the per-tier badge: Black, Red, or Grey | Black |
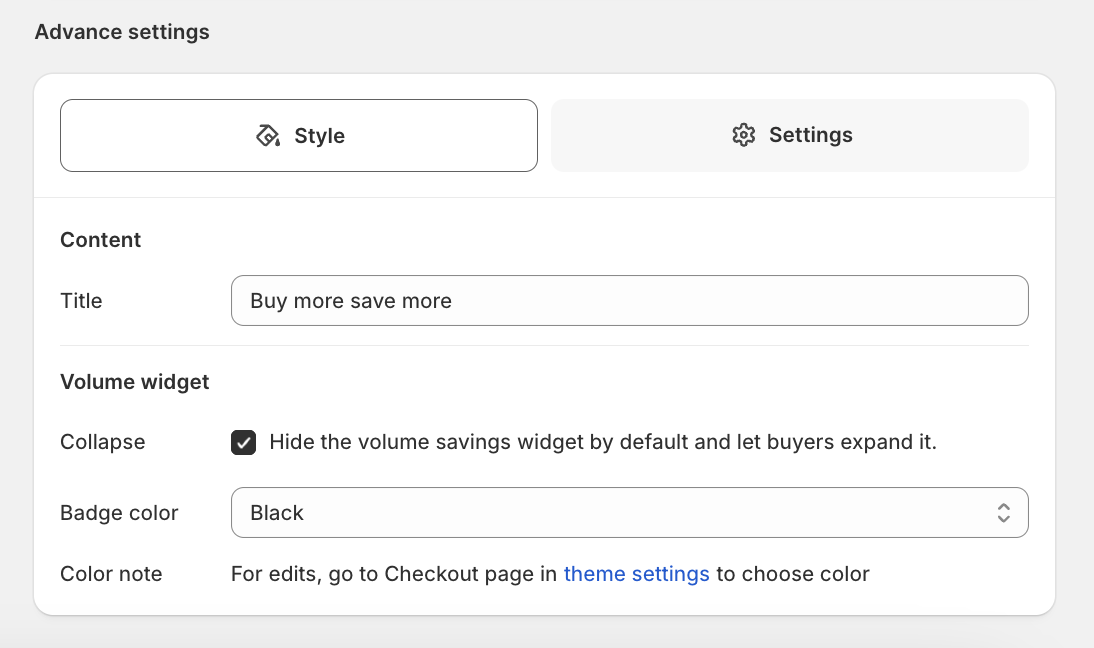
Badge color note: For finer color control, edit the widget on the Checkout page in your theme settings (the editor links you there).
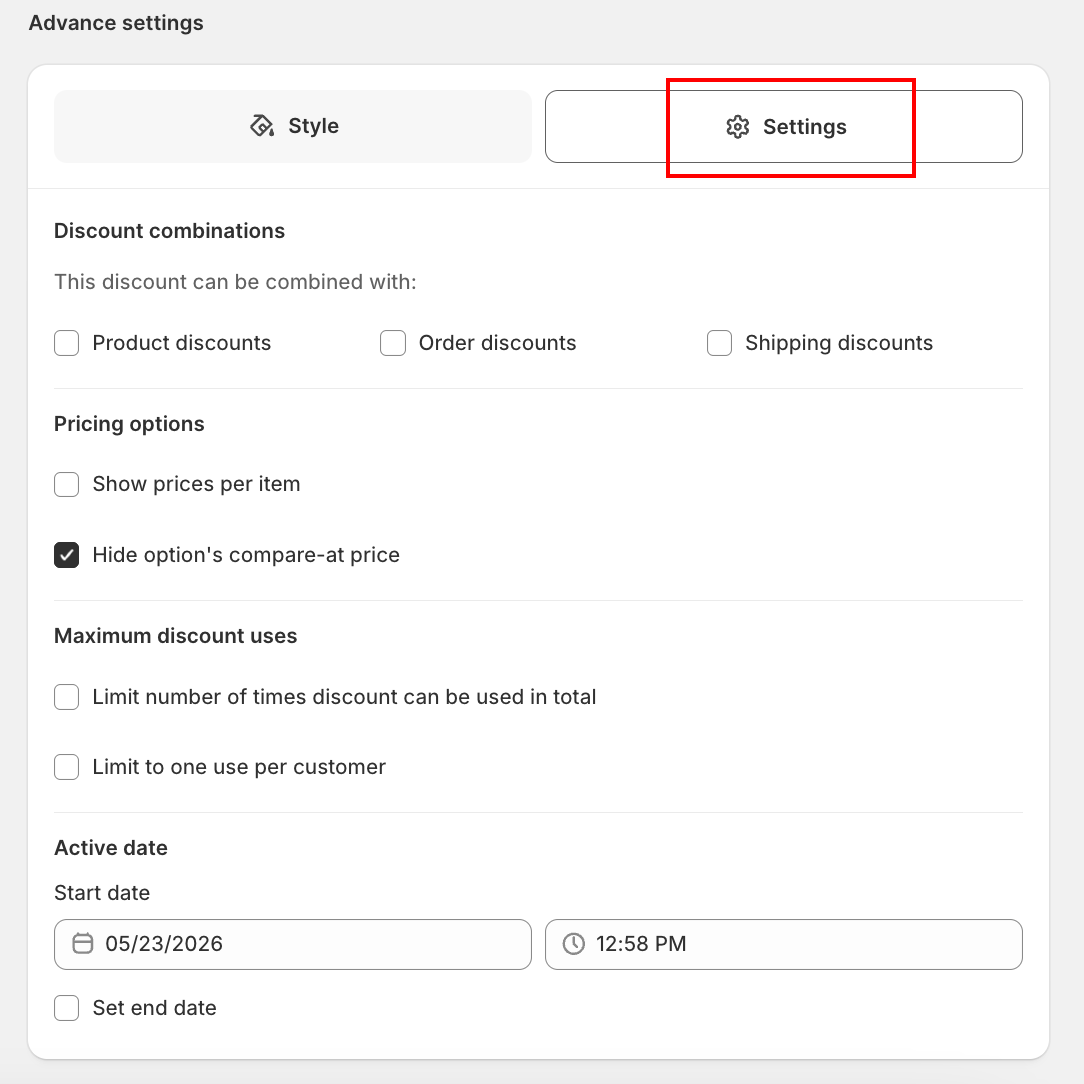
Settings tab
| Setting | Description |
|---|---|
| Discount combinations | Which other discounts this can combine with: Product discounts, Order discounts, Shipping discounts |
| Show prices per item | • Show each tier's price as a per-item price. • When on, a Per-item suffix field appears for the text appended after the per-item price (default /each). |
| Hide option's compare-at price | Hide the original (struck-through) price next to the discounted tier price |
| Limit number of times discount can be used in total | Cap total uses of the discount. When on, set the usage limit number. |
| Limit to one use per customer | Restrict the discount to one use per customer |
| Schedule | Set an Active date (Start date) and optionally Set end date |
Step 5: Status, name, and the app block
The right column shows the offer's status, name, discount code (after first save), and app-block status.
| Field | Description |
|---|---|
| Status | Active (live at checkout) or Expired (hidden). Toggle from the status badge. |
| Offer name | Internal name for your reference — not shown to buyers. Required. |
| Discount code | Auto-generated code (prefix AOV_VolumeSavings_) applied behind the scenes. Read-only unless your plan allows editing — contact support to change it. Shown after the first save. |
| App block | Shows Added (green) or Not added for the Volume Savings checkout block. Click Go to theme settings to add it. |

Live preview: The right column shows a sample product with your tiers. Click the title to expand/collapse and click a tier to preview its price and badge. The preview uses a sample base price.
Step 6: Add the block in Theme Editor
After saving your offer, add the block to your checkout page:
- Go to Shopify Admin → Online Store → Customize (or click Go to theme settings in the editor)
- Navigate to the Checkout page in the theme editor
- Click Add block → select AOV Volume savings
- Position the block in the Order Summary section — it renders below each product line item
- Click Save in the theme editor
If the app block is not added, the editor aside shows Not added for the block status. The widget will not appear at checkout until the block is added on the Checkout page.
How it works at checkout
The Volume Savings block targets purchase.checkout.cart-line-item.render-after, so it renders directly below each eligible product line item in the Order Summary.
Collapsed state (when "Collapse" is on)
Buyers see the offer title as a clickable link under the product. Clicking it expands the tier list.
Expanded state
Buyers see the title with a collapse control, then a list of selectable tiers. Each tier shows:
- Title — e.g., "Buy 3" (with
{{quantity}}filled in) - Badge (optional) — e.g., "Save 20%" or "Save $5" (with
{{value}}filled in), in your chosen badge color - Price — the discounted price for that tier, with the optional per-item suffix and optional struck-through compare-at price
When a buyer selects a tier, the line quantity updates to that tier's quantity and the offer's discount code is applied automatically.
Discount validation: The widget only shows (and only applies the discount) when the offer's discount is valid for the current cart — it checks the live discount list and existing applied codes. If the discount can't apply, the widget stays hidden.
Matching rules
- Only Active offers are matched. If multiple offers match a line, the one with the lowest priority number wins (unless one's code is already applied to the cart, which takes precedence).
- A line that already has a checkout-upsell discount attached is skipped — Volume Savings won't double up on it.
- For collection targeting, the widget looks up which collections the product belongs to before matching.
Tips
- Make the savings obvious — use the badge (
Save {{value}}) so buyers see the benefit at a glance. - Order tiers by value — higher quantities should carry a bigger discount; the app steps new tiers up by 5% automatically.
- Use "Show prices per item" for consumables — a per-unit price ("$6.40/each") makes bulk value easy to compare.
- Keep the title benefit-led — "Buy more save more" or "Bulk & save" reads better than a generic label.
- Target deliberately — use Specific products or Collections when only part of your catalog should offer volume pricing.
- Test at checkout — the admin preview uses a sample price; place a test order to confirm tiers and the auto-applied discount.
FAQs
Q: Is Volume Savings an Extra Widget? A: No. It's an offer type created from the Offers section (alongside Checkout Upsell). It does render at checkout via a Checkout UI Extension block, like the Extra Widgets do.
Q: Do I need Shopify Plus for Volume Savings? A: Yes. It uses Checkout UI Extensions, which require Shopify Plus.
Q: Do buyers have to enter a discount code? A: No. When a buyer selects a tier, the matching discount code is applied automatically.
Q: Can I apply it to only some products? A: Yes. Choose Specific products or Products in selected collections in Step 1.
Q: How many tiers can I add? A: As many as you need. Up to 4 tier tabs show inline; the rest appear in an overflow menu.
Q: Can the discount combine with other discounts? A: Use Discount combinations in the Settings tab to allow combining with Product, Order, and/or Shipping discounts.
Q: What's the maximum percentage discount? A: The app auto-steps new tiers up to 40%, but you can type any value in the tier's Value field.
Q: Does it work with Cart Editor? A: Yes. When both are active for the same product, Cart Editor handles variant editing while Volume Savings handles the quantity tiers — no duplicate controls.
Q: Where does the widget appear? A: In the Order Summary, directly under each eligible product line item (target purchase.checkout.cart-line-item.render-after).