How to set up
Increase your average order value by showing relevant product recommendations at checkout. Buyers see upsell offers and can add items to their order with one click — no page reload needed.
Shopify Plus required. Checkout upsell renders through a Checkout UI Extension placed on the checkout page. Editing the checkout page in the theme editor — and showing extensions there — is available only on Shopify Plus.
What it does
Checkout Upsell displays a product recommendation block on your checkout page. You control:
- Which buyers see the offer (trigger conditions)
- Which products appear (manual selection or AI-powered recommendations)
- Discounts per product (percentage discount, fixed amount discount, or no discount)
- Priority when multiple offers match the same buyer
Checkout upsell is one of two offer types in the app — the other is Volume savings (quantity-break pricing). This guide covers Checkout upsell.
The block appears inline in your checkout layout. Buyers can browse products, select variants, adjust quantity, and add to their order — all without leaving checkout.
Before you start: Add the app block
Before creating any offer, you must add the AOV Checkout upsell app block to your checkout theme in the Theme Editor. This is a one-time setup, shared by all checkout widgets.
👉 See Installation → Activate Checkout Widgets for the step-by-step guide to adding the block.
Once the block is added, you can drag it to reposition. Common placements:
| Location | Description |
|---|---|
| Main column (left) | Inline between checkout sections — maximum visibility |
| Order summary sidebar (right) | Alongside order summary — less intrusive |
Click Save in the Theme Editor to confirm.
You only need to do this once. After the block is added, all your offers will display through it automatically.
Step 1: Go to the Offers list
In the app sidebar, open the Offers list page to see all your offers.
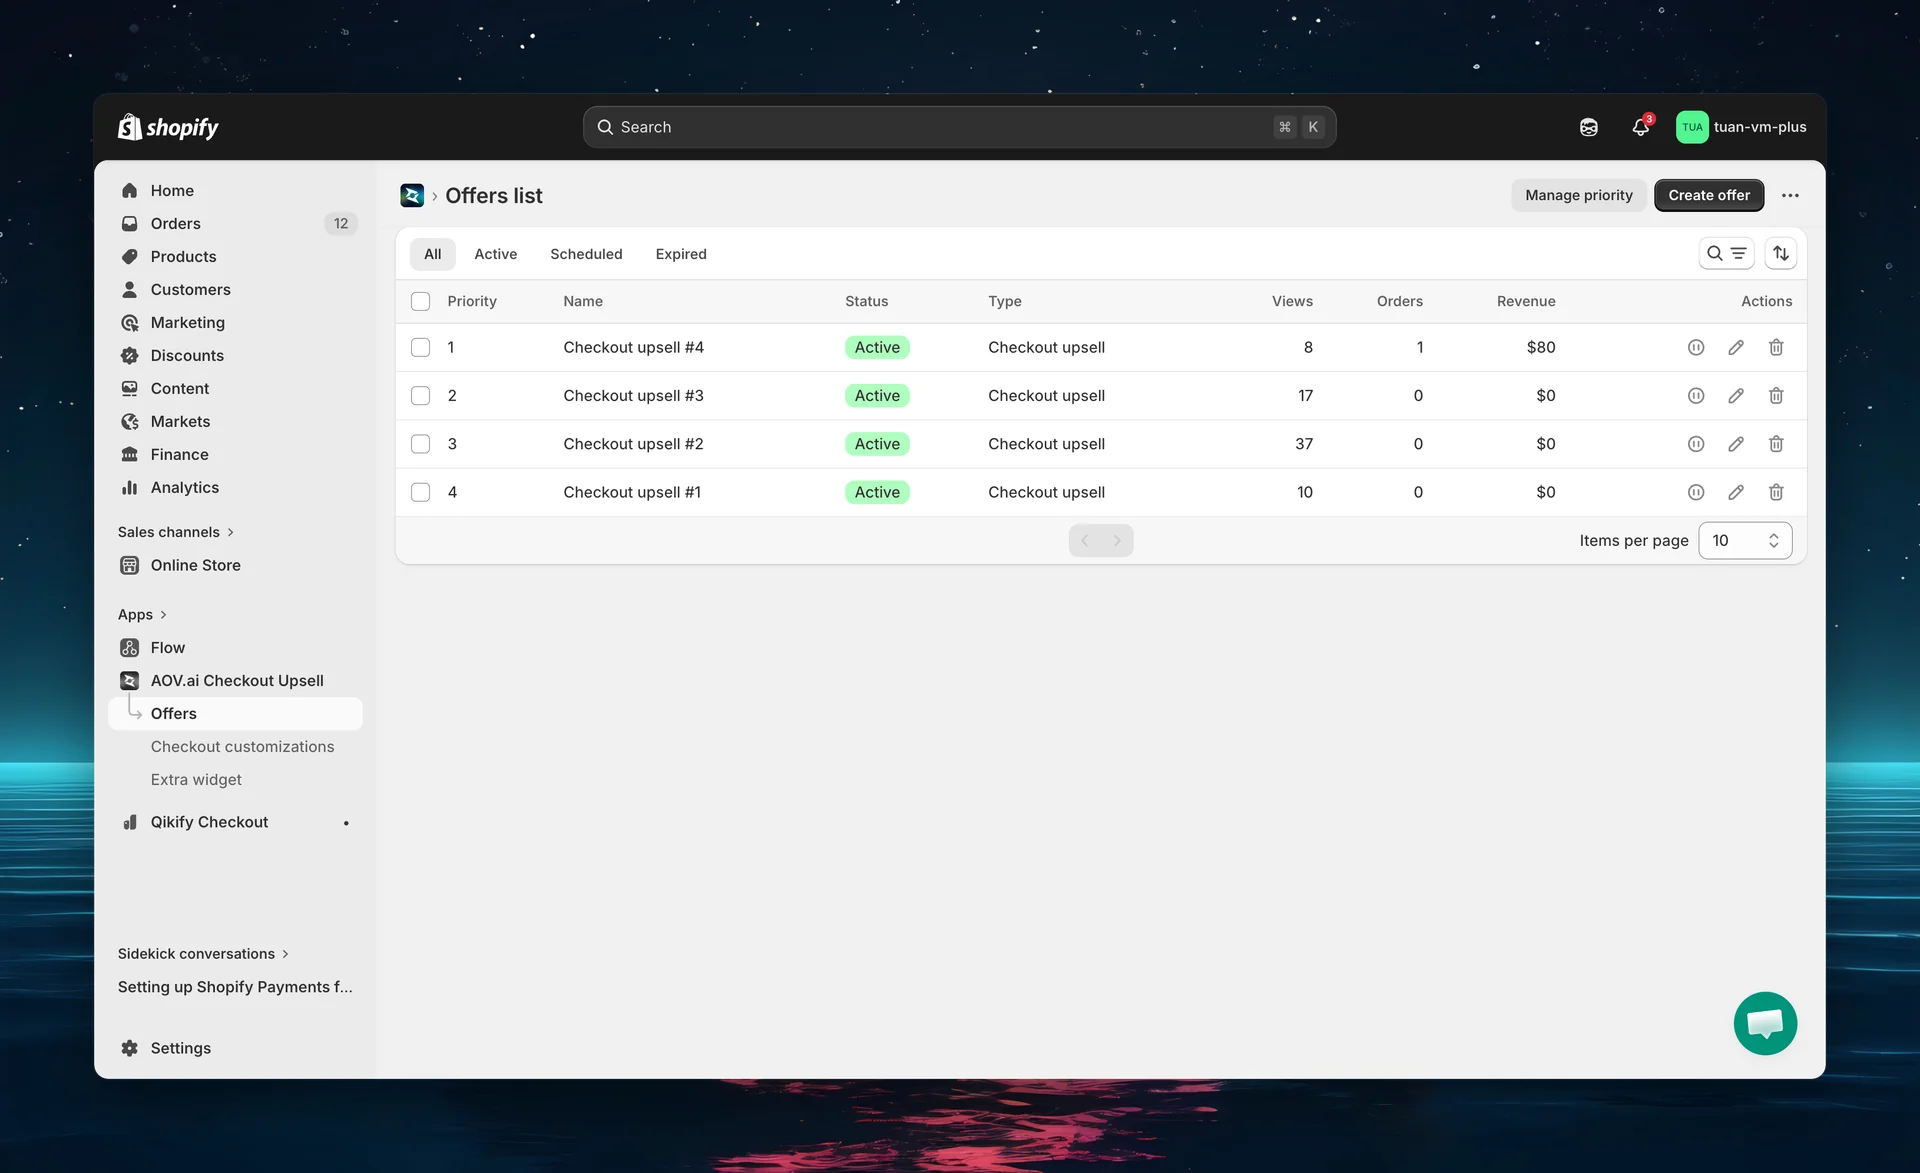
List page overview
The list is a table with columns: Priority, Name, Status, Type, Views, Orders, Revenue, and Actions.
| Feature | Description |
|---|---|
| Tabs | Filter by status: All, Active, Scheduled, Expired |
| Search | Find offers by name (placeholder "Searching in all") |
| Sort | Priority (Ascending / Descending) or Date Created (Oldest / Newest) |
| Row actions | Activate / Deactivate (play / pause icon), Edit, Delete |
| Bulk actions | Select multiple offers to Activate offers, Deactivate offers, or Delete offers |
| Create offer | Primary button (top right) |
| Manage priority | Secondary button (top right) — see "Manage offer priority" below |
Views, Orders, and Revenue are shown per offer right in the list, so you can compare performance at a glance.
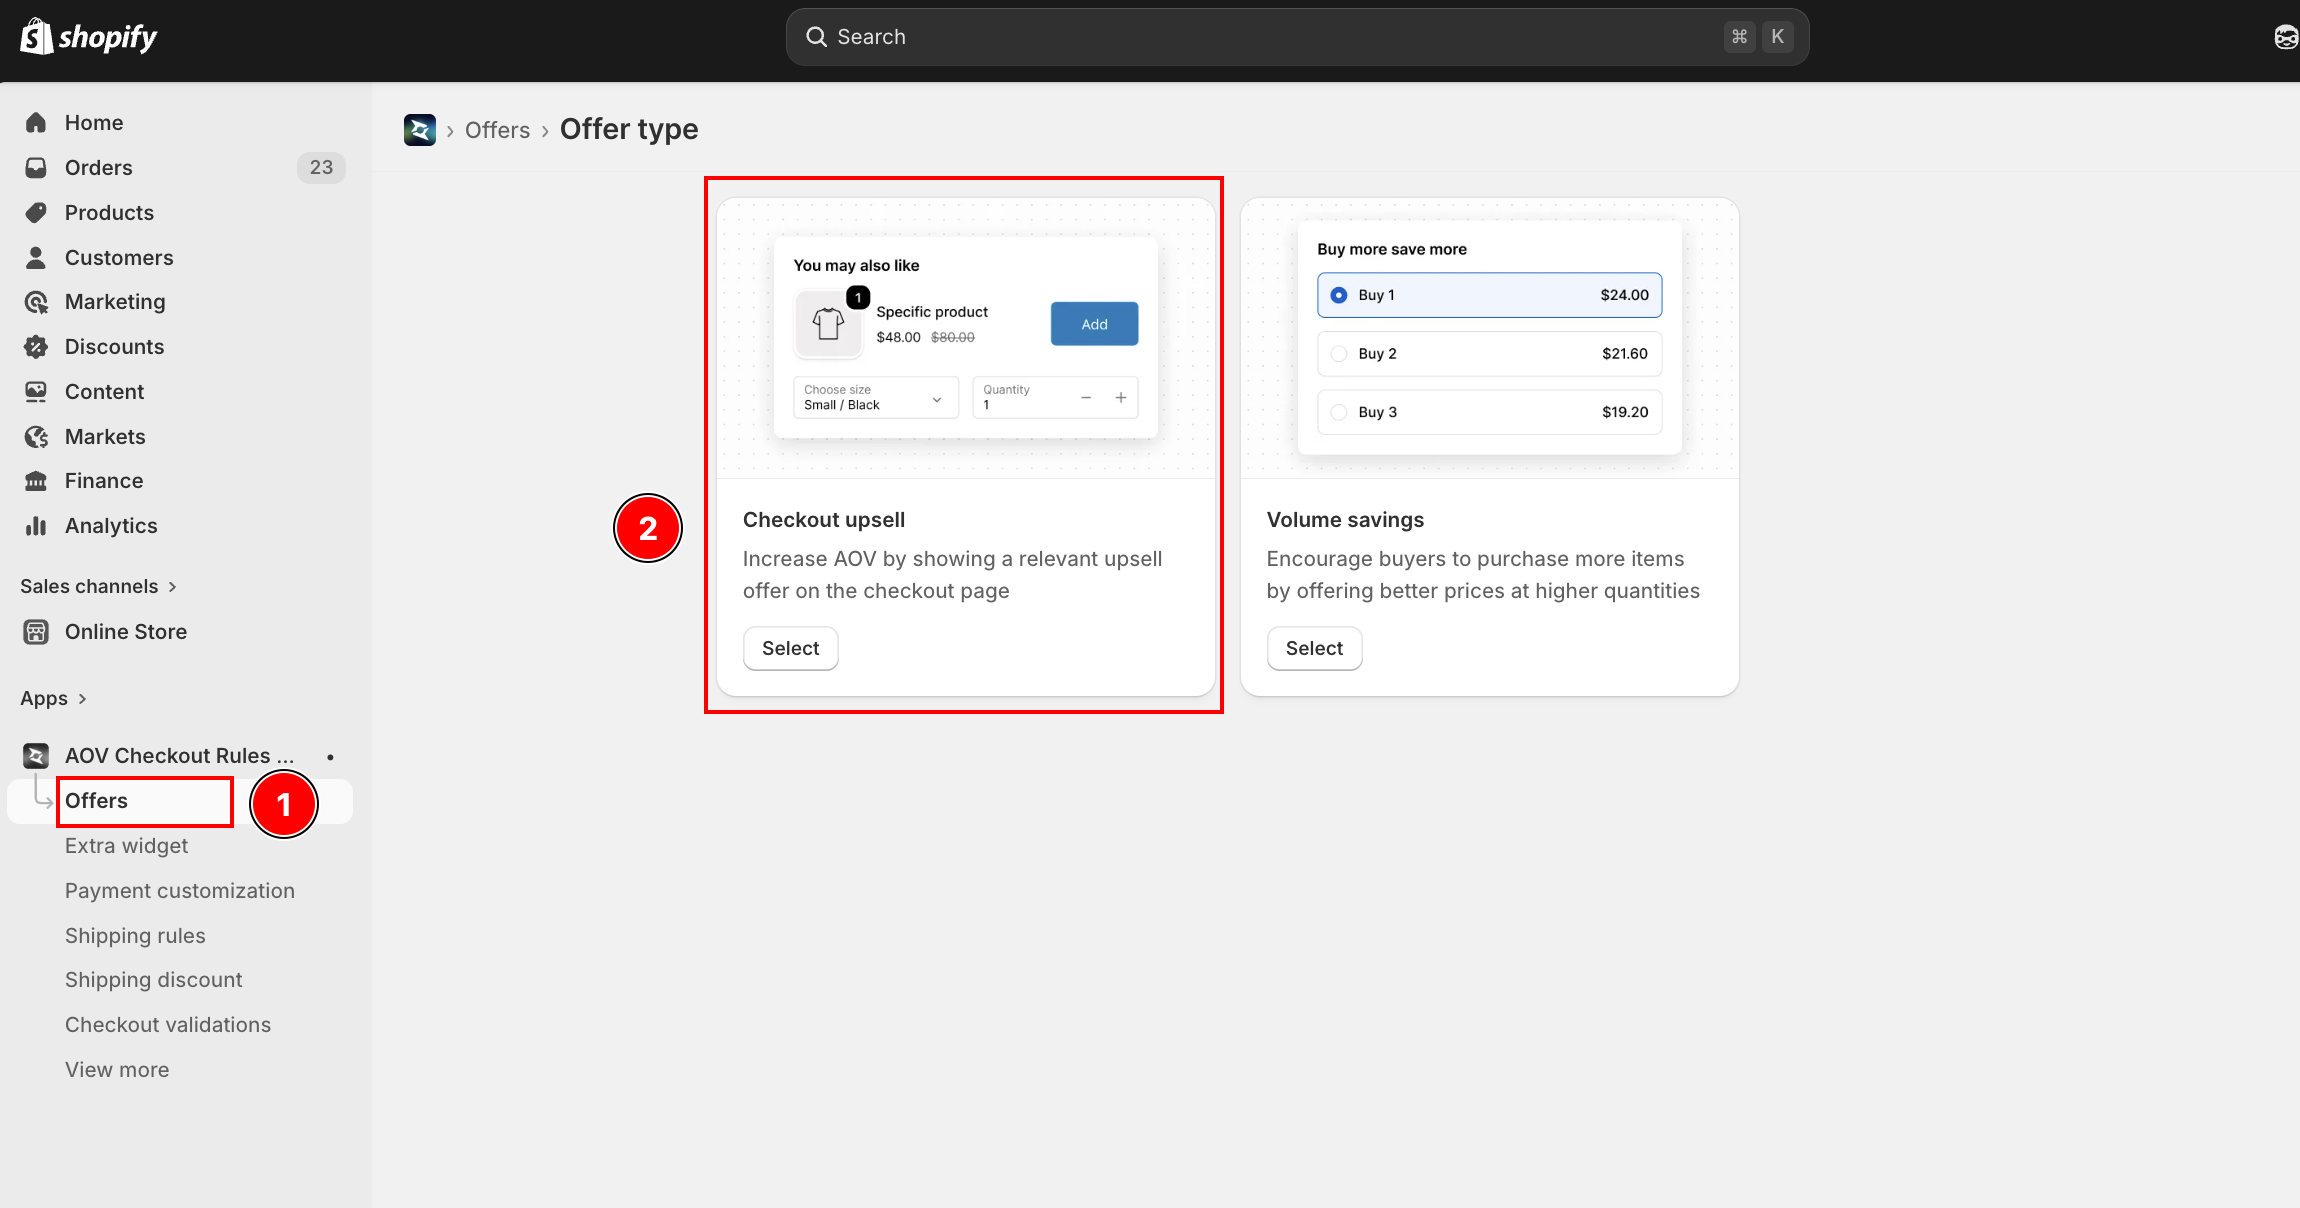
Step 2: Choose offer type
- Click Create offer (top right) to open the Offer type page
- On the Checkout upsell card, click Select
The other card is Volume savings — a separate offer type not covered here.
Step 3: Configure trigger conditions
The editor opens with two columns:
- Left — Step 1: Trigger conditions, Step 2: Offer settings, and Advance settings (collapsible cards)
- Right — Status (Active / Expired), Offer name, Discount code (edit page only), and the App block card with a live preview

Expand Step 1 and choose a mode
Click the Step 1: Trigger conditions header to expand (subtitle: "Set conditions when this deal will be triggered."). Two options:
| Mode | Behavior |
|---|---|
| No condition | Offer always shows. Displays the message "Always show offer without rule". |
| Set conditions | Offer only shows when all conditions are satisfied (AND logic) |
Set conditions
When you select Set conditions, a condition builder appears. You can add up to 5 conditions (each type used only once). Each row is labeled Condition 1, Condition 2, etc., joined by an AND divider. Click "+ Add 'AND' condition" to add rows; click the trash icon on a row to remove it (when more than one condition exists).
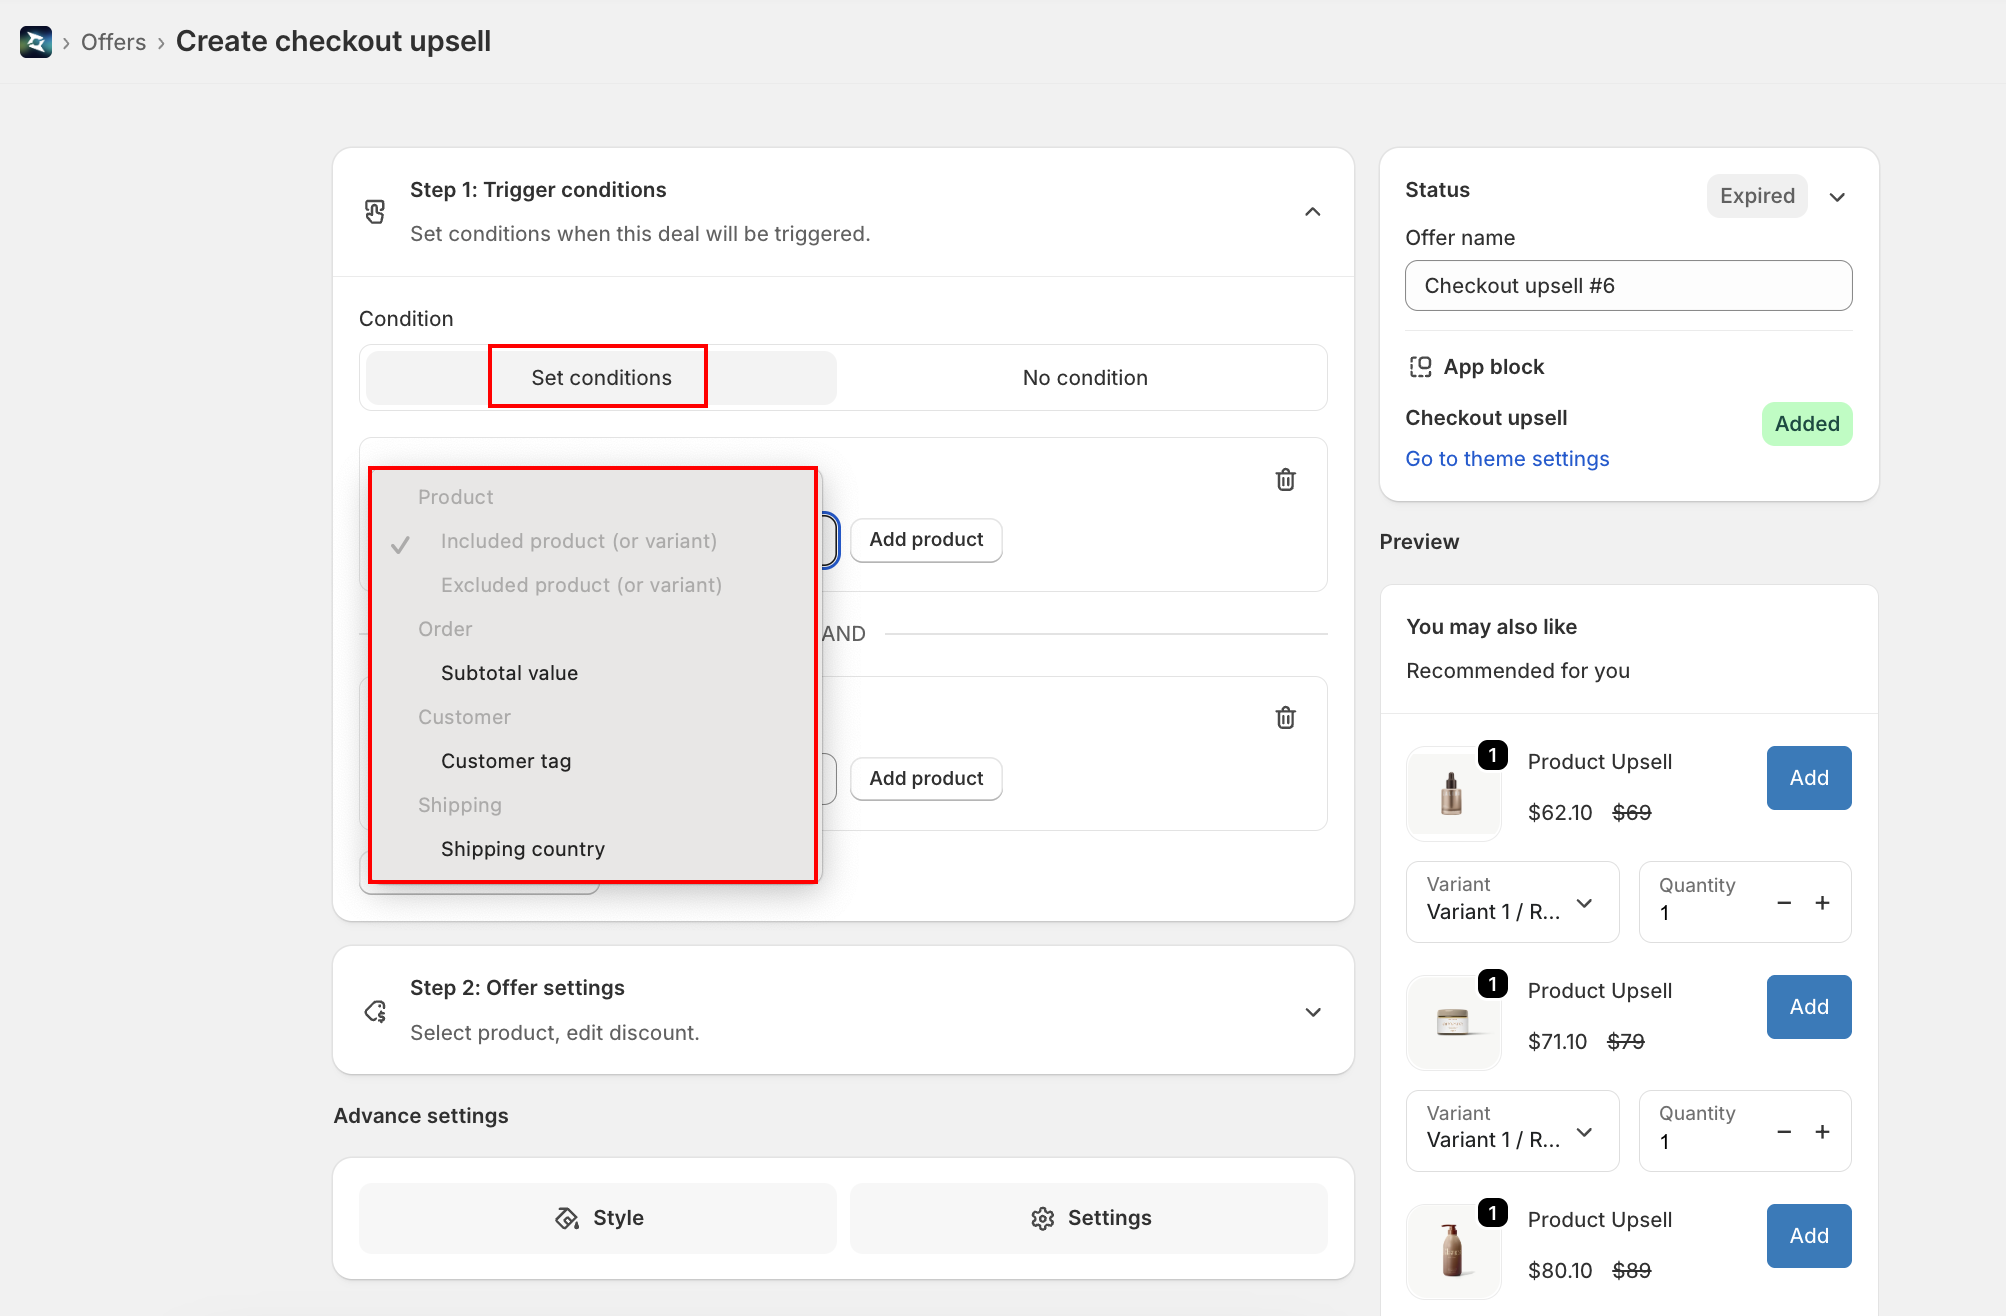
Available condition types
Conditions are grouped in the picker under Product, Order, Customer, and Shipping.
1. Included product (or variant)
| Setting | Details |
|---|---|
| UI | Product picker — choose specific products or variants |
| Logic | Offer shows when buyer's cart contains any of the selected products |
| Use case | Show accessories when buyer has a specific main product |
2. Excluded product (or variant)
| Setting | Details |
|---|---|
| UI | Product picker — choose specific products or variants |
| Logic | Offer shows when buyer's cart does NOT contain any of the selected products |
| Use case | Hide upsell when buyer already has the upsell product |
3. Subtotal value
| Setting | Details |
|---|---|
| UI | Operator dropdown + currency value field. Operators: Greater (>), Greater or equal (≥), Less (<), Less or equal (≤), Equal (=) |
| Range mode | Click Use a range to switch to a from / to range (and Change to basic to switch back) |
| Logic | Compares the cart subtotal against the threshold (or range) | | Use case | Only show premium upsells when subtotal is above a threshold |
4. Customer tag
| Setting | Details |
|---|---|
| UI | Include / Exclude dropdown + customer-tag picker |
| Logic | Checks the buyer's Shopify customer tags |
| Use case | Show VIP-only offers to tagged customers |
5. Shipping country
| Setting | Details |
|---|---|
| UI | Include / Exclude dropdown + country picker |
| Logic | Checks the buyer's shipping destination country |
| Use case | Show country-specific offers, or hide an offer in regions you don't ship |
All conditions use AND logic — every condition must be true for the offer to show. For example: "Cart contains Product A" AND "Cart value > $50" means both must be satisfied.
Step 4: Add products and discounts
Click the Step 2: Offer settings header to expand the product section (subtitle: "Select product, edit discount.").
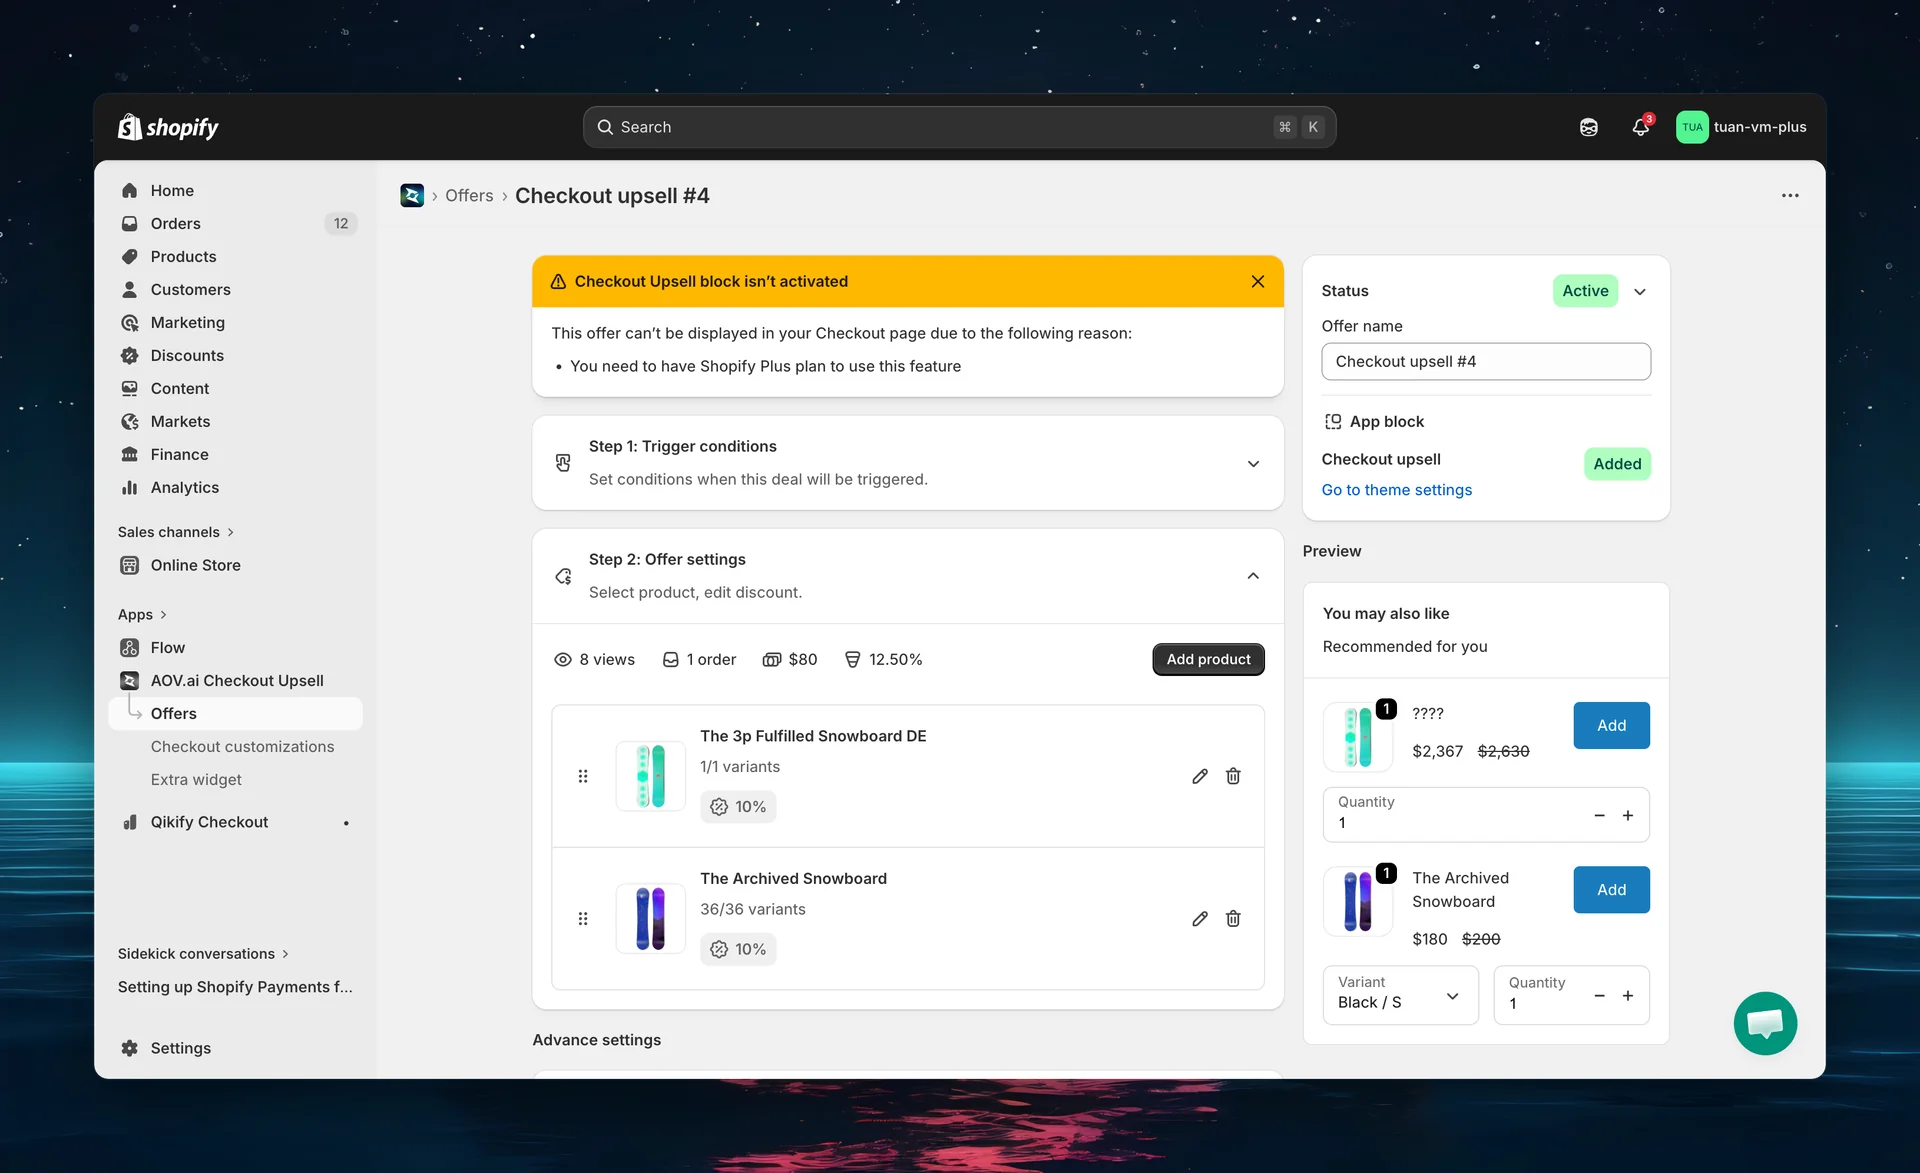
Add products
Click Add product to open a small menu with two sources:
| Source | Description |
|---|---|
| AI smart pick | Adds an AI recommendation card ("AI suggests a product based on trending choices"). Default discount: 10%. |
| Select product | Opens the Shopify product picker — choose specific products and variants manually. |
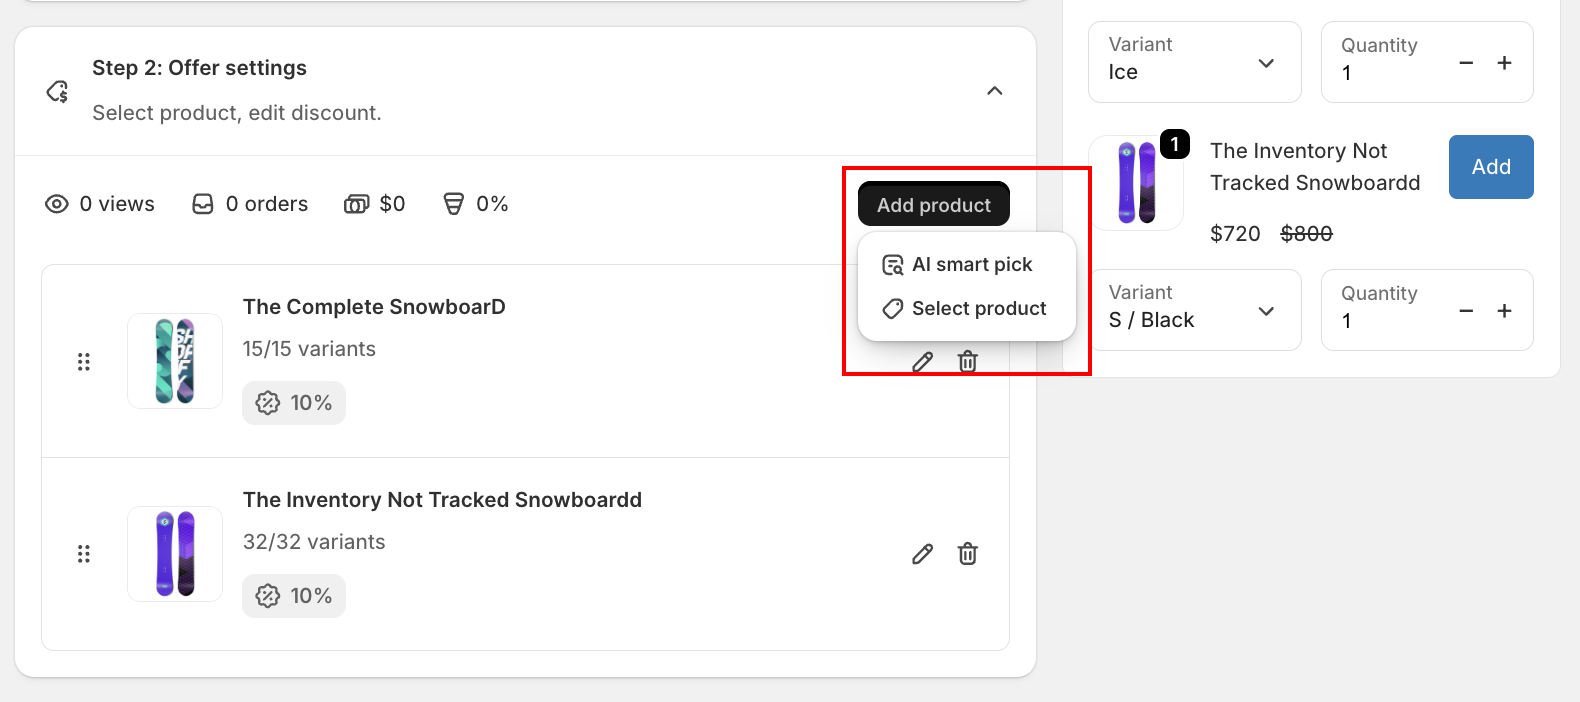
After adding, products appear as draggable cards. Drag the handle to reorder.
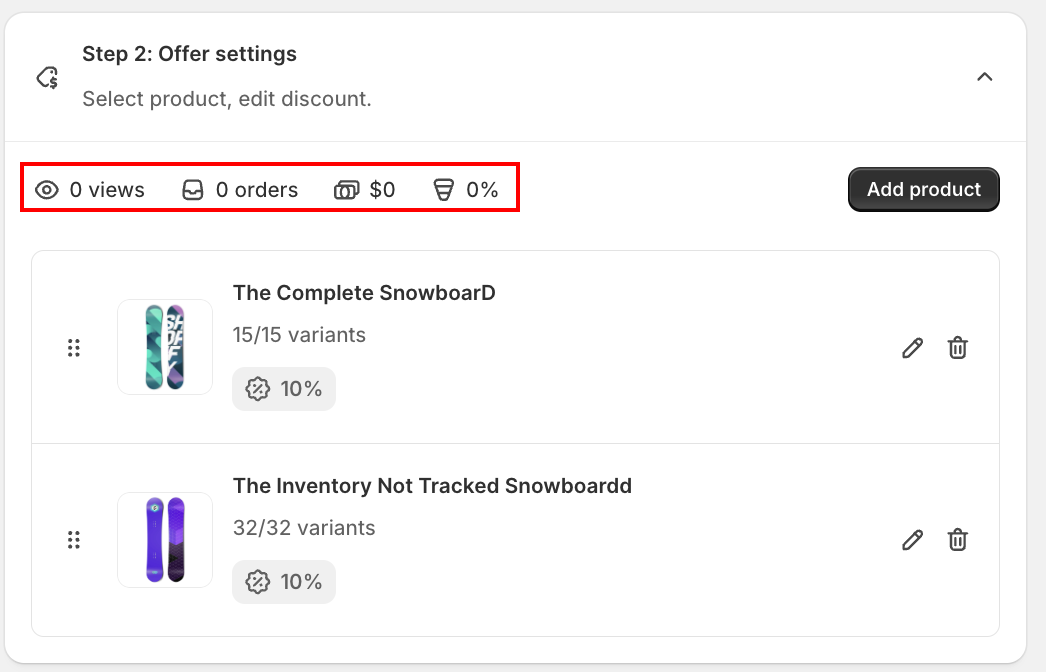
Statistics row
Above the product list, real-time performance data:
| Stat | Description |
|---|---|
| Views | "Times this offer was displayed" |
| Orders | "Orders created from this offer" |
| Revenue | "Revenue from this offer's orders" (formatted in your currency) |
| Conversion | "Conversion rate" — orders ÷ views as a percentage (0% if no data) |
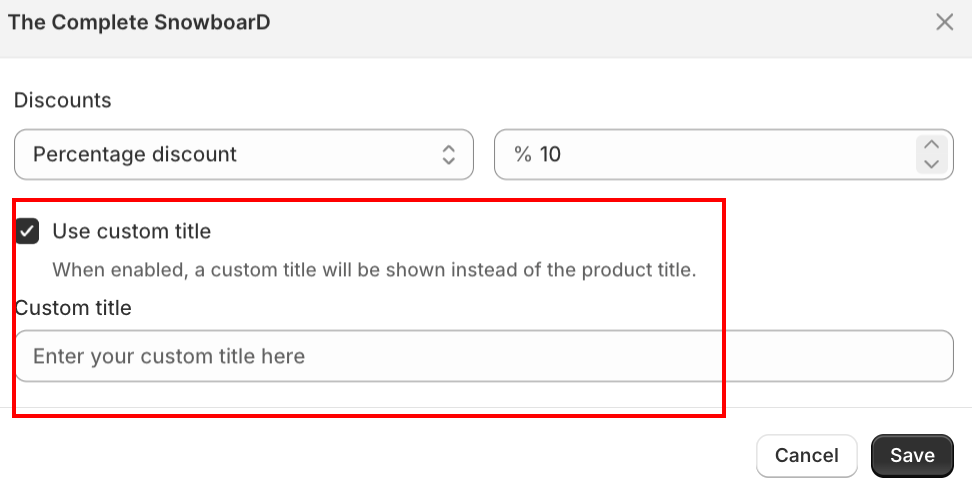
Per-product settings
Click the edit icon on any product card to open the settings modal (its heading is the product title). It has two parts: Discounts and Use custom title.
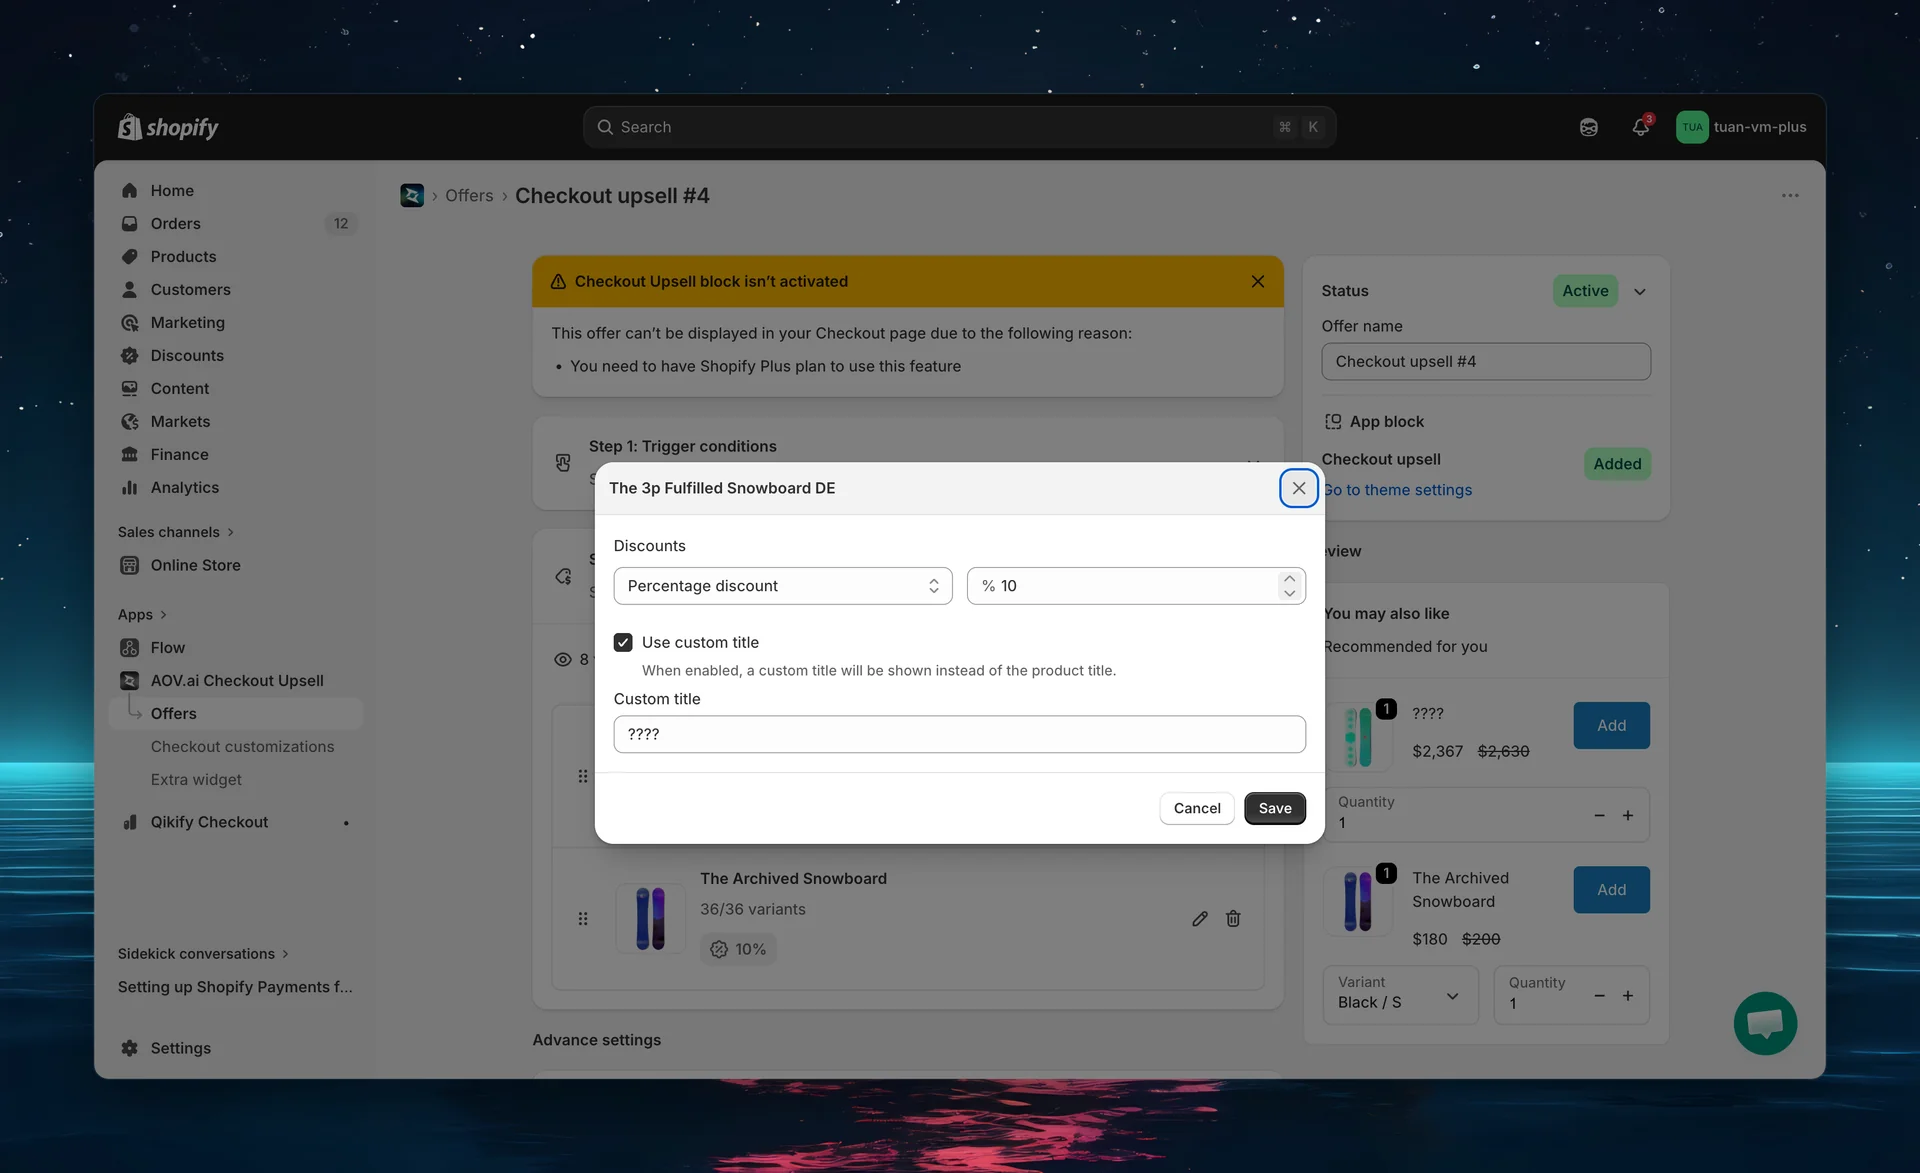
Discounts
| Setting | Options | Notes |
|---|---|---|
| Discount type | Percentage discount / Fixed amount discount / No discount | Dropdown |
| Discount value | Number field (hidden when No discount is selected) | Prefix is % for percentage, your store currency for fixed |
| No discount | Adds the upsell product at its original price | The discount value field is hidden when this option is selected |
The default discount value when none is entered is 10. Percentage values are clamped to 1–100.
Use custom title
| Setting | Default | Description |
|---|---|---|
| Use custom title | Off | Checkbox: "When enabled, a custom title will be shown instead of the product title." |
| Custom title | (empty) | Text field that appears when Use custom title is on — the name shown at checkout |
Click Save in the modal to apply (or Cancel to discard).
Discounts are applied at checkout via an automatic discount tied to the offer's discount code. They appear in the order summary alongside any other discounts.
The product settings modal does not have a variant-picker toggle. Whether a variant dropdown appears at checkout is controlled at the offer level (it shows automatically when a product has more than one variant).
Step 5: Advance settings
Below Step 2, the Advance settings card has two tabs: Style and Settings.
Style tab
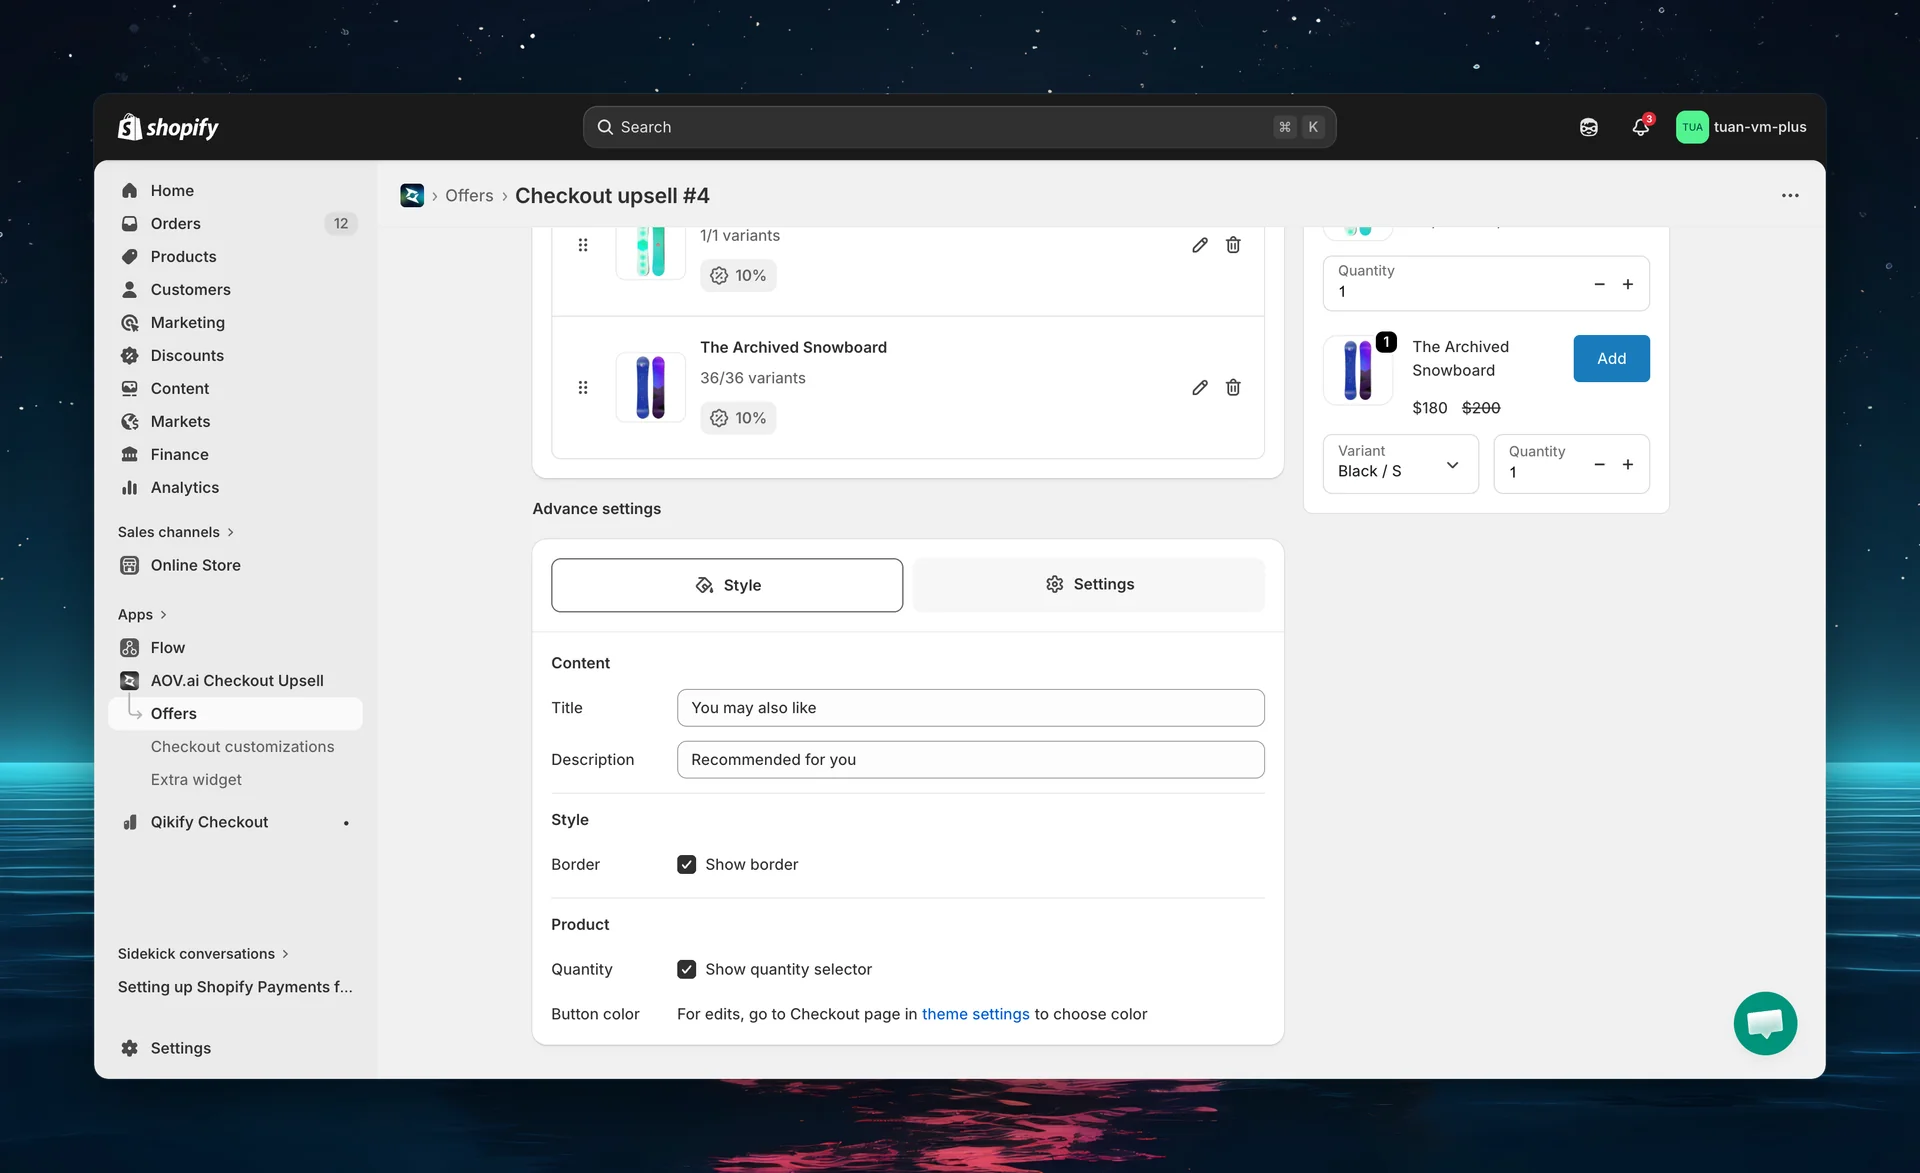
Content
| Setting | Type | Default |
|---|---|---|
| Title | Text field | "You may also like" (placeholder: "Enter your offer title here") |
| Description | Text area | "Recommended for you" (placeholder: "Enter your offer description here") |
| Button text | Text field | Falls back to "Add" if left empty. Max 30 characters. |
Countdown timer
Add a live countdown to the upsell block to create urgency. Tick Show countdown timer to reveal the settings (off by default).
| Setting | Default | Description |
|---|---|---|
| Show countdown timer | Off | Turns the countdown on and shows the settings below |
| Content | Placeholder: "THIS OFFER IS AVAILABLE FOR" | The countdown copy. Insert the {{timer}} token where the live count should appear, for example "Hurry! Offer ends in {{timer}}". Click Add variable to insert the token. |
| Display duration | 5 minutes | How long the countdown runs, in minutes (minimum 1) |
Style the wording and the number separately, with a live preview on the right:
| Group | Options (default first) |
|---|---|
| Text color | Black / Green / Amber / Red / Blue |
| Text style | Regular / Bold / Italic |
| Timer text color | Red / Black / Green / Amber / Blue |
| Timer text style | Bold / Regular / Italic |
| Background color | Info / Success / Warning / Critical |
Tip: keep the wording neutral (Text in Black Regular) and make the number pop (Timer text in Red Bold).
Style
| Setting | Default | Description |
|---|---|---|
| Show border | On | Adds a visible border around the upsell block |
Product
| Setting | Default | Description |
|---|---|---|
| Show quantity selector | On | Adds a +/- quantity stepper to each product card |
| Button color | (theme color) | Read-only here. A link sends you to the Checkout page in theme settings to choose the color. |
Button color follows your Shopify checkout branding — it cannot be changed from within the app. To change it: go to Online Store → Themes → Edit theme → Checkout and customer accounts, click the Settings icon (⚙️) in the top-left toolbar, scroll down to the Color section, and change the Buttons color.
Settings tab
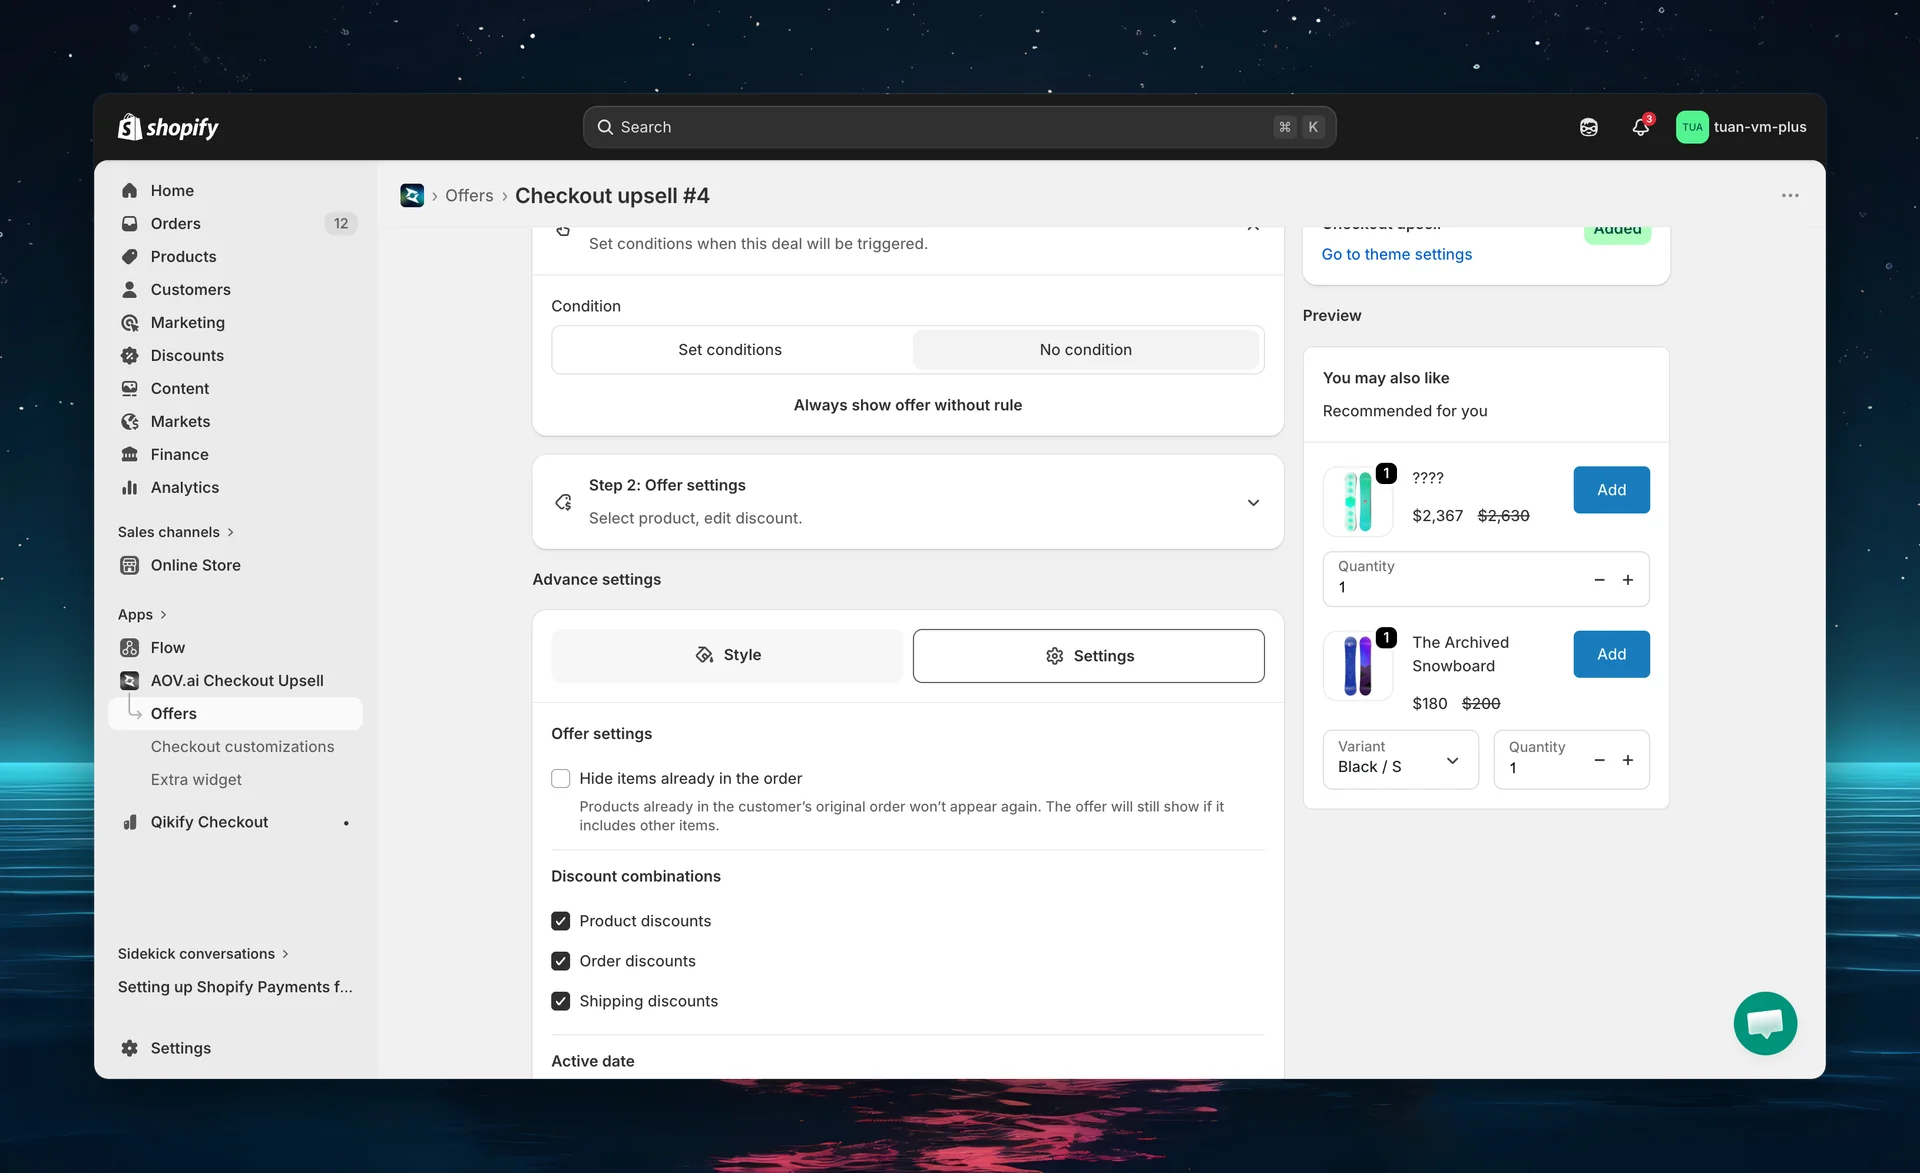
The Settings tab contains offer behavior and scheduling options.
Offer settings
| Setting | Default | Description |
|---|---|---|
| Hide items already in the order | Off | "Products already in the customer's original order won't appear again. The offer will still show if it includes other items." |
Discount combinations
Controls whether upsell discounts can stack with other discount types:
| Combination | Default | Description |
|---|---|---|
| Product discounts | On | Allow upsell discount to combine with product-level discounts |
| Order discounts | On | Allow upsell discount to combine with order-level discounts |
| Shipping discounts | On | Allow upsell discount to combine with free shipping discounts |
If a combination is off and the buyer has that discount type applied, the upsell discount will not apply — the product is still added but at full price.
Active date
| Setting | Description |
|---|---|
| Start date | Date/time the offer becomes active. A future start date puts the offer in Scheduled status. |
| Set end date | Checkbox. When ticked, an End date field appears (defaults to 24 hours after the start date). |
| End date | Date/time the offer expires (shown only when Set end date is on) |
Leave Set end date off for an offer that never auto-expires (controlled only by the Status toggle). The Active date section is hidden when an offer is already expired.
Step 6: Save and activate
- In the right column, enter an Offer name (e.g., "Summer upsell bundle") — this is internal, not shown to buyers
- Check the App block card status badge:
- Added (green) — the checkout block is in your theme, offers will display
- Not added — click "Go to theme settings" to add the block (see "Before you start" section above)
- Set the Status dropdown (top of the right column) to Active
- Click Save in the top bar
The offer is live when:
- Status is Active
- Start date has passed (or no start date is in the future)
- The checkout block is Added to your theme
Discount code. Checkout upsell offers apply their discounts through a per-offer discount code (prefixed AOV_CheckoutUpsell_). On the edit page you'll see a Discount code field — it's read-only unless your store has the edit permission enabled. To change it, use the Contact us link shown beside the field.
Manage offer priority
When multiple offers match the same buyer's cart, only one is shown — the one with the highest priority (lowest number = highest priority).
How to set priority
- Open the Offers list page
- Click Manage priority (secondary button, top of the page) — this opens a modal
- Select Checkout upsell from the offer-type dropdown
- Drag and drop the rows to reorder (columns: Offer name and Priority) — top of list = priority 1 (highest)
- Click Save
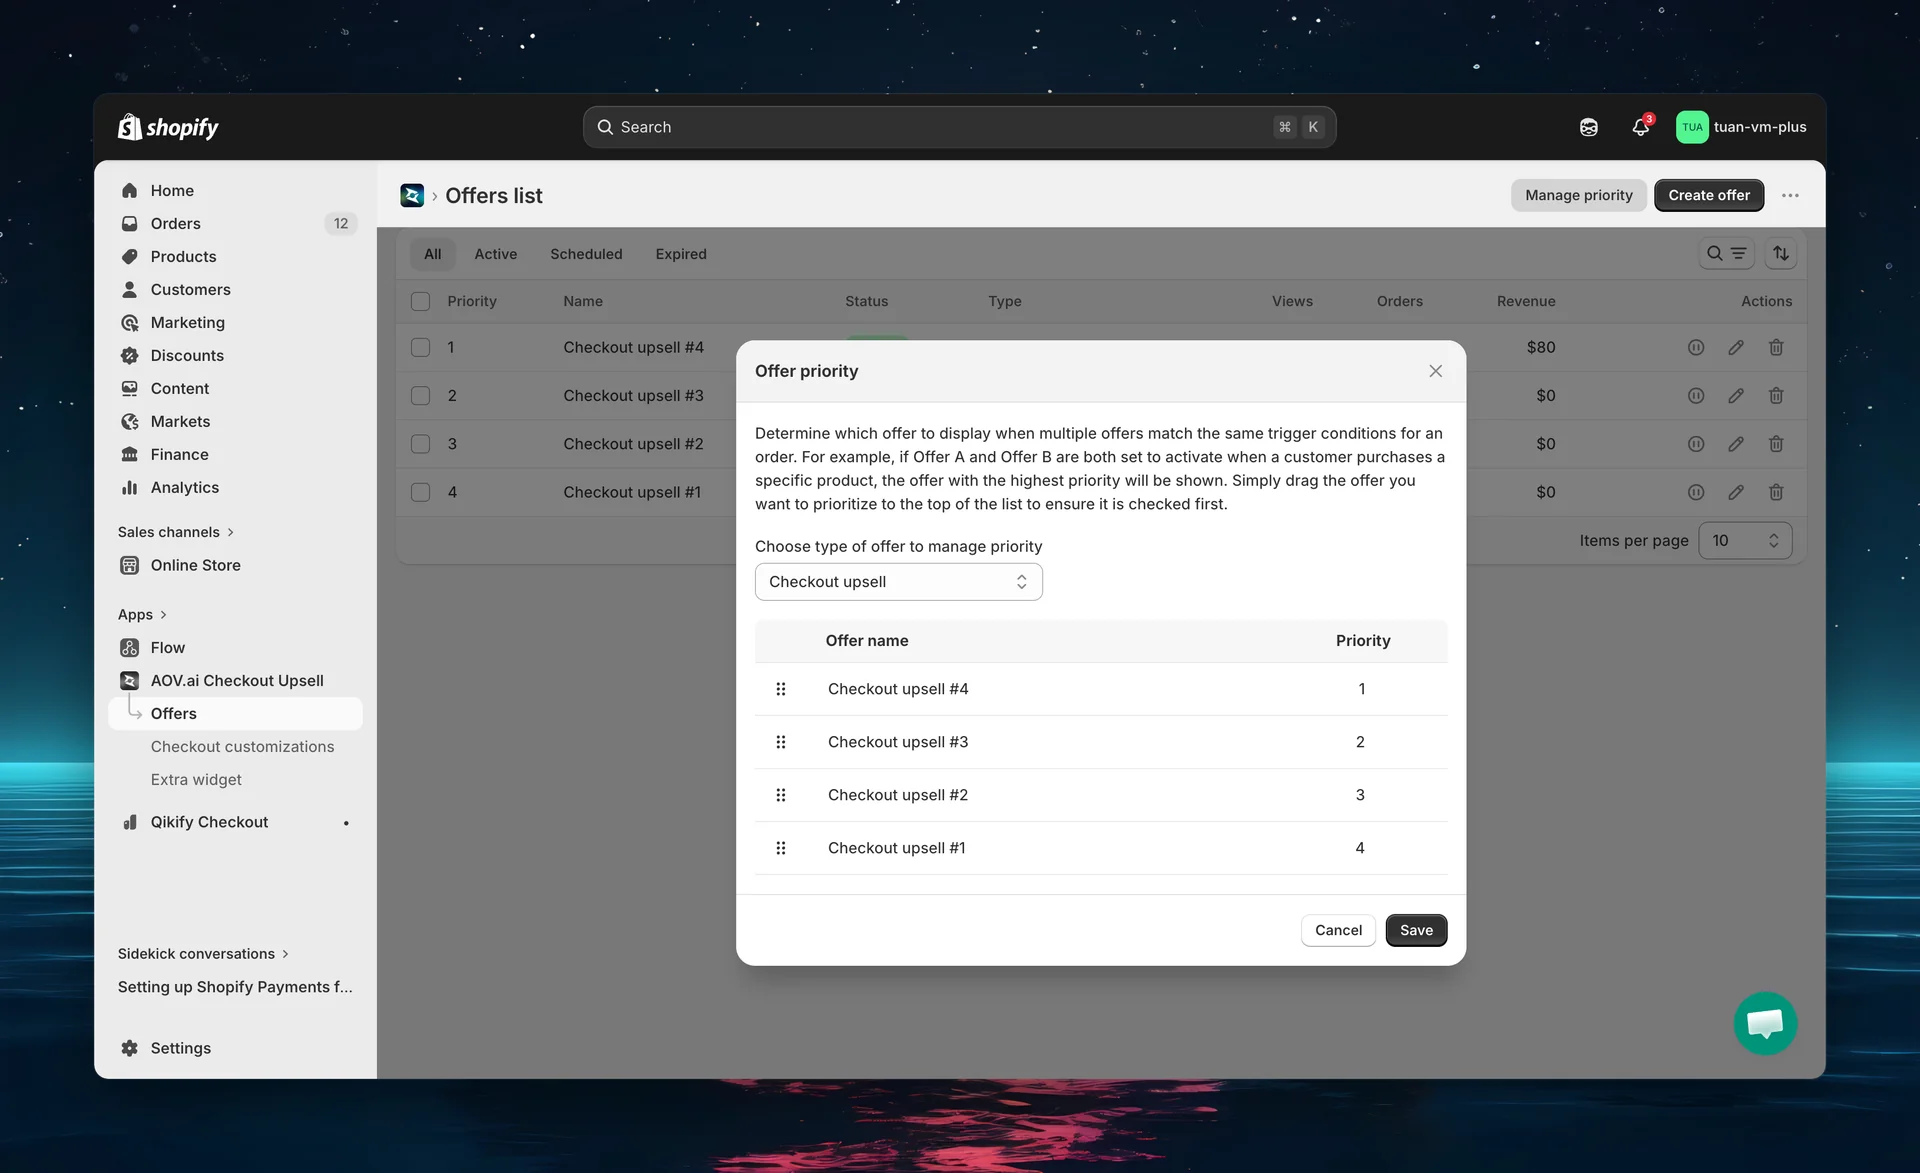
Tip: Put your highest-converting or time-sensitive offers at priority 1. You can safely schedule future offers at high priority without affecting current ones — scheduled/expired offers are automatically skipped.
Priority and scheduling
Scheduled or expired offers are skipped — the next active match is shown:
| Scenario | Result |
|---|---|
| Priority 1 offer is scheduled (future start date) | Skipped → Priority 2 shows |
| Priority 1 offer is expired (past end date) | Skipped → Priority 2 shows |
| Priority 1 offer is active but conditions don't match | Skipped → Priority 2 shows |
| Priority 1 offer is active and conditions match | Shown |
Buyer experience at checkout
When a matching offer is active, buyers see a product recommendation block at checkout:
| Element | Description |
|---|---|
| Title | Block heading (e.g., "You may also like") |
| Description | Subtitle text (e.g., "Recommended for you") |
| Product image | Thumbnail of the upsell product (shows selected variant's image when applicable) |
| Name | Original name or custom title (if set by merchant) |
| Price | |
| Variant selector | Dropdown (label "Variant") — shown automatically when the product has more than one variant |
| Quantity stepper | Stepper labeled "Quantity" (if "Show quantity selector" is on) |
| Add button | Uses your Button text (default "Add") in your store's checkout brand color |
Multiple products appear in a vertical scrollable area (max ~480px height).
Add to order flow
| Step | What happens |
|---|---|
| Default | Product card with the Add button (your Button text, default "Add") |
| Select variant | Price and image update instantly |
| Change quantity | Updates via the stepper (min 1) |
| Click Add | Button shows a loading state, the line is added to the order, and the offer's discount code is applied automatically |
| After adding | The added product is removed from the upsell block so the buyer isn't offered it again |
| Order summary | Updates immediately with the new line item + discount |
The buyer does not leave the checkout page. The addition happens inline via Shopify's Cart API.
Offer statuses
| Status | Badge tone | Meaning |
|---|---|---|
| Active | Success | Live and can show at checkout (if conditions match) |
| Expired | New (grey) | Past end date or manually deactivated |
| Scheduled | Caution | Future start date — will auto-activate when the date arrives |
The Status dropdown in the offer editor only switches between Active and Expired — Scheduled is derived automatically from the start date. (The app also has internal Draft and Test mode states, which you generally won't encounter on a live checkout-upsell offer.)
How status changes
| Action | Status change |
|---|---|
| Create new offer | Defaults to Active (unless start date is set) |
| Set future start date | Shows as Scheduled |
| Start date passes | Auto-changes to Active |
| End date passes | Auto-changes to Expired |
| Toggle Status to Expired | Offer is deactivated |
Edit and delete offers
Edit an offer
- Go to Offers → click the edit icon (pencil) in the Actions column, or click the offer name
- Make changes
- Click Save
Changes take effect immediately at checkout.
Delete an offer
- Go to Offers → click the delete icon (trash) in the Actions column
- Confirm deletion
Deletion is permanent. The offer and its analytics data cannot be recovered.
Validation errors
| Rule | Error message |
|---|---|
| Offer name is empty | "Offer name is required" |
| Discount code is empty | "Discount code is required" |
| No products added | "Add products that will be offered to customers" |
| Button text longer than 30 characters | "Button text must be 30 characters or fewer" |
| Included product condition with no product selected | "Select at least one product customers must buy" |
| Excluded product condition with no product selected | "Select at least one product customers must NOT buy" |
| Customer tag condition left blank | "Customer tag can't be blank" |
| Shipping country condition left blank | "Shipping country can't be blank" |
| Start date is on/after end date | "Start date must be earlier than end date" |
| End date is on/before start date | "End date must be later than start date" |
There is no "discount value required" or "cannot exceed 100%" error for a checkout-upsell product — an empty or out-of-range per-product discount value is silently normalized to the default (10), and percentages are clamped to 1–100.
FAQs
General
Q: Do I need Shopify Plus for Checkout Upsell? A: Yes. Checkout UI Extensions require a Shopify Plus plan.
Q: Can I show multiple offers at the same time? A: No. Only one offer is shown per checkout — the highest-priority matching offer. Use the priority system to control which offer wins.
Q: Does the upsell block slow down checkout? A: No. The block loads asynchronously and does not block the checkout rendering.
Trigger conditions
Q: What happens if I set no conditions? A: The offer shows to every buyer at checkout, regardless of their cart contents.
Q: Can I combine multiple conditions? A: Yes, up to 5 conditions with AND logic (Included product, Excluded product, Subtotal value, Customer tag, Shipping country — each used once). All must be true for the offer to show.
Q: Can I target buyers by country? A: Yes. Add the Shipping country condition and choose Include or Exclude plus the countries. You can also target by Customer tag for region-tagged customers.
Q: Can I target by a subtotal range? A: Yes. In the Subtotal value condition, click Use a range to enter a from / to range instead of a single threshold.
Q: Does "Included product" check variants or just products? A: You can pick specific products or individual variants. If a selected product (any variant) is in the cart, the condition is met.
Products and discounts
Q: How many products can I add to one offer? A: There is no hard limit, but we recommend 2-5 products for best conversion. Too many options can overwhelm buyers.
Q: Can I use AI Smart Pick and manual selection together? A: Yes. You can add products from both sources to the same offer.
Q: How does AI smart pick choose products? A: It adds an AI recommendation card that suggests a product based on trending choices. It applies a default 10% discount.
Q: What discount types are supported? A: Percentage discount, Fixed amount discount, or No discount. Each product in the offer can have a different discount.
Q: Can upsell discounts stack with discount codes? A: Yes, if you enable the corresponding discount combination in the Settings tab. By default, all combinations are enabled.
Display and behavior
Q: Can I change the "Add" button color? A: The button uses your Shopify checkout branding color. To change it: go to Online Store → Themes → Edit theme → Checkout and customer accounts, click the Settings icon (⚙️) in the top-left toolbar, scroll down to the Color section, and change the Buttons color.
Q: What if a product is out of stock? A: Out-of-stock products are automatically hidden from the upsell block at checkout.
Q: Can buyers add the same product twice? A: If the product is already in their cart and "Hide items already in order" is on, it won't appear. If the setting is off, they can add it again as a separate line item.
Q: Where does the upsell block appear? A: You control placement in the Theme Editor. Common positions: main column (between checkout sections) or order summary sidebar.
Priority and scheduling
Q: What happens when multiple offers have the same priority? A: The most recently created offer takes precedence.
Q: Can I schedule an offer for a future date? A: Yes. Set a start date in the Settings tab. The offer status changes to "Scheduled" and auto-activates when the date arrives.
Q: What happens when a scheduled offer activates? A: It automatically changes to "Active" and starts competing with other active offers based on priority and conditions.
Tips
- Enable all discount combinations — unless you have a specific reason not to. This ensures upsell discounts always apply, maximizing conversion.
- Use "Hide items already in the order" — prevents buyers from seeing products they've already added, keeping the block clean.
- Keep block title short — "You may also like" or "Complete your order" works well. Buyers scan quickly at checkout.
- Put your best offer at priority 1 — highest-converting or highest-margin products should get top priority.
- Schedule seasonal offers in advance — set start/end dates and priority. The system handles transitions automatically.
- Test at checkout — use a real test order to verify conditions, discounts, and block placement. The admin preview shows sample data, but the checkout shows real behavior.
- Use AI smart pick if you're unsure which products to recommend — it suggests a product based on trending choices.