How to set up
Control which payment methods are shown at checkout, rename them, or change their display order — all powered by Shopify Functions. Changes take effect immediately after saving a rule.
Available on all Shopify plans. No Shopify Plus required.
What it does
Payment Customization lets you create rules that modify how payment methods appear at checkout. You control:
- Which methods to hide, rename, or reorder
- When rules apply (trigger conditions)
- How methods are matched (exact name or contains)
| Rule | Description |
|---|---|
| Hide | Remove one or more payment methods from checkout |
| Rename | Change the display name of a payment method |
| Reorder | Change the order in which payment methods appear |
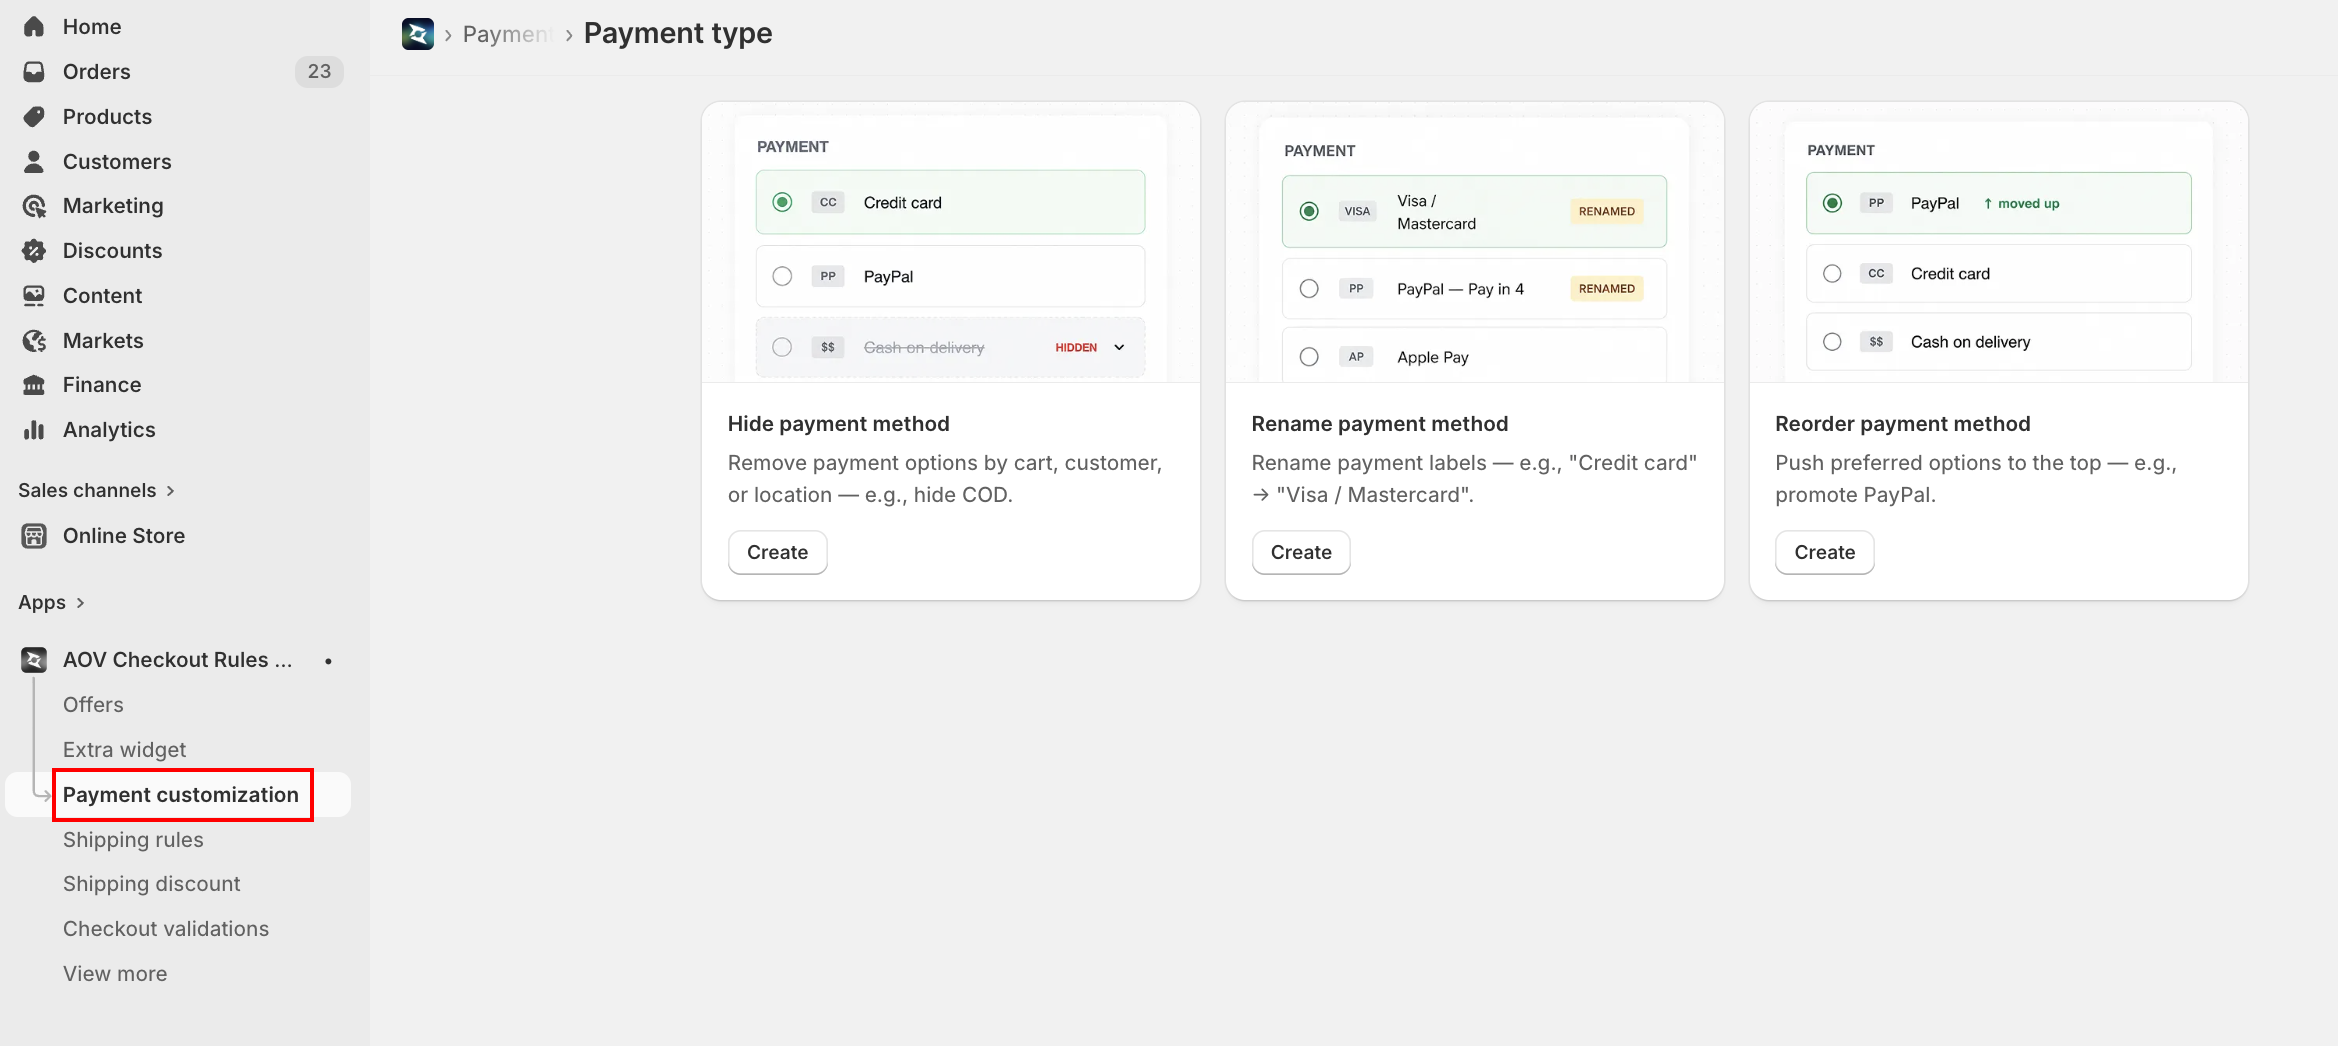
Step 1: Choose rule type
- Click Create rule (top right) — this opens the Payment type selection page
- Pick one of the three cards and click Create
Three cards:
| Type | What it does |
|---|---|
| Hide payment method | Remove payment options by cart, customer, or location — e.g., hide COD |
| Rename payment method | Rename payment labels — e.g., "Credit card" → "Visa / Mastercard" |
| Reorder payment method | Push preferred options to the top — e.g., promote PayPal |
Credit Card (Shopify Payments) customization is restricted by Shopify. Stores in the United States and Canada on non-Plus plans cannot customize Credit Card (Shopify Payments) methods (hide, rename, or reorder) — these options remain standard. Upgrade to Shopify Plus to customize Credit Card fields in these regions. Stores outside the US and Canada are not affected. This is a Shopify platform restriction, not an app limit.
Step 2: Configure general settings
The editor opens with three sections: General Setting, Trigger Conditions, and Rule Action.
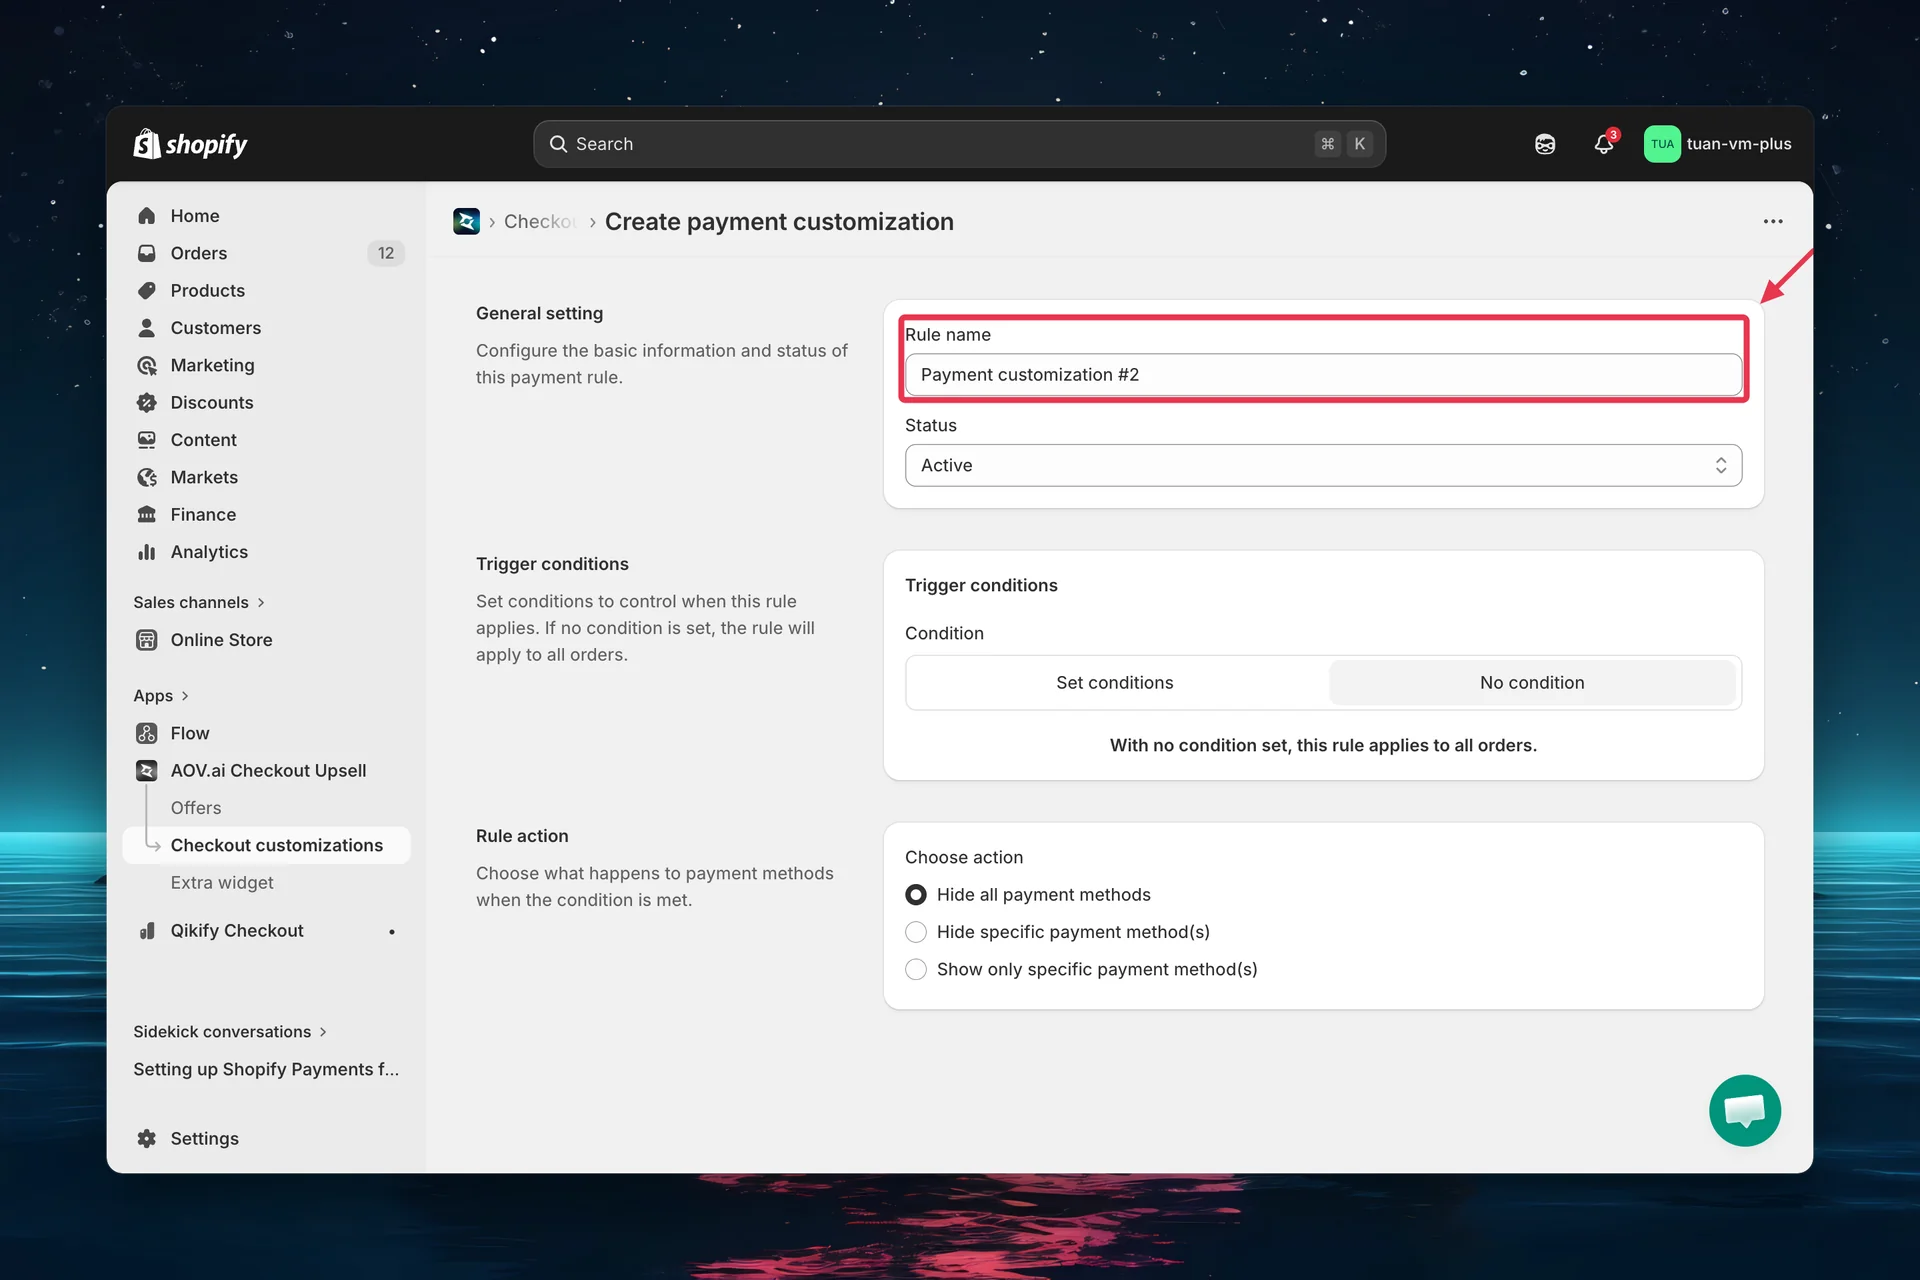
Rule name
Enter a descriptive name (e.g., "Hide COD for international orders"). A default name like "Hide payment method #1" is pre-filled.
Status
The Status dropdown has three options:
| Status | Description |
|---|---|
| Active | Rule applies to all customers at checkout |
| Expired | Rule is saved but not applied |
| Test mode | Rule only triggers when the checkout email is [email protected] |
When you set the status to Test mode, an in-app banner appears with the 4 testing steps: open your store, meet all conditions, enter [email protected] as the checkout email, then complete checkout to review the result.
Tip: Start with Test mode to verify the rule works correctly before activating it for all customers.
Step 3: Configure trigger conditions
Trigger conditions control when the rule applies. By default, rules apply to all orders.
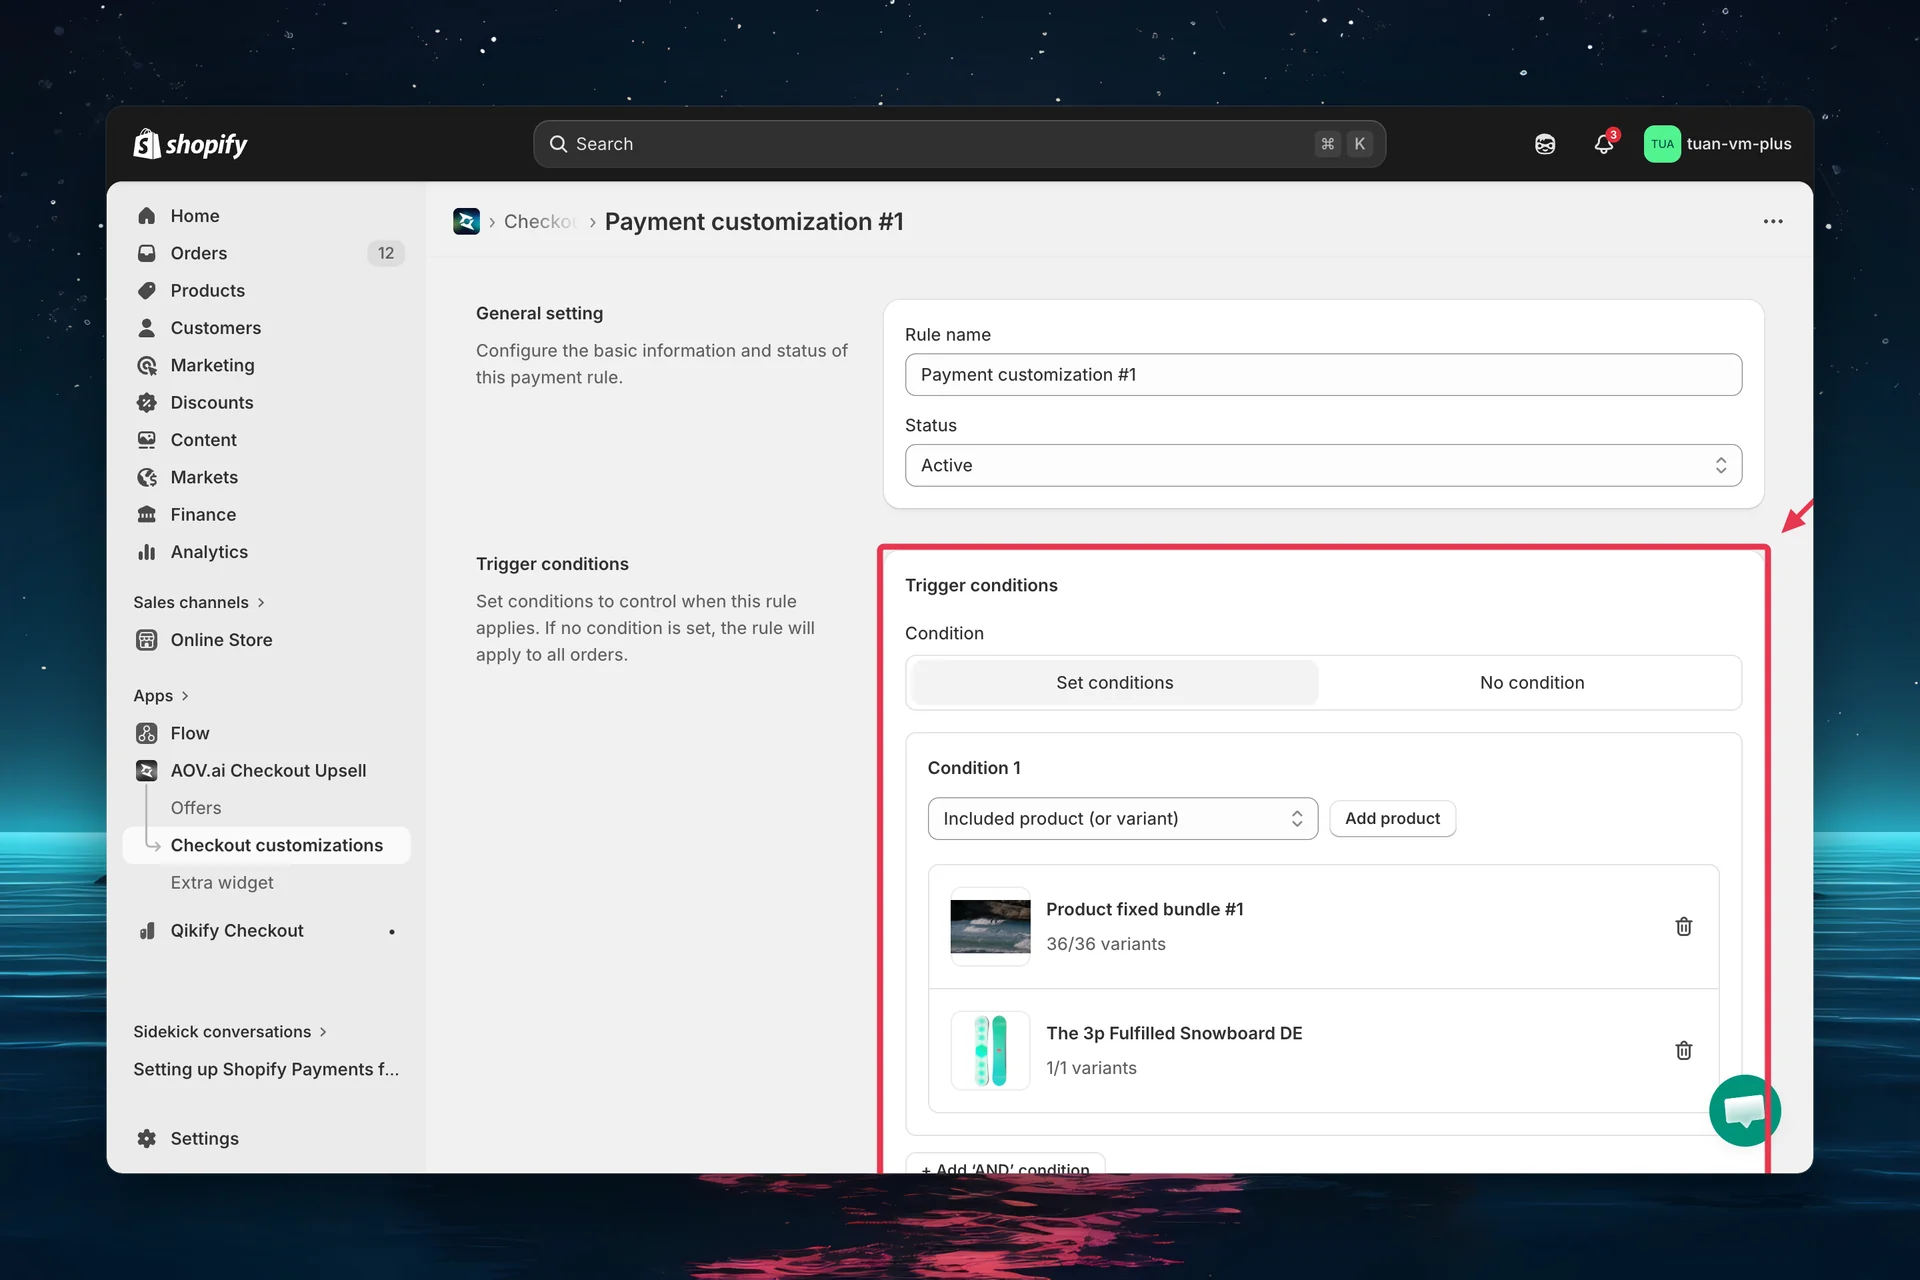
Two modes
| Mode | Behavior |
|---|---|
| No condition | Rule always applies to all orders |
| Set conditions | Rule only applies when all conditions are satisfied (AND logic) |
Available condition types
When you select Set conditions, a condition builder appears. Each condition row starts with a grouped dropdown (Product / Order / Customer / Shipping). Click "+ Add 'AND' condition" to add more rows (one of each type, up to five).
1. Included product (or variant)
| Setting | Details |
|---|---|
| Logic | Rule applies when buyer's cart contains any of the selected products |
| UI | Product picker — browse and select products or variants |
| Use case | Hide COD when buyer has digital products in cart |
2. Excluded product (or variant)
| Setting | Details |
|---|---|
| Logic | Rule applies when buyer's cart does NOT contain any of the selected products |
| UI | Product picker — browse and select products or variants |
| Use case | Only apply a rename when the buyer does not have a specific product |
3. Subtotal value
| Setting | Details |
|---|---|
| UI | Operator dropdown + value field (with your store currency symbol) |
| Operators | Greater (>), Greater or equal (≥), Less (<), Less or equal (≤), Equal (=) |
| Range mode | Click Use a range to switch to a "from / to" range; click Change to basic to switch back |
| Use case | Hide Buy Now Pay Later for orders under $50 |
4. Customer tag
| Setting | Details |
|---|---|
| UI | Include / Exclude dropdown + customer-tag picker (browse your store's tags) |
| Logic | Include = buyer has the tag; Exclude = buyer does not have the tag |
| Use case | Show wholesale payment options only for tagged customers |
5. Shipping country
| Setting | Details |
|---|---|
| UI | Include / Exclude dropdown + country picker |
| Logic | Include = ships to a selected country; Exclude = does not |
| Use case | Hide COD for orders shipping outside your home country |
6. Shipping method
Available in Hide payment method rules only. Add a Shipping method trigger condition to show or hide payment methods based on the shipping option the buyer selects at checkout.
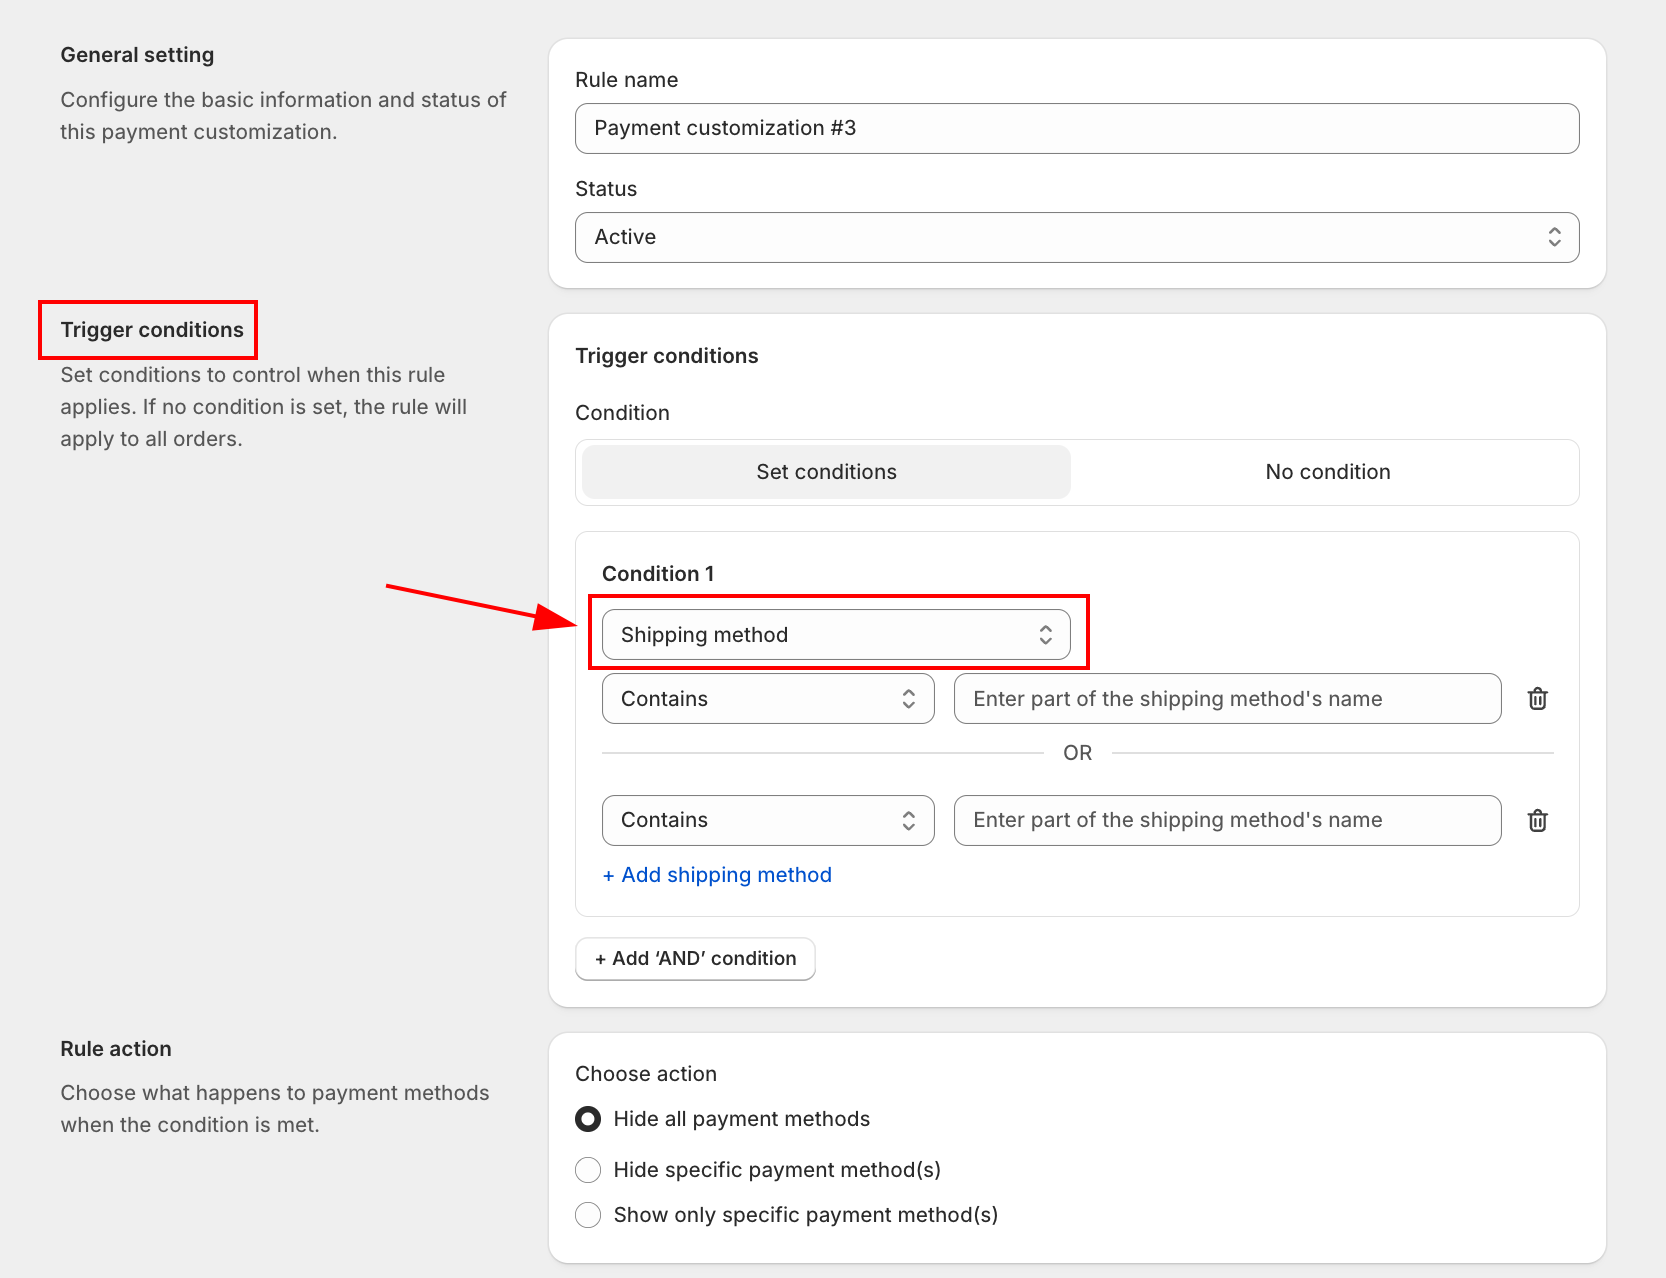
| Setting | Details |
|---|---|
| UI | Operator dropdown + free-text field for the shipping method name |
| Contains | Partial match, case-insensitive — e.g. cod matches "COD Express" and "Standard COD" |
| Is exactly | Full match, case-sensitive — the buyer's selected rate must match the value exactly |
| Multi-value | Add multiple method names in one condition row — any one match triggers the rule (OR logic within row) |
| Use case | Show only Cash on Delivery when the buyer picks a COD shipping rate; hide it for all other rates |
COD surcharge example. In Shopify, go to Settings > Shipping and create a dedicated rate named "COD Delivery +60Rs". In the app, create a Hide payment method rule with Trigger = Shipping method contains COD and Action = Show only Cash on Delivery. Buyers who pick the COD rate see only the COD payment option. Buyers who pick any other rate see the full payment list.
All conditions use AND logic — every condition must be true for the rule to apply. For example: "Cart contains Product A" AND "Cart value > $100" means both must be satisfied.
Step 4: Configure rule action
This section changes based on the rule type you selected in Step 2.
Hide payment method
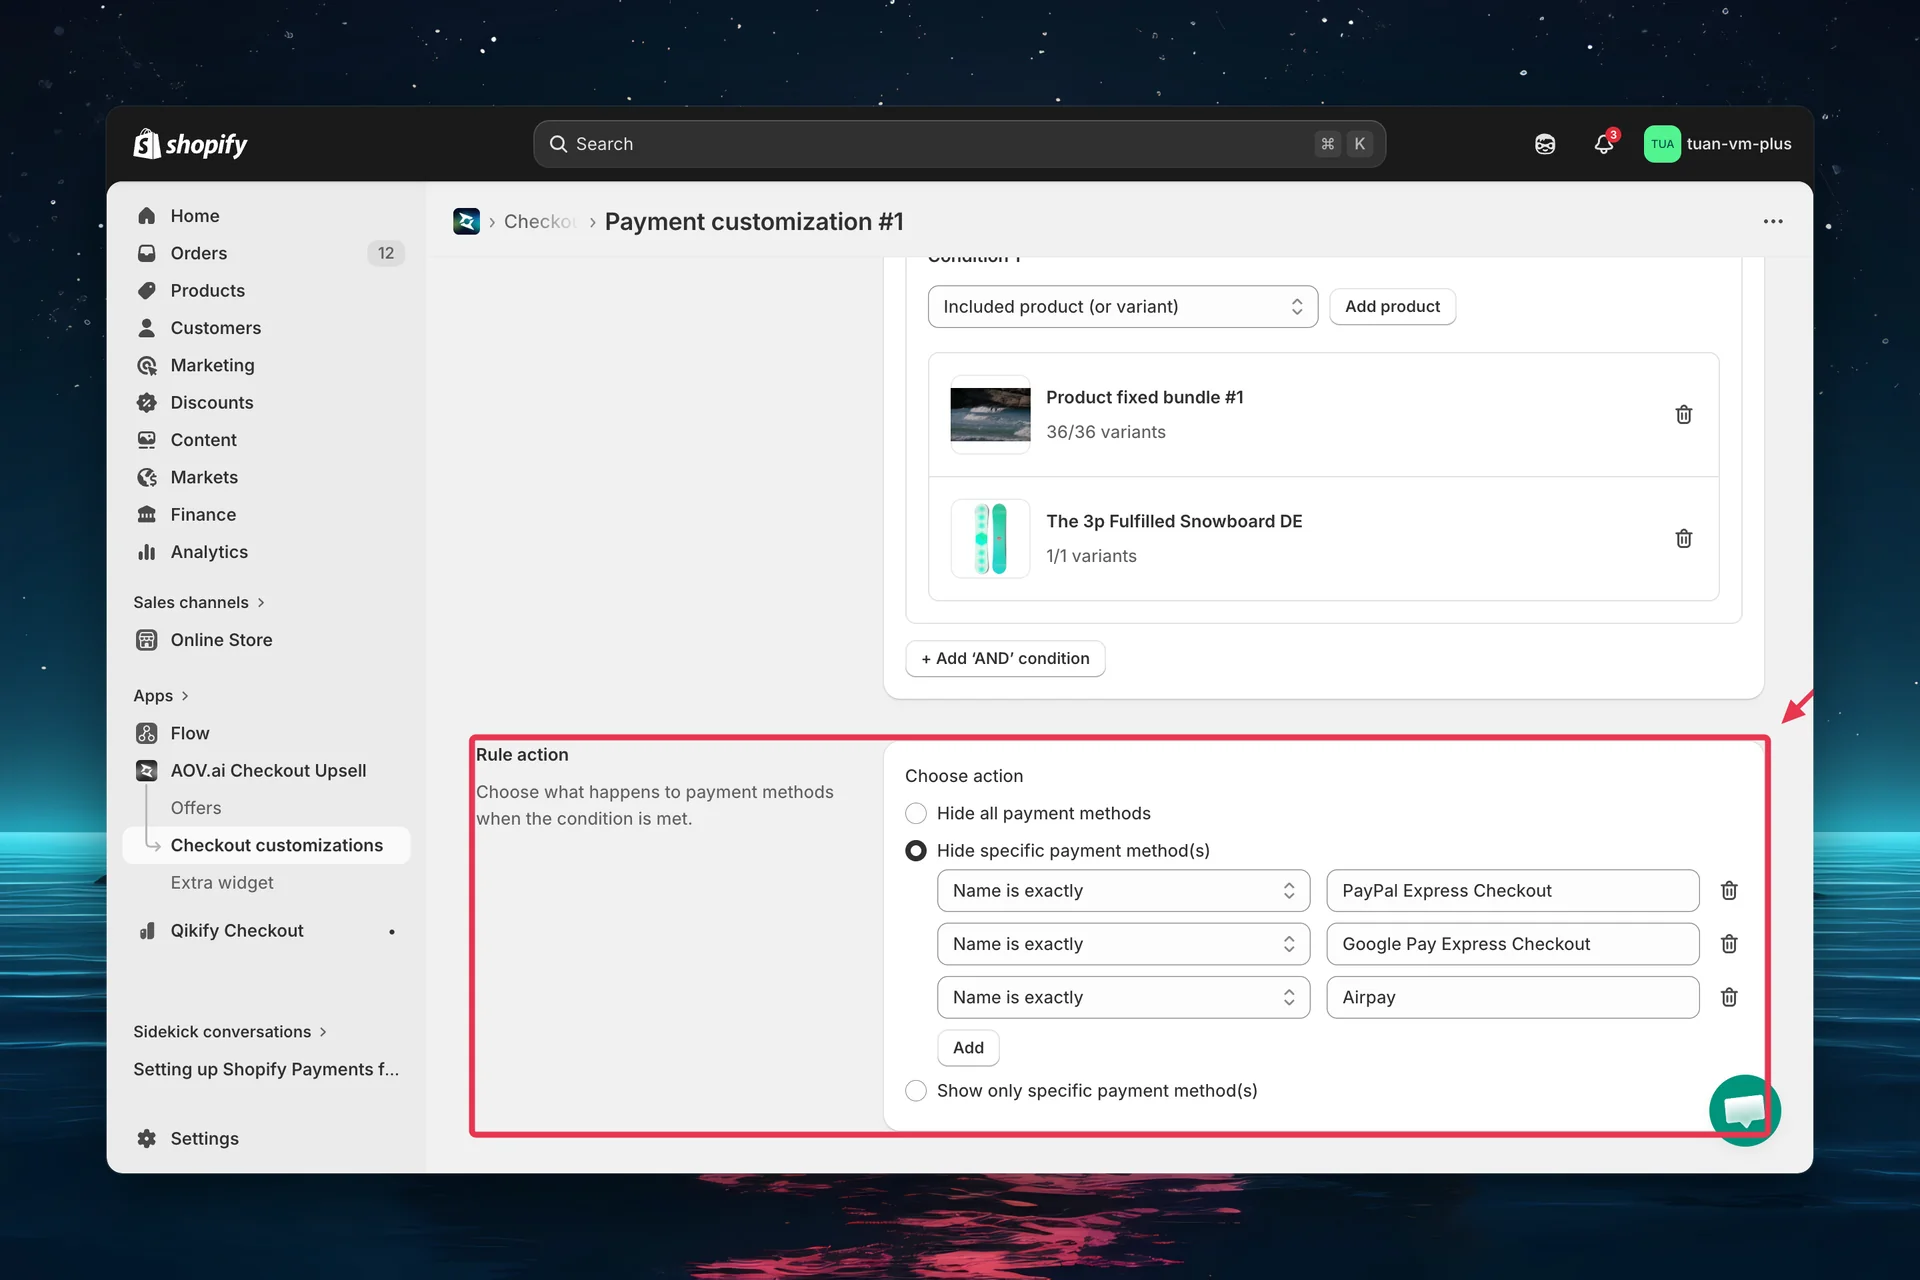
Three options:
| Option | Description |
|---|---|
| Hide all payment methods | Removes every payment method (use with trigger conditions!) |
| Hide specific payment method(s) | Select which methods to hide |
| Show only specific payment method(s) | Hide everything except the selected methods |
For specific methods, add rows with:
| Column | Description |
|---|---|
| Matching type | "Name is exactly" (exact match) or "Name contains" (partial match) |
| Payment method | Search and select from your store's payment methods |
Click Add to add more conditions. Click the trash icon to remove a row.
"Hide all payment methods" removes every payment option. Always use this with trigger conditions — otherwise buyers cannot complete checkout.
Rename payment method
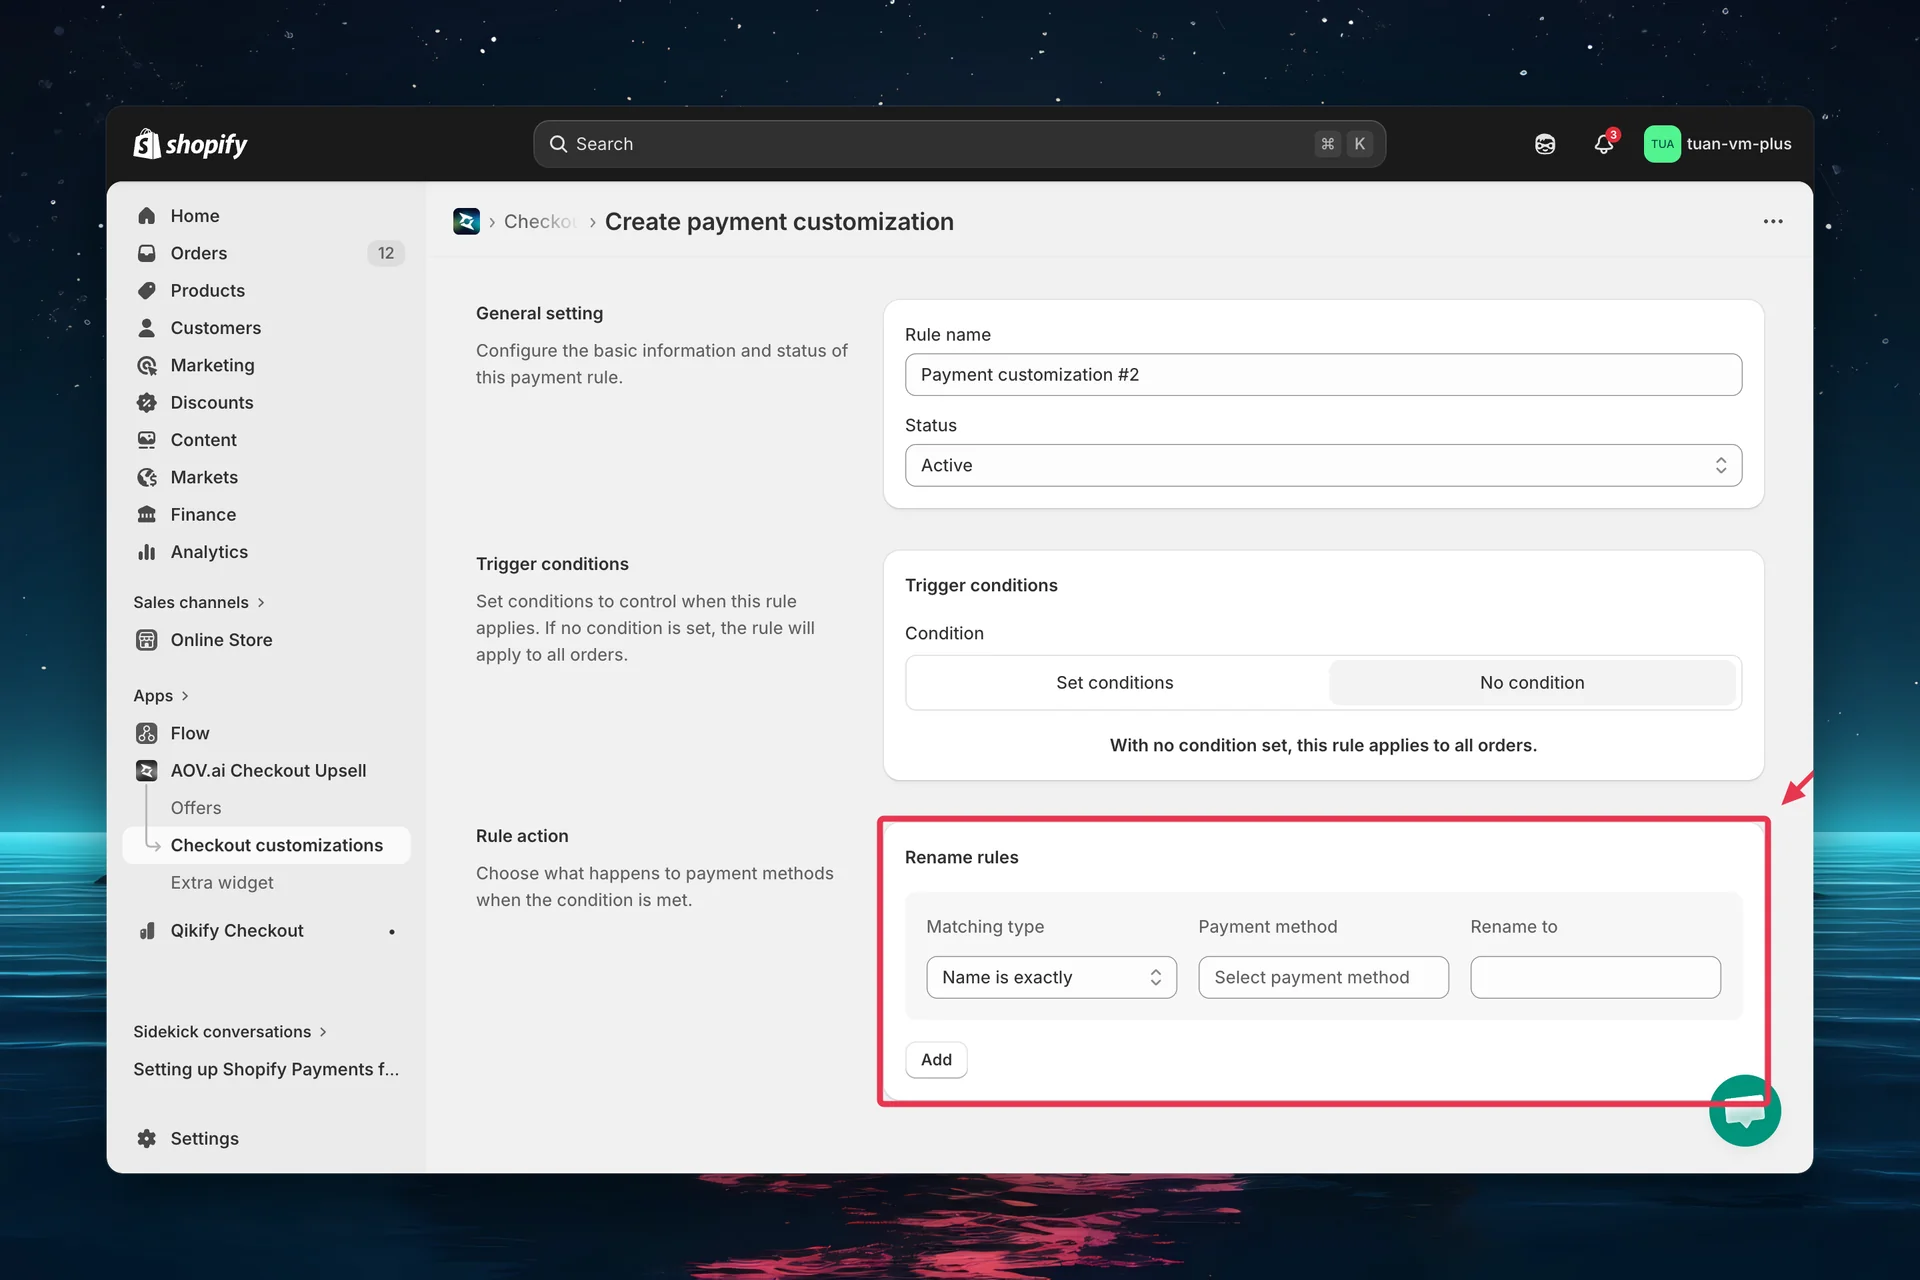
Add rename mappings with three columns:
| Column | Description |
|---|---|
| Matching type | "Name is exactly" or "Name contains" |
| Payment method | The current method name to match |
| Rename to | The new display name buyers will see |
You can add multiple rename mappings in a single rule. Click Add to add more rows.
Example: Rename "Cash on Delivery (COD)" → "Pay when delivered" to make the option clearer for buyers.
Reorder payment method
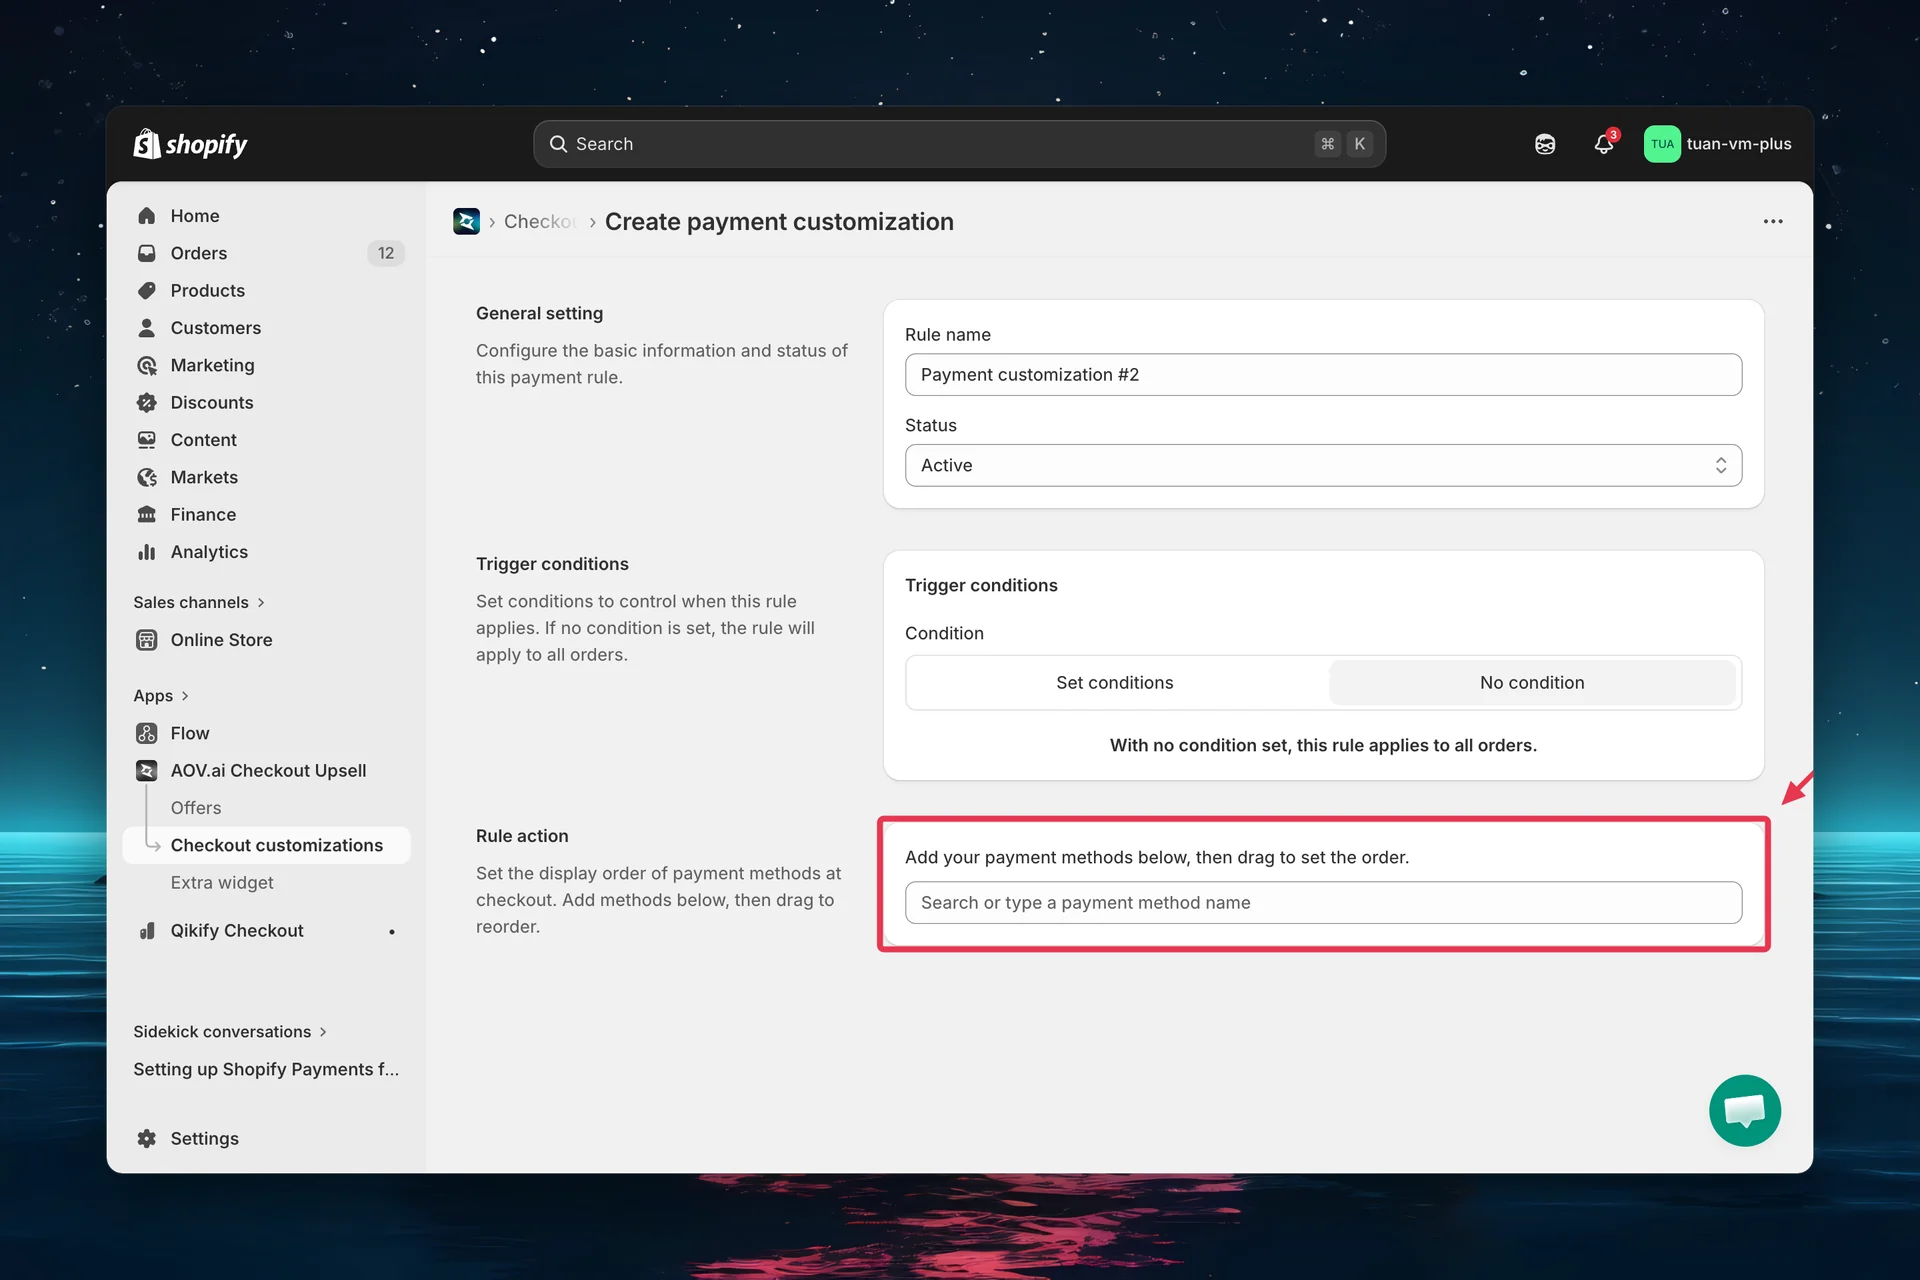
- Search and select your payment methods from the dropdown
- Selected methods appear as a draggable list
- Drag and drop using the handle (≡) to set the desired order
- Methods listed here appear first; unlisted methods follow in their default order
Click the trash icon to remove a method from the list.
Tip: If your payment method is not in the list, type its name in the search box and click Add "<name>" as Payment Method to add it manually.
Step 5: Save and activate
- Review all settings
- Click Save in the top bar
The rule is live when:
- Status is Active
- All conditions are properly configured
The rule takes effect at checkout immediately.
Test your rule with Test Mode
Before activating a rule for all customers, test it first:
- Set the rule Status to Test mode and save
- Go to your store and add products to the cart
- Proceed to checkout
- Enter [email protected] as the checkout email
- Make sure all trigger conditions (if any) are met
- Verify the payment methods are correctly hidden, renamed, or reordered
- Once verified, change the status back to Active
Test mode only works with the email [email protected]. All trigger conditions must also be satisfied for the rule to take effect.
Manage existing rules
Toggle status
Use the Activate (play) / Deactivate (pause) icon button on any rule to quickly toggle its status without opening the editor.
Edit a rule
Click the edit icon (pencil) in the Actions column, or click the rule row to open the editor.
Delete rules
- Single rule: Click the delete icon (trash) in the Actions column
- Bulk delete: Select multiple rules with checkboxes → click Delete rules
Other bulk actions: Activate rules, Deactivate rules.
Deletion is permanent. The rule cannot be recovered.
Rule statuses
| Status | Badge | Meaning |
|---|---|---|
| Active | Green (success) | Live and affecting checkout |
| Expired | Grey | Manually deactivated |
| Test mode | Yellow/orange (warning) | Only triggers with [email protected] email |
Important notes from Shopify
Activation in Shopify Settings required. After creating a payment rule in the app, you must also activate it in your Shopify admin. Go to Settings → Payments → Payment customizations → Manage, select your customization, and click Activate. If you skip this step, the rule will not take effect at checkout.
Draft order checkouts. Payment customizations apply to both regular Shopify Checkout and draft order checkouts. However, customizations will not display in the admin while you are creating a draft order — they only appear on the actual checkout page.
Finland regulation. For customers based in Finland, no payment method is pre-selected by default at checkout, in compliance with local regulations (opens in a new tab).
FAQs
General
Q: Do I need Shopify Plus for Payment Customization? A: No. Payment Customization uses Shopify Functions, which are available on all Shopify plans.
Q: Can I customize the Credit Card (Shopify Payments) method? A: It depends on your location. In the United States and Canada, only stores on the Shopify Plus plan can customize Credit Card (Shopify Payments) fields (hide, rename, reorder). Non-Plus stores in these regions cannot — Credit Card options remain standard. Stores outside the US and Canada are not affected by this restriction.
Trigger conditions
Q: What happens if I set no conditions? A: The rule applies to every order at checkout.
Q: Can I combine multiple conditions? A: Yes. Add multiple conditions with AND logic — all must be true for the rule to apply.
Q: Does "Included product (or variant)" check variants? A: You can select either whole products or specific variants in the picker. If a selected product (any variant) or a selected variant is in the cart, the condition is met.
Rule actions
Q: What's the difference between "Name is exactly" and "Name contains"? A: "Name is exactly" requires a perfect match. "Name contains" matches if the payment method name includes the keyword anywhere. Use "Name contains" for flexibility — it catches variations like "Credit Card" and "Credit Card (Stripe)".
Q: What happens if I hide all payment methods without conditions? A: Buyers will see no payment options and cannot complete checkout. Always use trigger conditions with "Hide all".
Q: Do reordered methods override Shopify's default order? A: Yes. Methods in your reorder list appear first in the order you set. Unlisted methods appear after in their default order.
Tips
- Start with Test mode — verify the rule works correctly before activating for all customers
- Use "Name contains" for flexibility — it catches variations of payment method names
- Keep rule names descriptive — "Hide COD for international" is better than "Rule #1"
- Combine trigger conditions to target specific segments (e.g., hide COD for orders above $500 from wholesale customers)
- Check Shopify Payments settings to confirm exact payment method names before creating rename rules
- Use "Show only specific methods" when you want to whitelist — it's easier than hiding many methods individually
Share app function logs
If a payment rule isn't working as expected at checkout, you can share the function execution logs with our team for faster troubleshooting. The rule editor has a Share app function logs section (heading: "Payment rule not working on checkout?"). You can find this section at the bottom of every campaign/rule editor page.
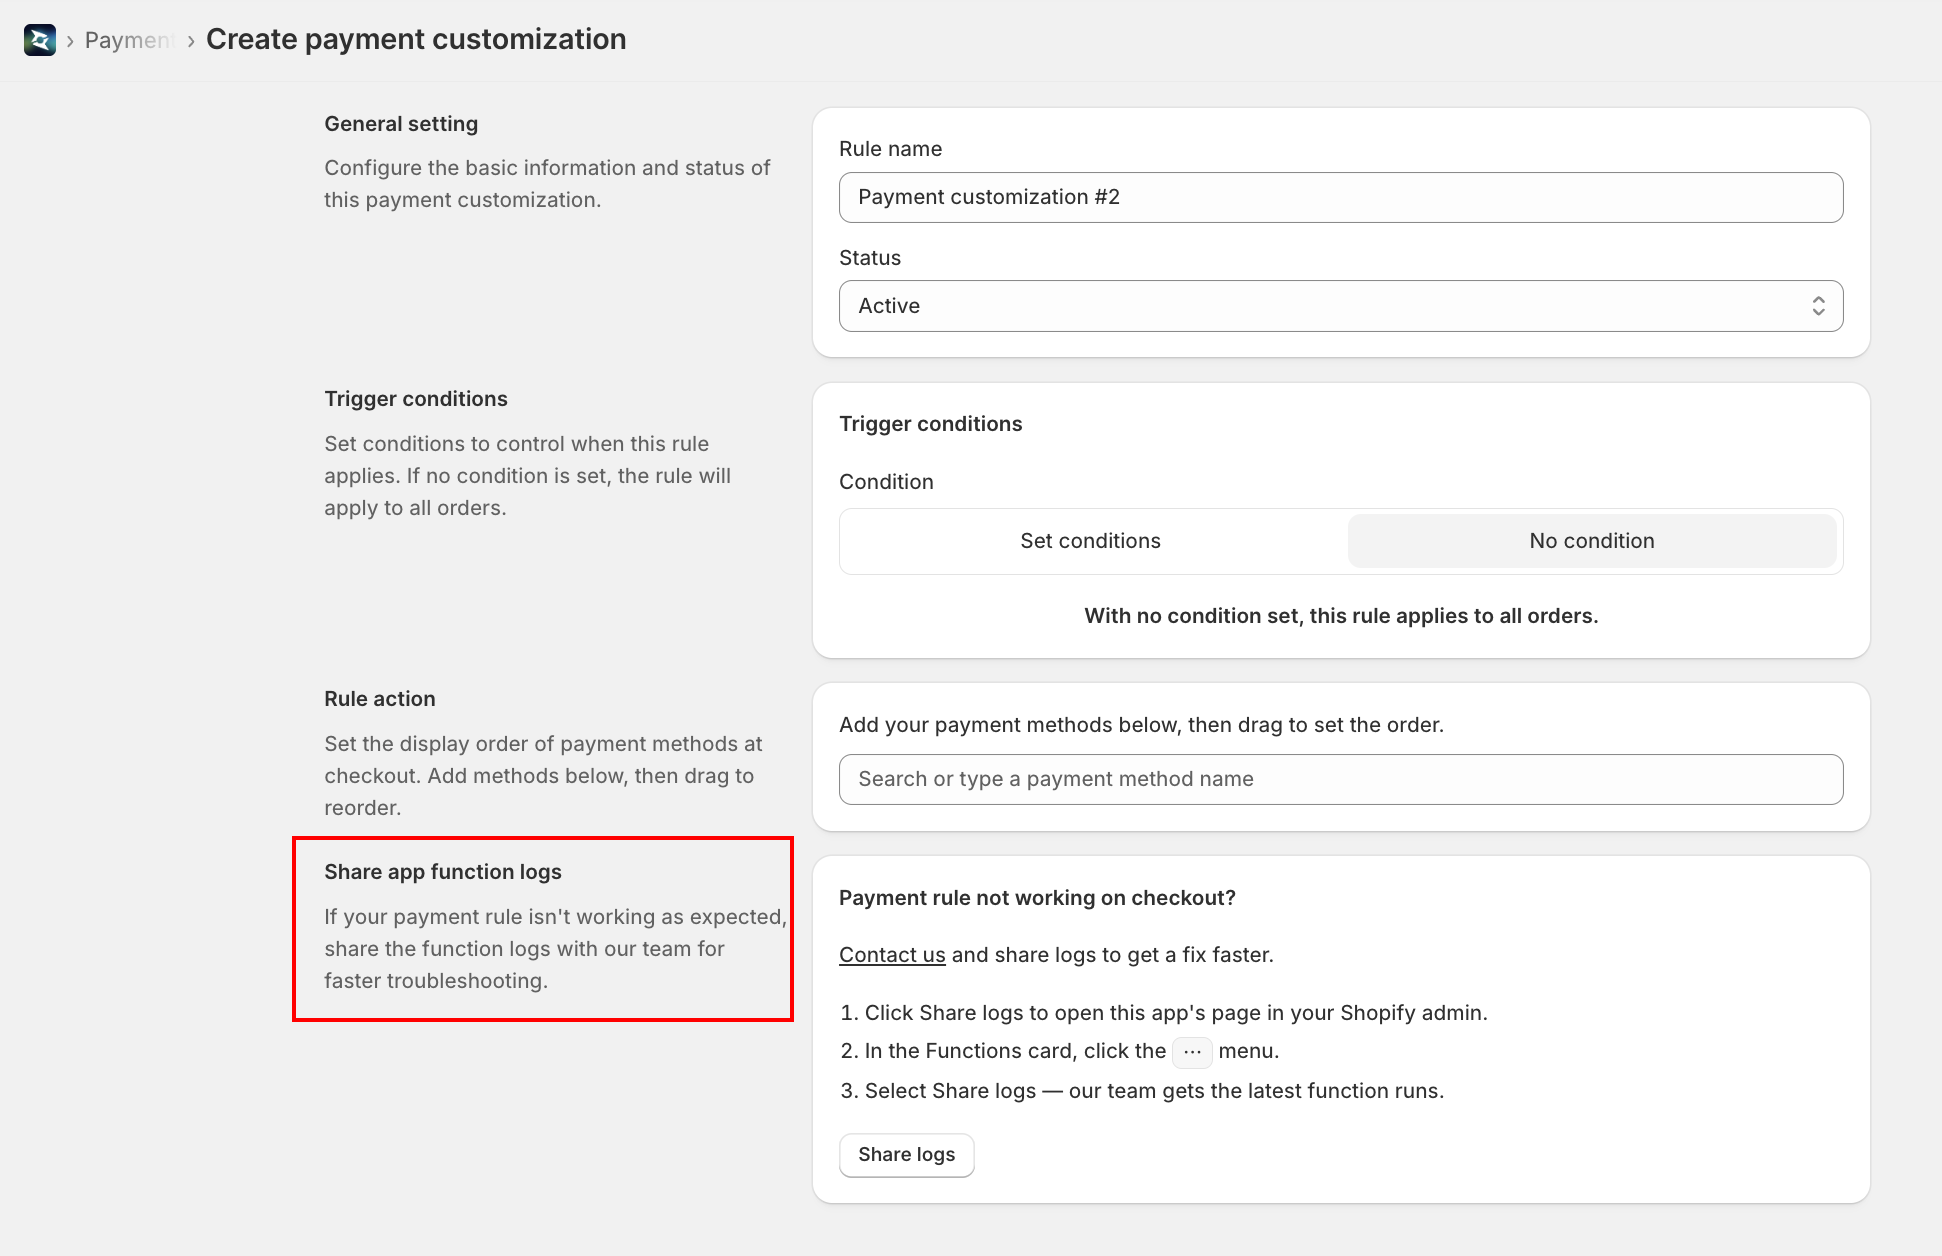
- In the rule editor, find the Share app function logs section and click Share logs — this opens this app's page in your Shopify admin (Settings → Apps and sales channels → [the app])
- In the Functions card, click the ⋯ (more) menu
- Select Share logs — our team receives the latest function runs
You can also use the Contact us link in that section to message support directly.