Regex Validation
Validate checkout fields against regex patterns to block orders with incorrectly formatted data. Use preset patterns from a built-in library or write your own custom regex.
Available on all Shopify plans. Regex Validation uses Shopify Functions — no Shopify Plus required.
What it does
Regex Validation lets you create pattern-matching rules that validate what buyers type into checkout fields. When a field value doesn't match the expected format, checkout is blocked and the buyer sees a clear error message.
- Address formatting — ensure addresses contain both letters and numbers, block entries with special characters or emoji
- Name validation — detect invalid characters like
@,#,!in name fields - Phone numbers — enforce international phone number formats
- Postal codes — validate ZIP/postal code formats for specific countries (US, Canada, UK)
- Email format — enforce valid email structure
- Custom patterns — write your own regex for any validation scenario
Each rule targets one checkout field and shows a custom error message at a position you choose. To validate multiple fields, create multiple rules.
Step 1: Go to Checkout Validations
In the app sidebar, click Checkout Validations. You'll see the list of all validation rules.
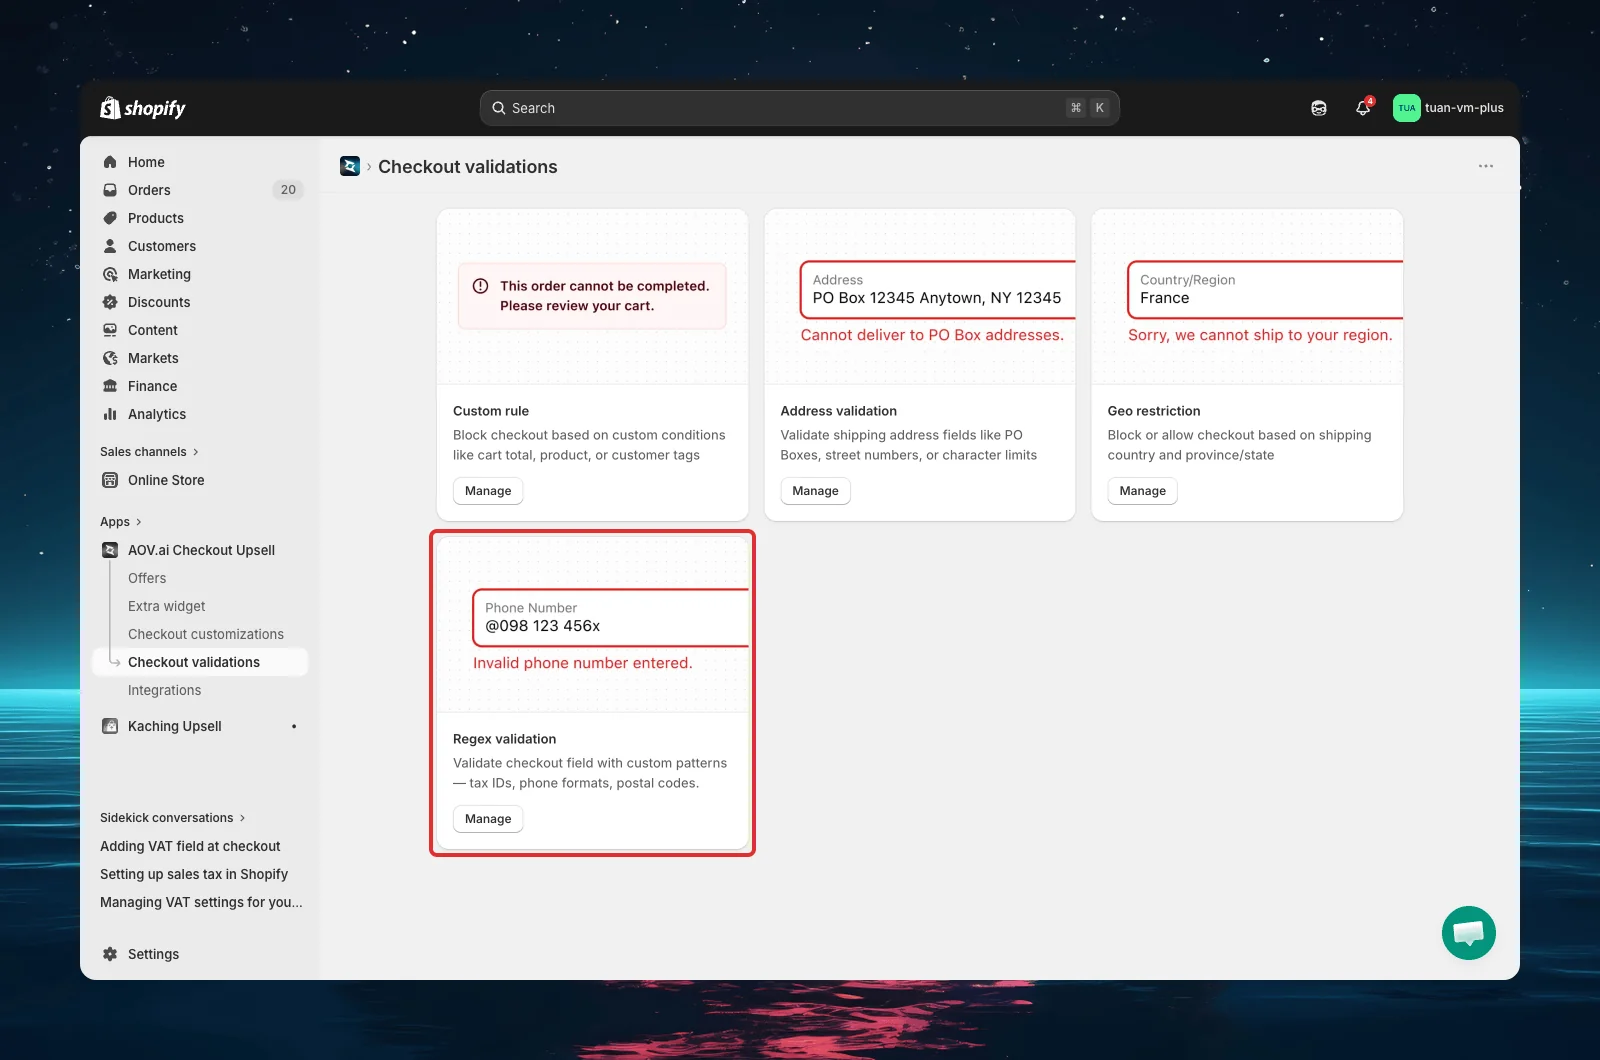
List page overview
| Feature | Description |
|---|---|
| Search | Find rules by name |
| Status filter | Filter by status (Active, Test mode, etc.) |
| Table | Shows rule name, type badge ("Regex validation"), status, summary, and actions |
| Actions | Activate/Deactivate, Edit, Delete for each rule |
| Bulk actions | Select multiple rules to activate, deactivate, or delete |
Step 2: Create a new rule
Click Create validation (top right), then select Regex validation. The editor opens with a 2:1 layout — settings on the left, summary and preview on the right.

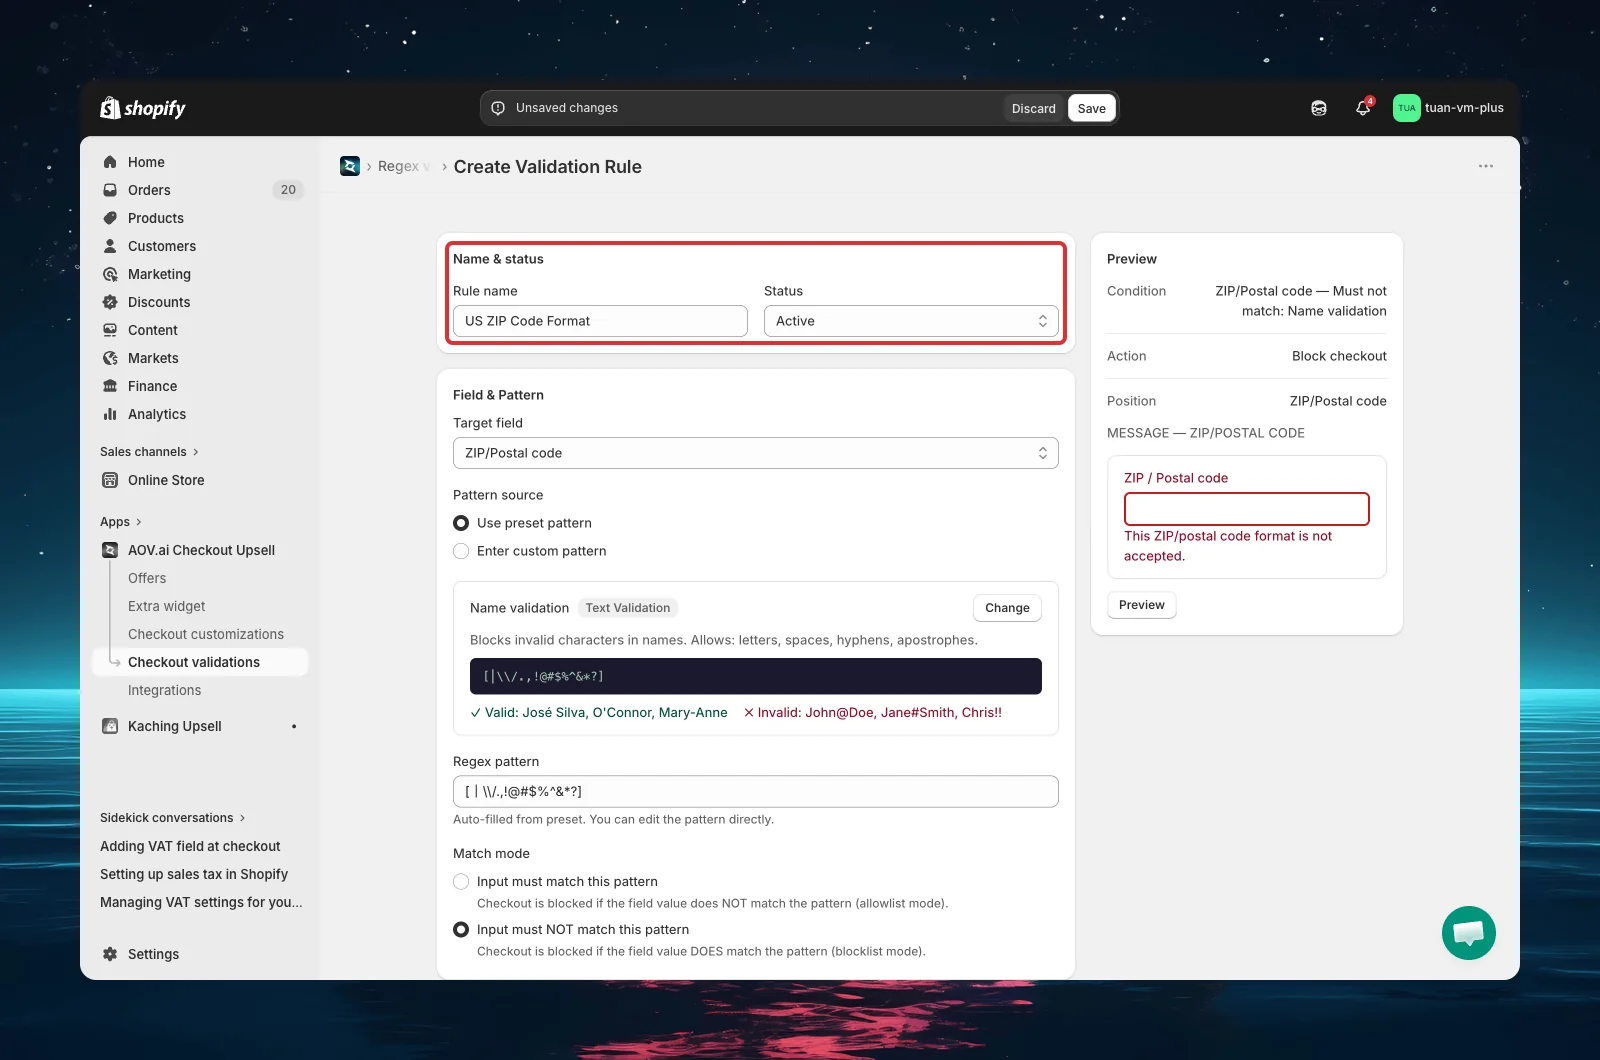
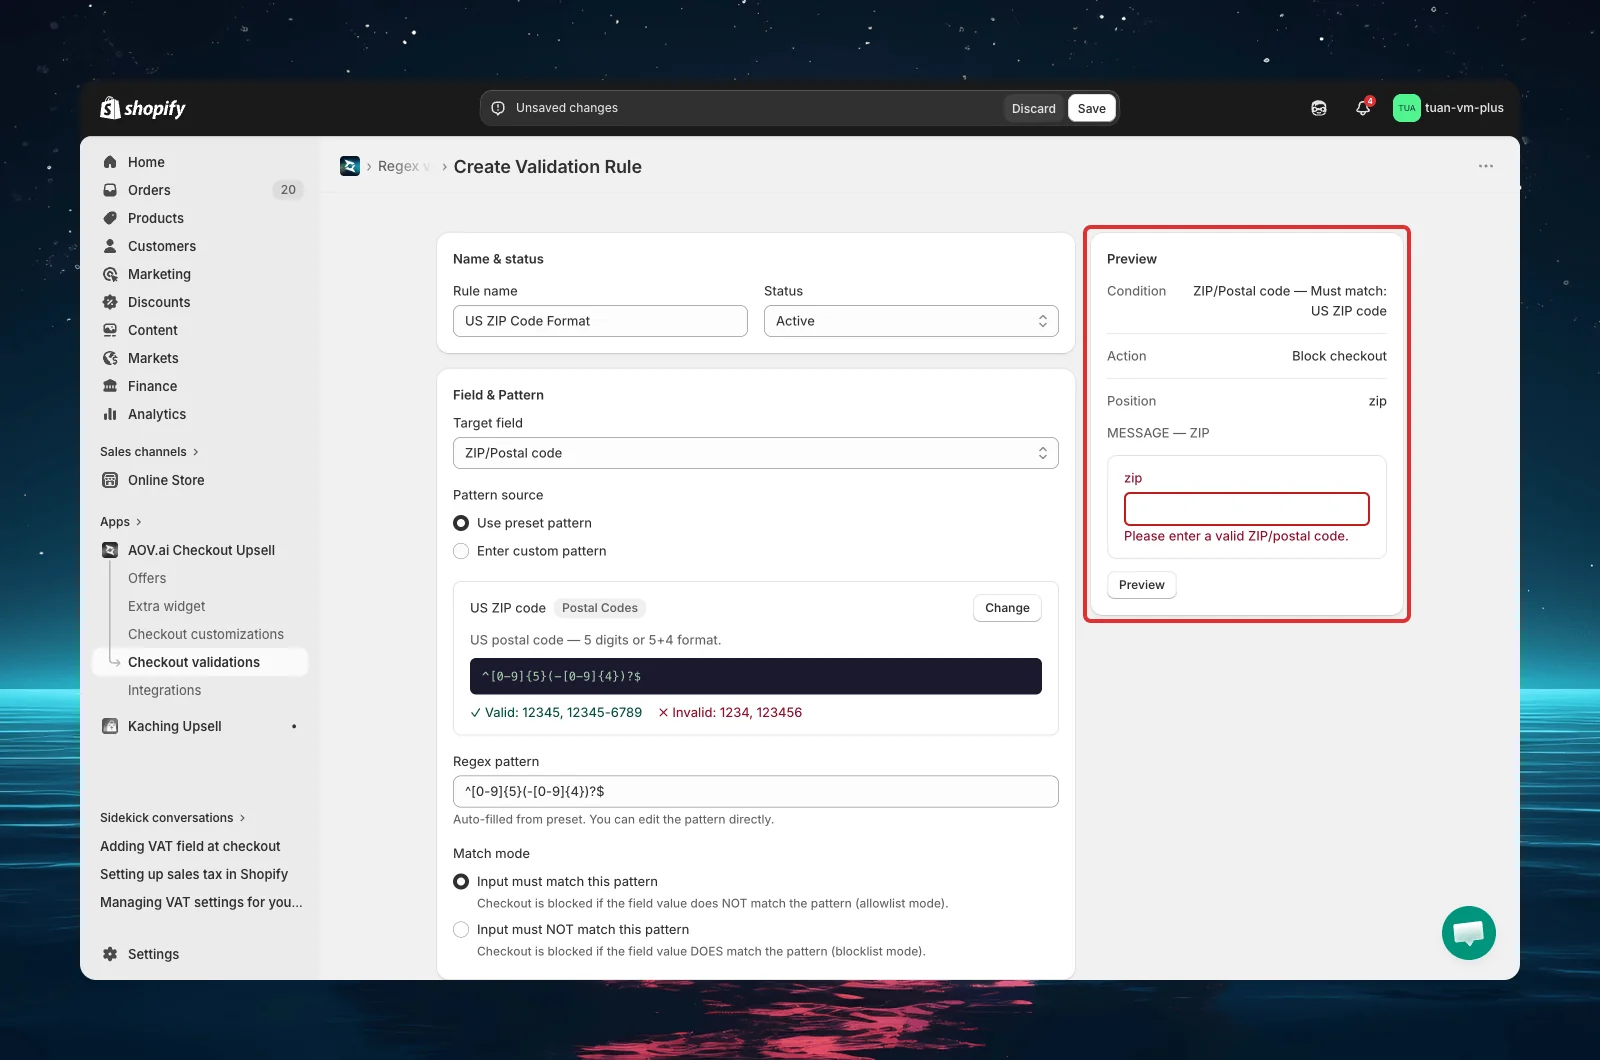
Step 3: Set name and status
| Setting | Description |
|---|---|
| Rule name | A descriptive name for your reference (e.g., "US ZIP code format") |
| Status | Active — rule applies at checkout. Test mode — only triggers when checkout email is [email protected]. Expired — rule is saved but not applied. (You can also pause a rule from the list page to stop it without deleting it.) |
Tip: Start with Test mode to verify the rule works correctly before activating it for all customers.
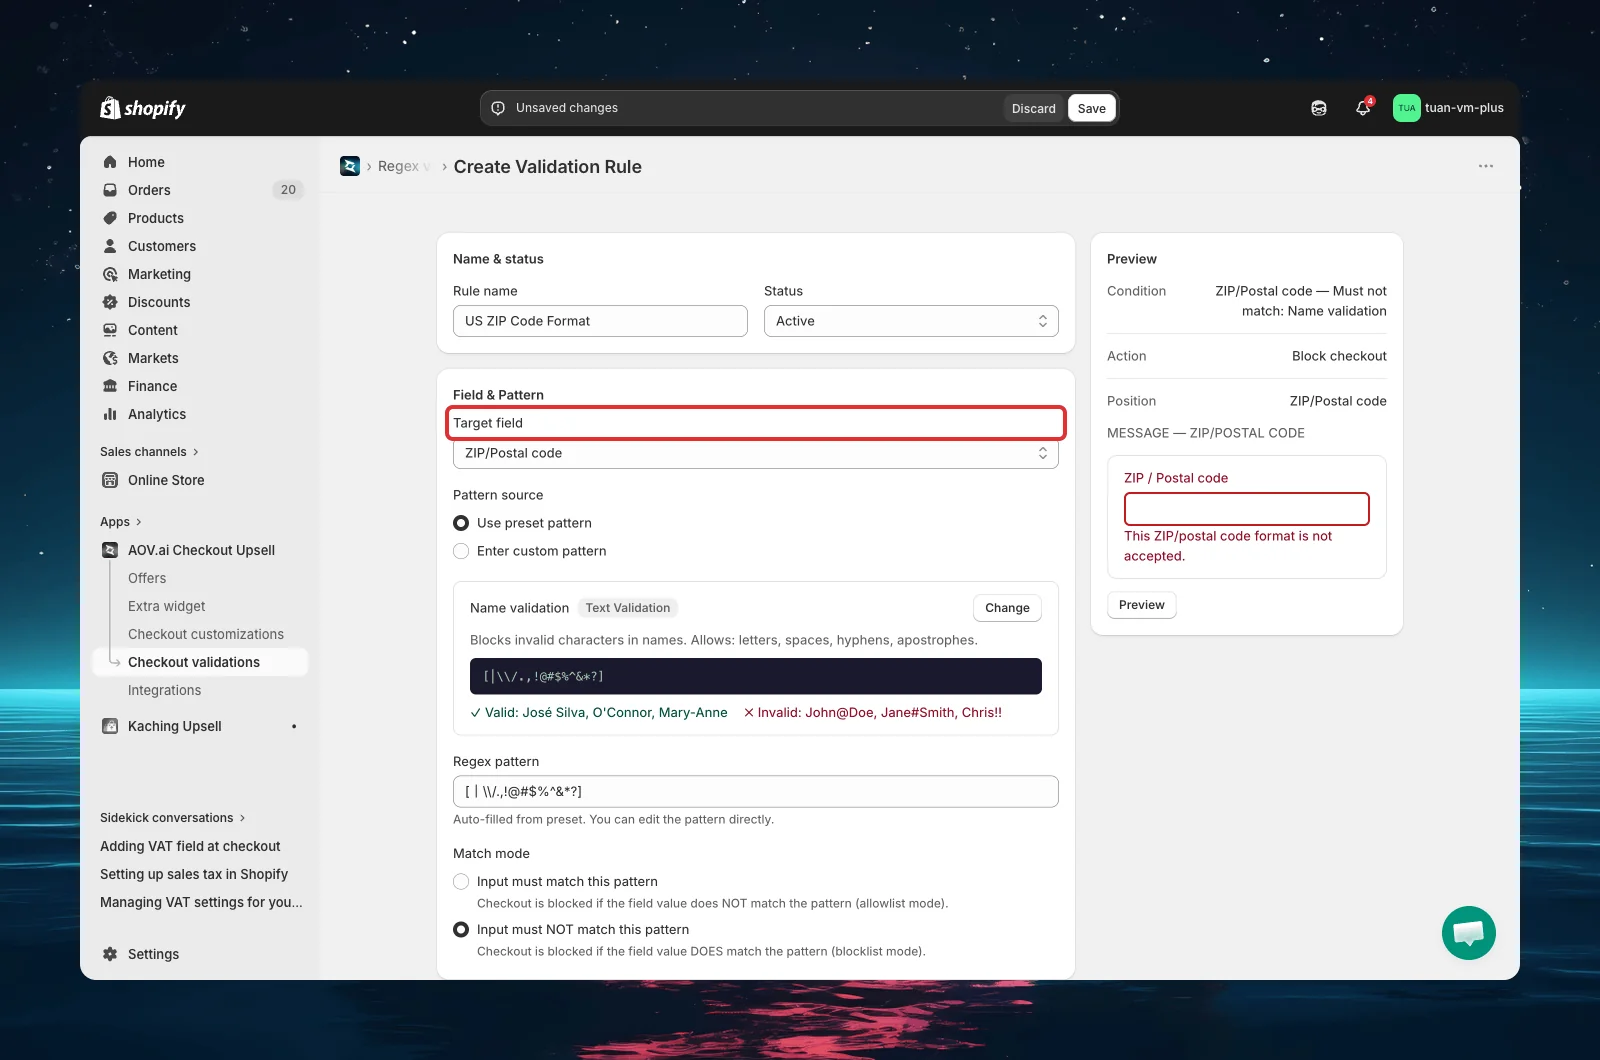
Step 4: Choose the target field
Select the checkout field this rule will validate. Each rule applies to exactly one field.
| Target field |
|---|
| First name |
| Last name |
| Company |
| Address line 1 |
| Address line 2 |
| City |
| ZIP/Postal code |
| Phone |
Step 5: Select the pattern source
Choose how to define your regex pattern using the two options:
| Option | When to use |
|---|---|
| Use preset pattern (default) | Pick from 13 ready-made patterns organized in 4 categories — no regex knowledge needed |
| Enter custom pattern | Write your own regex for advanced or specific validation needs |
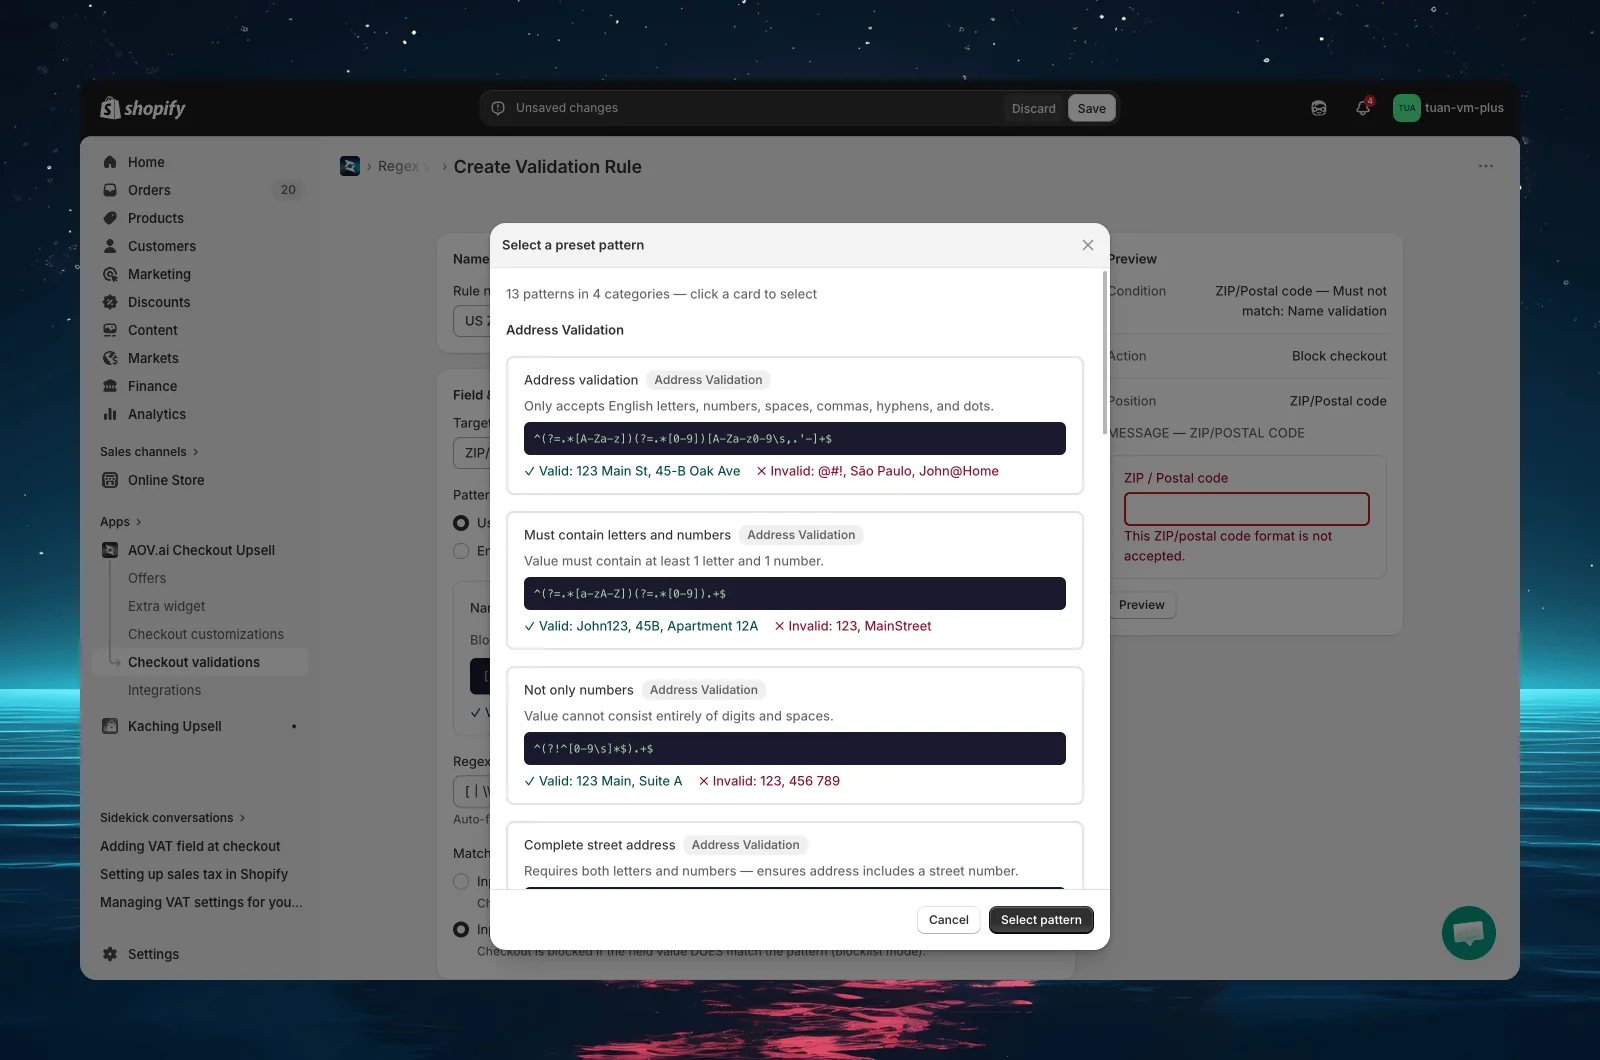
Option A: Use a preset pattern
Click "Choose a pattern" (or "Change" if one is already selected) to open the Preset Pattern Library modal. The library contains 13 patterns in 4 categories:
Address Validation
| Pattern | Description | Valid examples | Invalid examples |
|---|---|---|---|
| Address validation | Letters, numbers, spaces, commas, hyphens, dots only | 123 Main St, 45-B Oak Ave | @#!, John@Home |
| Must contain letters and numbers | Value must include at least one letter and one number | John123, 45B, Apartment 12A | 123, MainStreet |
| Not only numbers | Cannot be only numbers and spaces | 123 Main, Suite A | 123, 456 789 |
| Complete street address | Requires both letters and numbers — ensures a full street address | 123 Main St., 45-47 Oak Ave | 123, Main Street |
Text Validation
| Pattern | Description | Valid examples | Invalid examples |
|---|---|---|---|
| Name validation | Detects invalid characters in names — blocks: | \ / . , ! @ # $ % ^ & * ? | Jose Silva, O'Connor, Mary-Anne | John@Doe, Jane#Smith |
| Only letters and spaces | Letters, spaces, and hyphens only | John Doe, Main Street | John123, Main St. |
| Only numbers | Digits only | 12345, 999 | 123abc, 12.34 |
| Alphanumeric only | Letters and numbers, no spaces or special characters | ABC123, Product1 | ABC-123, Product 1 |
Note: The "Name validation" preset uses blocklist mode ("Must NOT match") by default — it blocks input that contains invalid characters. All other presets use allowlist mode ("Must match").
Contact Information
| Pattern | Description | Valid examples | Invalid examples |
|---|---|---|---|
| Valid email format | Standard email format | [email protected] | user@domain |
| Phone number (international) | International phone number format | +1234567890, 5551234567 | 123abc, 12345 |
Postal Codes
| Pattern | Description | Valid examples | Invalid examples |
|---|---|---|---|
| US ZIP code | US format: 12345 or 12345-6789 | 12345, 12345-6789 | 1234, 123456 |
| Canadian postal code | Canadian format: A1A 1A1 | K1A 0A6, M5V3A8 | 12345, ABC123 |
| UK postal code | UK format: SW1A 1AA | SW1A 1AA, M1 1AA | 12345, ABC |
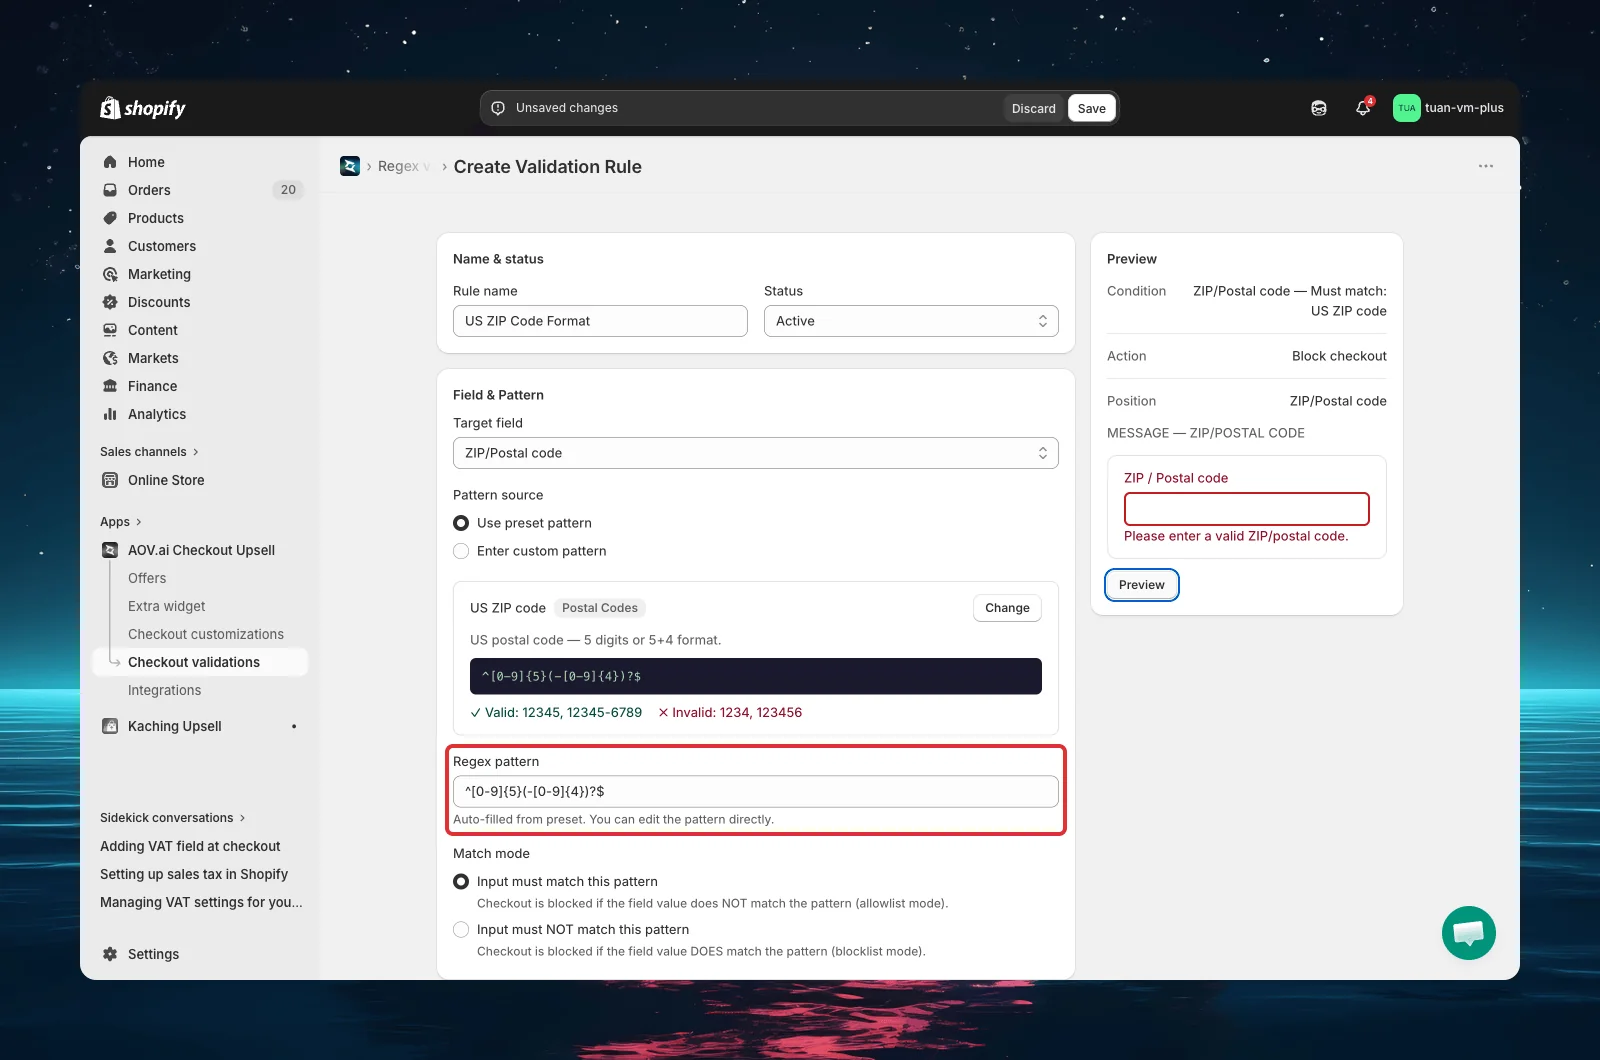
Each preset card shows the pattern name, regex expression, and valid/invalid examples so you can understand what it does without knowing regex. Click a card to select it, then click "Select pattern".
Tip: Postal code patterns work best when combined with a Shipping country condition (see Step 8) — for example, enforce the US ZIP code pattern only when shipping to the United States.
Option B: Enter a custom pattern
Select "Enter custom pattern" and type your regex directly into the pattern input field. The field uses a monospace font for readability.
The regex pattern is checked as you type. If the expression is invalid, you'll immediately see an inline error: "Invalid regex pattern. Please check your expression." The field also shows a hint — for custom patterns: "Enter a valid JavaScript regular expression"; for presets: "Auto-filled from preset. You can edit the pattern directly."
Step 6: Set the match mode
Choose how the pattern is applied:
| Mode | Behavior | Use case |
|---|---|---|
| Input must match this pattern (default) | Allowlist — checkout is blocked if the field value does NOT match the pattern | Enforce a specific format (e.g., US ZIP code must be 5 digits) |
| Input must NOT match this pattern | Blocklist — checkout is blocked if the field value DOES match the pattern | Block invalid characters (e.g., names containing @, #, !) |
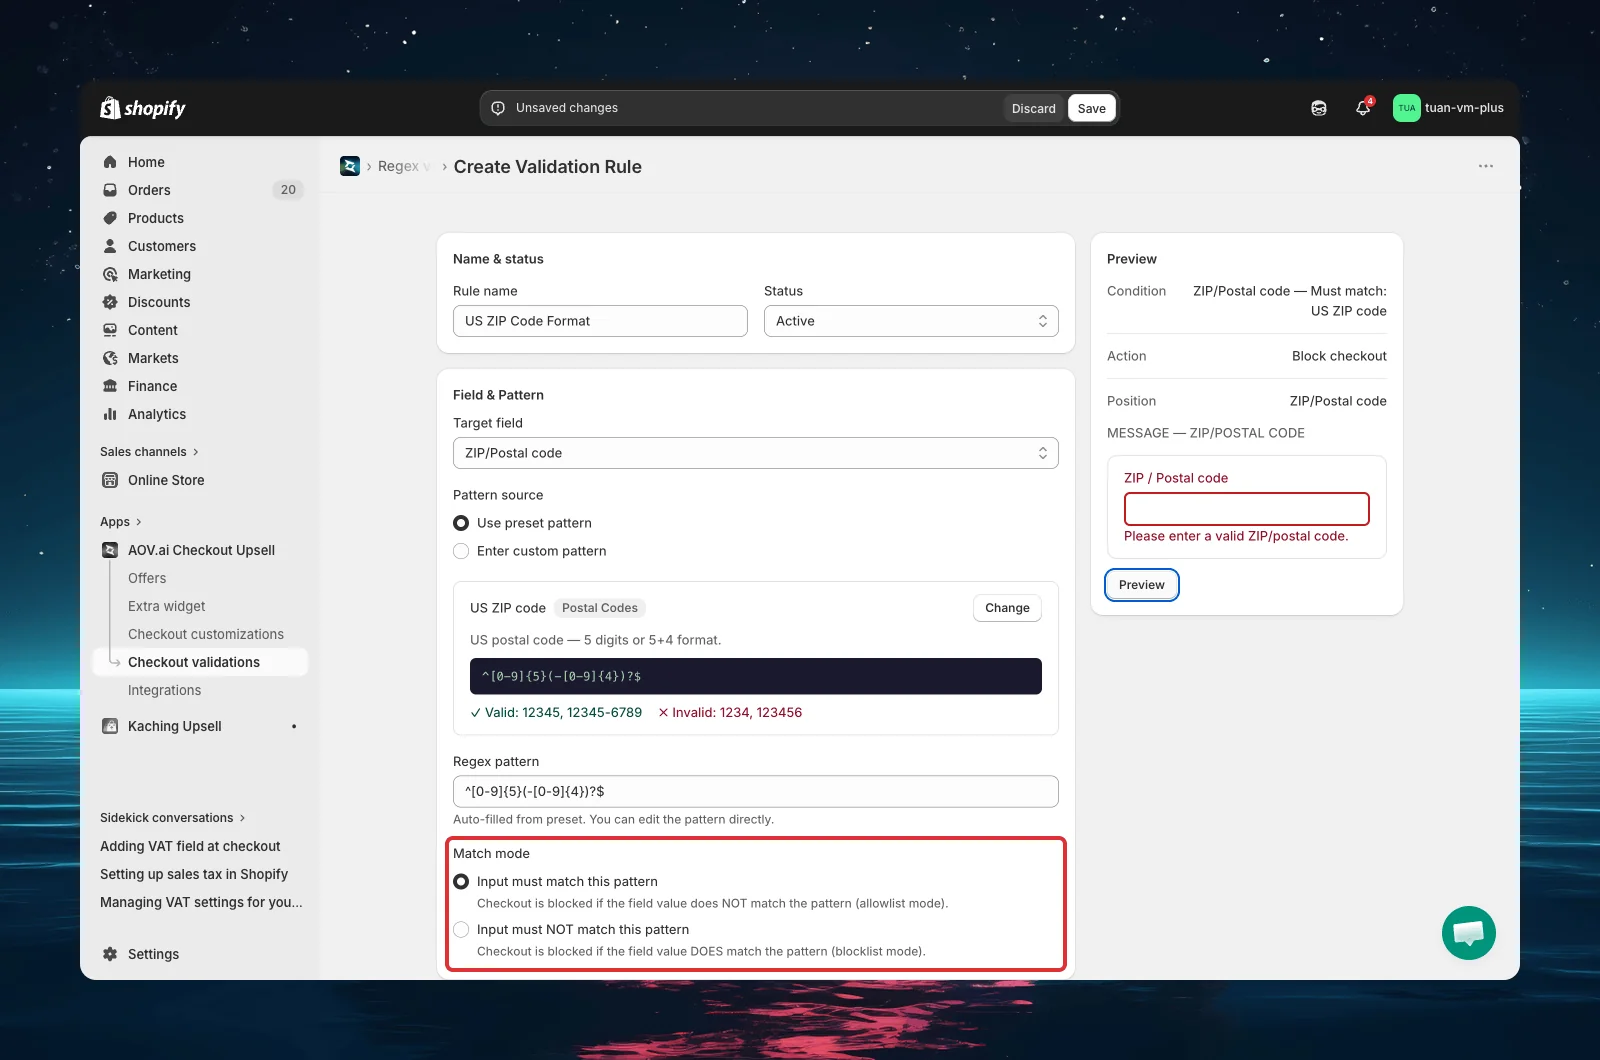
When using "Must NOT match" mode, a yellow warning box explains: "Checkout is blocked if the field value DOES match the pattern (blocklist mode)." This helps avoid confusion about the reversed logic.
Step 7: Test your pattern
Before saving, use the built-in test tool to verify your pattern works as expected. This section appears below the pattern settings.
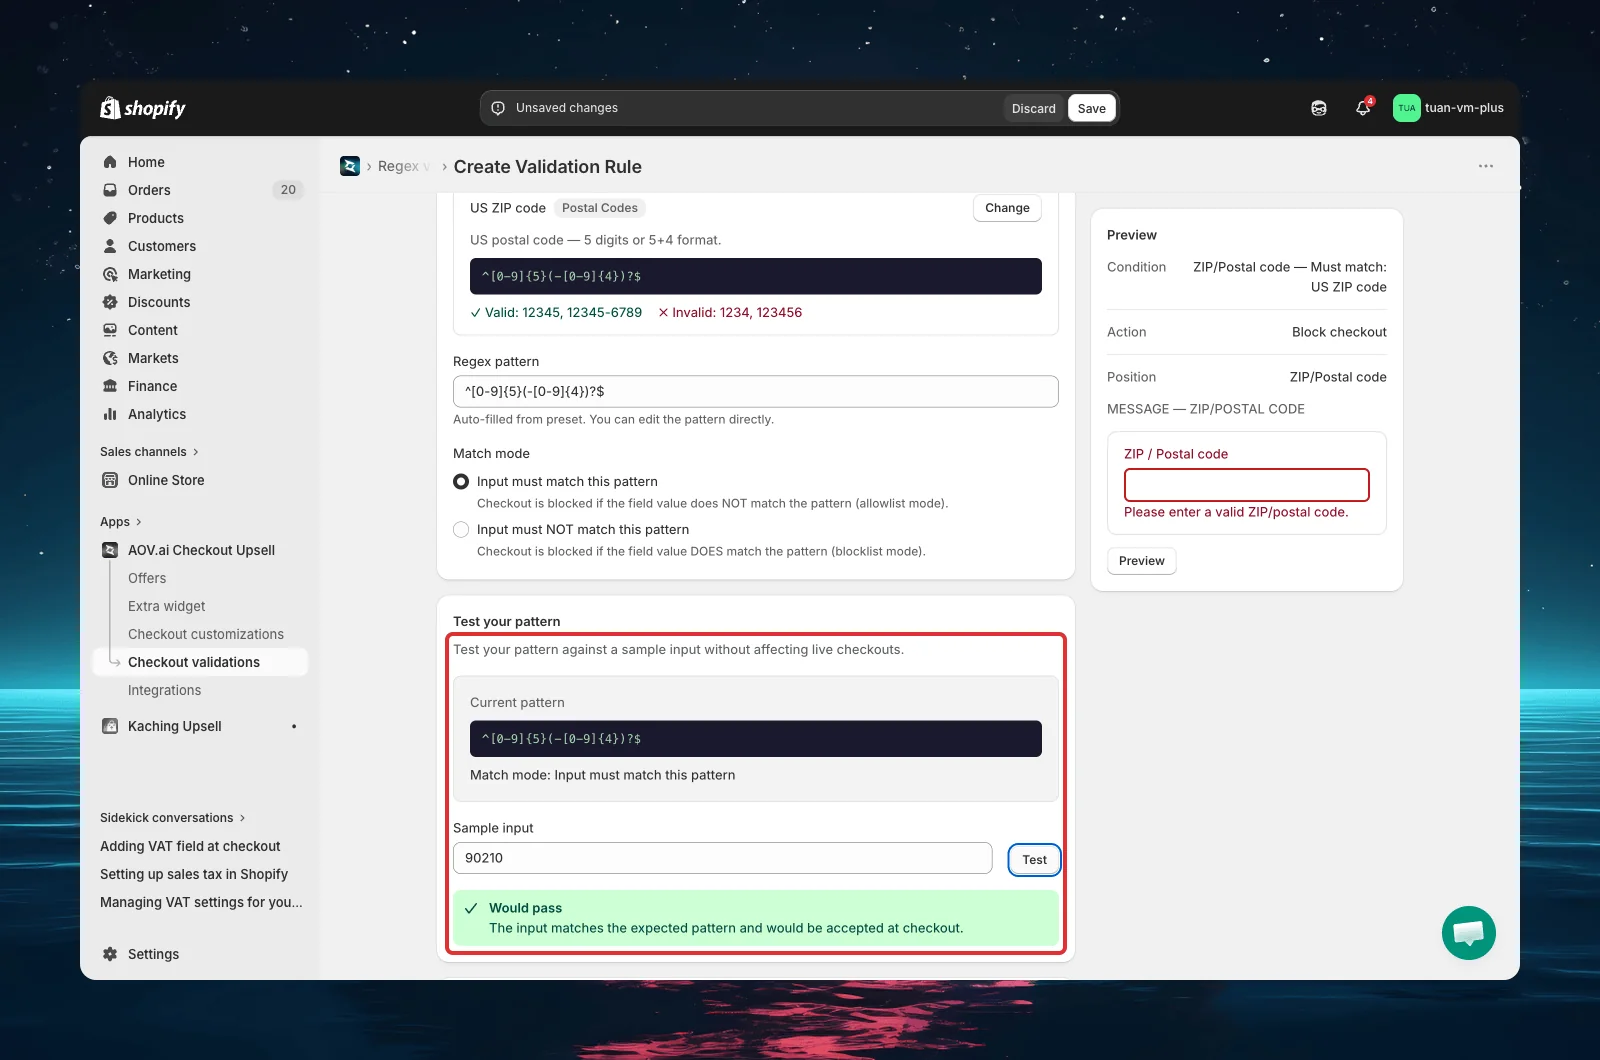
- Enter a sample value in the text input (e.g., "John123", "+84901234567", "90210")
- Click "Test"
- See the result:
- Would pass (green check) — the buyer can complete checkout with this input
- Would be blocked (red X) — the buyer would see the error message with this input
The test runs entirely in your browser — no server call, instant results.
Example:
- Pattern: "Only letters and spaces" (
^[a-zA-Z\s-]+$), Match mode: "Must match" - Sample input: "John123" → Would be blocked (contains numbers)
- Sample input: "John Smith" → Would pass
The Test button is disabled when the regex pattern field is empty or contains an invalid expression.
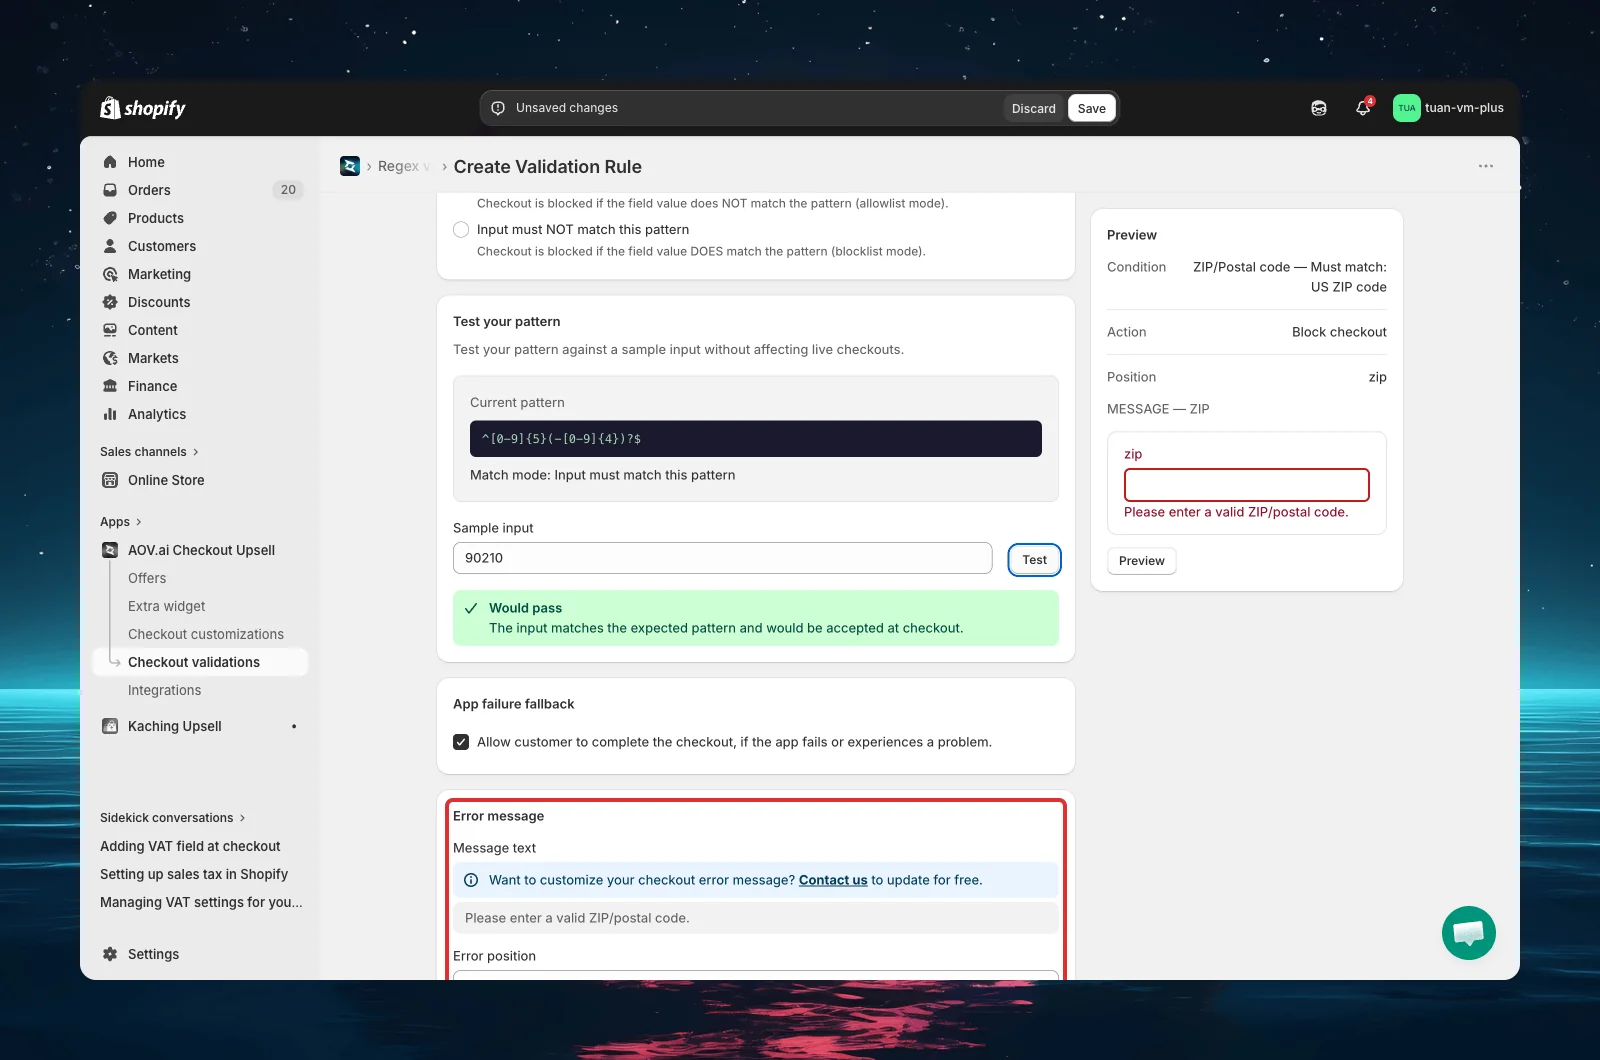
Step 8: Configure error message and position
Error message
Enter the message buyers will see at checkout. A default message is generated based on your target field and match mode — you can customize it.
Examples of default messages:
- "Please enter a valid ZIP/postal code."
- "Please enter a valid phone number."
- "This format is not allowed in the first name field."
Keep messages clear and actionable — tell buyers what format is expected.
Editing the message: By default the message field may be read-only and show a banner: "Want to customize your checkout error message? Contact us to update for free." Click Contact us to have the team enable custom messages for your store. When you change the target field or match mode, the default message updates automatically.
Error position
Choose where the error message appears on the checkout page:
| Position | Display |
|---|---|
| Top of the checkout page | Red banner at the top of the page — most visible |
| First name | Inline error below the First name field |
| Last name | Inline error below the Last name field |
| Company | Inline error below the Company field |
| Address line 1 | Inline error below Address line 1 |
| Address line 2 | Inline error below Address line 2 |
| City | Inline error below the City field |
| Email or phone number | Inline error below the Email/Phone field |
| Delivery phone | Inline error below the Delivery phone field |
| ZIP / Postal code | Inline error below the ZIP code field |
| Country | Inline error below the Country dropdown |
| Province / State | Inline error below the Province/State dropdown |
Recommended: Set the error position to match the target field. For example, if you're validating the ZIP/Postal code field, place the error at "ZIP / Postal code" so buyers know exactly which field to fix.
Step 9: Set additional conditions (optional)
By default, the rule applies to all checkouts. To narrow the scope, expand the Additional Conditions section at the bottom of the editor and select "Set conditions".
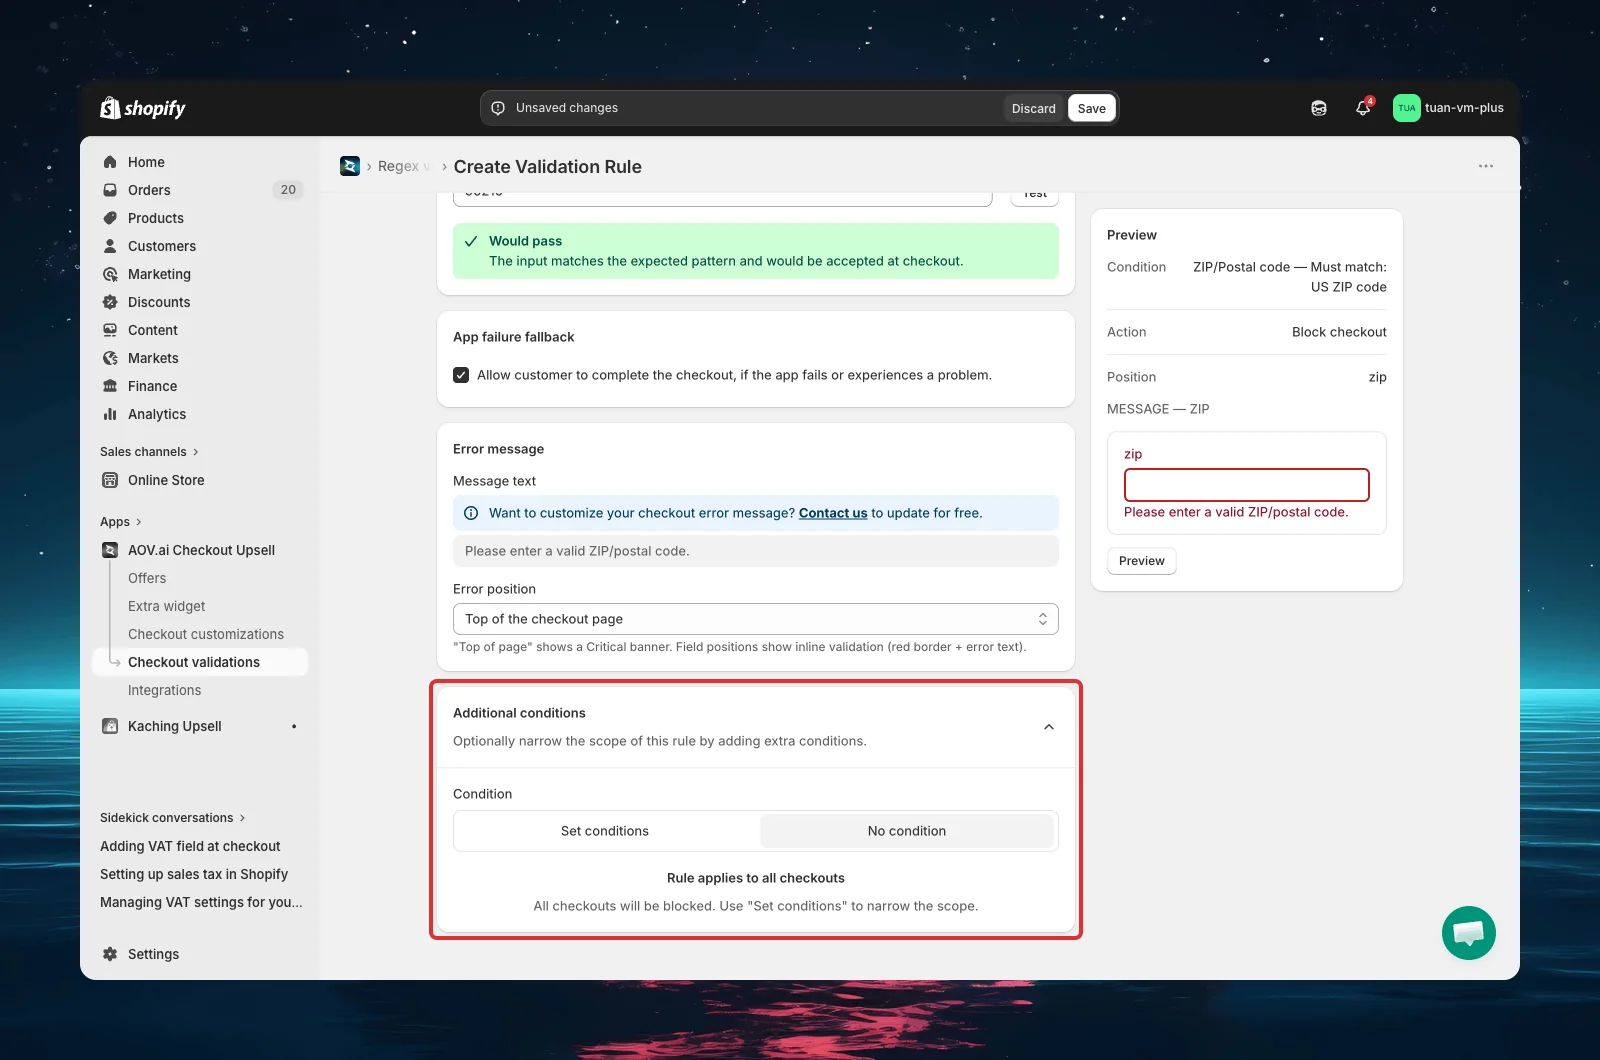
| Condition | Description |
|---|---|
| Included product (or variant) | Rule only applies when the cart contains this product |
| Excluded product (or variant) | Rule does NOT apply when the cart contains this product |
| Customer tag | Rule only applies when the customer has (or doesn't have) this tag |
| Shipping country | Rule only applies for orders shipping to a specific country |
All conditions use AND logic — the regex pattern AND every additional condition must be satisfied for the rule to trigger.
Common combinations:
- US ZIP code pattern + Shipping country = United States
- UK postal code pattern + Shipping country = United Kingdom
- Name validation + Customer tag = "B2B"
Step 10: Preview and save
The right sidebar shows a live summary of your rule configuration and a preview of how the error message will appear.
Summary
The summary card displays your current settings at a glance:
| Row | Example value |
|---|---|
| Condition | All checkouts |
| Target field | ZIP/Postal code |
| Pattern | US ZIP code |
| Match mode | Must match |
| Position | ZIP / Postal code |
Checkout preview
Click "Preview" to open a full-screen modal showing the complete checkout layout with your error message rendered at the correct position.
When everything looks good:
- Set the Status to your preferred option
- Click Save in the top bar
The rule takes effect at checkout immediately.
Test your rule with Test Mode
Before activating a rule for all customers, test it first:
- Set the rule Status to Test mode and save
- Go to your store and add products to the cart
- Proceed to checkout
- Enter [email protected] as the checkout email
- In the target field, enter a value that should be blocked by your pattern
- Complete the checkout form and click "Pay now" or "Continue to shipping"
- Verify the error message appears at the correct position
- Once verified, change the status to Active
Test mode only works with the email [email protected]. All additional conditions (if any) must also be satisfied for the rule to take effect.
App failure fallback
The editor includes an App Failure Fallback toggle (enabled by default):
| Setting | Default | Description |
|---|---|---|
| Allow customer to complete checkout if the app fails | On | If the app encounters an error or times out, the buyer can still complete checkout — prevents accidentally blocking all orders due to a technical issue |
We recommend keeping this toggle on to avoid blocking buyers due to unexpected app errors.
Manage existing rules
Toggle status
Use the Pause / Start action on any rule to quickly toggle its status without opening the editor.
Edit a rule
Click the edit icon (pencil) in the Actions column, or click the rule name to open the editor.
Delete rules
- Single rule: Click the delete icon (trash) in the Actions column
- Bulk delete: Select multiple rules with checkboxes → click Delete rules
Other bulk actions: Activate rules, Deactivate rules.
Deletion is permanent. The rule cannot be recovered.
Tips
- Start with Test mode — verify the rule works correctly before activating for all customers
- Use preset patterns first — the built-in library of 13 patterns covers most common needs, no regex knowledge required
- Match error position to target field — place the error at the same field you're validating so buyers know exactly what to fix
- Combine with shipping country — pair postal code patterns with a Shipping country condition to enforce the right format per country
- Test both valid and invalid inputs — use the built-in Test tool to check multiple sample values before saving
- Keep messages actionable — tell buyers the expected format (e.g., "Please enter a 5-digit ZIP code" instead of "Invalid input")
- One field per rule — to validate multiple fields, create separate rules for each
- Need more rules? — the free plan includes 1 validation rule (shared across all checkout-validation types). Use the Contact us link in the app to have more rules unlocked
FAQs
General
Q: Do I need Shopify Plus for Regex Validation? A: No. Regex Validation uses Shopify Functions, which are available on all Shopify plans.
Q: Do I need to know regex to use this feature? A: No. The Preset Pattern Library provides 13 ready-made patterns with descriptions and examples. Select one and it works immediately. Custom regex is only needed for advanced use cases.
Q: How many rules can I have? A: The free plan includes 1 validation rule, counted across all checkout-validation types (Custom Rules, Geo Restriction, Address Validation, Regex, VAT, and Order Limits combined — active, paused, and test-mode rules all count). To create more, use the Contact us link in the app to have additional rules unlocked.
Q: Do rules take effect immediately after saving? A: Yes. Once a rule is set to Active and saved, it applies to all new checkouts immediately.
Q: Can I validate multiple fields with one rule? A: No. Each rule targets one field. Create separate rules for each field you want to validate.
Patterns and matching
Q: What's the difference between "Must match" and "Must NOT match"? A: "Must match" (allowlist) blocks checkout when the input does NOT match the pattern — use it to enforce a specific format. "Must NOT match" (blocklist) blocks checkout when the input DOES match the pattern — use it to block specific characters or formats.
Q: What happens if my custom regex pattern is invalid? A: The app validates your regex when you save. If it's invalid, you'll see an error and the rule won't be saved. If an invalid pattern somehow reaches checkout, the rule is skipped — it won't block any buyers.
Q: Does the regex support Unicode characters (accents, Asian scripts)? A: Yes. The regex engine supports Unicode, so patterns work with accented characters, Asian scripts, and other non-ASCII text.
Q: Is the regex case-sensitive? A: Yes, by default. To match both uppercase and lowercase letters, use [A-Za-z] in your pattern instead of just [A-Z] or [a-z].
Checkout behavior
Q: What happens if the buyer leaves a field empty? A: The rule does not trigger for empty fields. It only validates when the buyer has entered content. Empty fields always pass regex validation.
Q: What happens if multiple rules trigger at the same time? A: All matching rules display their error messages. Buyers must resolve all errors before completing checkout.
Q: Does the error block checkout or just show a warning? A: The error blocks checkout — buyers cannot complete their purchase until they correct the field value.
Q: Can I use different languages in the error message? A: Yes. Enter the message in any language you prefer — it will display exactly as typed.
Conditions
Q: What does "No condition" mean for additional conditions? A: It means the regex rule applies to every checkout. Any buyer whose field input fails the pattern check will see the error.
Q: Can I apply a postal code rule only to specific countries? A: Yes. Use the Shipping country additional condition. For example, set the US ZIP code preset and add a condition for "United States" — buyers shipping to other countries won't be affected.