Campaign Settings
Step 1 of the campaign wizard: configure campaign name, product selection, pre-order trigger, continue selling, delivery date, and markets.
How to set up
Navigate to AOV.ai Pre-Order > Preorders > Create campaign (or click Edit on an existing campaign). The wizard opens on Step 1.
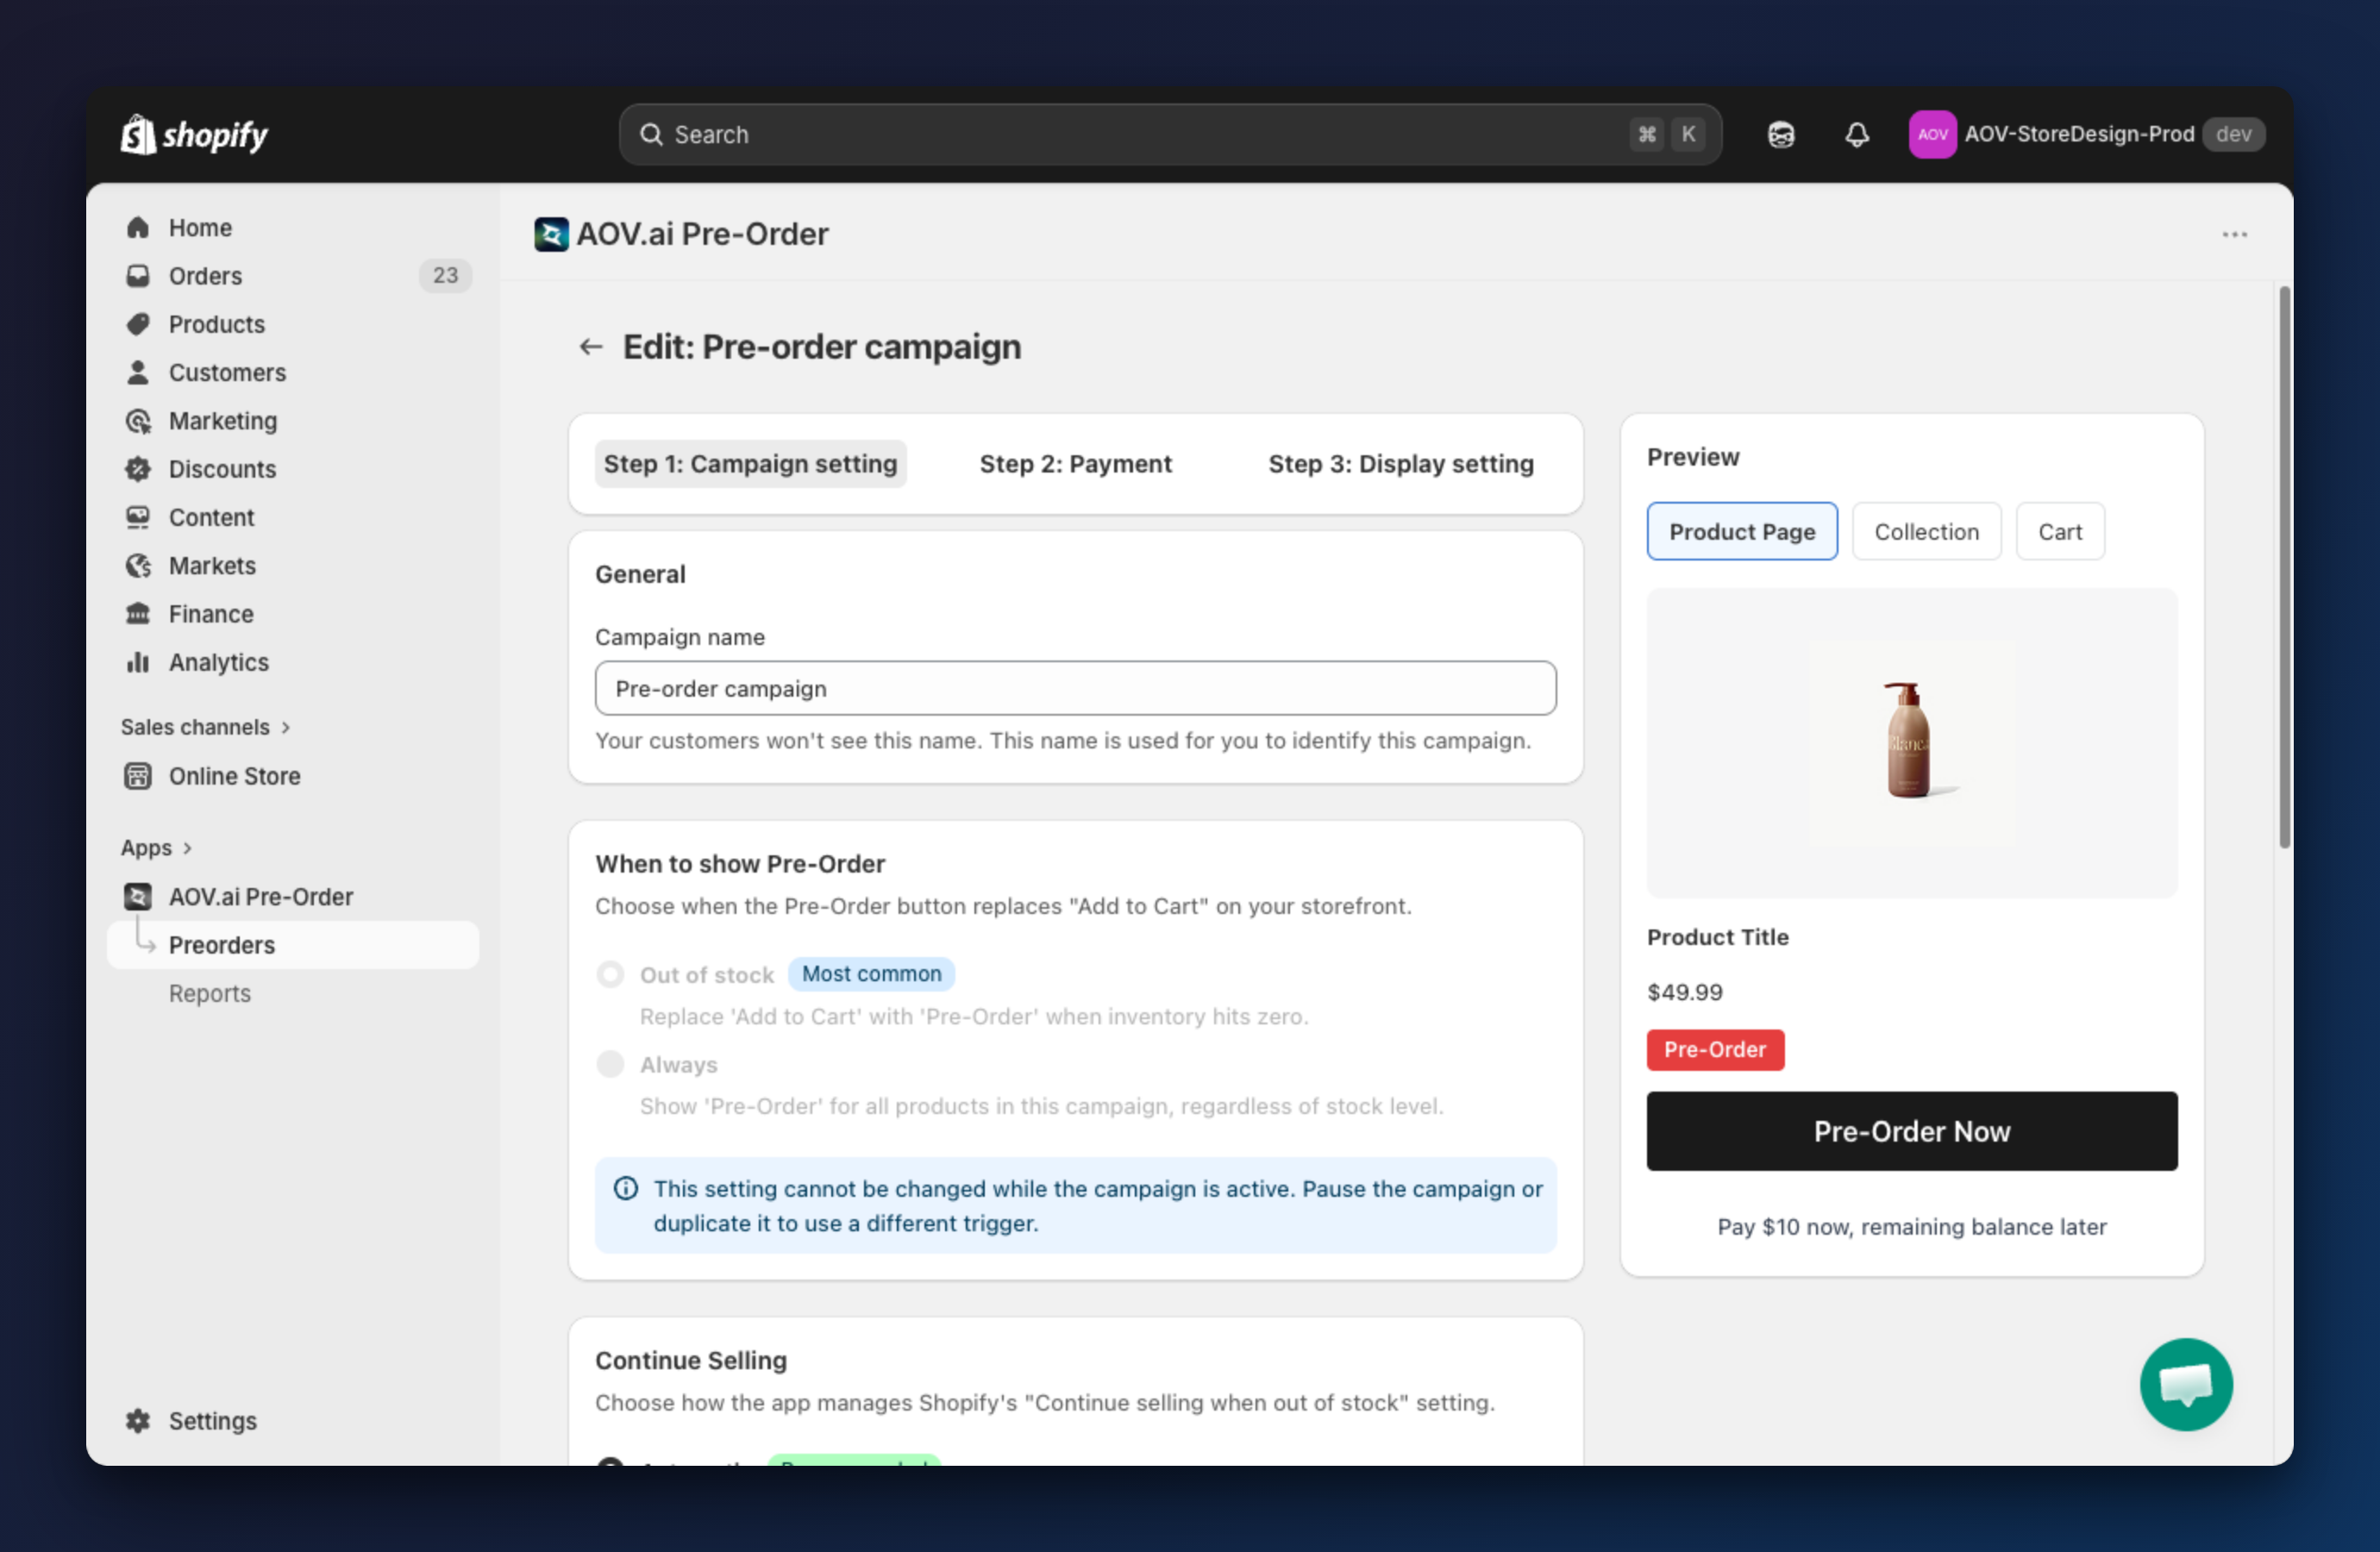
Name your campaign
In the General card, fill in:
- Campaign name: an internal label used to identify this campaign in the admin. Your customers will never see this name.
- Example:
Summer Pre-Order CampaignorNew Skincare Launch
- Example:
Choose when to show Pre-Order
The When to show Pre-Order card controls when the Pre-Order button replaces "Add to Cart" on your storefront.
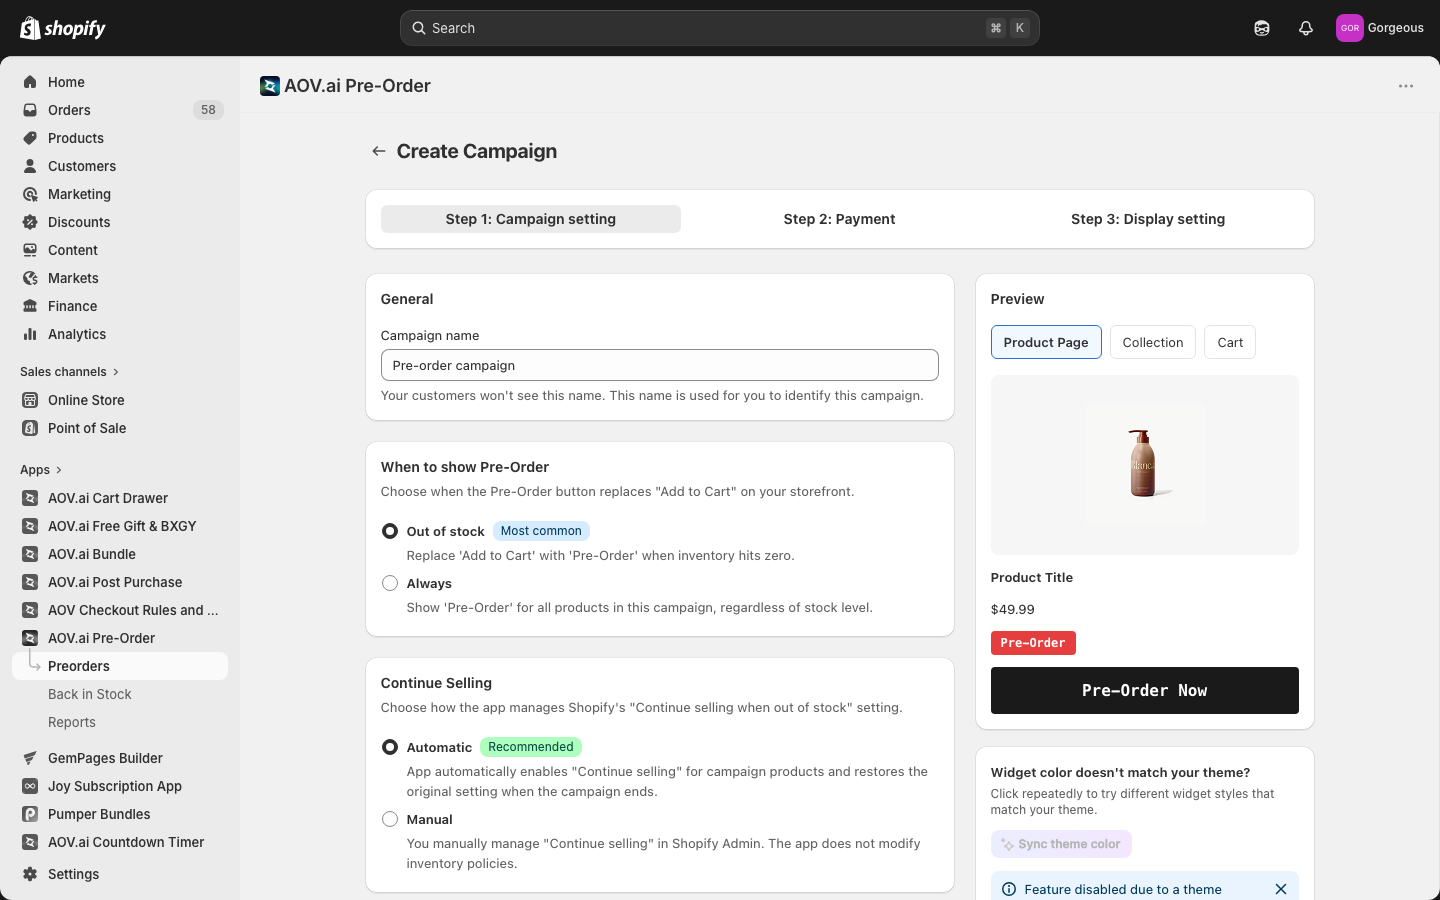
Select a trigger:
- Out of stock (Most common): replace "Add to Cart" with "Pre-Order" when inventory hits zero. While the variant is in stock, customers see "Add to Cart".
- Always: show "Pre-Order" for all products in this campaign, regardless of stock level.
| Trigger | Product in stock | Product out of stock |
|---|---|---|
| Out of stock | Shows "Add to Cart" | Shows "Pre-Order" |
| Always | Shows "Pre-Order" | Shows "Pre-Order" |
This setting cannot be changed while the campaign is active. The options are disabled and a banner appears: "This setting cannot be changed while the campaign is active. Pause the campaign or duplicate it to use a different trigger."
Configure Continue Selling
The Continue Selling card controls how the app manages Shopify's "Continue selling when out of stock" inventory setting.
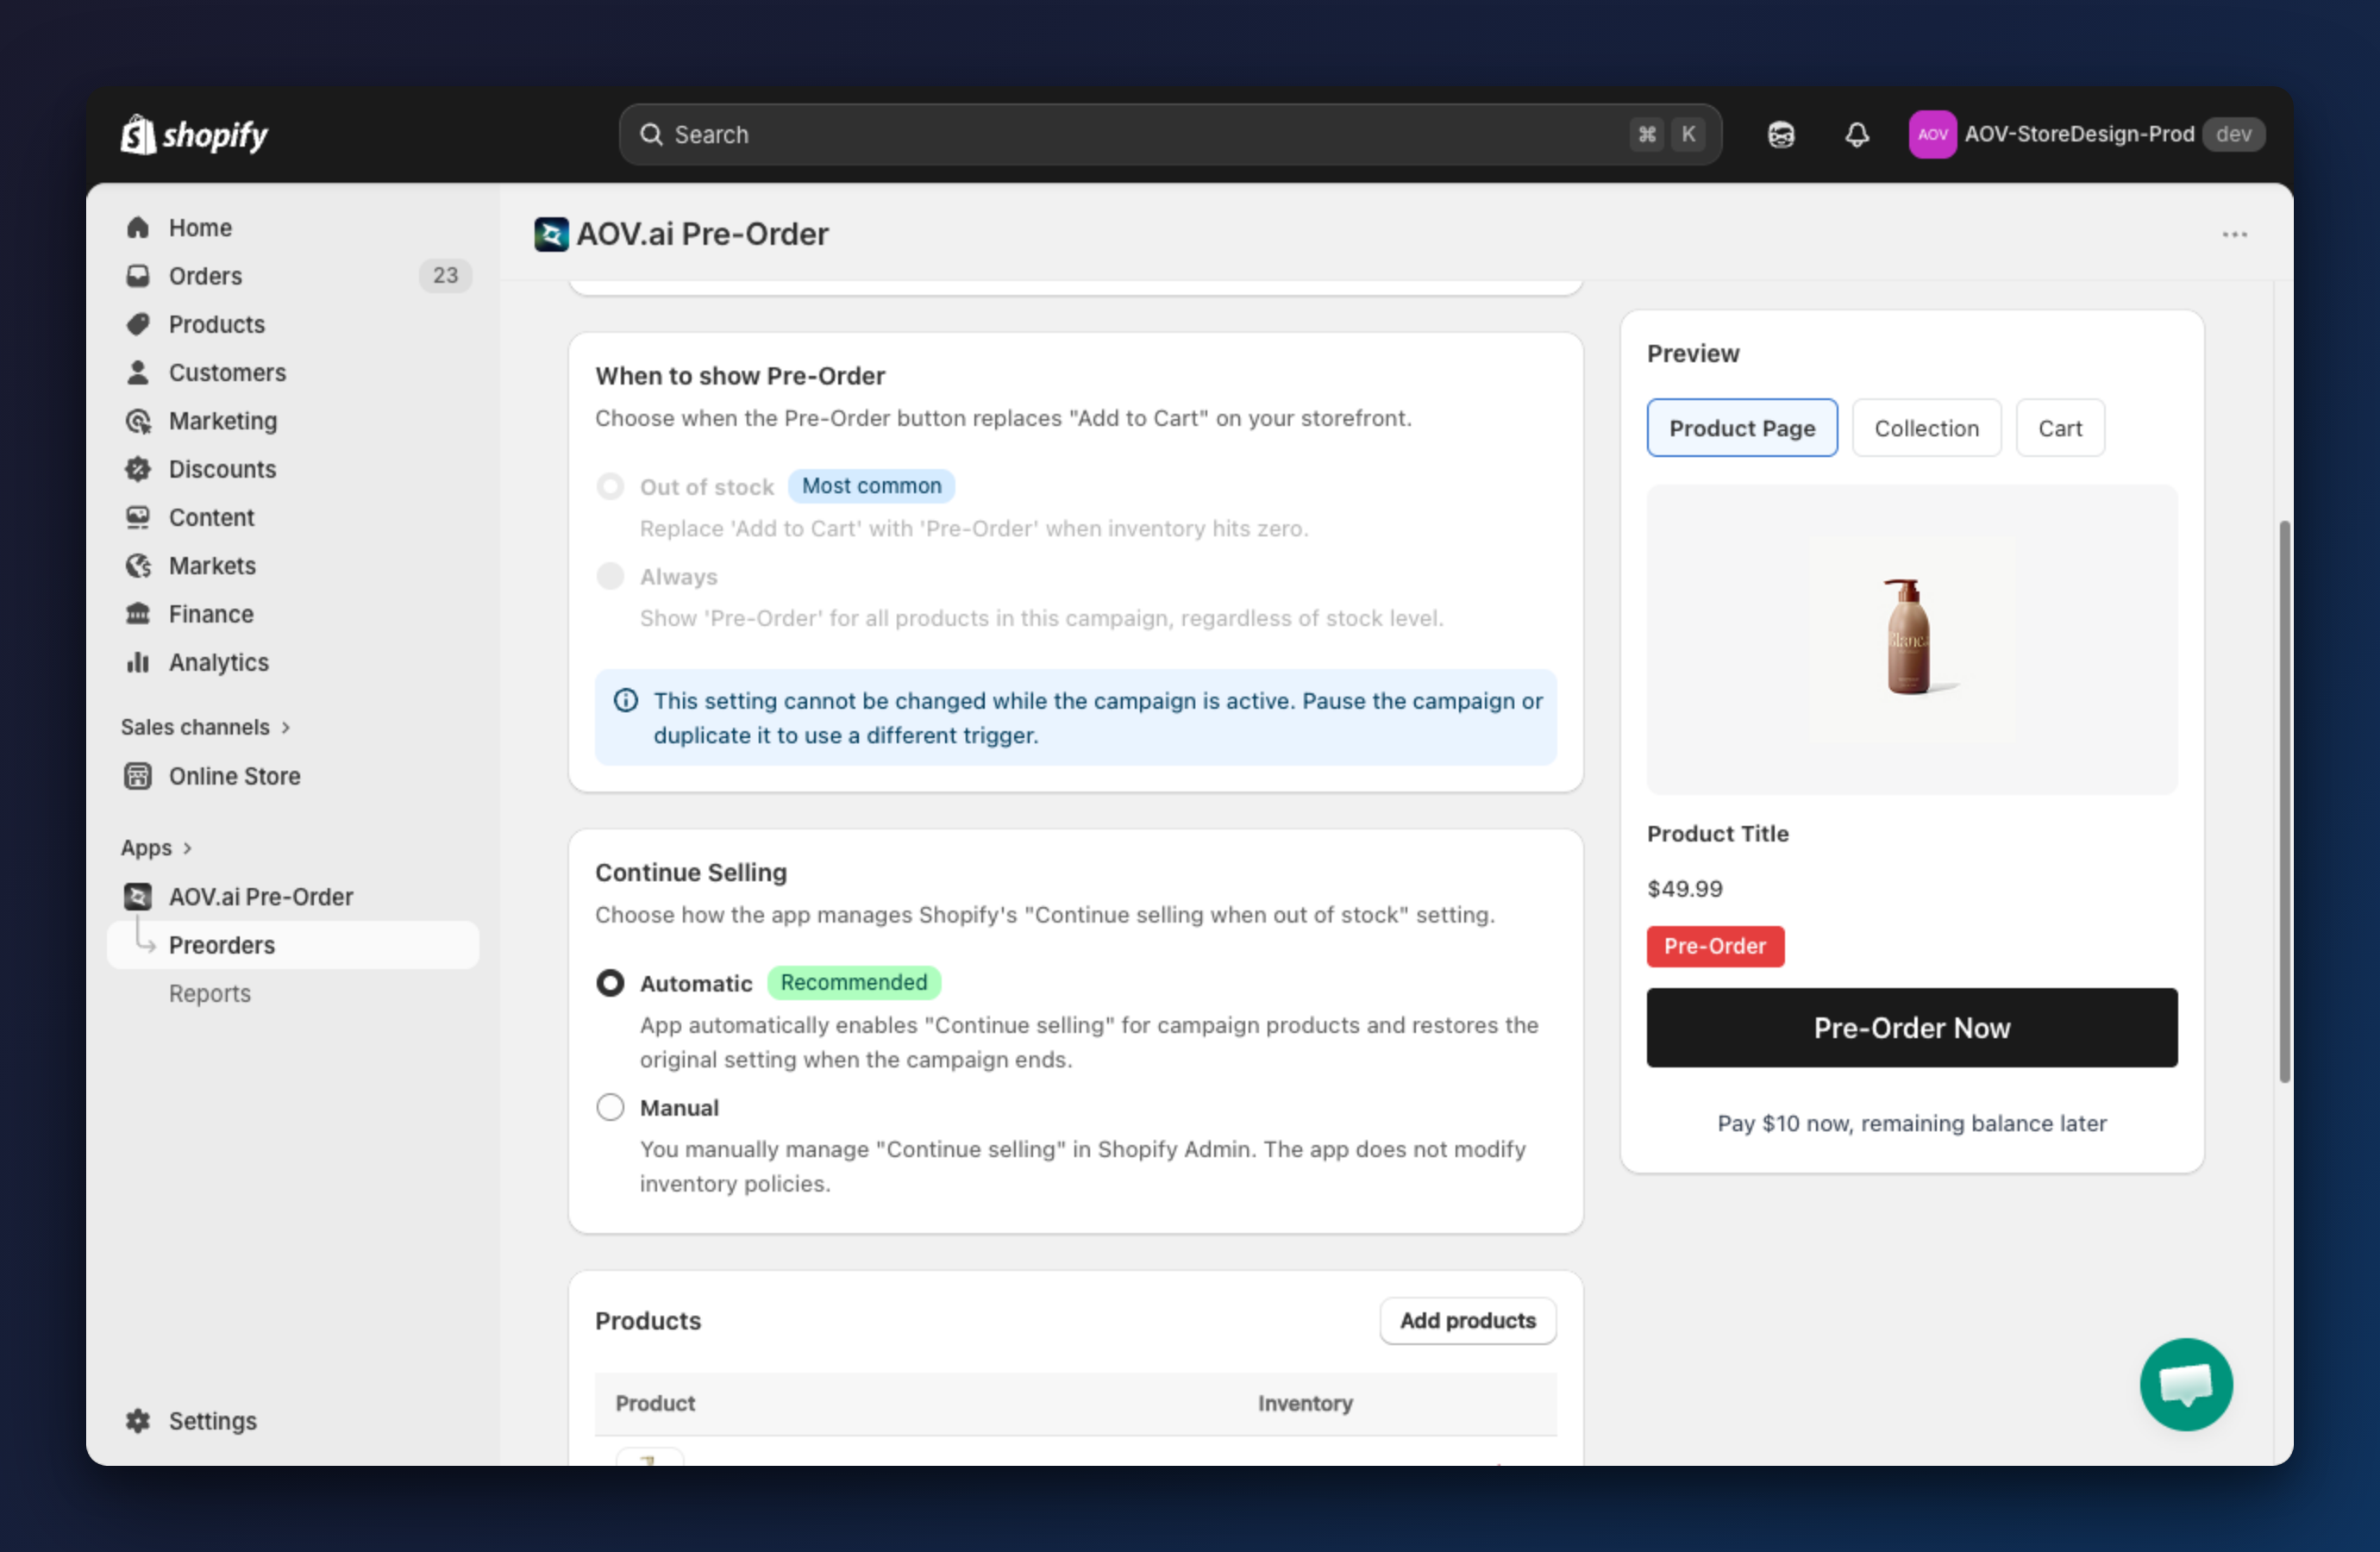
Choose a mode:
- Automatic (Recommended): the app automatically enables "Continue selling" for campaign products and restores the original setting when the campaign ends.
- Manual: you manually manage "Continue selling" in Shopify Admin. The app does not modify inventory policies.
Continue selling is required: if you pick Manual while the trigger is Out of stock, a warning banner appears. Make sure "Continue selling when out of stock" is enabled in Shopify admin for every campaign product, otherwise customers will see "Sold out" instead of "Pre-Order".
Tip: Unlike the pre-order trigger, you can change the continue selling mode on an active campaign. A confirmation modal "Change continue selling mode?" will appear and explain the immediate effect on the campaign's products.
Set up products
The Products card controls which products are part of this campaign. Pick a selection mode, then configure it:
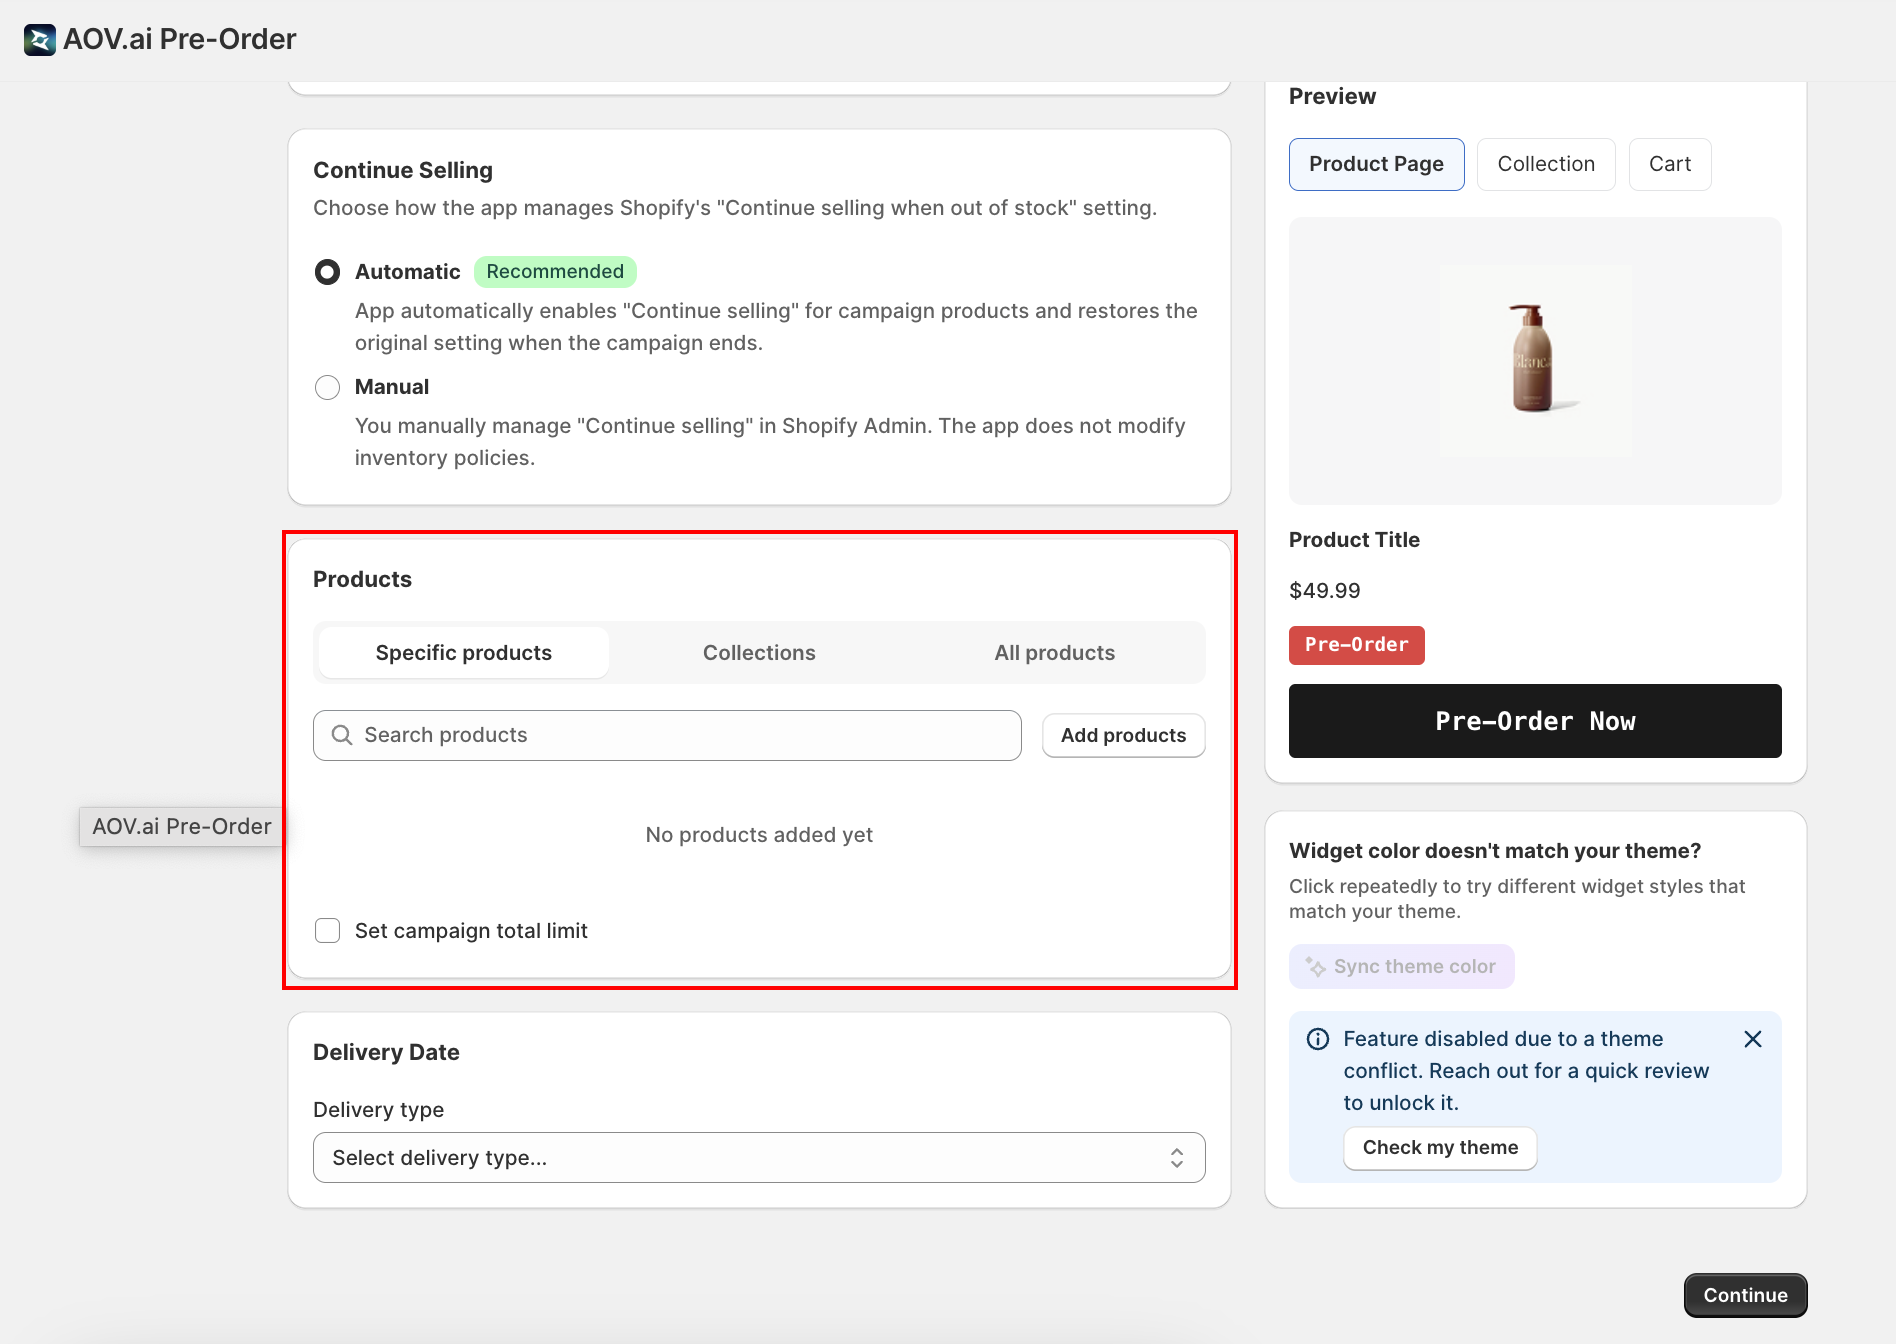
| Mode | What it does |
|---|---|
| Specific products | (Default) Hand-pick individual products (and variants) from your catalog. |
| Collections | Pick one or more Shopify collections. Every product in those collections joins the campaign automatically. |
| All products | Every product in your store is included. No further configuration needed. |
The selection mode cannot be changed while the campaign is active. Hover the disabled tabs to see "Cannot change selection mode while campaign is active. Duplicate this campaign to use a different mode."
1. Specific products (default)
Click Add products, or click the Search products field, to open the Shopify product picker. Select one or more products (the picker also lets you select specific variants). Each one appears as a row in the product table:
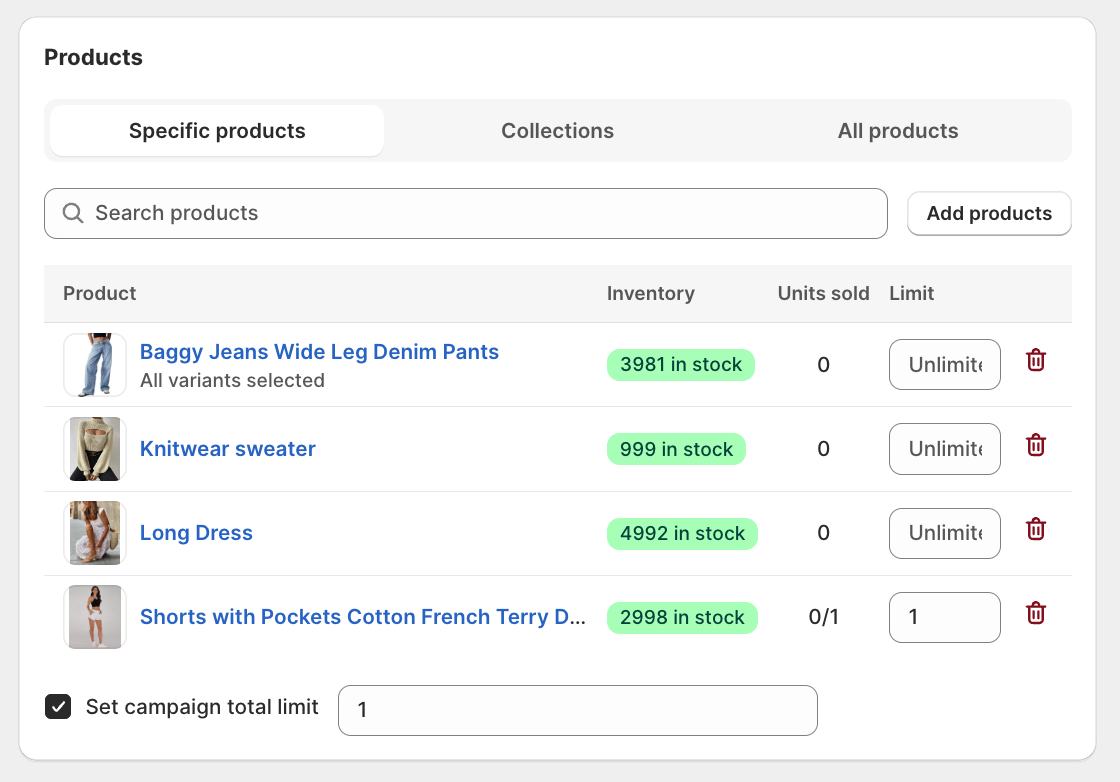
| Column | What it shows |
|---|---|
| Product | Thumbnail and name, linked to your storefront. Shows "X of Y variants selected" or "All variants selected" (hidden for single-variant products). |
| Inventory | Stock badge: Out of stock (red), or X in stock (yellow when under 10, green otherwise). |
| Units sold | Pre-order units sold so far, shown as sold/limit (e.g. 12/50) or just the count. Out of stock trigger only. |
| Limit | Caps pre-order units for this product. See Set a per-product limit below. Out of stock trigger only. |
| Remove | Red trash icon removes the product from the campaign. |
When more than 5 products are added, the table collapses behind a Show all N products / Show less toggle.
2. Set a per-product limit (optional)
When the trigger is Out of stock, you can cap how many pre-order units each product will accept. Once a product reaches its limit, the storefront automatically switches it from "Pre-Order" to "Sold out", while the rest of the campaign keeps running.
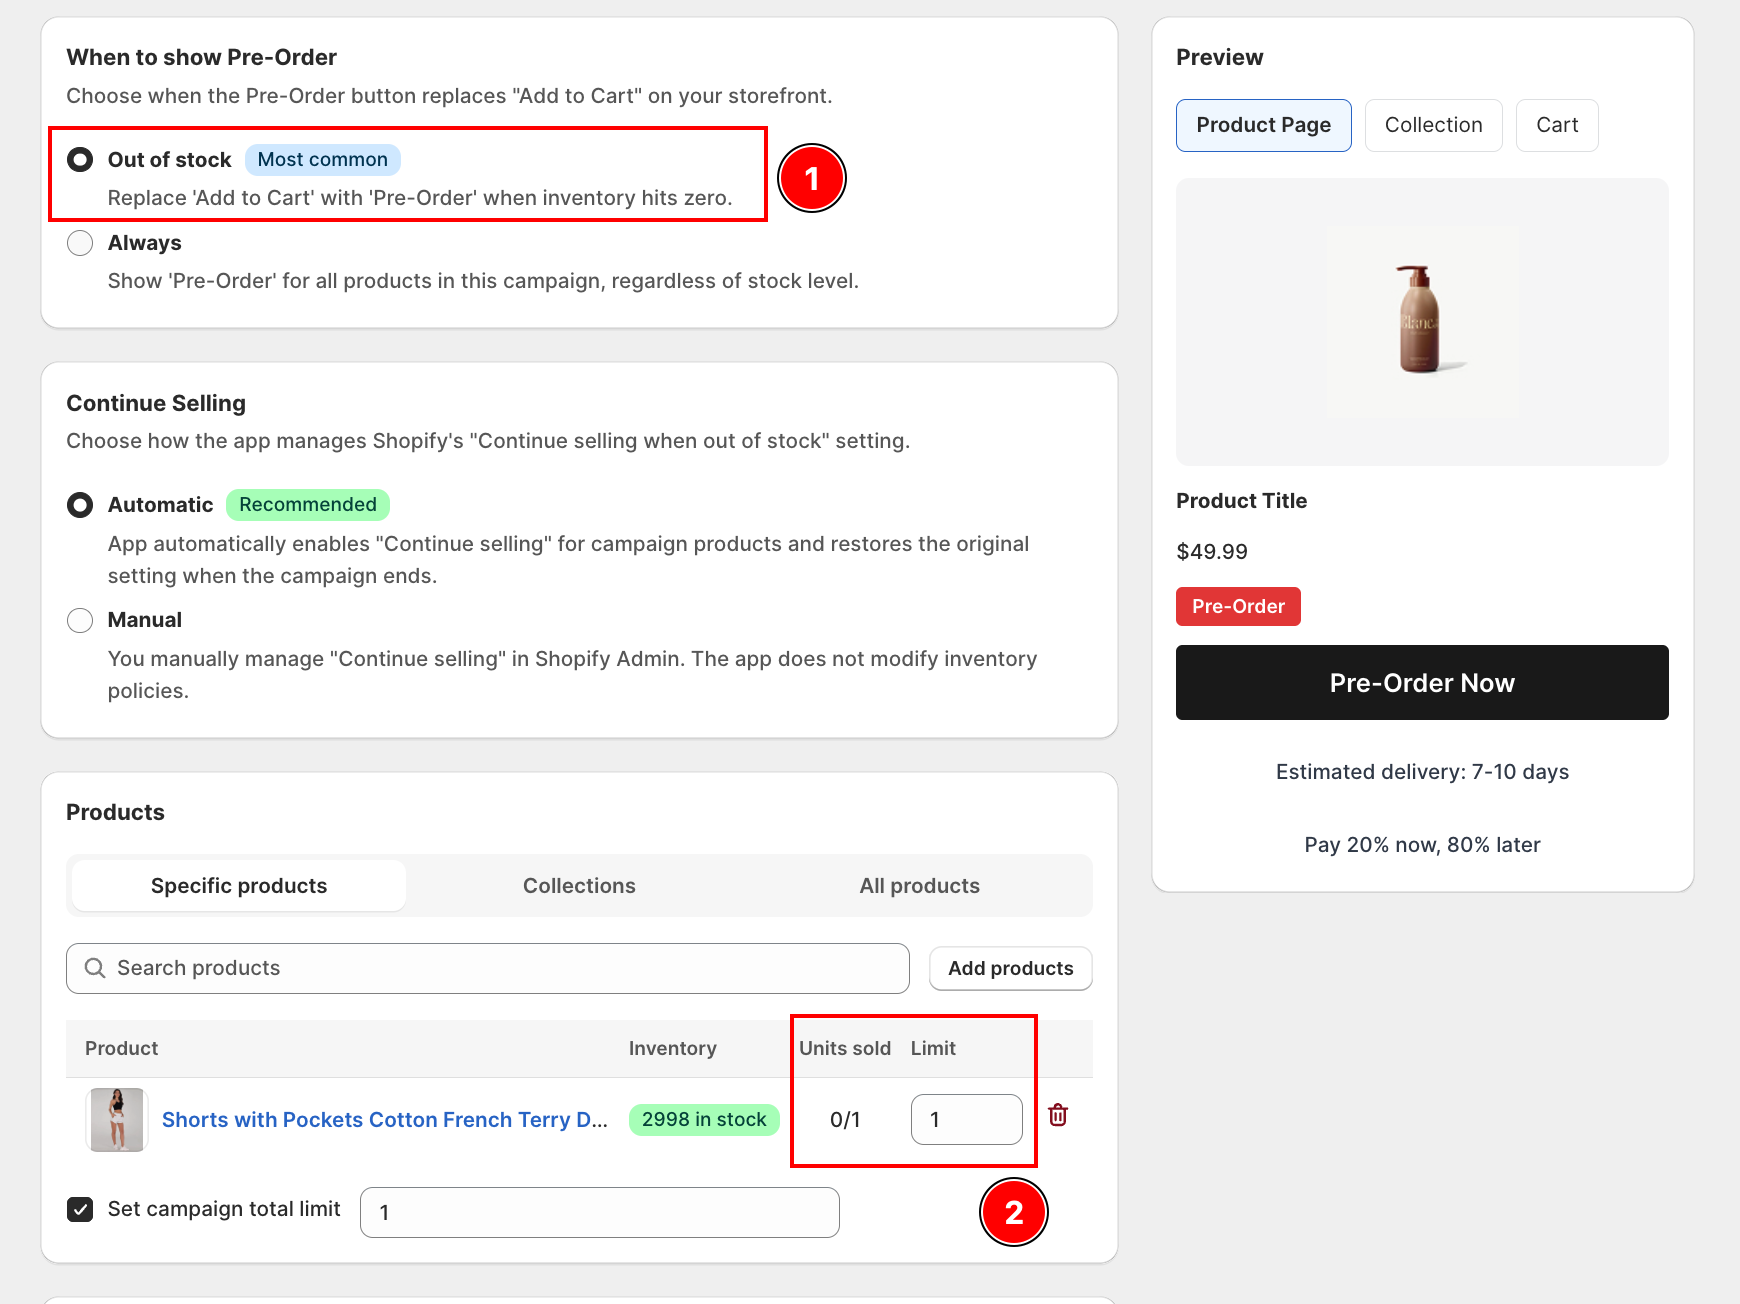
To set a limit:
- Make sure the When to show Pre-Order trigger is set to Out of stock. The Units sold and Limit columns only appear for this trigger.
- In the product table, type a number into the Limit field for each product you want to cap. The field accepts up to 99,999 units.
- Leave the field empty (placeholder "Unlimited") to accept unlimited pre-orders for that product.
The limit is counted per product, across all of its variants.
What customers see on your storefront:
- Spots remaining: the product page widget shows a progress bar with the number of spots left, for example "5 left".
- Low-stock nudge: when the remaining spots drop to 20% or less of the limit, the label adds a ⚡ icon (for example "⚡ 3 left") and the bar turns orange to signal urgency.
- Sold out: when the limit is reached, the bar turns red, the button shows your sold-out state, and product cards in collection and search results get a SOLD OUT badge.
The limit is cart-aware: the count includes any pre-order units the same customer already has in their cart, so one buyer cannot pass the limit by raising the quantity. A final check at checkout prevents overselling.
Per-product limit vs campaign total limit: the Limit column caps pre-orders for a single product, and only that product turns "Sold out" when reached. The Set campaign total limit checkbox (below) caps total orders across the whole campaign, and expires the entire campaign when reached. Use either, both, or neither.
3. Collections
Click Browse collections (or focus the Search collections field) to pick one or more Shopify collections.
- Each selected collection appears as a tag with
Collection name (N)showing its product count. Click the tag's name to open it in your storefront, or click the × to remove it. - A Loading products... spinner appears while the app resolves products from the selected collections.
- The resolved products are listed below in a read-only table (product + inventory badge).
- If a selected collection has no products, a warning banner names the empty collection(s).
4. All products
Choosing All products shows a single empty-state card:
All products will be included
Every product in your store will automatically have Pre-Order enabled. No additional configuration needed.
There are no further fields to configure.
Set campaign total limit (optional)
Below the product table (or collection picker), enable the Set campaign total limit checkbox to restrict the total number of pre-orders allowed across all products in this campaign.
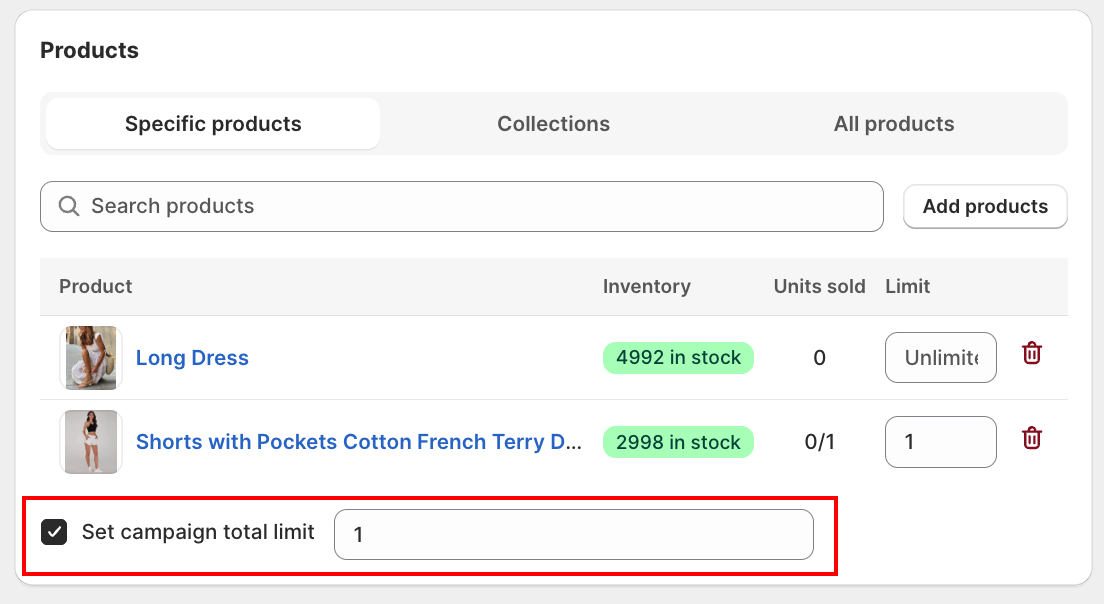
- When enabled, enter the maximum number of orders allowed (minimum 1).
- When the limit is reached, the campaign is automatically deactivated (status flips to Expired) and the pre-order button stops appearing on the storefront.
Choose delivery type
In the Delivery Date card, pick a Delivery type to tell customers when they can expect their order:
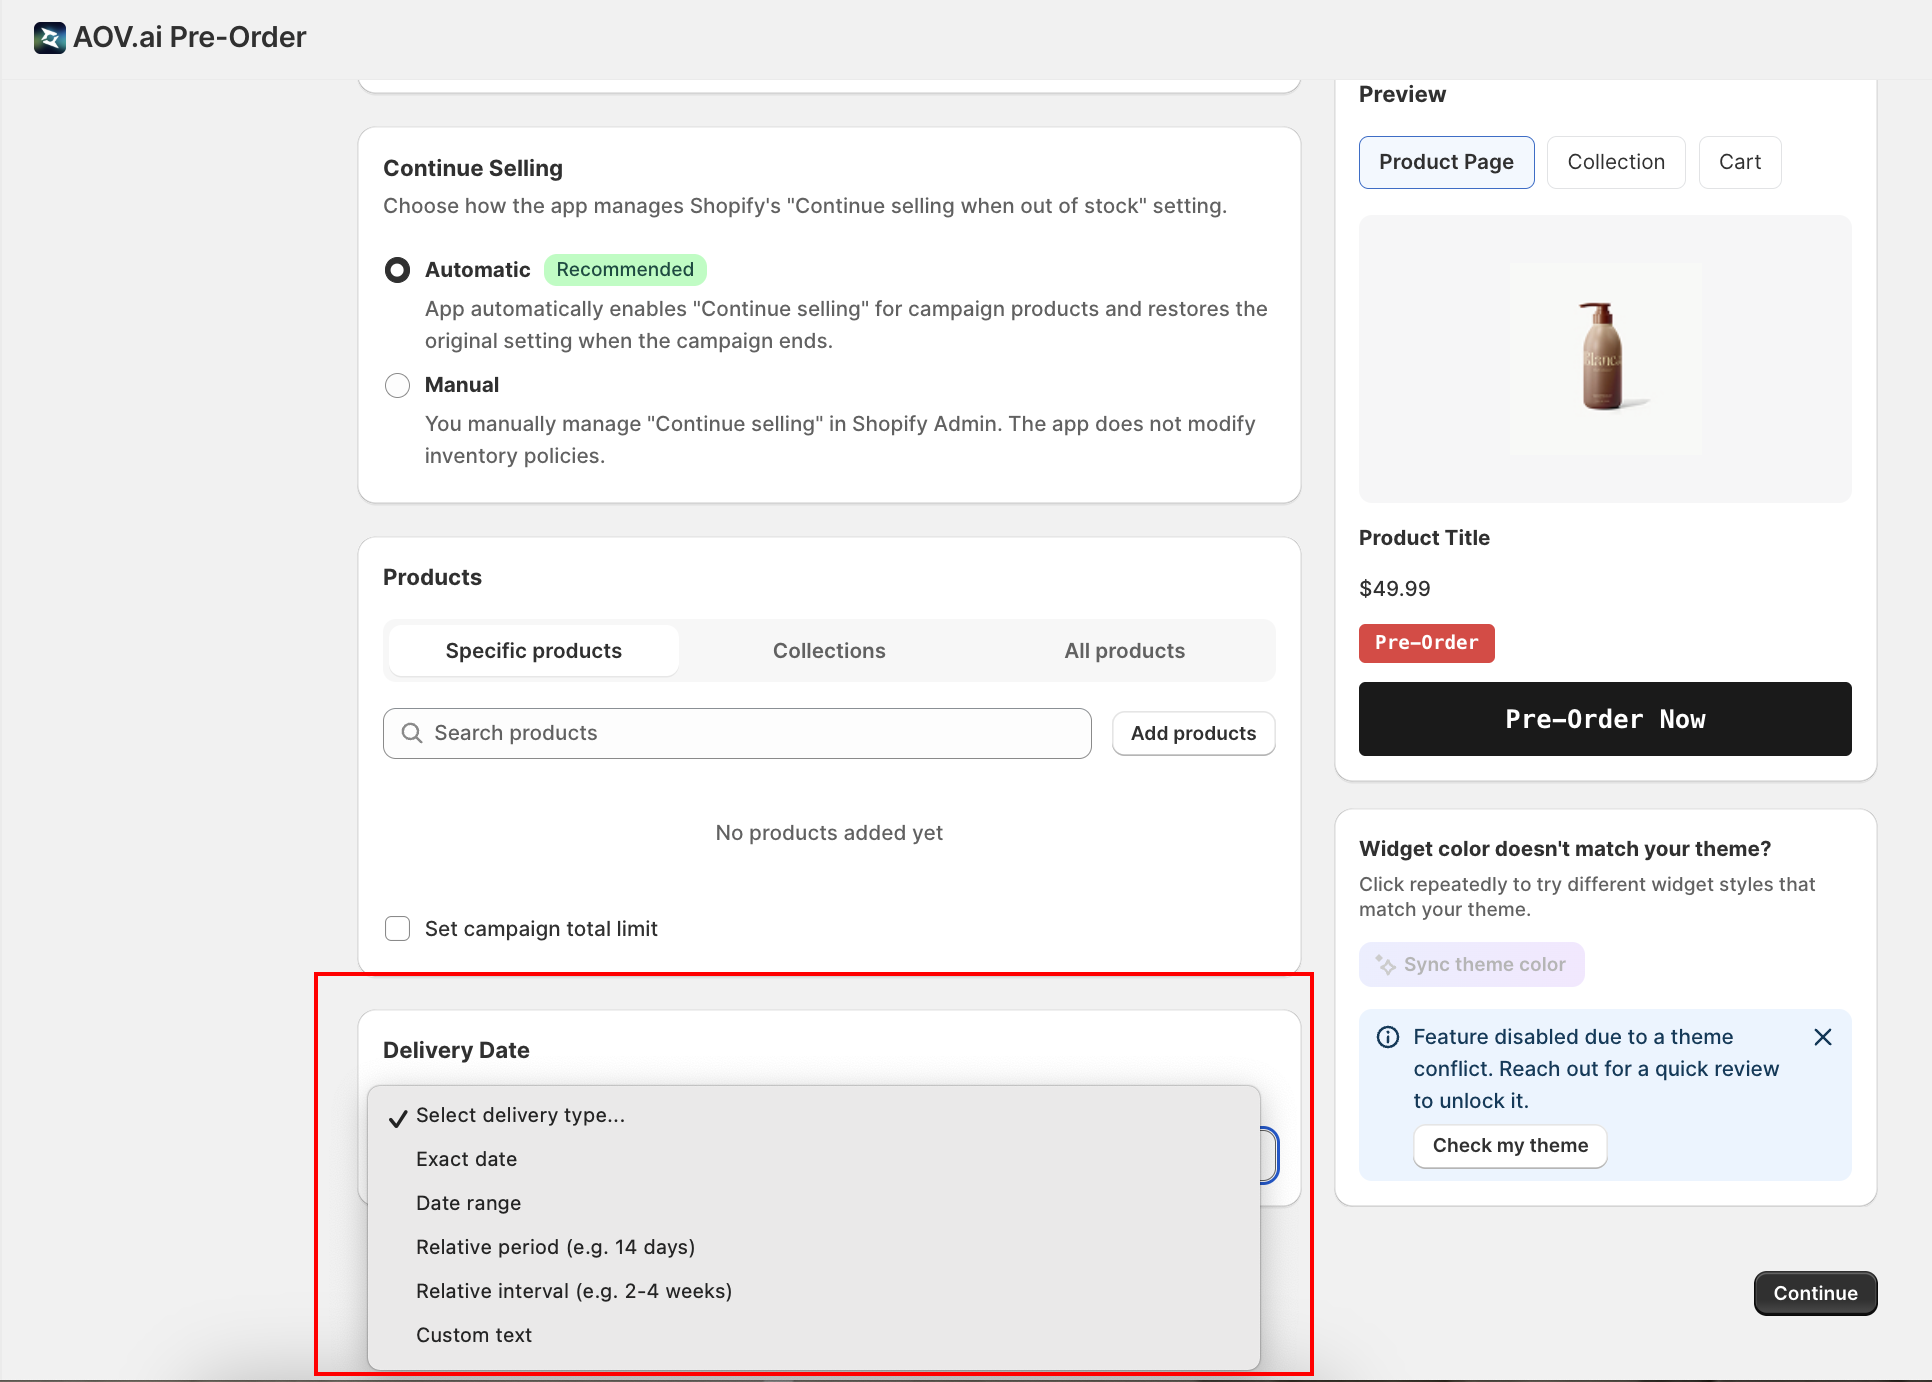
Tip: Use Exact date when you know the precise ship date. Use Relative period for delivery that depends on the order date (e.g. "14 days from purchase"). Use Custom text for uncertain timelines like "Ships when available".
Fill in the delivery details
Based on your chosen type, fill in the fields that appear:
| Delivery type | Fields shown |
|---|---|
| Exact date | One date picker: Delivery date |
| Date range | Two date pickers: Start date, End date |
| Relative period | Number + Unit (Days / Weeks / Months) |
| Relative interval | Min + Max + Unit (Days / Weeks / Months) |
| Custom text | One free-text field: Custom delivery text |
Date pickers disable any date before today; the End date picker disables any date before the Start date.
The delivery information is rendered to customers on the product page, in the cart, and on the order confirmation (using the {{delivery_date}} variable wired up in Display Settings (opens in a new tab)).
Restrict by Markets (New)
The Markets card, the last card in Step 1, limits this campaign to specific Shopify Markets. It's per-campaign, not a global app setting, so you can run different pre-order campaigns for different regions on the same store.
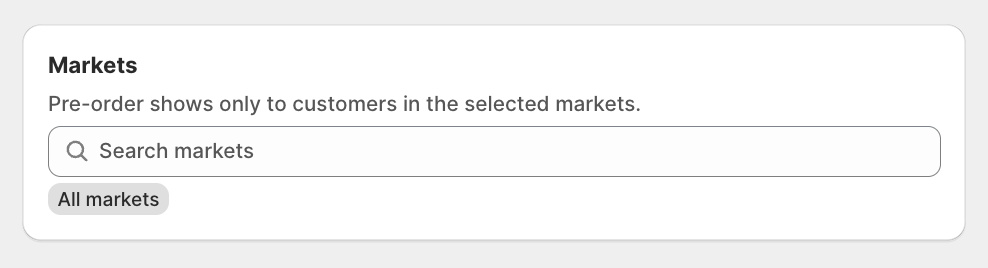
- Search and select one or more markets. Selected markets show as removable tags.
- Leave it empty (or select All markets) to run the campaign everywhere. This is the default for new campaigns, and no market selection is required to save.
- Only customers browsing in a selected market see the Pre-Order button and badge for this campaign; everyone else sees your store's normal Add to Cart or Sold out state.
Run two campaigns on the same product, in different markets: assign non-overlapping markets to each campaign (e.g. Campaign A → US and Canada, Campaign B → everywhere else) and both run correctly at once. Previously a second campaign on the same product would override the first; Markets fixes that.
Where market restriction applies:
- Product page: the Pre-Order button (and Buy it now) is blocked for a buyer outside the campaign's markets, with the message "This item is not available for preorder in your region." shown next to the button. This message is fixed English text and can't be edited from the admin.
- Pre-Order badge: hidden on collection, home, and search pages for buyers outside the campaign's markets.
- Cart: intentionally not gated. An item already in the cart is not removed if the buyer's market changes. The final check happens at checkout: if a cart line is still outside its campaign's markets, checkout is blocked with the same message.
Backward compatible: existing campaigns are unaffected and keep running in every market, exactly as before. Markets is available in both Create and Edit. Back in Stock campaigns don't have market targeting yet.
Preview your settings
The Preview panel on the right shows a live preview that updates in real time as you change settings across all three wizard steps. Switch between three tabs:
- Product Page: button, badge, delivery message, payment message
- Collection: product card with badge overlay
- Cart: cart line item with delivery note
A Sync theme color banner sits under the preview when theme color sync is enabled in your global Pre-Order Settings.
Click Continue to proceed to Step 2: Payment Settings (opens in a new tab).