# Milestone Rewards - Cart Drawer
***
### Overview
The Milestone Progress Bar works by:
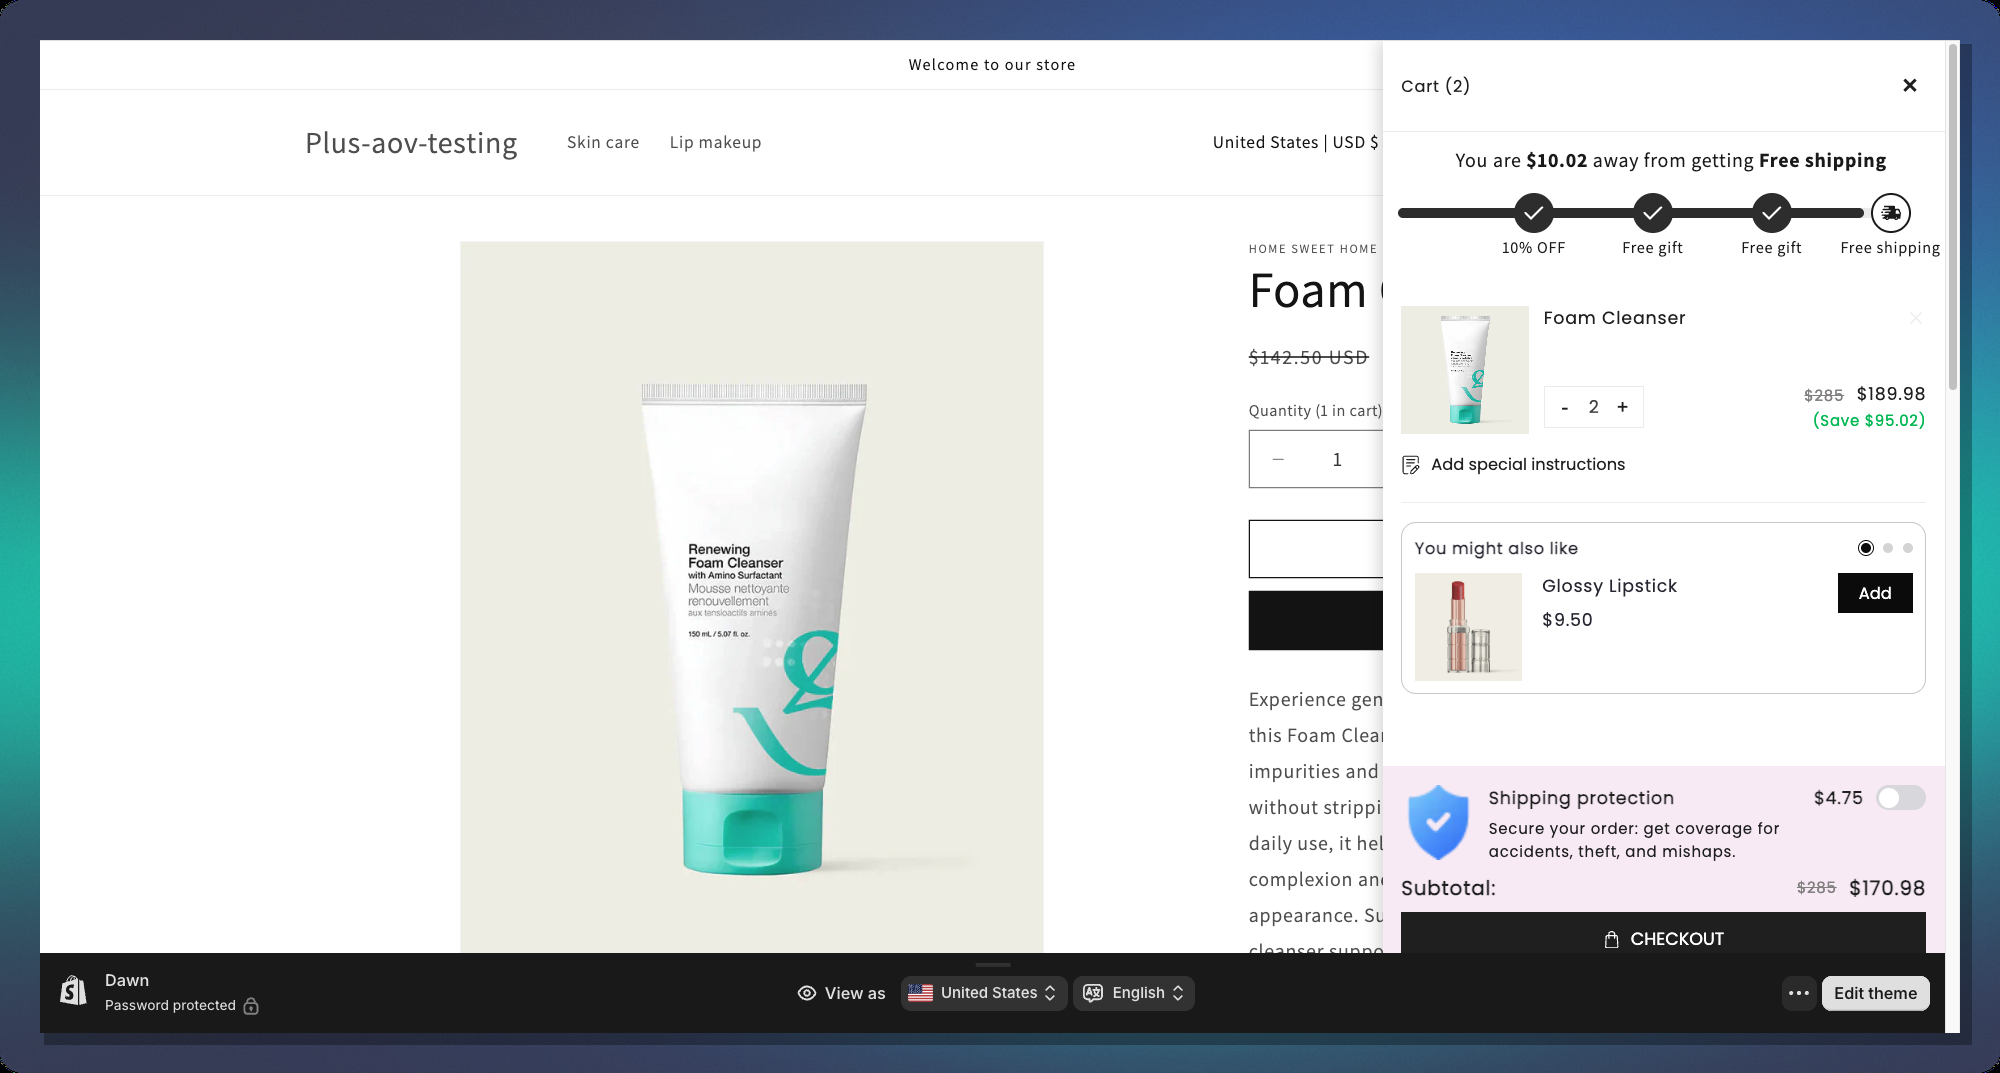
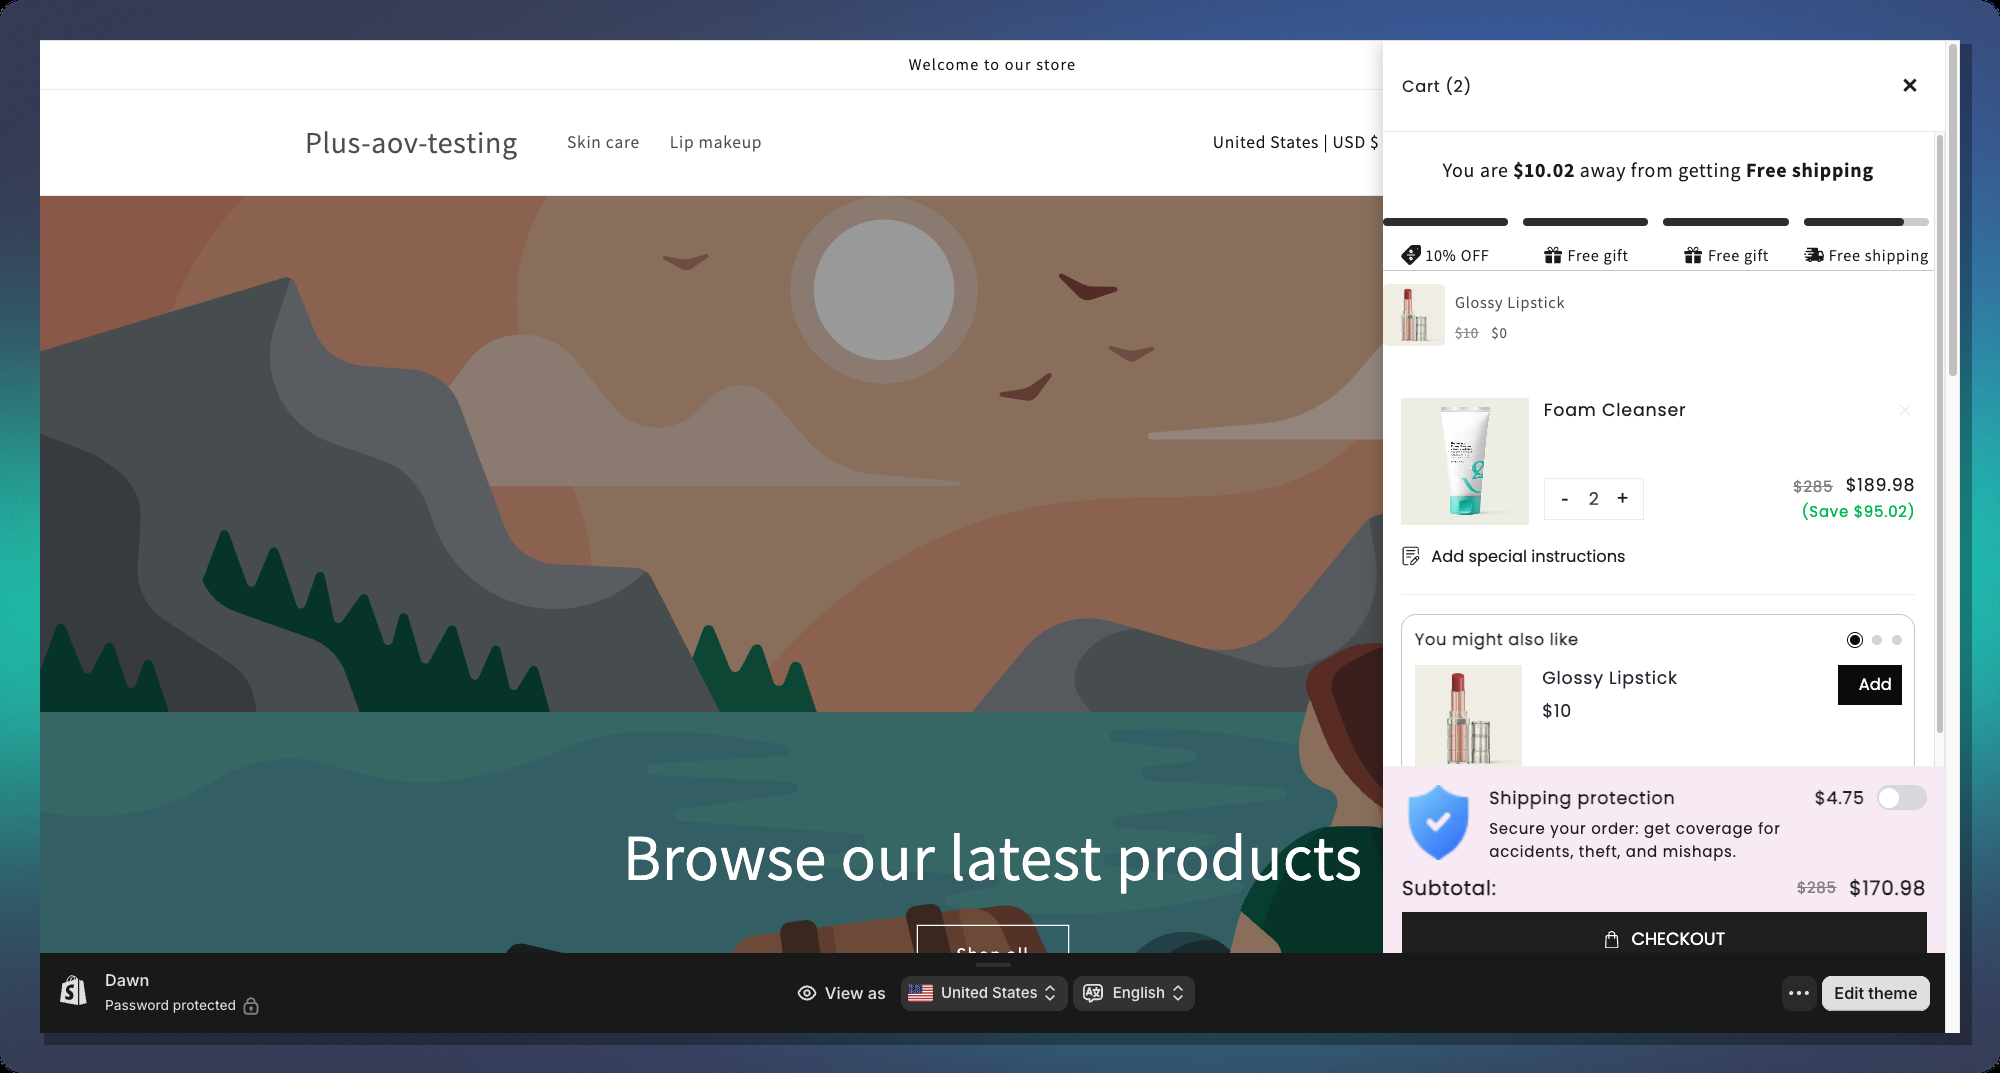
* Showing customers **how close they are** to unlocking the next reward
* Displaying **multiple reward tiers** (up to the max tier limit) on a single bar
* Supporting **3 types of rewards** per tier: Order Discount, Free Shipping, Free Gift
* Updating the bar **in real time** as customers add items to their cart
```
Example campaign with 3 tiers:
─────●────────────●────────────●
$50 $100 $150
10% off Free Shipping Free Gift
```
> **Note:** Only one Milestone campaign can be active per store at a time.
***
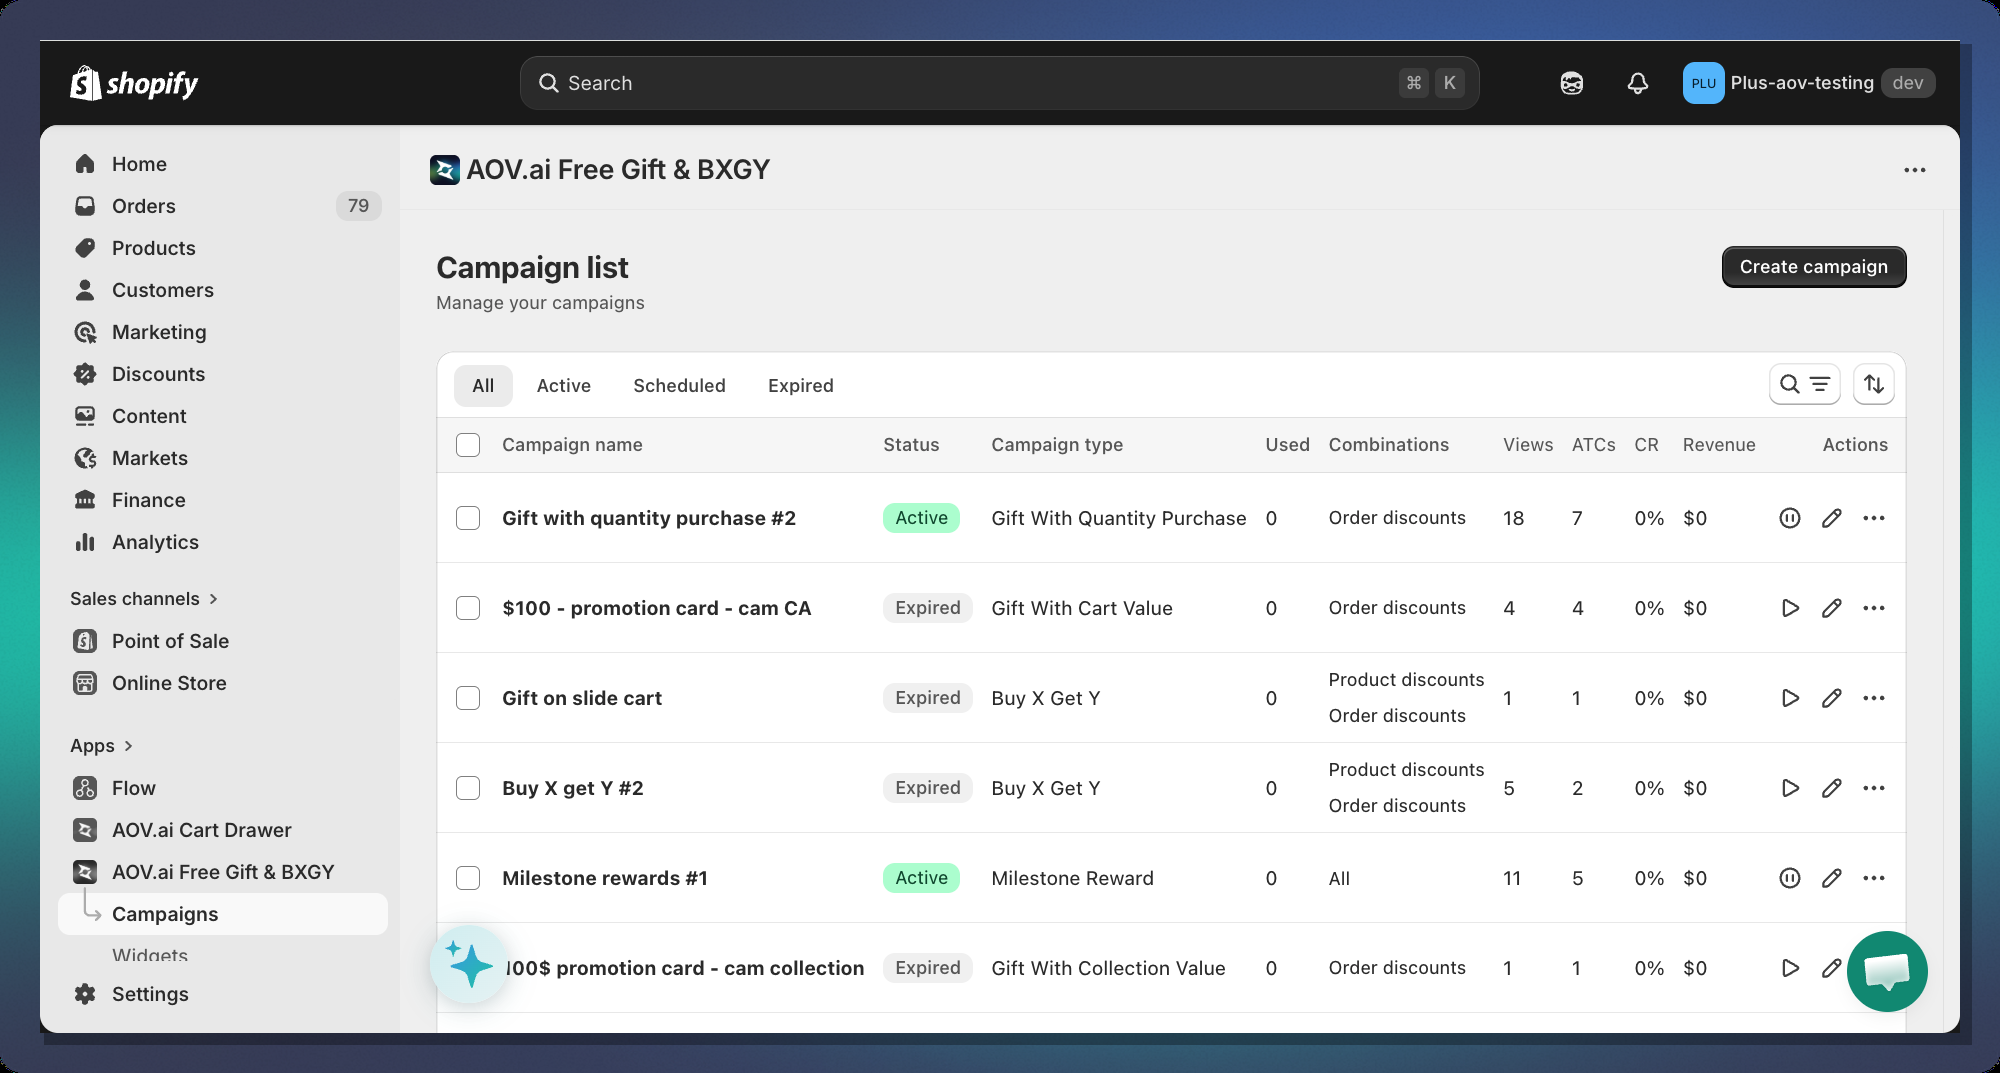
### Step 1 — Create a Milestone Campaign
1. In your Shopify Admin, open the **AOV.ai app**
2. Navigate to **Gift Campaigns** in the left sidebar
3. Click **Create campaign**
4. Select **AOV Milestone Rewards** as the campaign type
***
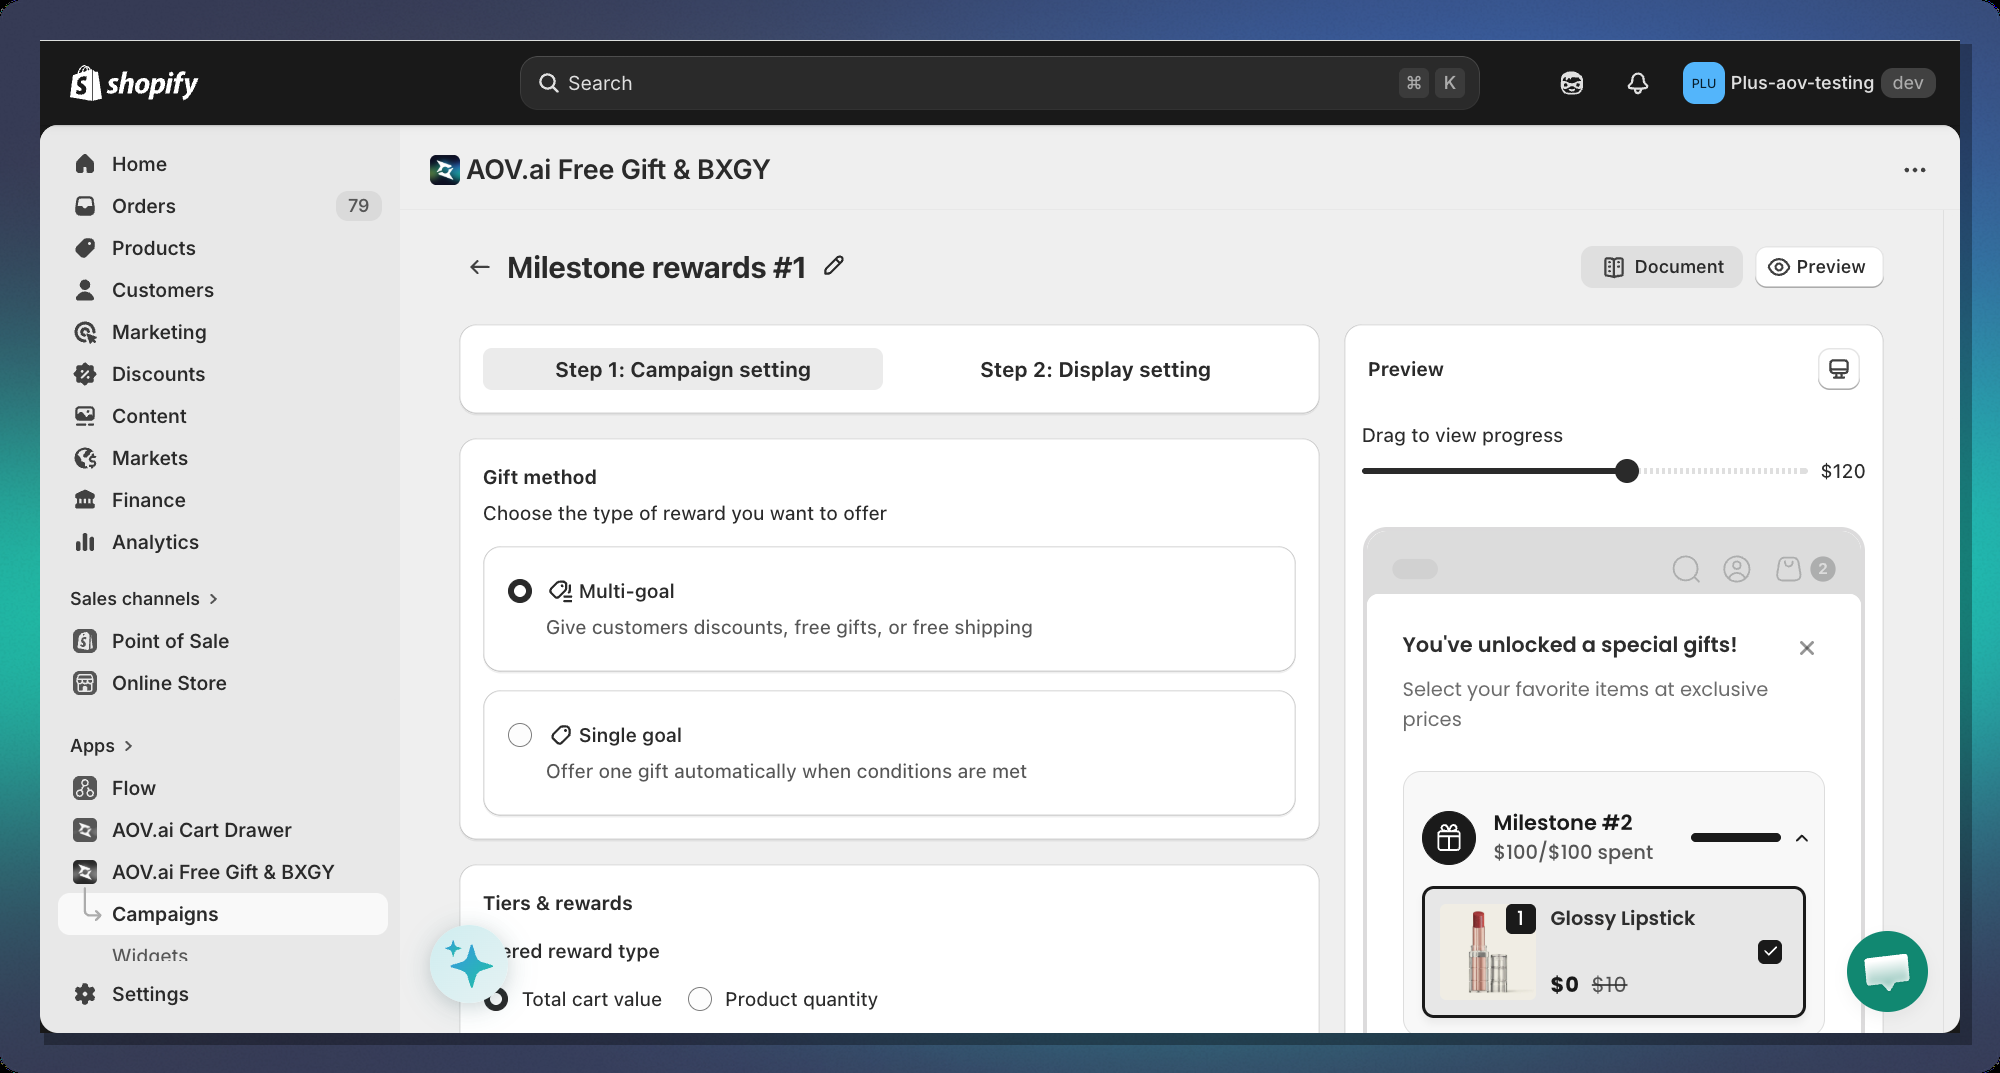
### Step 2 — Choose a Gift Method
After creating the campaign, you will see the **Gift Method** card at the top of the campaign editor.
#### Multi-goal (Recommended)
Shows a **progress bar with multiple milestone icons** — one icon per reward tier. The customer sees all rewards at once and can track their progress toward each one.
Use this when you want to:
* Offer **3 or more rewards** in one campaign
* Encourage customers to keep spending past the first reward
* Display a **visual roadmap** of all available rewards
#### Single-goal
Shows a **single-tier progress bar** that focuses on one reward — typically a free gift. The bar fills up until the customer reaches the trigger amount, then reveals the gift product card.
Use this when you want to:
* Highlight **one specific free gift** prominently
* Keep the widget **simple and clean**
* Show the gift product image, variant picker, and pricing directly in the bar
***
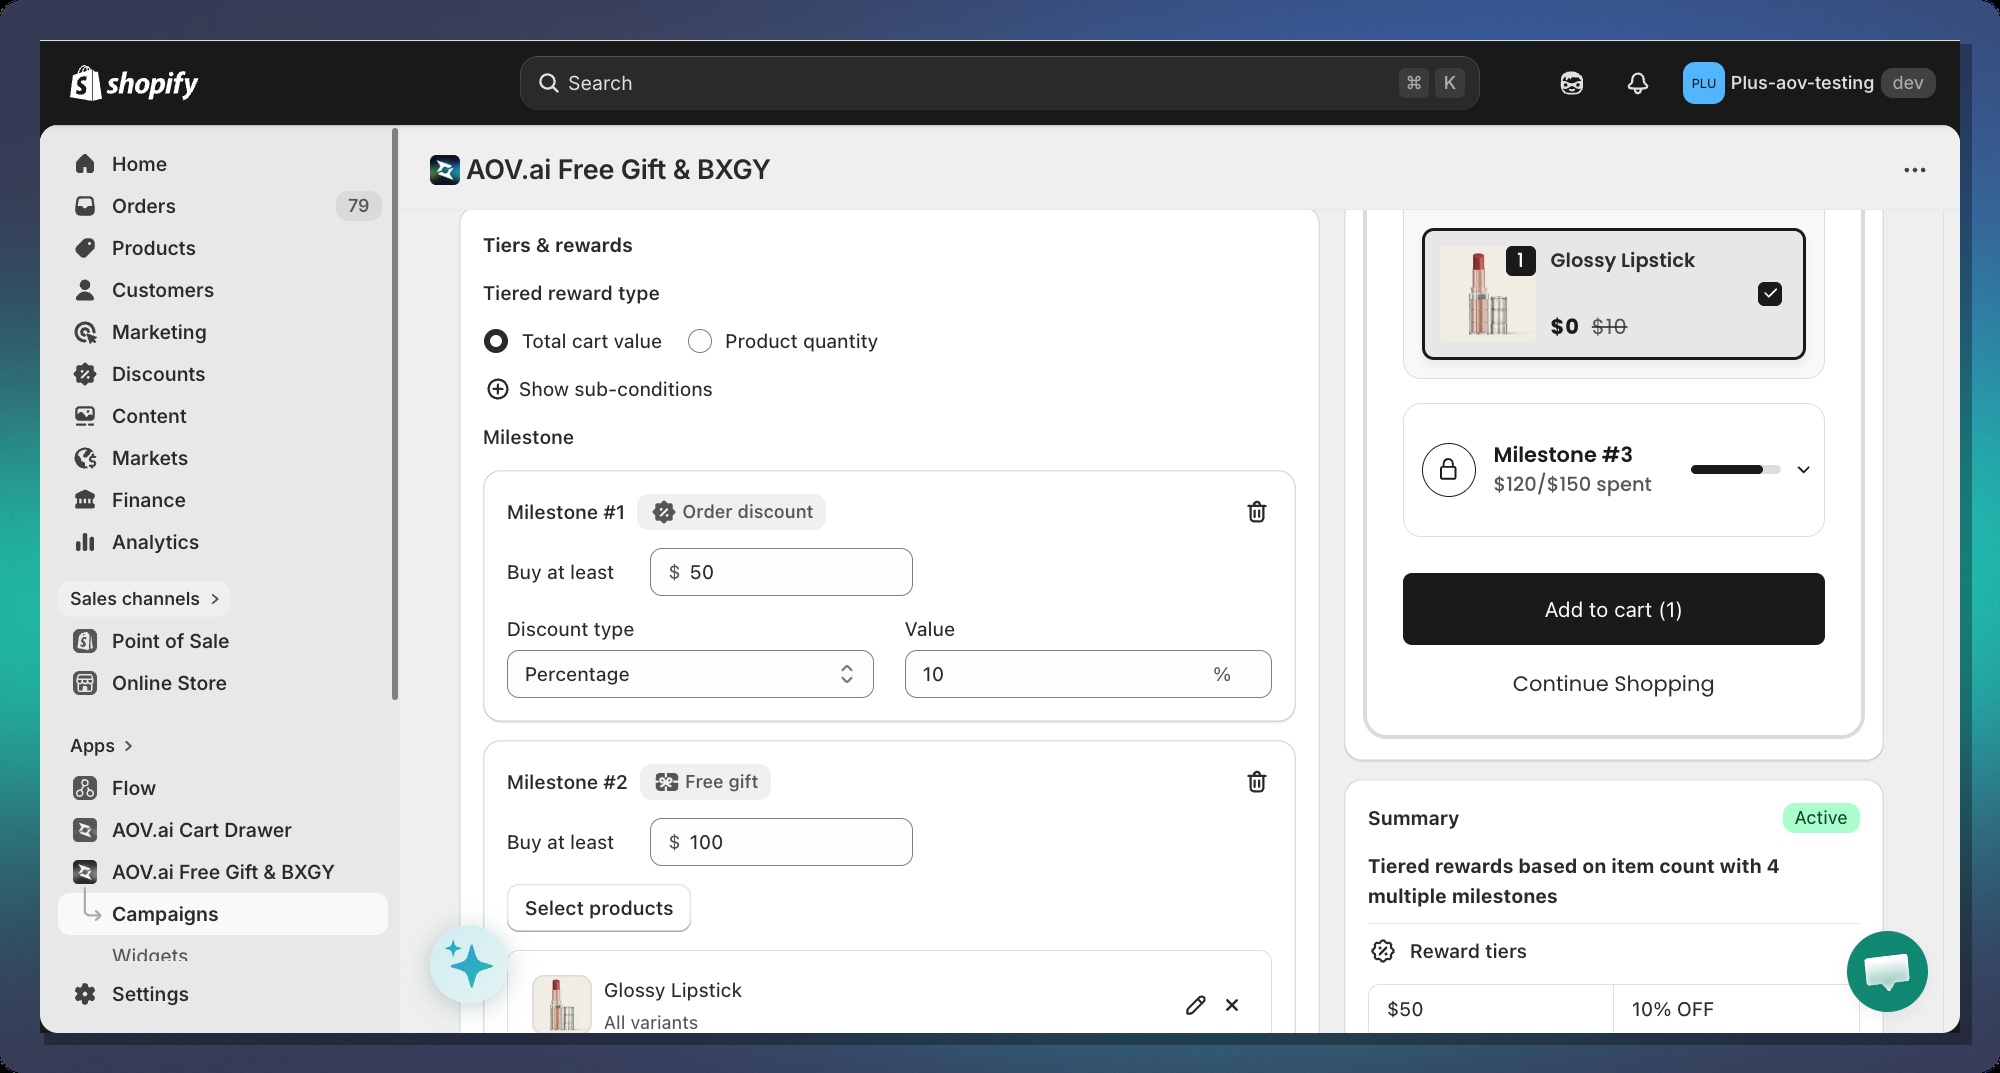
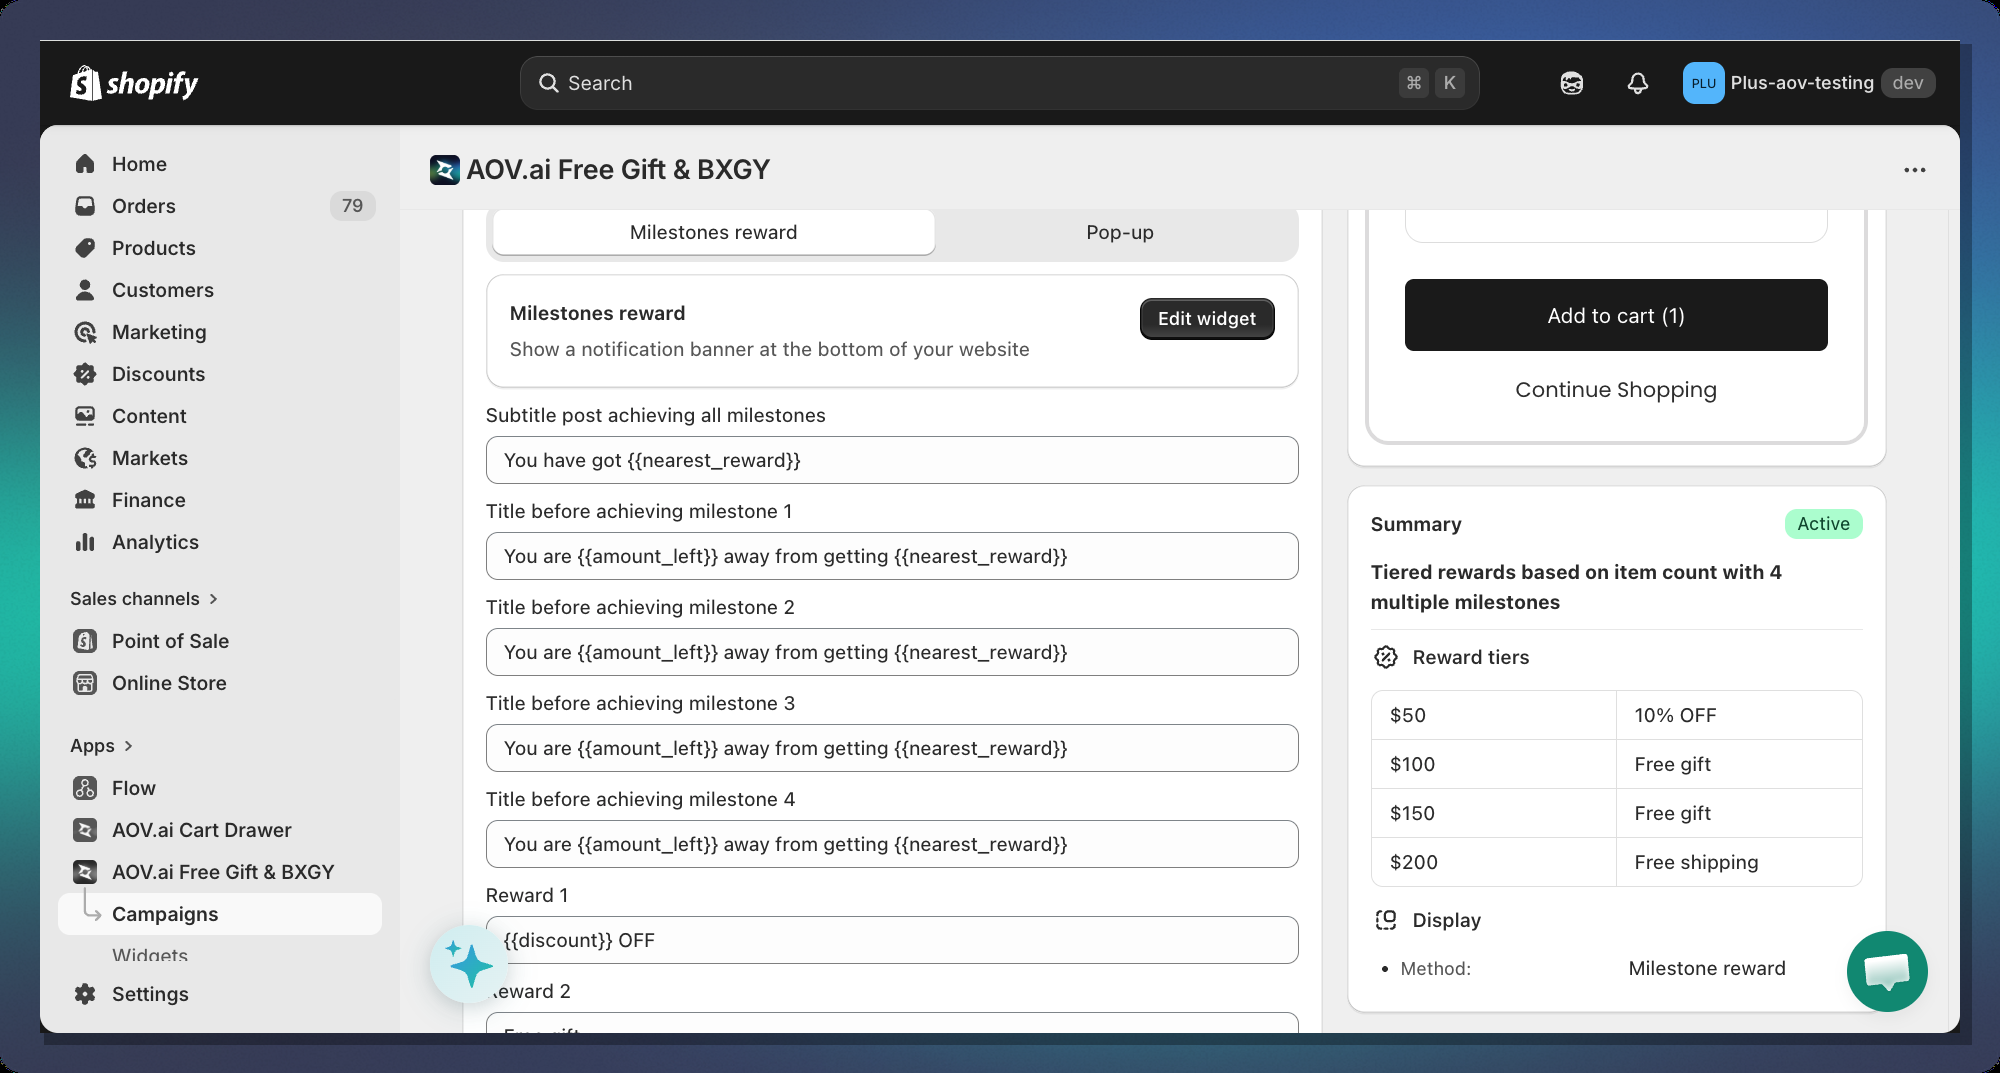
### Step 3 — Set Up Milestones (Tiers)
This is the core of your campaign. Scroll down to the **Tiered Rewards** card.
#### 3.1 Choose a Trigger Type
At the top of the Tiered Rewards card, select how the bar triggers:
| Option | Description |
| ----------------- | ---------------------------------------------------------------- |
| **Cart Value** | Progress is based on the total cart amount (e.g., spend $50) |
| **Item Quantity** | Progress is based on number of items in cart (e.g., buy 3 items) |
#### 3.2 Add Your First Milestone
Click **+ Add milestone** and choose a reward type from the dropdown:
**Option A — Order Discount**
| Field | Description |
| ----------------- | ------------------------------------------------------------------------ |
| **Buy at least** | Cart value (or item count) the customer must reach to unlock this reward |
| **Discount Type** | `Percentage` (e.g., 10%) or `Fixed amount` (e.g., $5 off) |
| **Value** | The discount amount. Percentage is capped at 100% |
**Option B — Free Shipping**
Free Shipping tiers have only the **Buy at least** threshold — no discount value needed (it always equals 100% shipping discount).
> **Note:** You can only have **one Free Shipping tier** per campaign.
**Option C — Free Gift**
| Field | Description |
| ------------------- | ----------------------------------------------------------------------------------------------------------------------------------------------------------------------- |
| **Buy at least** | Cart threshold to unlock the free gift |
| **Select Products** | Opens a product picker — customers can choose from all selected products |
| **Gift Limit** | When enabled (and multiple gifts selected), lets you set the **maximum number of gifts** a customer can choose. Only available when Grab Gift Behavior is set to Manual |
> **Tip:** Select multiple products so customers can pick their preferred gift. This increases conversion.
***
### Step 4 — Design the Progress Bar
Navigate to the **Display setting** tab of your campaign and customize widget Milestone
#### 4.1 Layout Style
**Layout 1**
One horizontal bar spans the full width. Each milestone has an **icon positioned along the bar** at its threshold position.
**Layout 2**
Each tier gets its **own independent progress bar**. Below each bar is an icon and label.
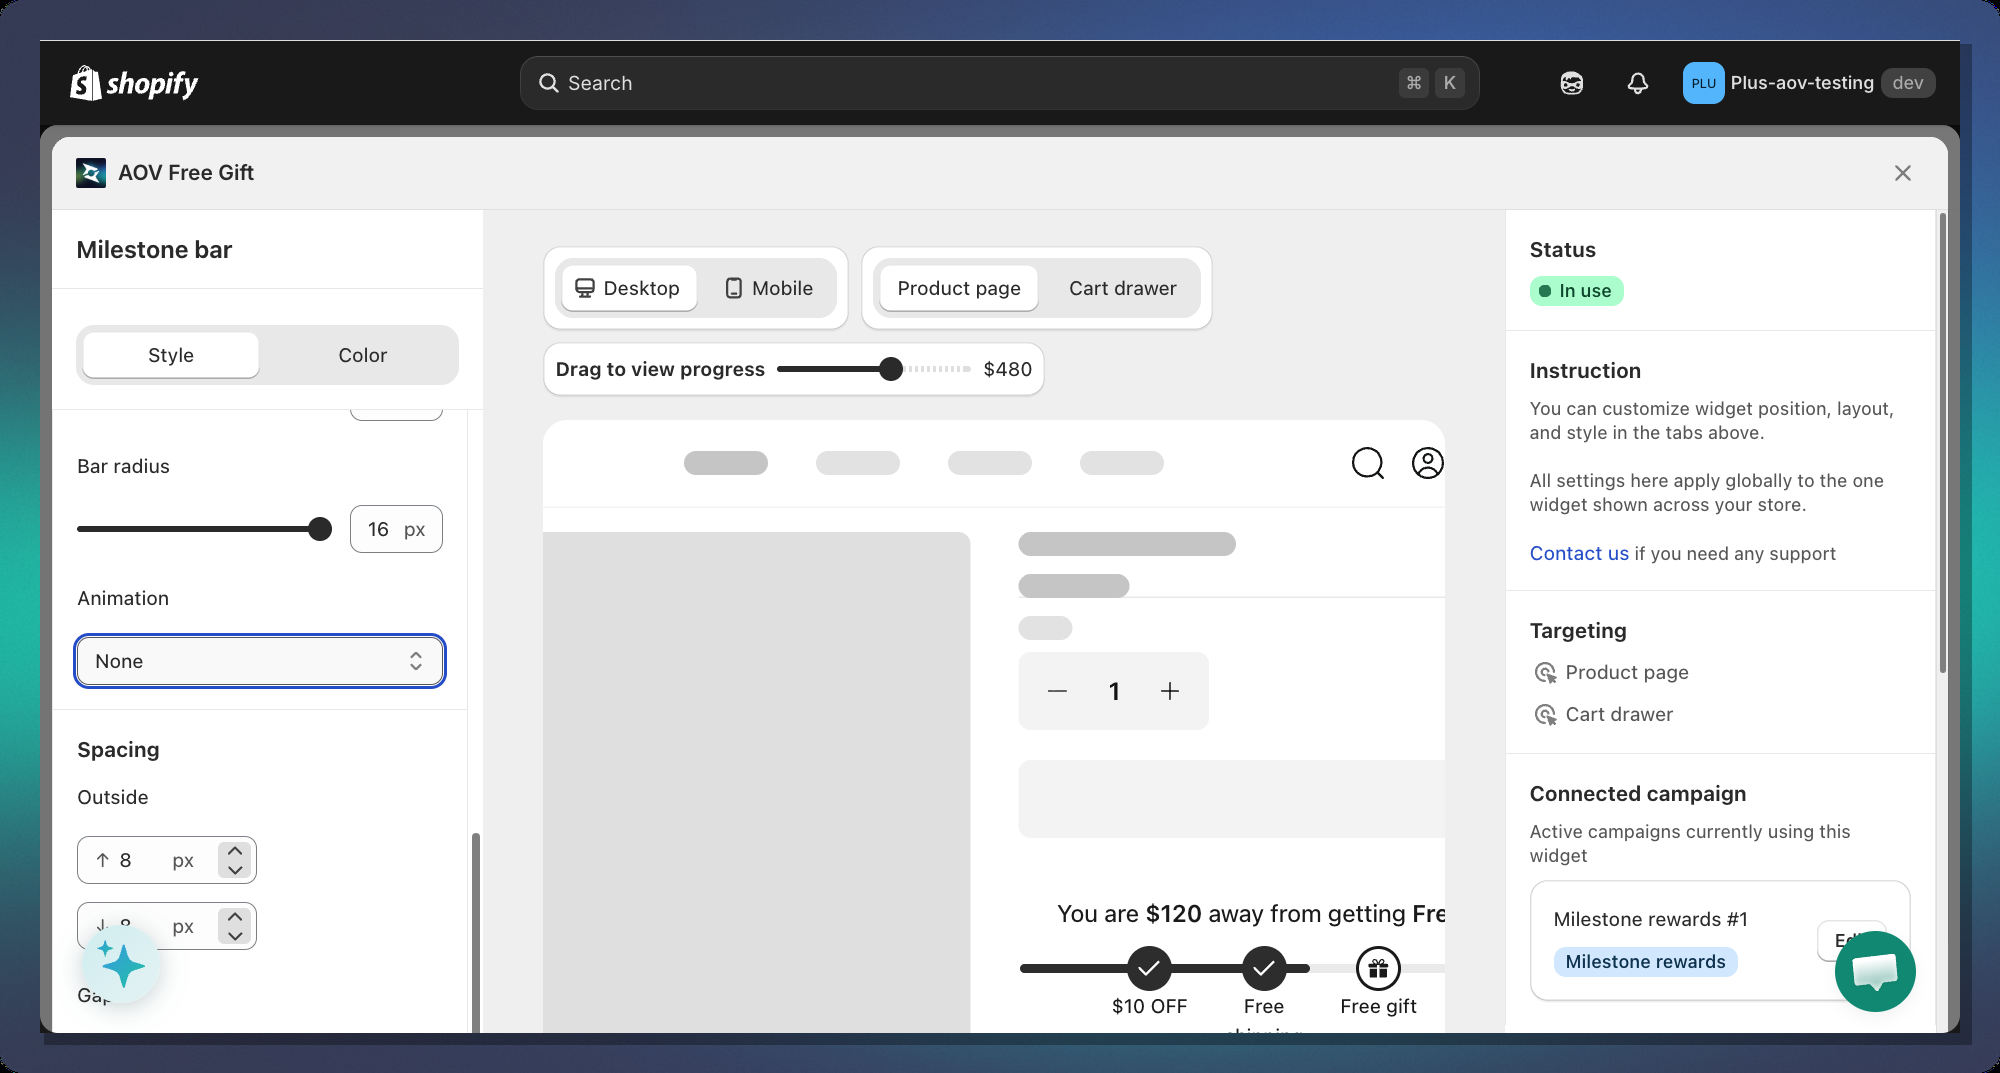
#### 4.2 Bar Appearance
| Setting | Default | Description |
| ------------------------ | ------- | --------------------------------------------------- |
| **Bar Thickness** | 8px | Height of the progress bar track |
| **Bar Radius** | 16px | Corner roundness — `0` = square, `16+` = pill shape |
| **Padding Top / Bottom** | 0px | Space inside the widget above/below the bar |
| **Margin Top / Bottom** | 8px | Space outside the widget |
| **Spacing Gap** | 24px | Space between the title message and the bar |
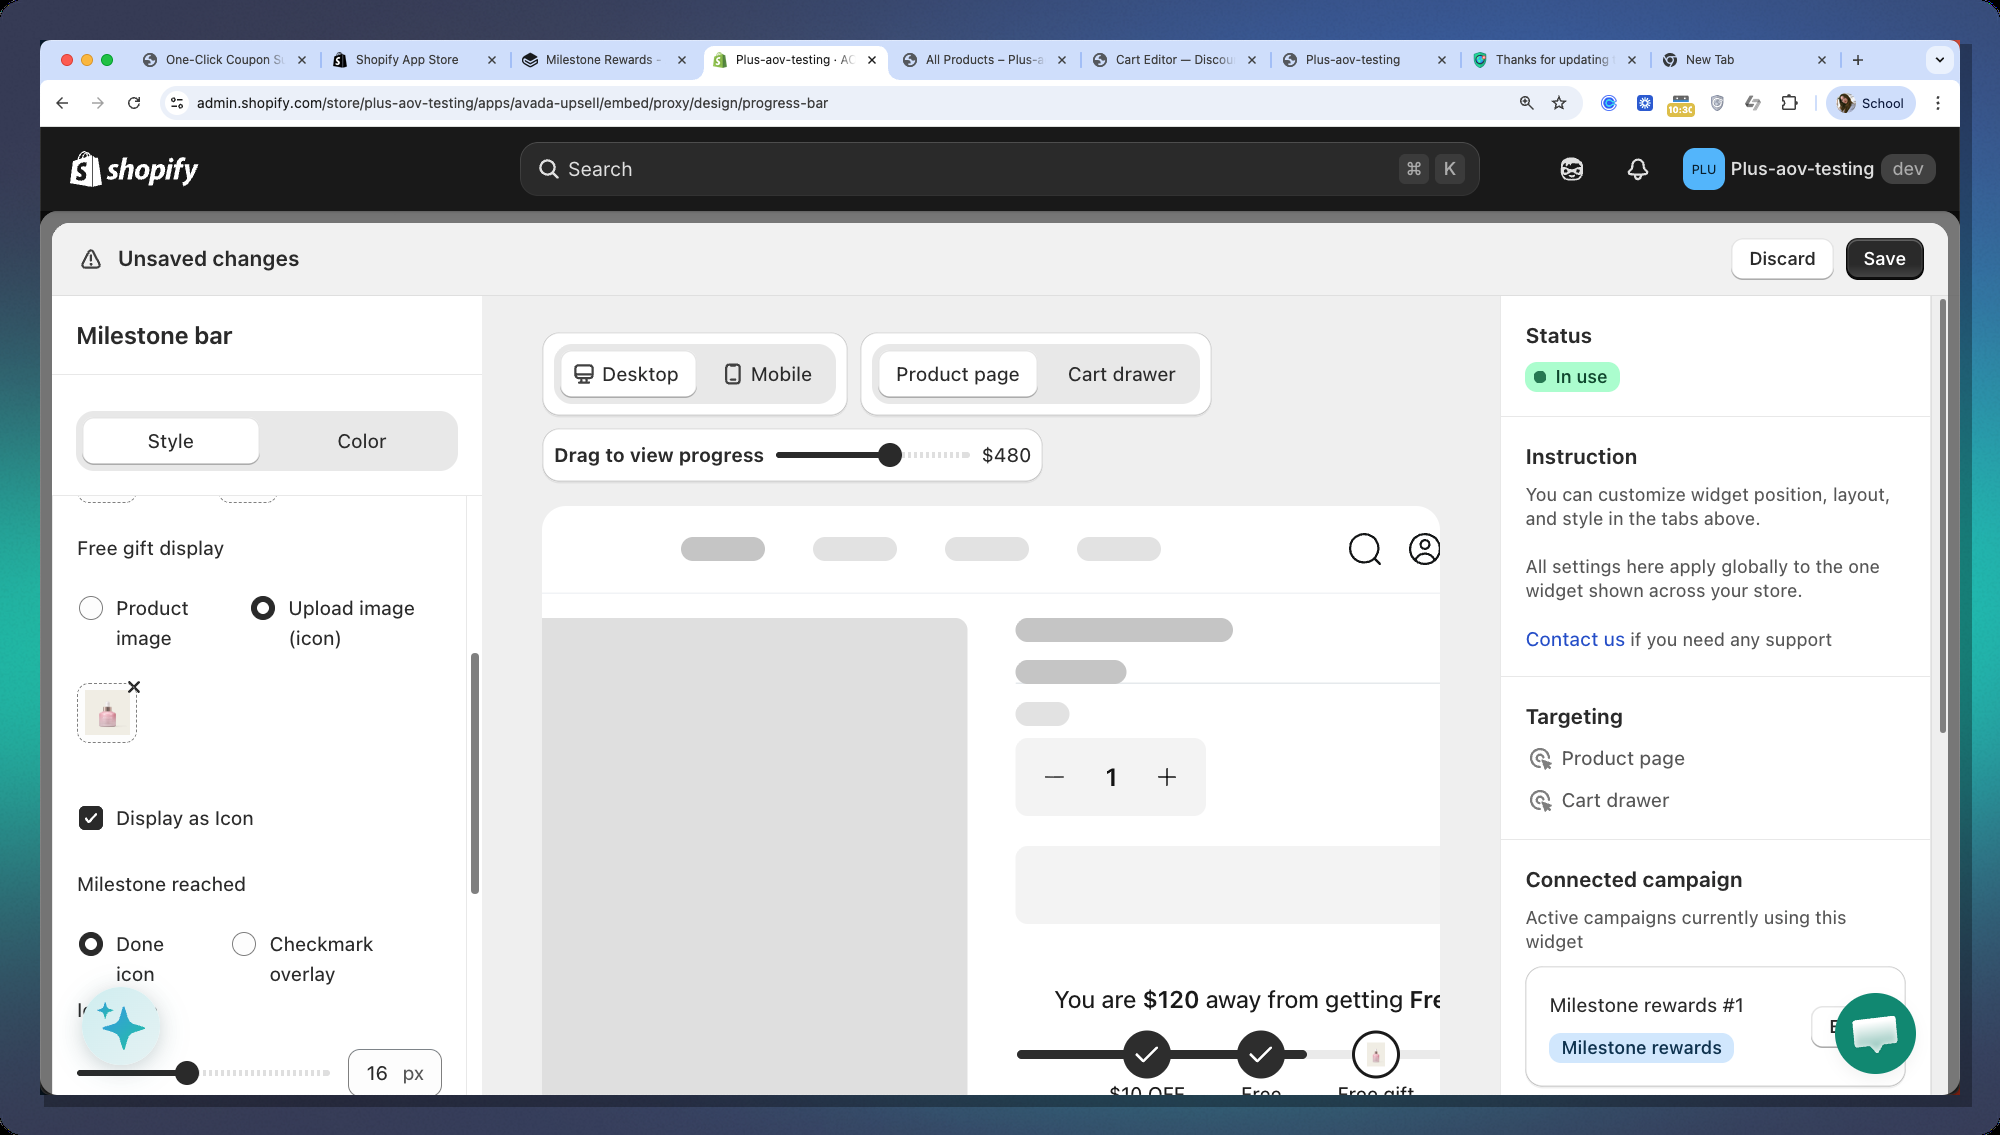
#### 4.3 Milestone Icons
**Icon Source**
| Option | What it shows |
| ----------- | ----------------------------------------------------------------------------- |
| **Default** | Built-in SVG icons: discount tag, truck, gift card |
| **Upload** | Your own images — upload separate icons for Discount, Shipping, and Free Gift |
| **None** | No icons shown (text only) |
> **Free Gift special case:** When Icon Source is **Upload** and the reward is a Free Gift, you can choose to show:
>
> * The **product image** of the first selected gift product
> * A **custom uploaded image**
**Icon Size**
| Setting | Default | Description |
| ----------------------- | ------- | ---------------------------------------------- |
| **Icon Size** | 16px | Size of the icon graphic inside the container |
| **Icon Border Radius** | 32px | Shape of the icon circle container |
| **Icon Border Opacity** | 100% | Opacity of the border on incomplete milestones |
**When a Milestone is Reached**
| Option | Description |
| --------------------- | --------------------------------------------------------------------------------------------------- |
| **Done Icon** | Replaces the entire icon with a ✓ checkmark (animated fade-in) |
| **Checkmark Overlay** | Keeps the original icon + adds a small circular checkmark badge at the top-right corner of the icon |
**Icon Position (Segmented Layout only)**
| Option | Description |
| ---------- | --------------------------------------------------- |
| **Beside** | Icon and reward label are side by side horizontally |
| **Above** | Icon sits above the reward label |
#### 4.4 Text & Colors
**Title Messages**
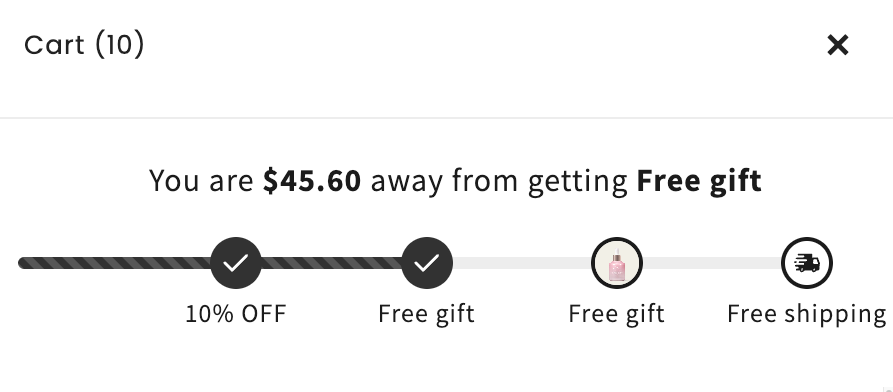
The **title text** at the top of the bar changes dynamically based on the customer's cart:
| Customer's cart | Message shown |
| ----------------------- | --------------------------------------------------------------------------------------- |
| Below first milestone | `beforeAchievedMessage` of the first tier (e.g., *"Spend **$35 more** to get 10% off"*) |
| Between milestones | `beforeAchievedMessage` of the next unreached tier |
| Reached final milestone | `postAchieveMessage` (global setting, e.g., *"You've unlocked all rewards! 🎉"*) |
**Available variables for message templates:**
| Variable | Replaced with |
| -------------------- | -------------------------------------------------- |
| `{{amount_left}}` | Formatted currency amount left (e.g., `$35.00`) |
| `{{item_left}}` | Number of items left (for quantity-based triggers) |
| `{{nearest_reward}}` | Bold text of the next reward (e.g., **10% off**) |
#### 4.5 Animations
| Animation | Effect |
| ----------- | ---------------------------------------------------------------------- |
| **None** | No animation on the bar |
| **Striped** | Diagonal white stripes continuously scroll from right to left |
| **Shimmer** | A light gleam sweeps across the bar from left to right every 2 seconds |
***
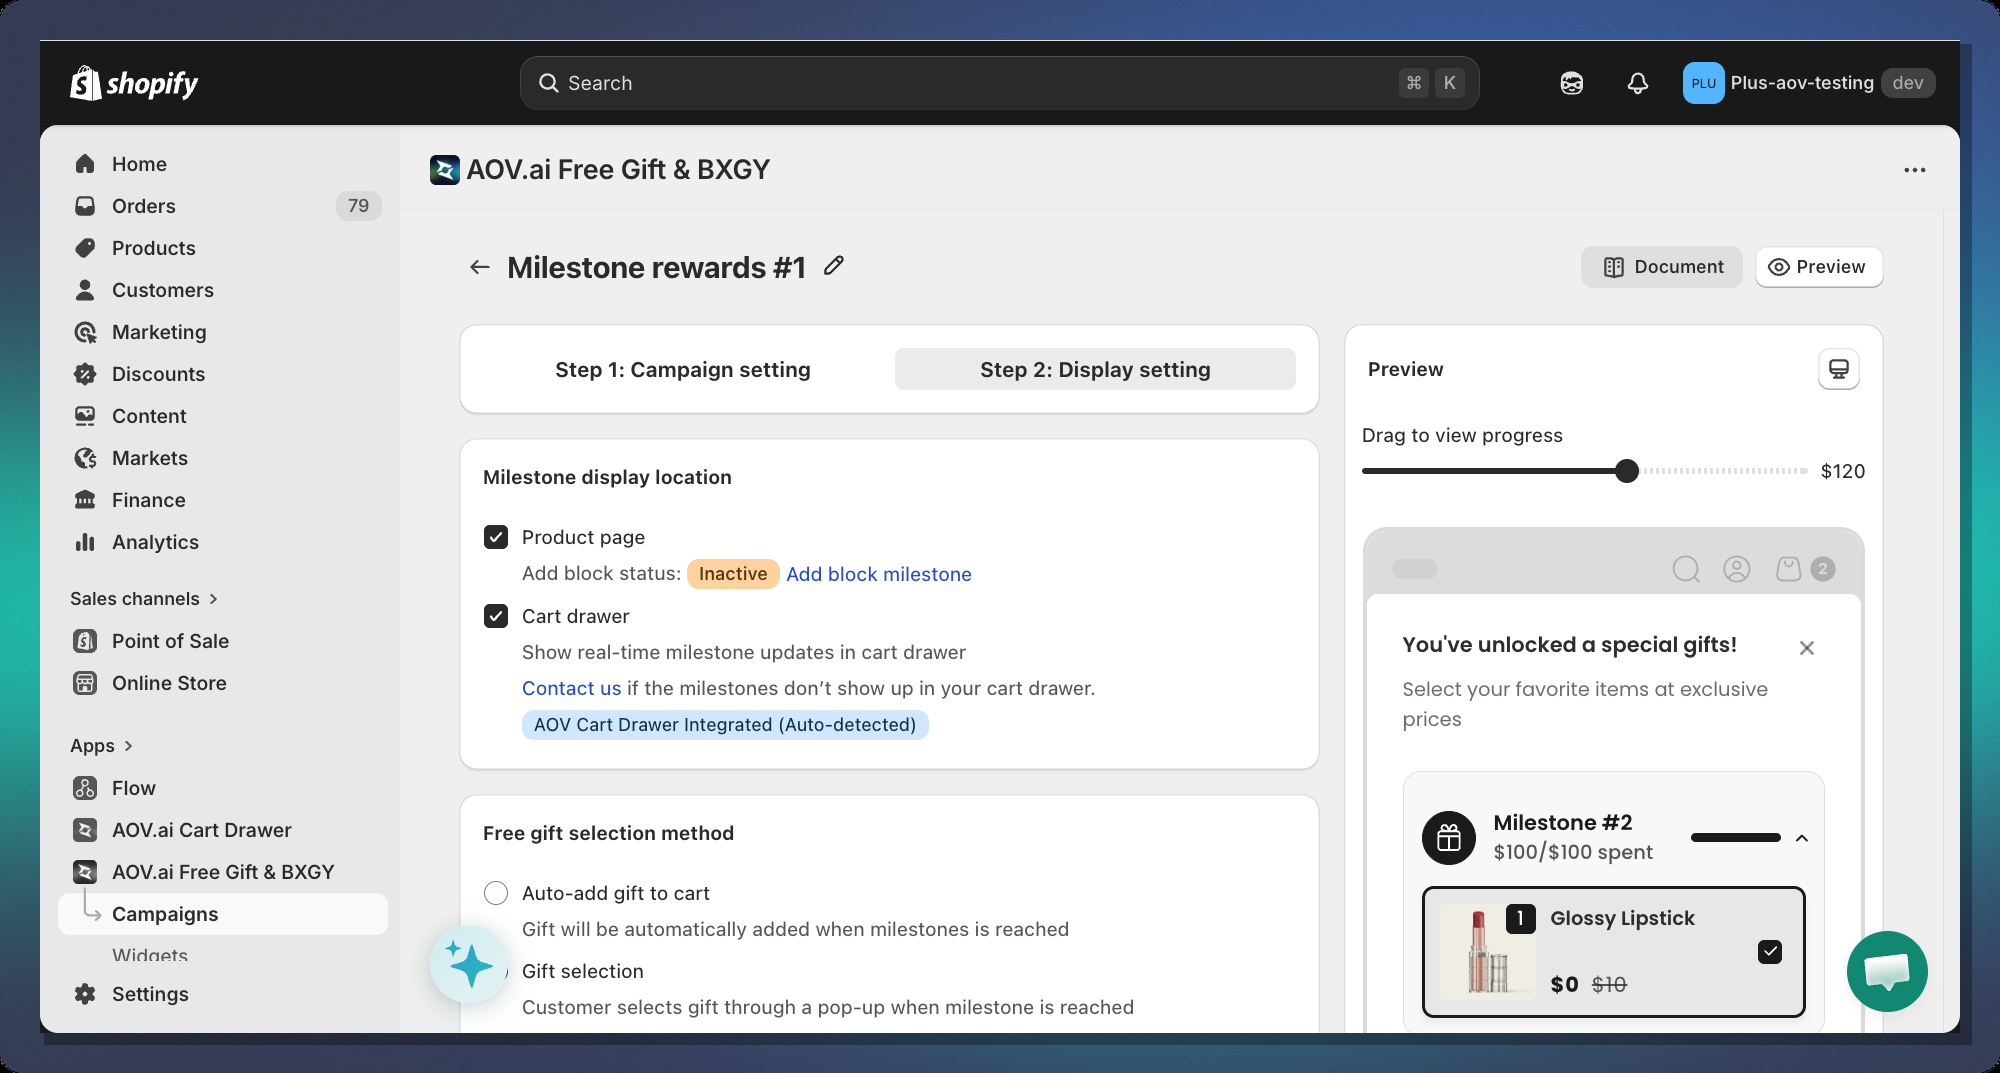
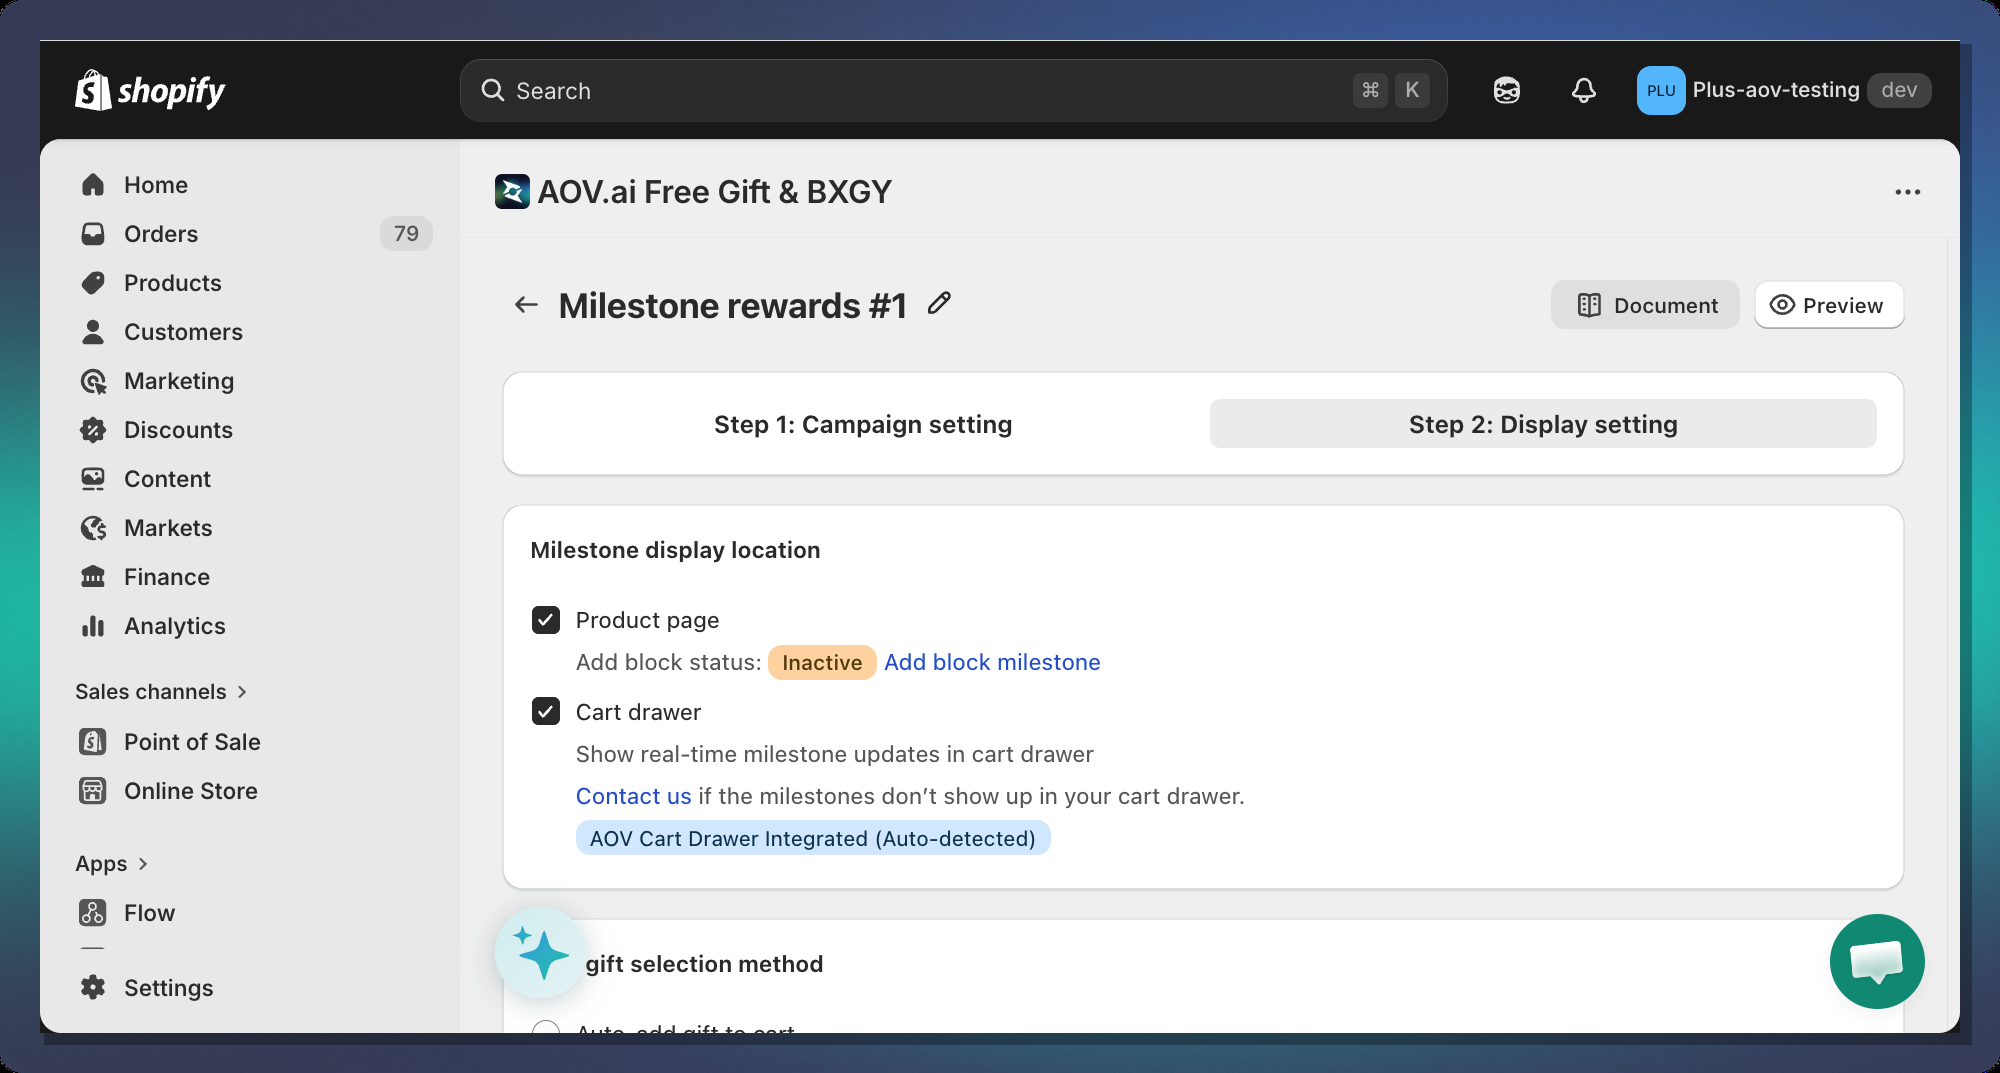
### Step 5 — Configure Display Location
The Milestone Progress Bar can be displayed in two locations:
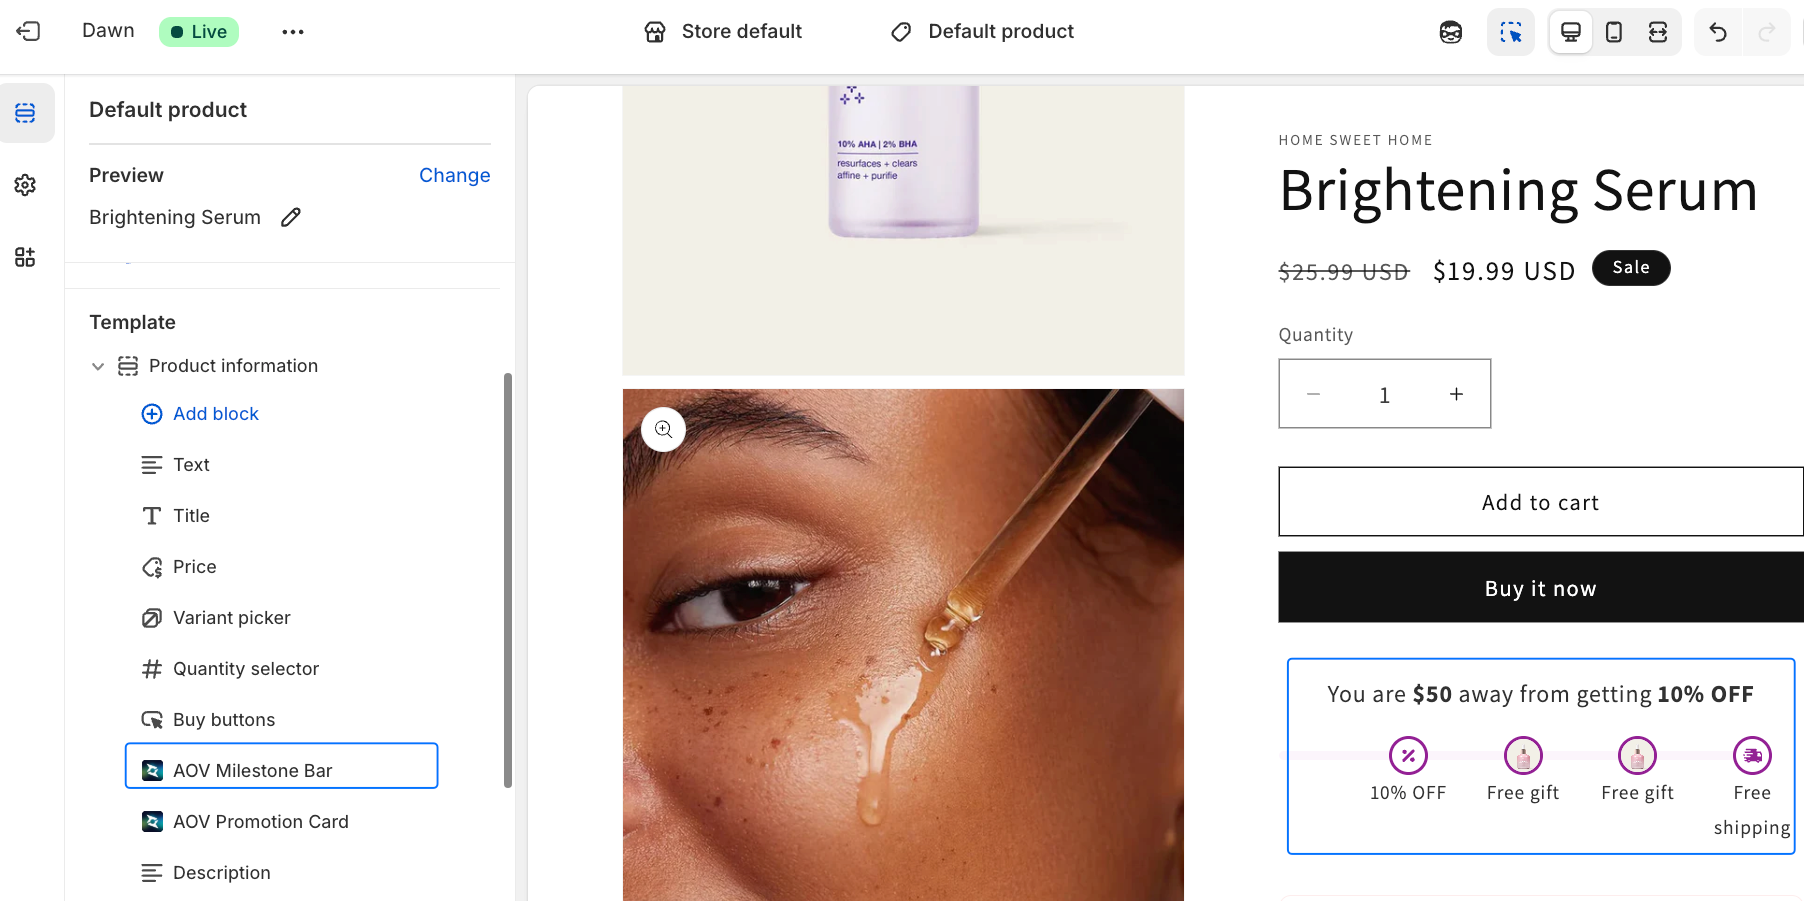
#### Product Page (Theme App Extension)
The bar is embedded directly into your product page template using Shopify's **Theme App Extension** system.
**To enable it:**
1. Click **Go to Theme Editor** (or navigate to **Online Store > Themes > Customize**)
2. Select a **Product** template
3. In the section list, click **Add block**
4. Search for **"AOV Milestone Bar"**
5. Position the block where you want it to appear (recommended: below the Add to Cart button)
6. Click **Save**
#### Cart Drawer
Cart drawer integration requires contacting our support team for manual setup as it depends on your specific theme's cart drawer implementation.
***
### How It Looks to Customers
#### Classic Layout
#### Segmented Layout
#### Single-Goal Layout
***
### Tips & Best Practices
#### Threshold Strategy
* **Start low, end high** — set your first milestone at a value just above your current Average Order Value (AOV). This nudges the most customers to reach at least one reward
* **Space tiers evenly** — e.g., $50 → $100 → $150 works better than $50 → $51 → $200
* **End with a high-value reward** — save the free gift for the last (highest) tier to maximize spend
#### Reward Mix
* Combine reward types for maximum effect:
* Tier 1: Small order discount (5–10%) — easy to reach, builds momentum
* Tier 2: Free shipping — high perceived value, customers love it
* Tier 3: Free gift — most exciting, drives highest cart values
#### Message Copy
* Use `{{amount_left}}` in your before-achieved message — showing the exact dollar amount is more motivating than a generic message
* Keep messages **short and action-oriented**: *"Add **$20 more** to get free shipping!"* ✅
* For the post-achieved message, celebrate the win: *"Congrats! You've unlocked all rewards!"*
#### Design
* Use **Shimmer** animation for a premium feel — it draws the eye without being distracting
* For stores with clean minimalist themes, use **Checkmark Overlay** for done milestones instead of replacing the icon
* Match the bar's **Active Bar Color** to your store's primary brand color for a seamless look
***
### FAQ
**Q: Can I have multiple Milestone campaigns active at once?** A: No. Only one Milestone campaign can be active per store at a time.
**Q: What happens if a customer's cart drops below a milestone threshold?** A: The progress bar animates backwards and the milestone icon reverts to its incomplete state in real time.
**Q: Can I use both Cart Value and Item Quantity triggers in the same campaign?** A: No. You must choose one trigger type for the entire campaign. Changing the trigger type after setting up milestones will reset all milestone messages to new defaults.
**Q: Why is the "Free Shipping" option greyed out when I try to add a second Free Shipping tier?** A: By default, each campaign allows only one Free Shipping tier. This is to prevent conflicting shipping discounts.
**Q: The gift product image is not showing in the icon. Why?** A: Make sure:
1. **Icon Source** is set to `Upload`
2. **Free Gift Display** is set to `Product Image`
3. The gift product has an image assigned
4. The product is selected in the milestone's Free Gift product picker
**Q: Can I translate the milestone messages?** A: Yes. The campaign supports multi-language translations via the **Translations** section of the Design Widget. You can set locale-specific versions of `rewardMessage`, `beforeAchievedMessage`, and `postAchieveMessage`.
***
*For further help, contact our support team through the app or visit our Help Center.*
---
# Agent Instructions: Querying This Documentation
If you need additional information that is not directly available in this page, you can query the documentation dynamically by asking a question.
Perform an HTTP GET request on the current page URL with the `ask` query parameter:
```
GET https://help.aov.ai/promotion-campaign/milestone-rewards/milestone-rewards-1.md?ask=
```
The question should be specific, self-contained, and written in natural language.
The response will contain a direct answer to the question and relevant excerpts and sources from the documentation.
Use this mechanism when the answer is not explicitly present in the current page, you need clarification or additional context, or you want to retrieve related documentation sections.