# Milestone Rewards
***
### Overview
The Milestone Progress Bar works by:
* Showing customers **how close they are** to unlocking the next reward
* Displaying **multiple reward tiers** (up to the max tier limit) on a single bar
* Supporting **3 types of rewards** per tier: Order Discount, Free Shipping, Free Gift
* Updating the bar **in real time** as customers add items to their cart
```
Example campaign with 3 tiers:
─────●────────────●────────────●
$50 $100 $150
10% off Free Shipping Free Gift
```
> **Note:** Only one Milestone campaign can be active per store at a time.
***
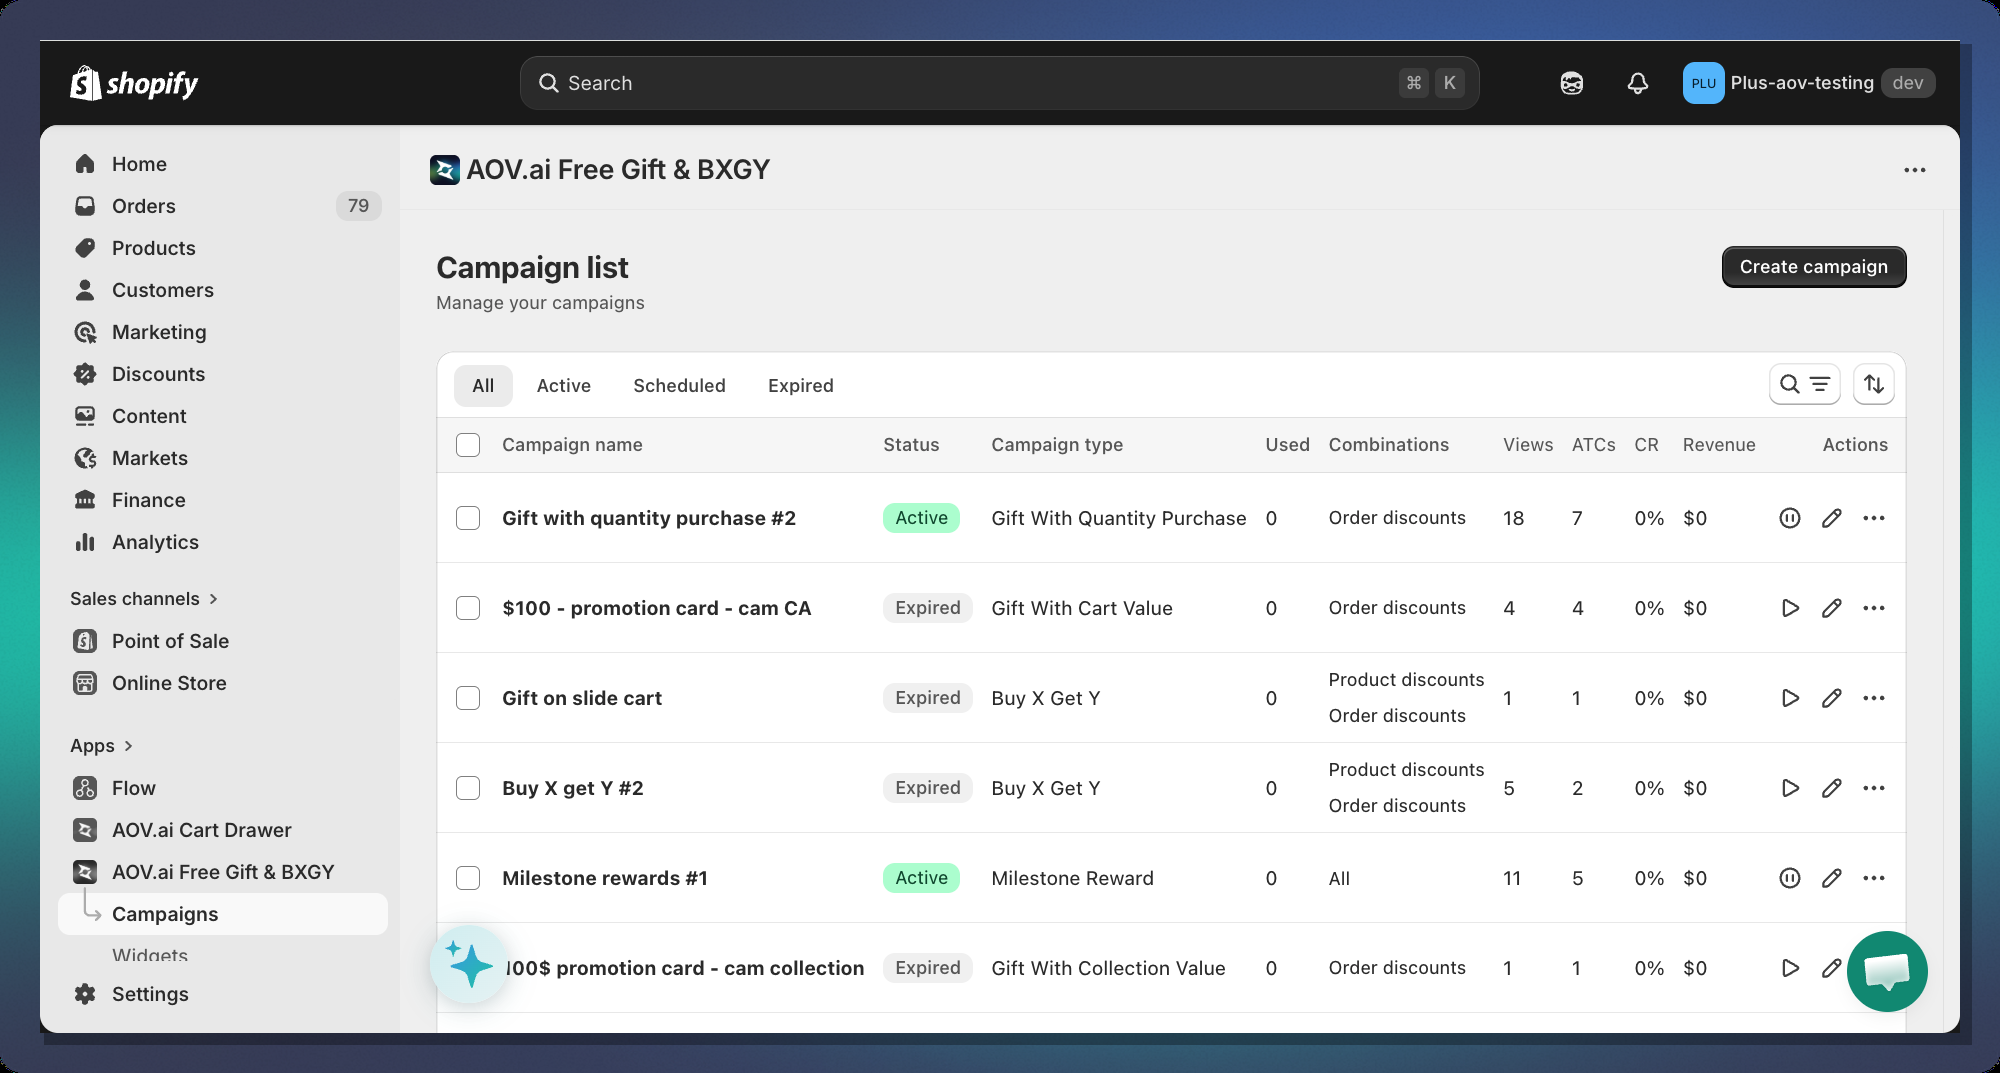
### Step 1 — Create a Milestone Campaign
1. In your Shopify Admin, open the **AOV.ai app**
2. Navigate to **Gift Campaigns** in the left sidebar
3. Click **Create campaign**
4. Select **AOV Milestone Rewards** as the campaign type
***
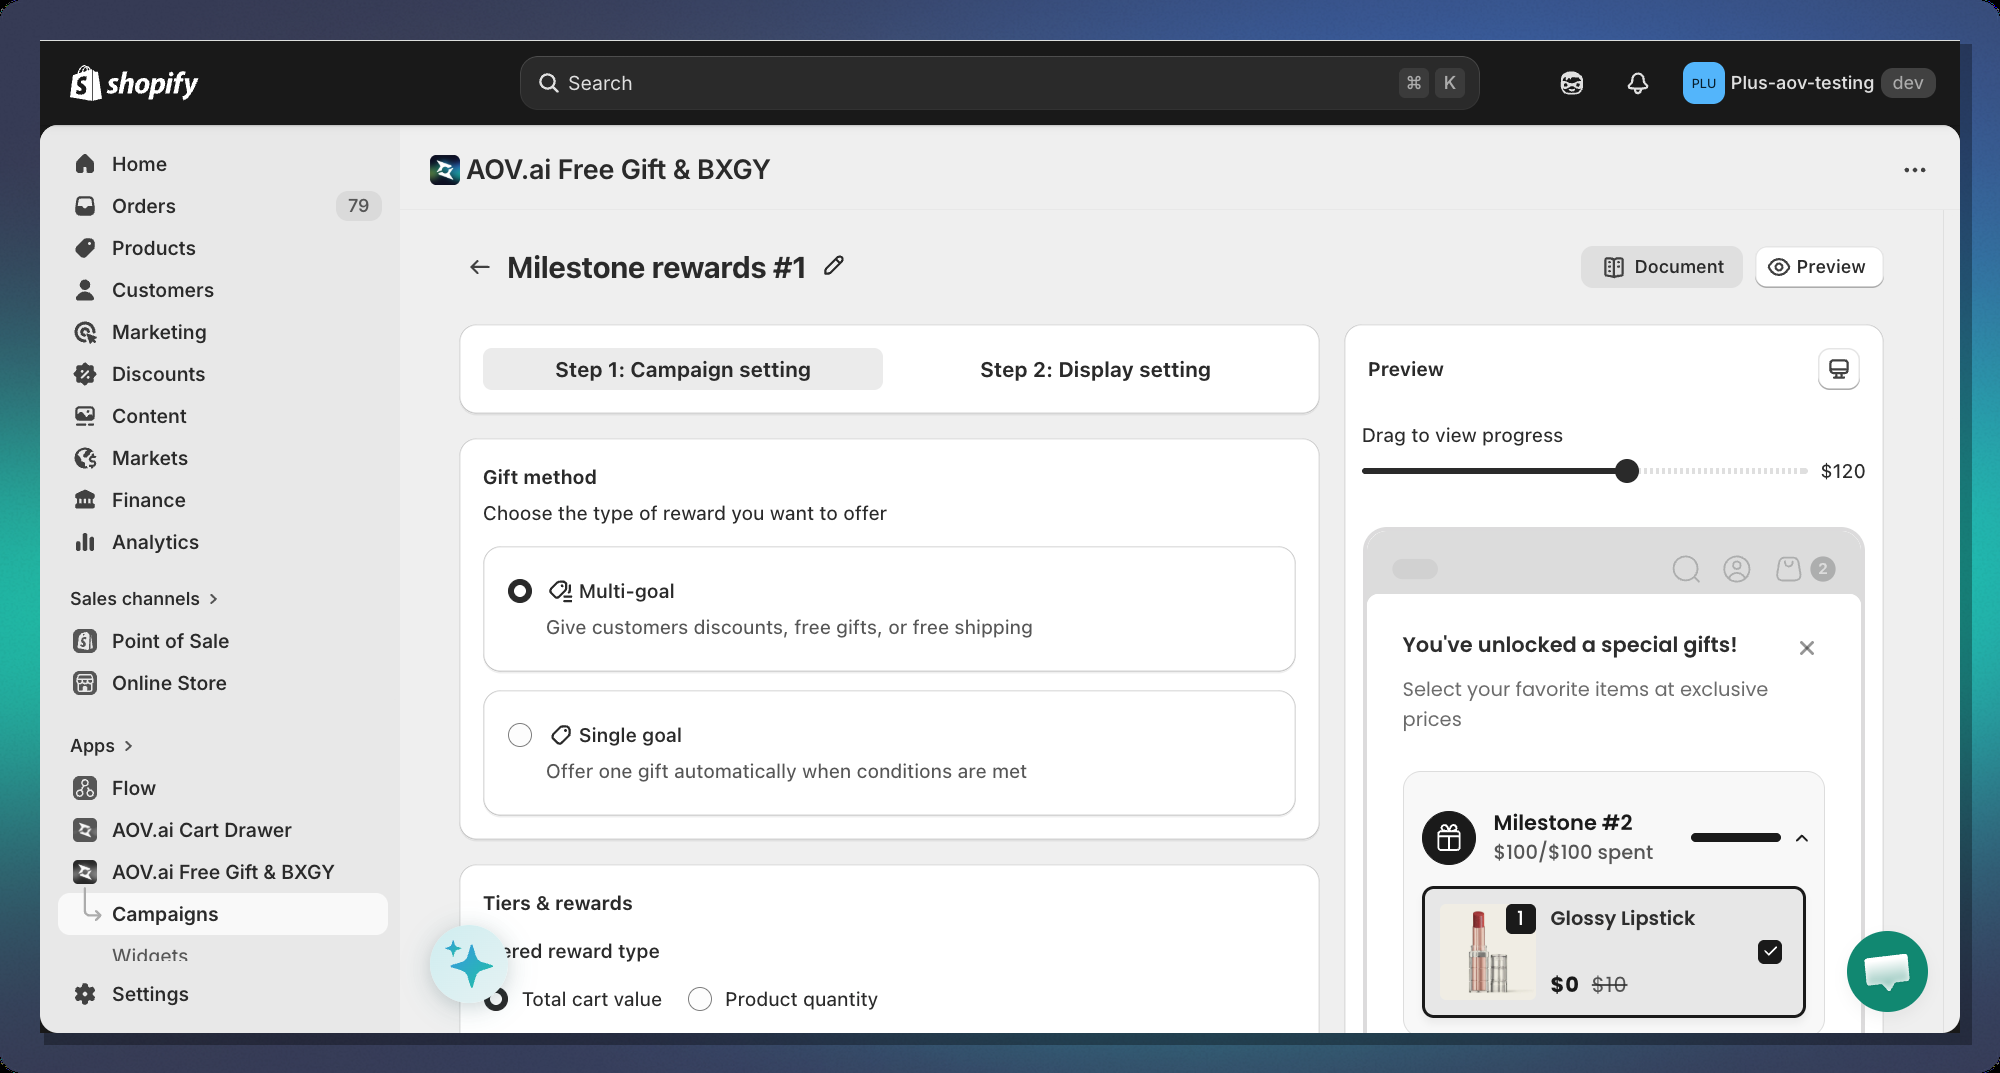
### Step 2 — Choose a Gift Method
After creating the campaign, you will see the **Gift Method** card at the top of the campaign editor.
#### Multi-goal (Recommended)
Shows a **progress bar with multiple milestone icons** — one icon per reward tier. The customer sees all rewards at once and can track their progress toward each one.
Use this when you want to:
* Offer **3 or more rewards** in one campaign
* Encourage customers to keep spending past the first reward
* Display a **visual roadmap** of all available rewards
#### Single-goal
Shows a **single-tier progress bar** that focuses on one reward — typically a free gift. The bar fills up until the customer reaches the trigger amount, then reveals the gift product card.
Use this when you want to:
* Highlight **one specific free gift** prominently
* Keep the widget **simple and clean**
* Show the gift product image, variant picker, and pricing directly in the bar
***
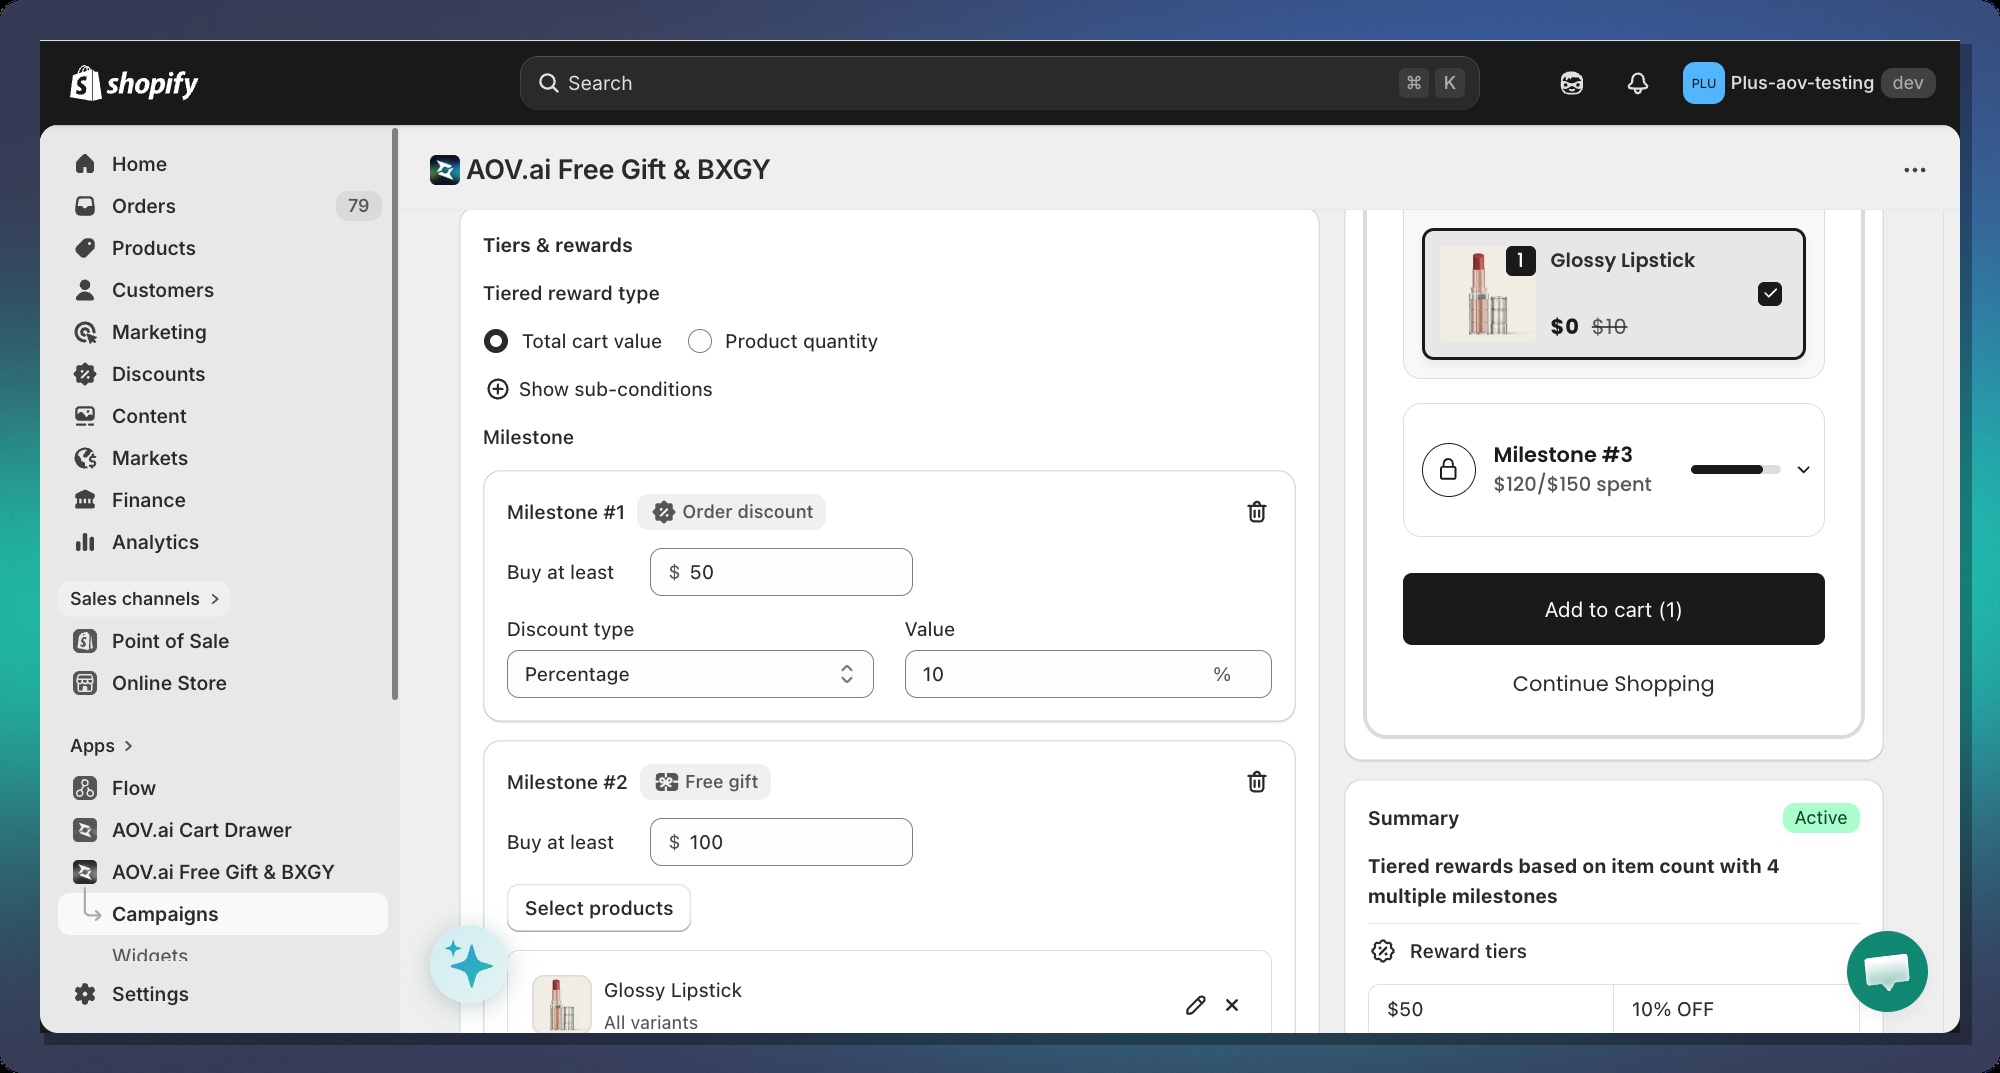
### Step 3 — Set Up Milestones (Tiers)
This is the core of your campaign. Scroll down to the **Tiered Rewards** card.
#### 3.1 Choose a Trigger Type
At the top of the Tiered Rewards card, select how the bar triggers:
| Option | Description |
| ----------------- | ---------------------------------------------------------------- |
| **Cart Value** | Progress is based on the total cart amount (e.g., spend $50) |
| **Item Quantity** | Progress is based on number of items in cart (e.g., buy 3 items) |
#### 3.2 Add Your First Milestone
Click **+ Add milestone** and choose a reward type from the dropdown:
**Option A — Order Discount**
| Field | Description |
| ----------------- | ------------------------------------------------------------------------ |
| **Buy at least** | Cart value (or item count) the customer must reach to unlock this reward |
| **Discount Type** | `Percentage` (e.g., 10%) or `Fixed amount` (e.g., $5 off) |
| **Value** | The discount amount. Percentage is capped at 100% |
**Option B — Free Shipping**
Free Shipping tiers have only the **Buy at least** threshold — no discount value needed (it always equals 100% shipping discount).
> **Note:** You can only have **one Free Shipping tier** per campaign.
**Option C — Free Gift**
| Field | Description |
| ------------------- | ----------------------------------------------------------------------------------------------------------------------------------------------------------------------- |
| **Buy at least** | Cart threshold to unlock the free gift |
| **Select Products** | Opens a product picker — customers can choose from all selected products |
| **Gift Limit** | When enabled (and multiple gifts selected), lets you set the **maximum number of gifts** a customer can choose. Only available when Grab Gift Behavior is set to Manual |
> **Tip:** Select multiple products so customers can pick their preferred gift. This increases conversion.
***
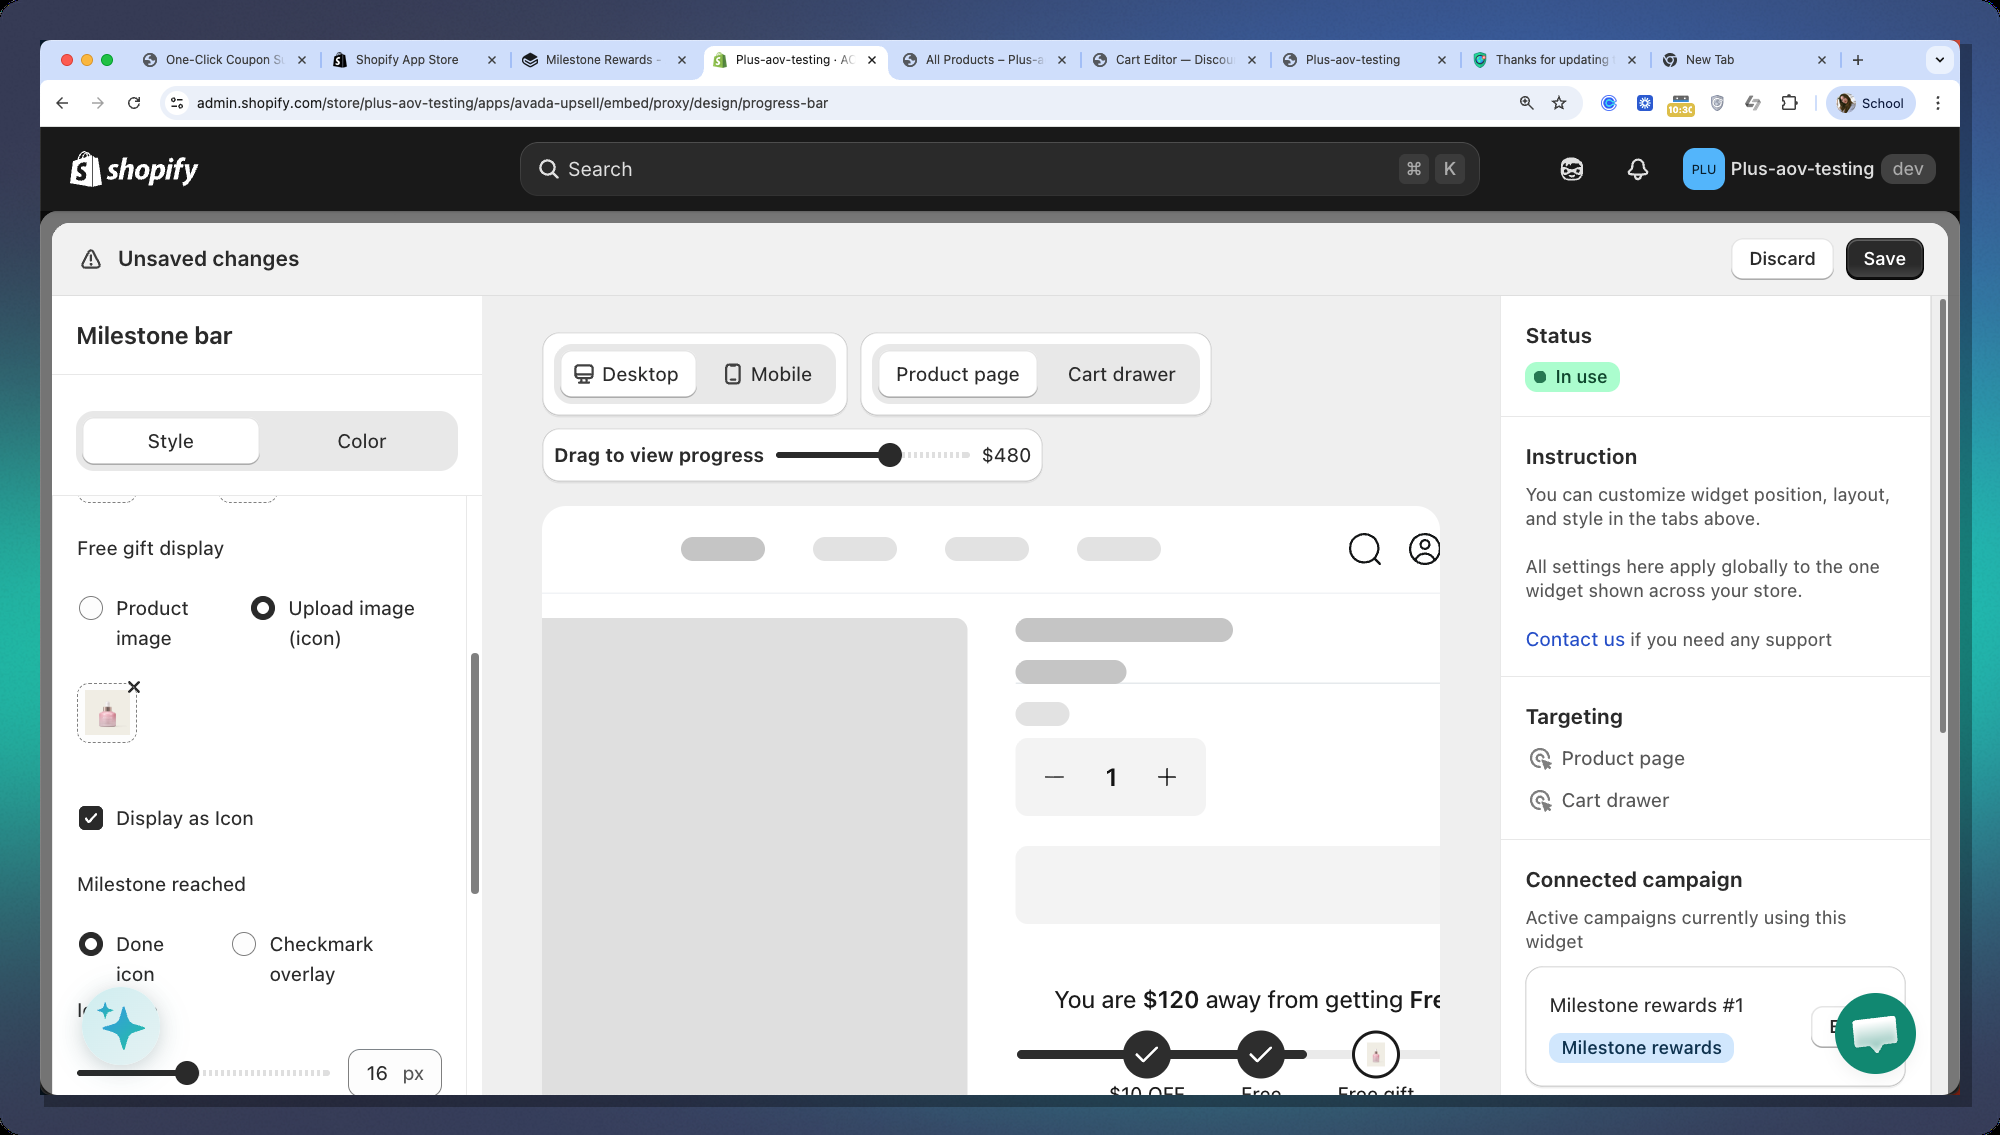
### Step 4 — Design the Progress Bar
Navigate to the **Display setting** tab of your campaign and customize widget Milestone
#### 4.1 Layout Style
**Layout 1**
One horizontal bar spans the full width. Each milestone has an **icon positioned along the bar** at its threshold position.
**Layout 2**
Each tier gets its **own independent progress bar**. Below each bar is an icon and label.
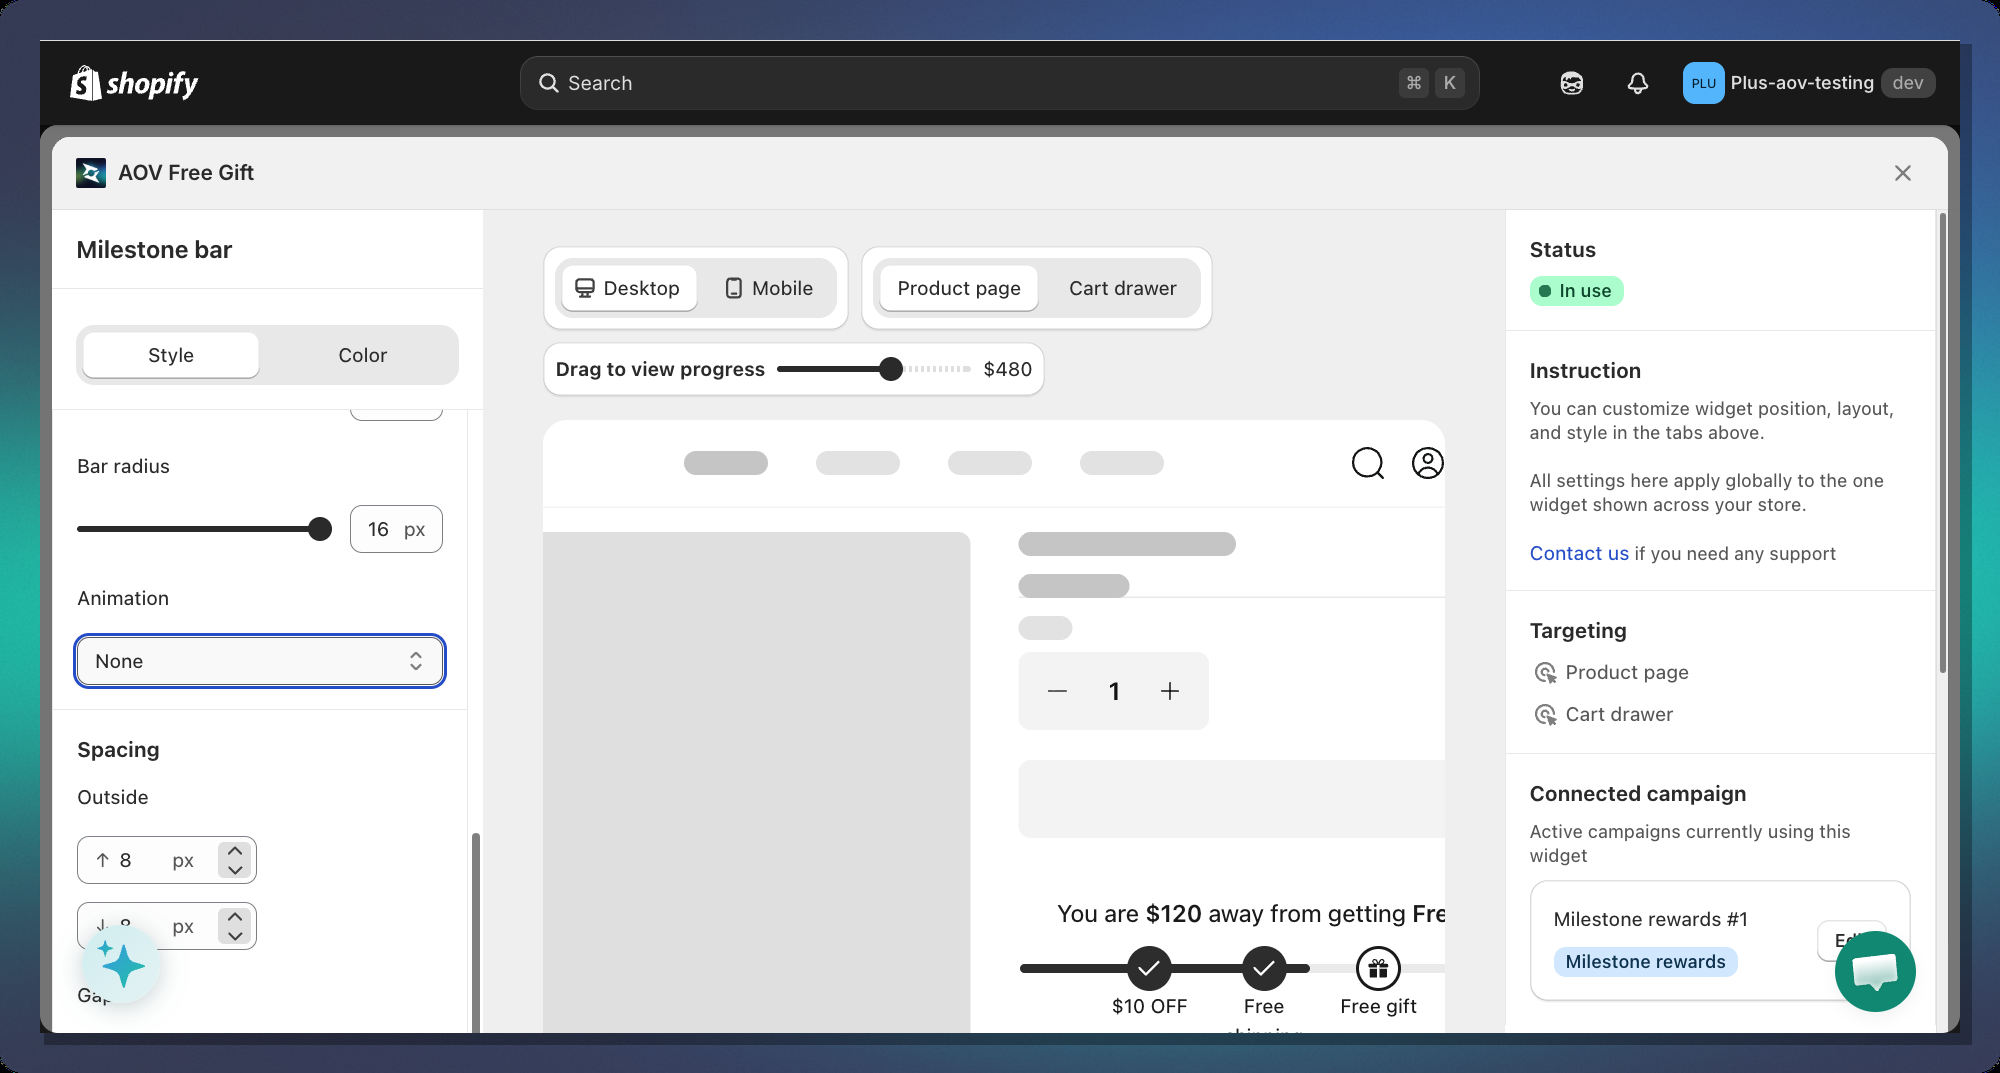
#### 4.2 Bar Appearance
| Setting | Default | Description |
| ------------------------ | ------- | --------------------------------------------------- |
| **Bar Thickness** | 8px | Height of the progress bar track |
| **Bar Radius** | 16px | Corner roundness — `0` = square, `16+` = pill shape |
| **Padding Top / Bottom** | 0px | Space inside the widget above/below the bar |
| **Margin Top / Bottom** | 8px | Space outside the widget |
| **Spacing Gap** | 24px | Space between the title message and the bar |
#### 4.3 Milestone Icons
**Icon Source**
| Option | What it shows |
| ----------- | ----------------------------------------------------------------------------- |
| **Default** | Built-in SVG icons: discount tag, truck, gift card |
| **Upload** | Your own images — upload separate icons for Discount, Shipping, and Free Gift |
| **None** | No icons shown (text only) |
> **Free Gift special case:** When Icon Source is **Upload** and the reward is a Free Gift, you can choose to show:
>
> * The **product image** of the first selected gift product
> * A **custom uploaded image**
**Icon Size**
| Setting | Default | Description |
| ----------------------- | ------- | ---------------------------------------------- |
| **Icon Size** | 16px | Size of the icon graphic inside the container |
| **Icon Border Radius** | 32px | Shape of the icon circle container |
| **Icon Border Opacity** | 100% | Opacity of the border on incomplete milestones |
**When a Milestone is Reached**
| Option | Description |
| --------------------- | --------------------------------------------------------------------------------------------------- |
| **Done Icon** | Replaces the entire icon with a ✓ checkmark (animated fade-in) |
| **Checkmark Overlay** | Keeps the original icon + adds a small circular checkmark badge at the top-right corner of the icon |
**Icon Position (Segmented Layout only)**
| Option | Description |
| ---------- | --------------------------------------------------- |
| **Beside** | Icon and reward label are side by side horizontally |
| **Above** | Icon sits above the reward label |
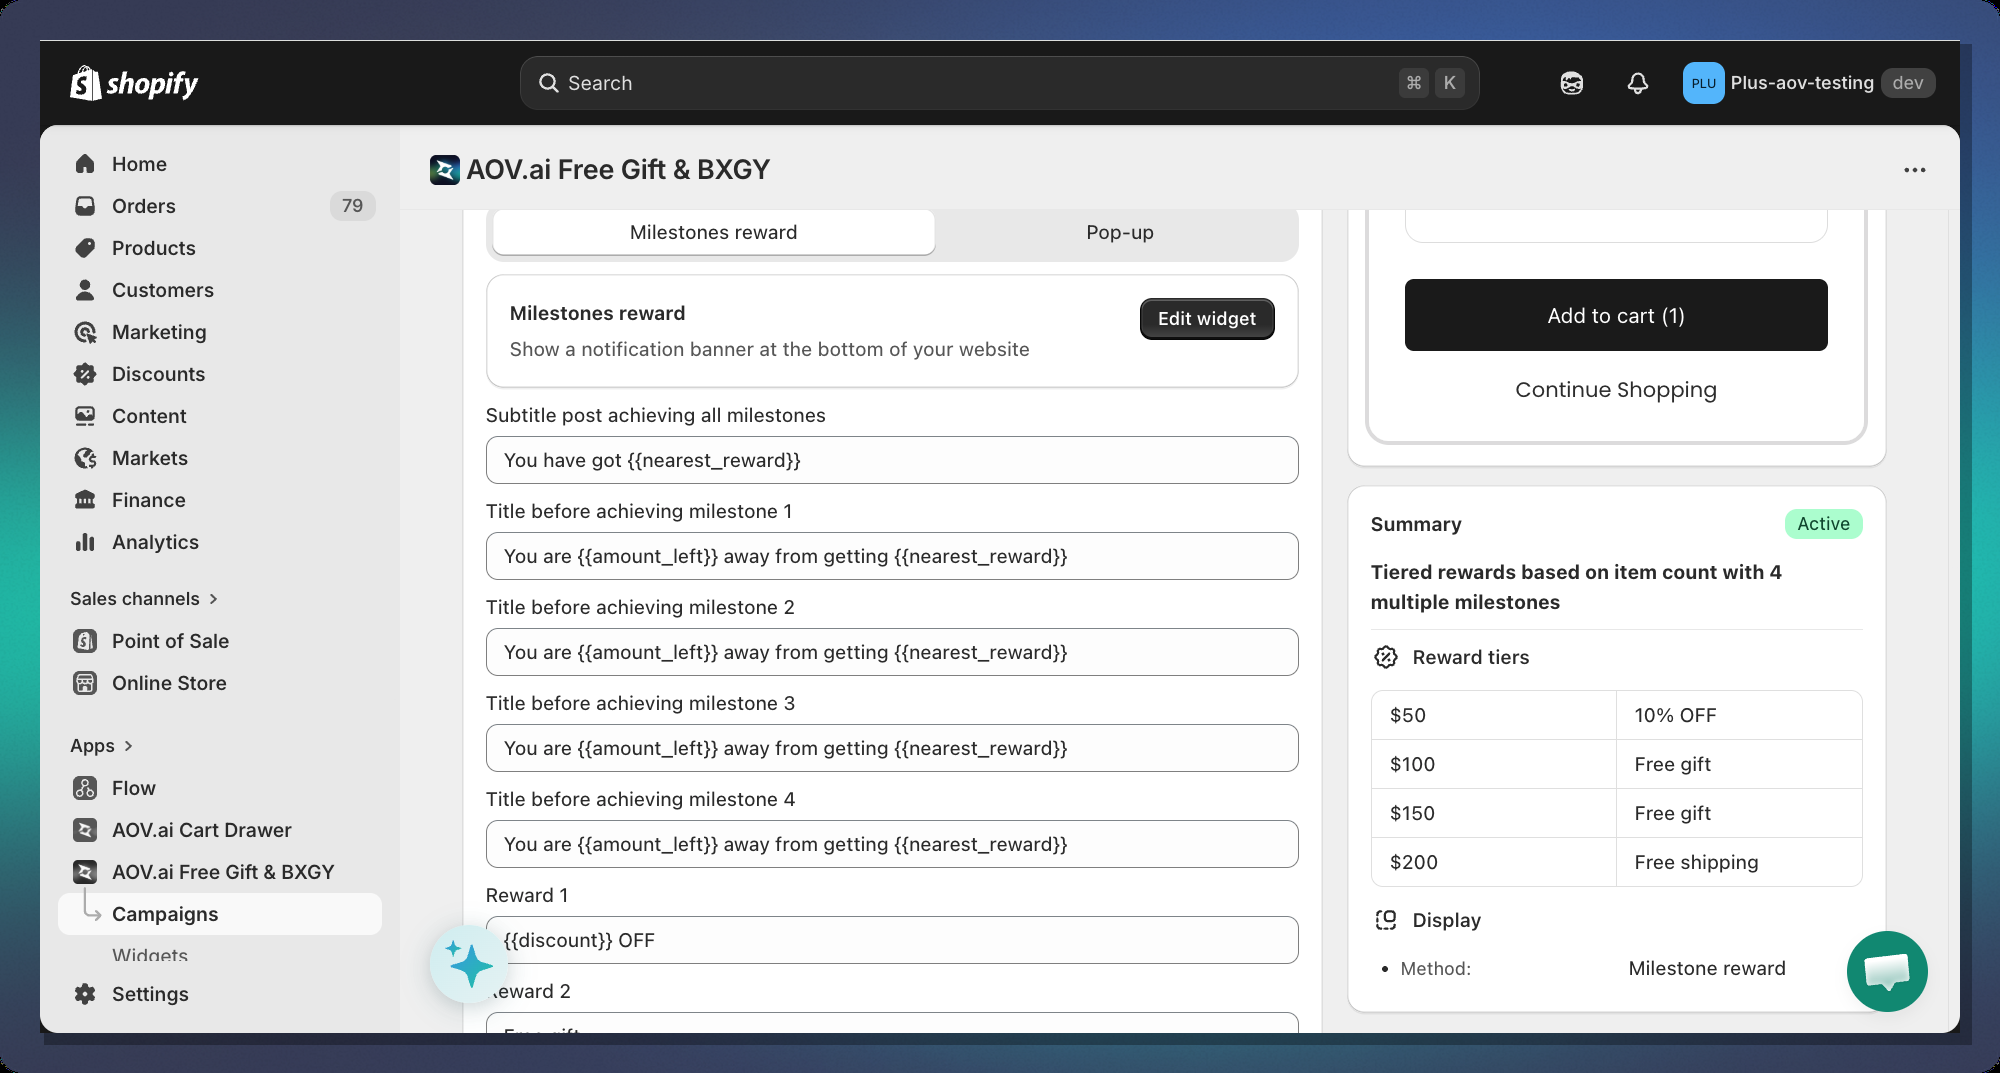
#### 4.4 Text & Colors
**Title Messages**
The **title text** at the top of the bar changes dynamically based on the customer's cart:
| Customer's cart | Message shown |
| ----------------------- | --------------------------------------------------------------------------------------- |
| Below first milestone | `beforeAchievedMessage` of the first tier (e.g., *"Spend **$35 more** to get 10% off"*) |
| Between milestones | `beforeAchievedMessage` of the next unreached tier |
| Reached final milestone | `postAchieveMessage` (global setting, e.g., *"You've unlocked all rewards! 🎉"*) |
**Available variables for message templates:**
| Variable | Replaced with |
| -------------------- | -------------------------------------------------- |
| `{{amount_left}}` | Formatted currency amount left (e.g., `$35.00`) |
| `{{item_left}}` | Number of items left (for quantity-based triggers) |
| `{{nearest_reward}}` | Bold text of the next reward (e.g., **10% off**) |
#### 4.5 Animations
| Animation | Effect |
| ----------- | ---------------------------------------------------------------------- |
| **None** | No animation on the bar |
| **Striped** | Diagonal white stripes continuously scroll from right to left |
| **Shimmer** | A light gleam sweeps across the bar from left to right every 2 seconds |
***
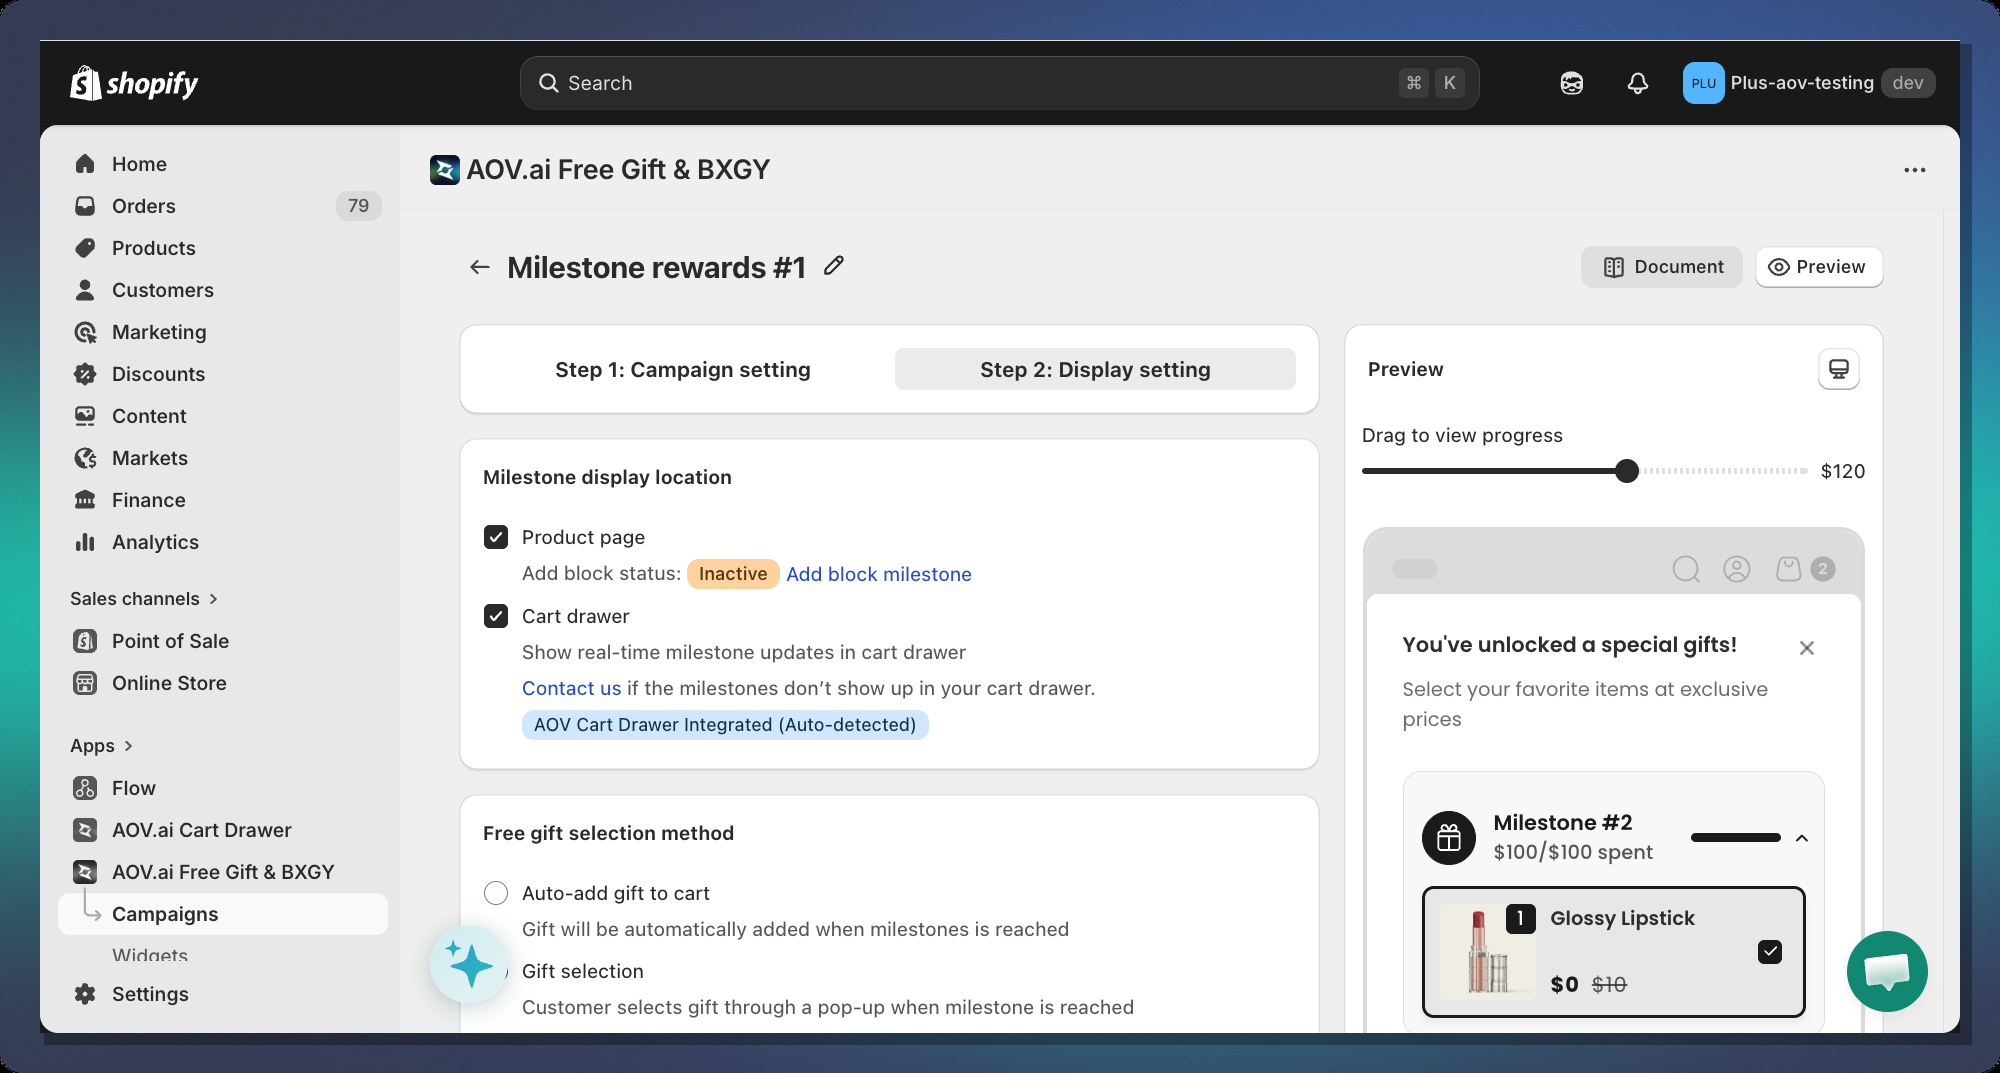
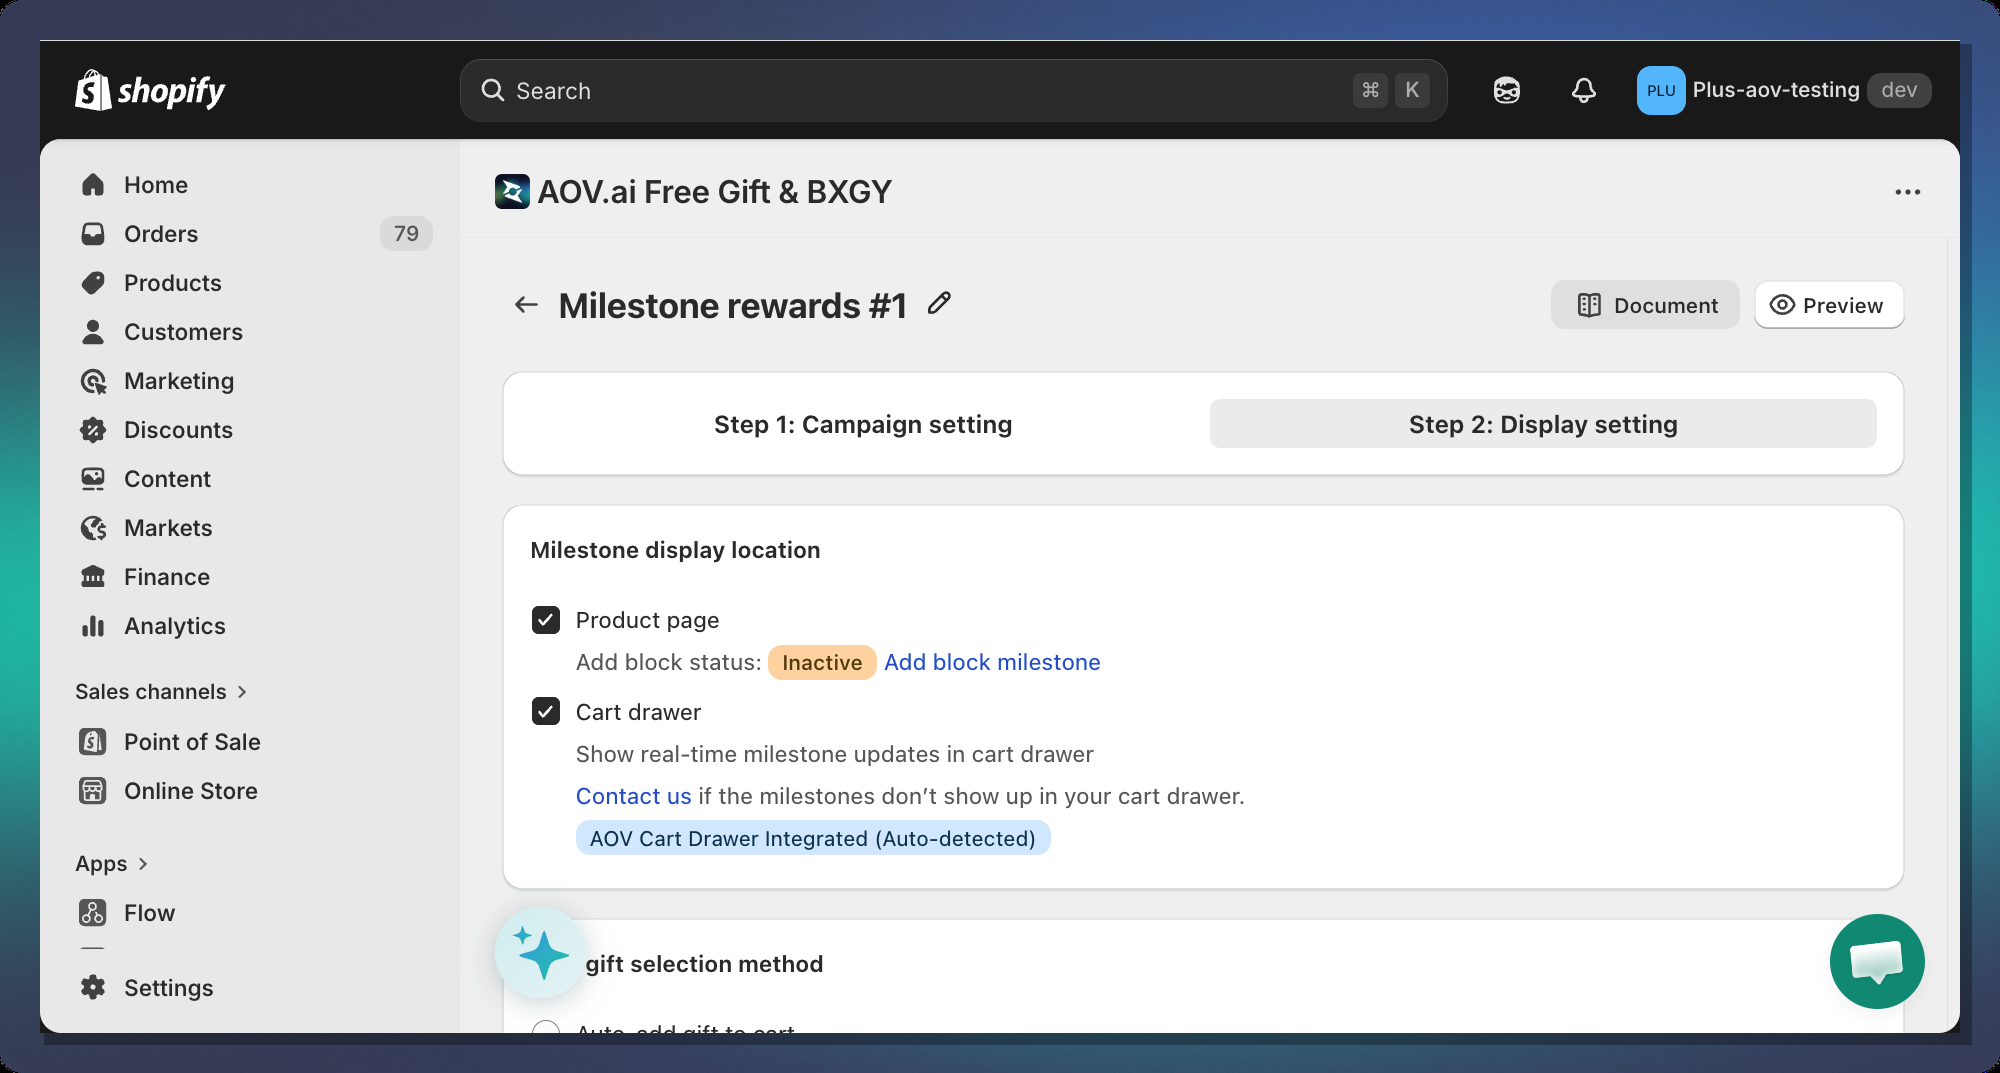
### Step 5 — Configure Display Location
The Milestone Progress Bar can be displayed in two locations:
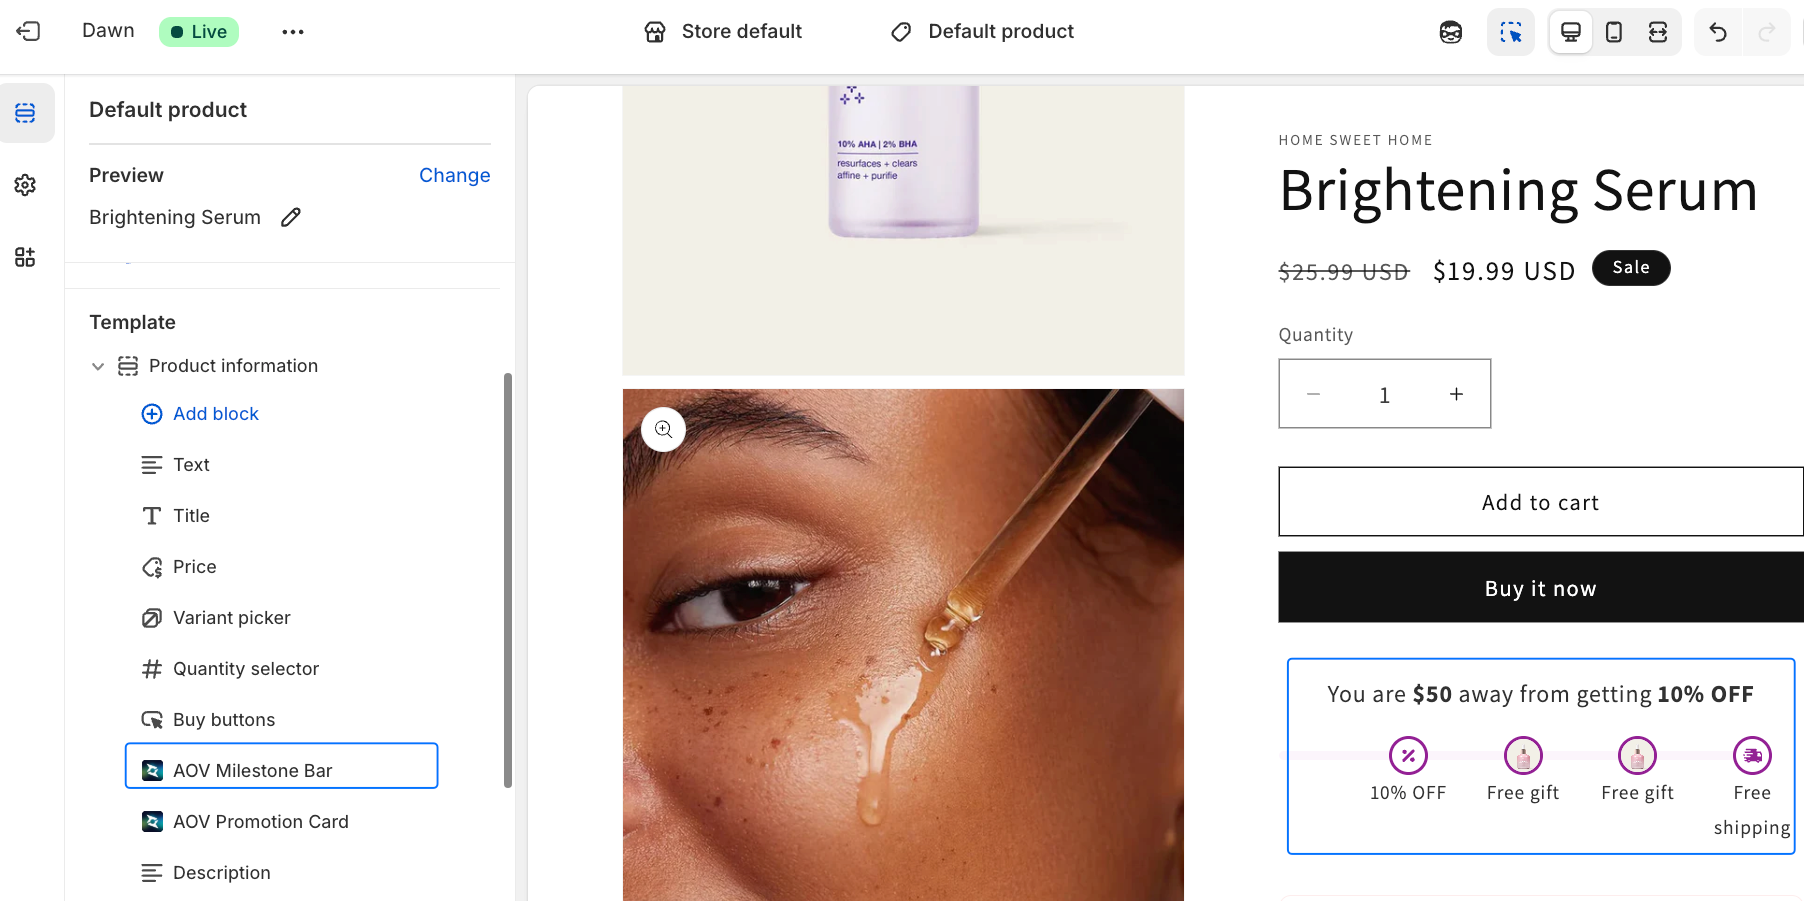
#### Product Page (Theme App Extension)
The bar is embedded directly into your product page template using Shopify's **Theme App Extension** system.
**To enable it:**
1. Click **Go to Theme Editor** (or navigate to **Online Store > Themes > Customize**)
2. Select a **Product** template
3. In the section list, click **Add block**
4. Search for **"AOV Milestone Bar"**
5. Position the block where you want it to appear (recommended: below the Add to Cart button)
6. Click **Save**
#### Cart Drawer
Cart drawer integration requires contacting our support team for manual setup as it depends on your specific theme's cart drawer implementation.
***
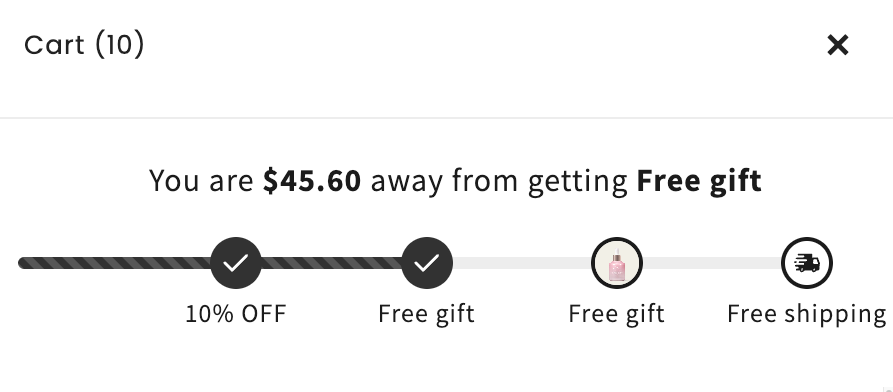
### How It Looks to Customers
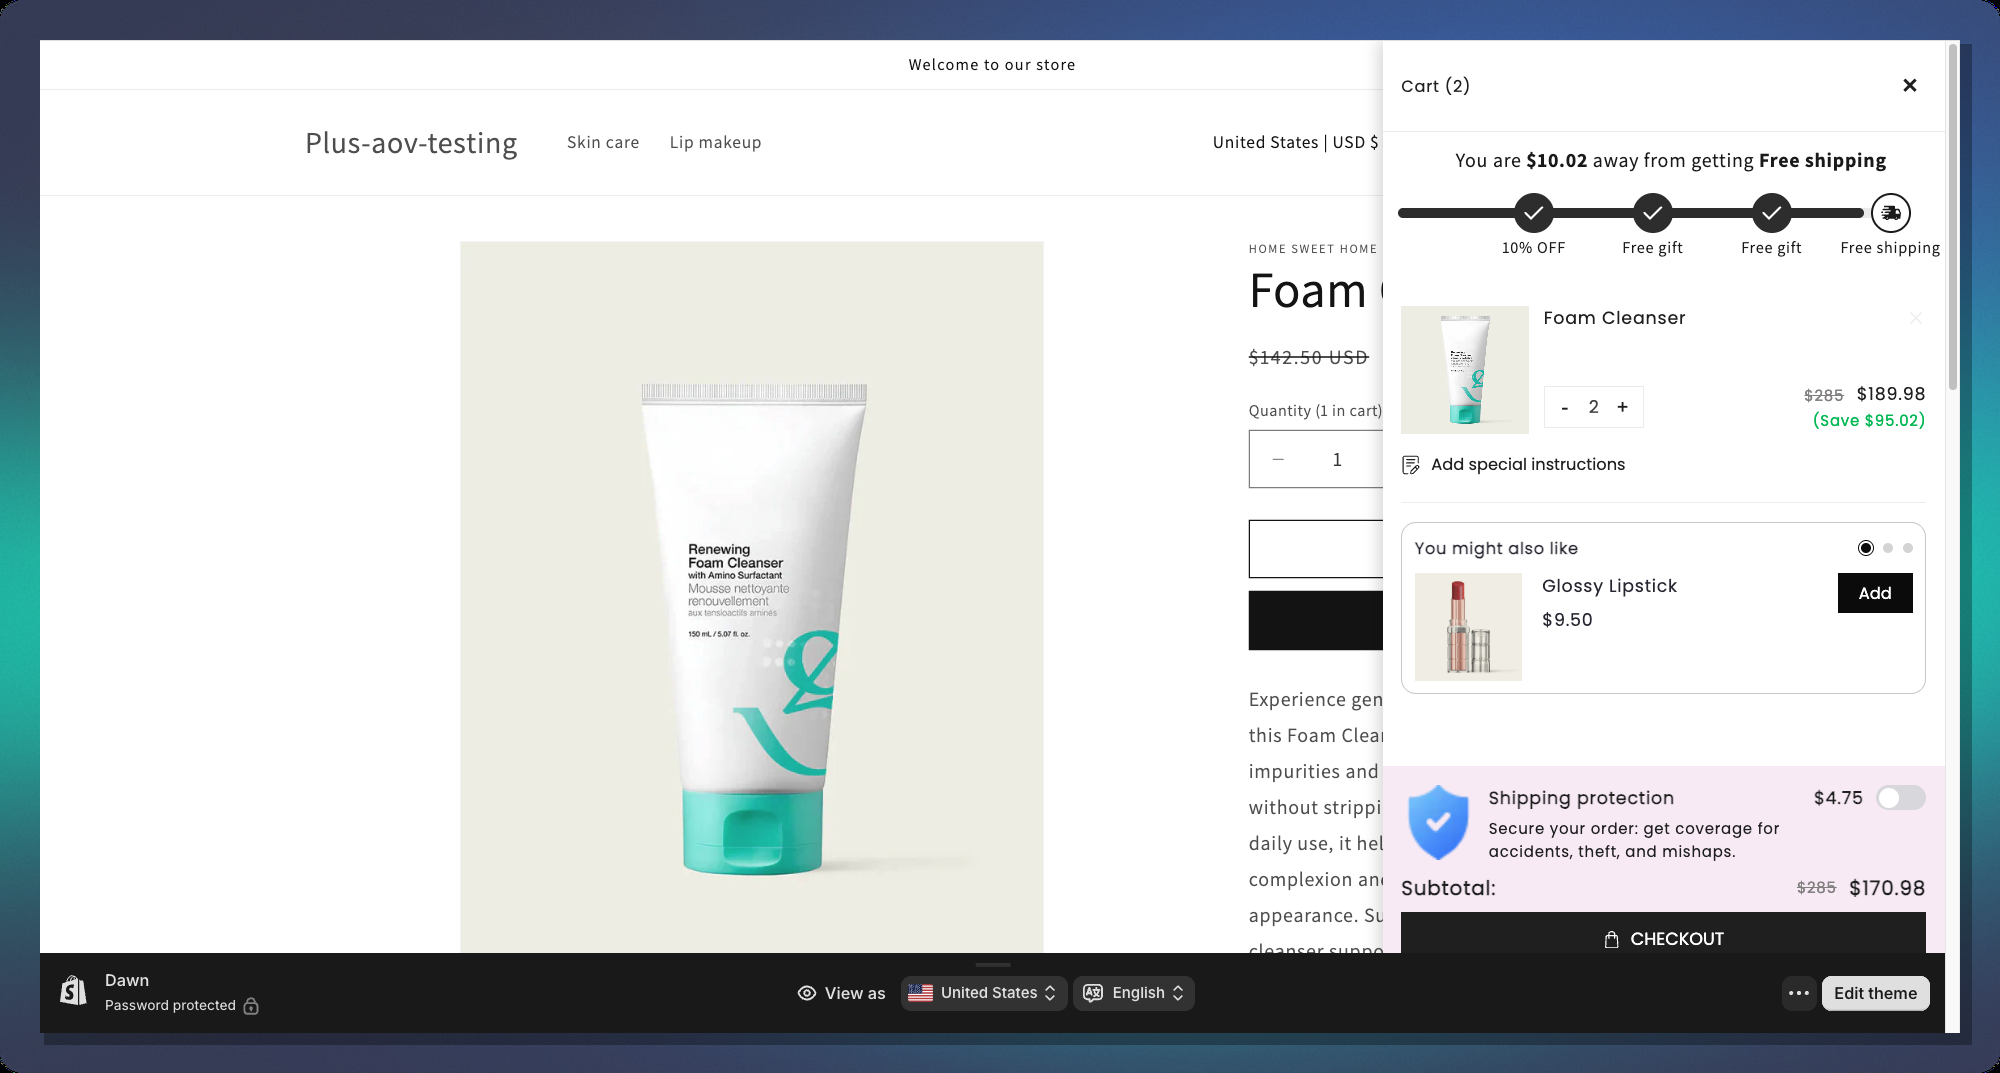
#### Classic Layout
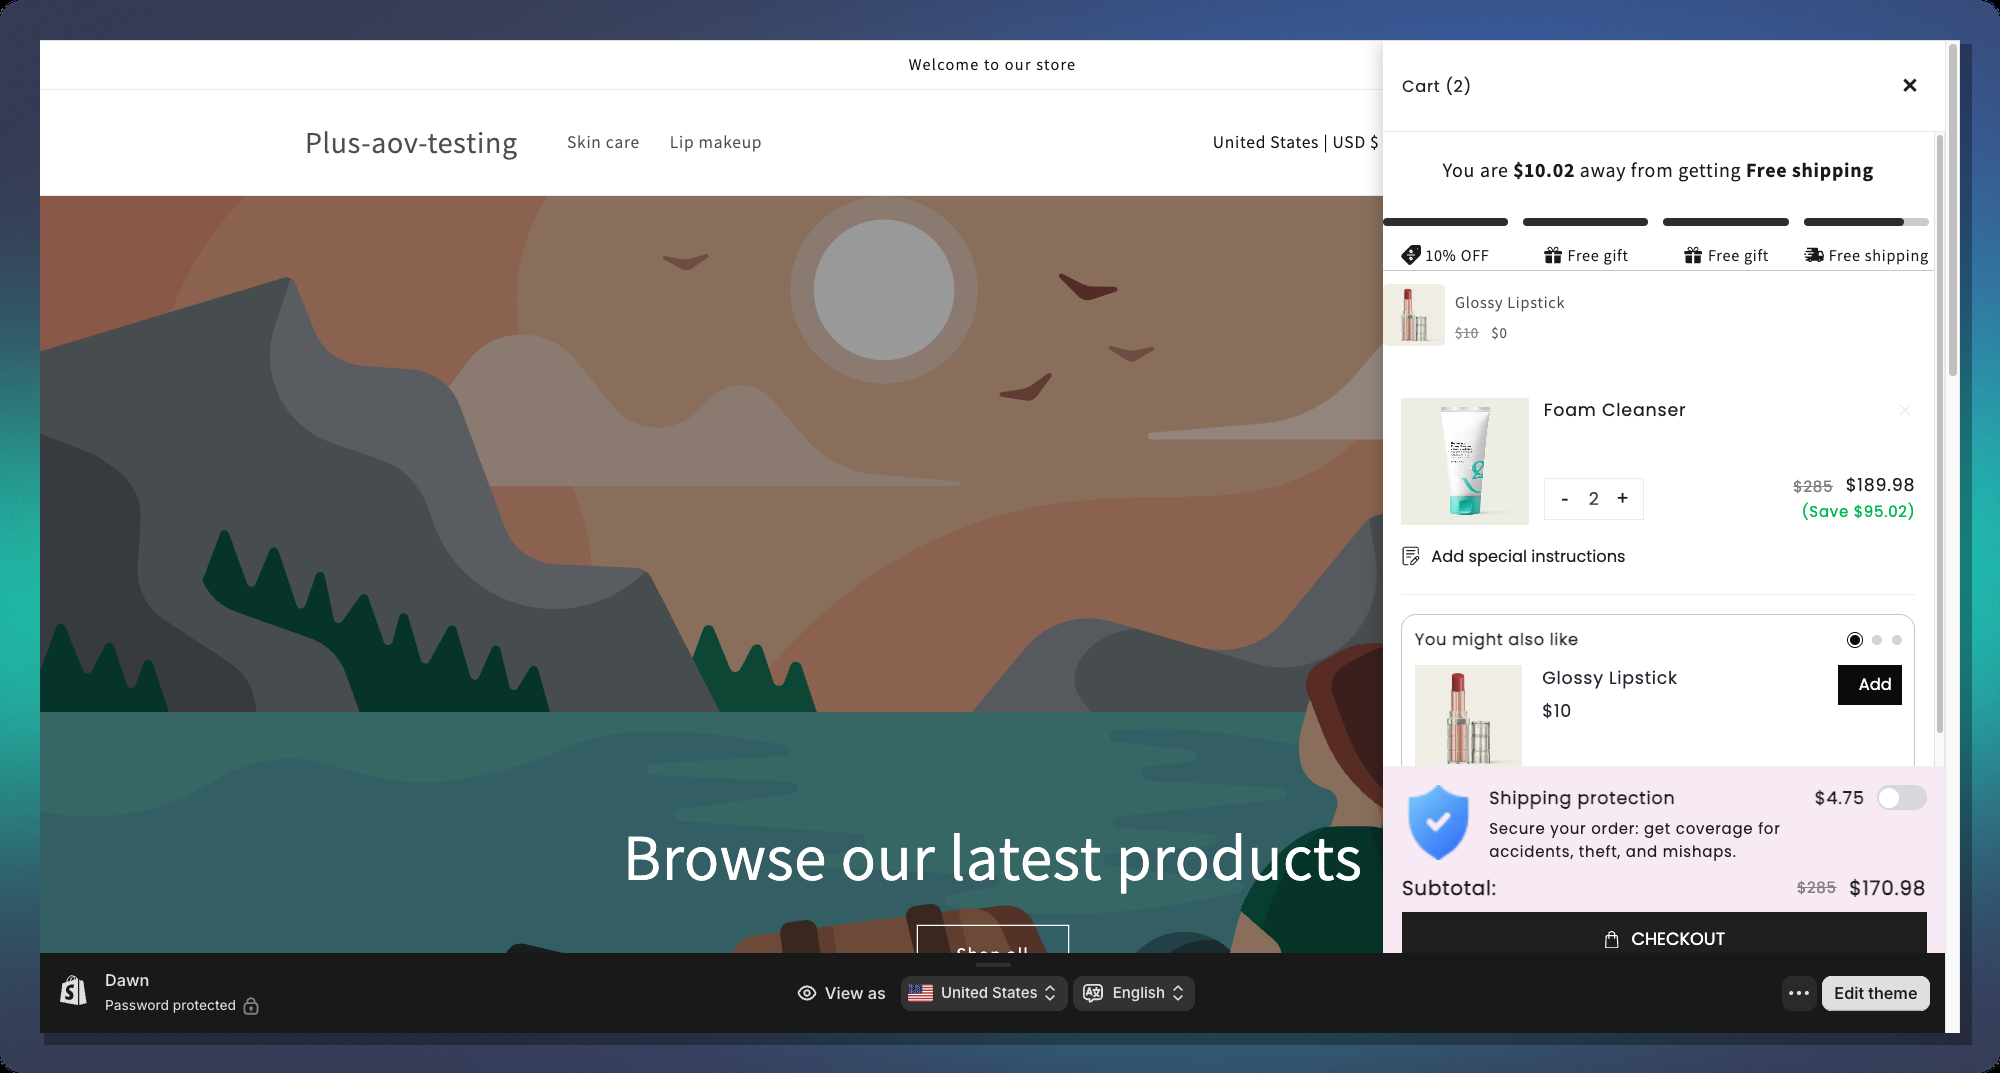
#### Segmented Layout
#### Single-Goal Layout
***
### Tips & Best Practices
#### Threshold Strategy
* **Start low, end high** — set your first milestone at a value just above your current Average Order Value (AOV). This nudges the most customers to reach at least one reward
* **Space tiers evenly** — e.g., $50 → $100 → $150 works better than $50 → $51 → $200
* **End with a high-value reward** — save the free gift for the last (highest) tier to maximize spend
#### Reward Mix
* Combine reward types for maximum effect:
* Tier 1: Small order discount (5–10%) — easy to reach, builds momentum
* Tier 2: Free shipping — high perceived value, customers love it
* Tier 3: Free gift — most exciting, drives highest cart values
#### Message Copy
* Use `{{amount_left}}` in your before-achieved message — showing the exact dollar amount is more motivating than a generic message
* Keep messages **short and action-oriented**: *"Add **$20 more** to get free shipping!"* ✅
* For the post-achieved message, celebrate the win: *"Congrats! You've unlocked all rewards!"*
#### Design
* Use **Shimmer** animation for a premium feel — it draws the eye without being distracting
* For stores with clean minimalist themes, use **Checkmark Overlay** for done milestones instead of replacing the icon
* Match the bar's **Active Bar Color** to your store's primary brand color for a seamless look
***
### FAQ
**Q: Can I have multiple Milestone campaigns active at once?** A: No. Only one Milestone campaign can be active per store at a time.
**Q: What happens if a customer's cart drops below a milestone threshold?** A: The progress bar animates backwards and the milestone icon reverts to its incomplete state in real time.
**Q: Can I use both Cart Value and Item Quantity triggers in the same campaign?** A: No. You must choose one trigger type for the entire campaign. Changing the trigger type after setting up milestones will reset all milestone messages to new defaults.
**Q: Why is the "Free Shipping" option greyed out when I try to add a second Free Shipping tier?** A: By default, each campaign allows only one Free Shipping tier. This is to prevent conflicting shipping discounts.
**Q: The gift product image is not showing in the icon. Why?** A: Make sure:
1. **Icon Source** is set to `Upload`
2. **Free Gift Display** is set to `Product Image`
3. The gift product has an image assigned
4. The product is selected in the milestone's Free Gift product picker
**Q: Can I translate the milestone messages?** A: Yes. The campaign supports multi-language translations via the **Translations** section of the Design Widget. You can set locale-specific versions of `rewardMessage`, `beforeAchievedMessage`, and `postAchieveMessage`.
***
*For further help, contact our support team through the app or visit our Help Center.*