# POS integration
This guide walks through the entire POS free gift workflow end-to-end: from a **merchant configuring a campaign** in the admin dashboard, to a **staff member using it** on a Shopify POS device.
***
## Overview
```
MERCHANT (Shopify Admin) STAFF (Shopify POS Device)
───────────────────────────── ──────────────────────────────
Step 1:Install AOV tile on POS device
Step 2: Create campaign (BXGY or GWQU)
Step 3: Set trigger conditions
Step 4: Add gift products
Step 5: Choose gift behavior (auto/manual)
Step 6: Enable POS channel
Step 7: Select POS locations
Step 8: Save & activate
Step 9: Add products to cart
Step 10: Campaign triggers
Step 11: Add gift to cart
Step 12: Complete checkout
```
***
## PART 1 — Merchant Setup
{% stepper %}
{% step %}
#### Step 1 — Install the AOV Free Gift Tile on POS
> ⚠️ This is a required setup
1. Log into your Shopify admin by PC, go to Point of sale channel.
{% hint style="info" %}
Do not use Shopify POS app on other devices to take action on this step. Recommend logging into Shopify admin on your laptop/PC to add AOV Free Gift Tile on POS channel
{% endhint %}
2. Click POS app, click Add Tile> click Embedded App
3. Select **AOV: Free Gift** from the list
4. Tap **Add** to confirm
5. Tap **Save**
The **AOV.ai Free Gifts** tile now appears on the POS home screen and is ready to use.
> ⚠️ POS only supports **Buy X Get Y (BXGY)** and **Gift with Quantity Purchase (GWQU)**. Other types do not appear on POS.
Go to **AOV Free Gifts** → **Create campaign** → choose **BXGY** or **GWQU**.
{% endstep %}
{% step %}
#### Step 2 — Set Trigger Conditions
Set what the customer needs to buy to qualify:
* **BXGY:** Select trigger products/collections and the minimum quantity required.
* **GWQU:** Set the minimum total cart quantity and which products count.
{% endstep %}
{% step %}
#### Step 3 — Add Gift Products
In the **Gift products** section, click **Add product**, select the gift item(s), and set the quantity per gift. Enable **Gift limitation** if you want to cap the number of gifts a customer can pick (e.g., "choose any 2").
{% endstep %}
{% step %}
#### Step 4 — Choose Gift Behavior
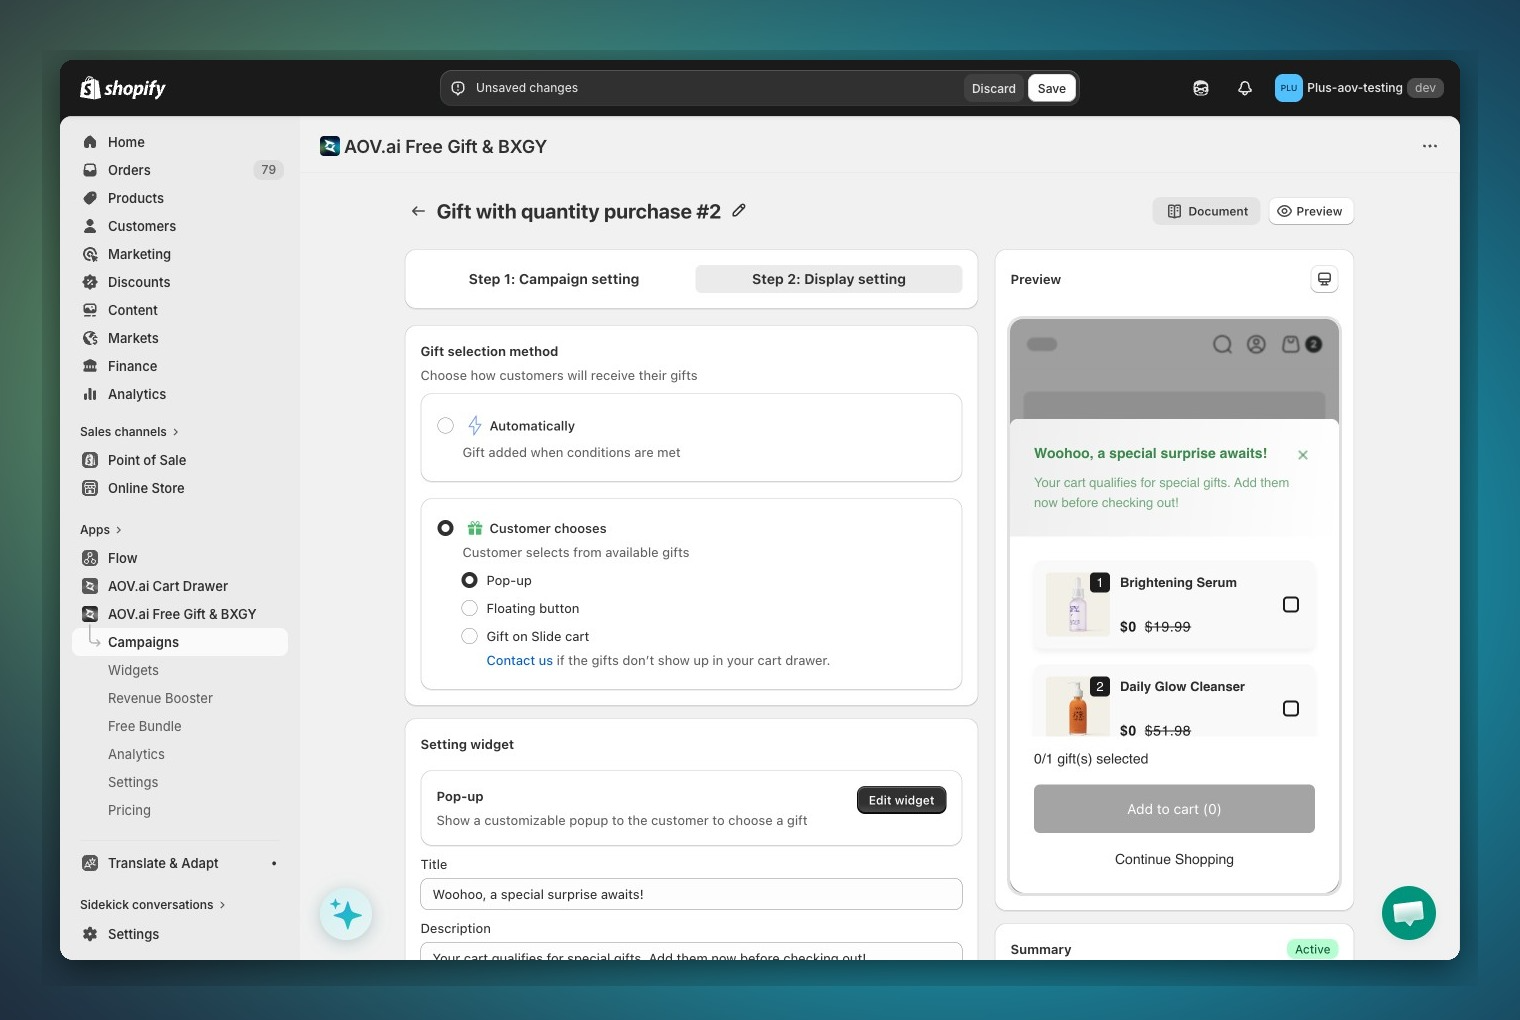
In **Step 2: Display setting**, set the **Gift selection method**:
| Setting | On POS |
| -------------------- | ------------------------------------------------------------------------------------------------------ |
| **Automatically** | Gift added to cart silently — no staff action needed. |
| **Customer chooses** | AOV tile shows a badge; staff taps tile to pick the gift. Use this for gifts with size/color variants. |
Default is **Customer chooses (Pop-up)**.
{% endstep %}
{% step %}
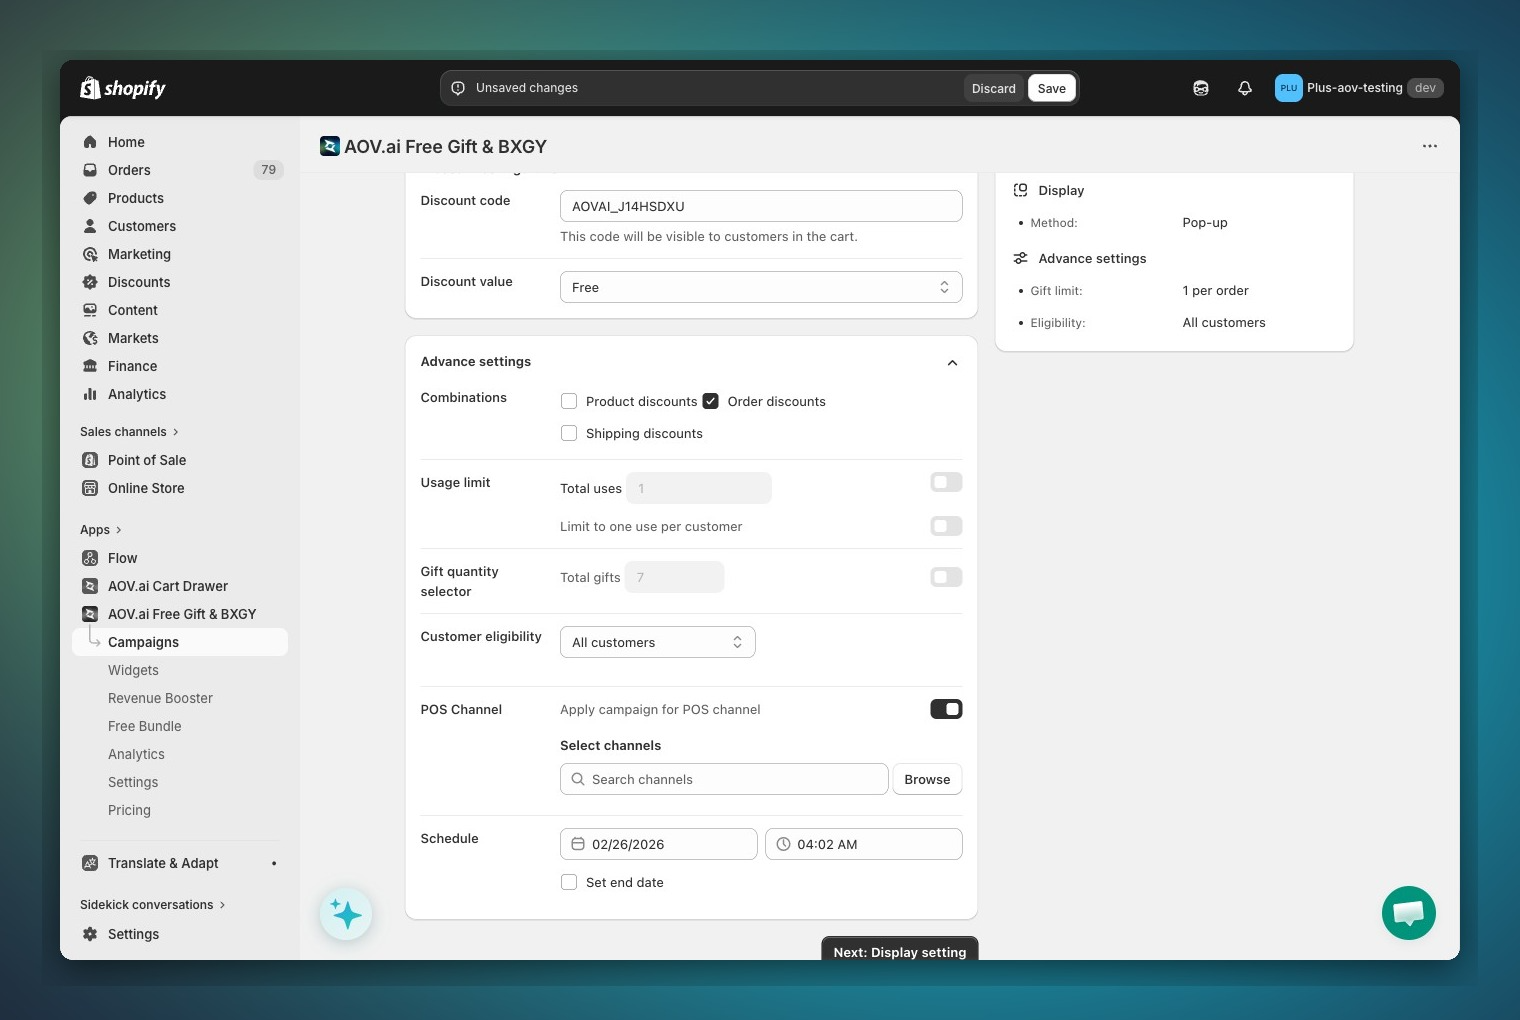
#### Step 5 — Enable POS Channel
In **Step 1: Campaign setting**, scroll down to the **Advance settings** section and find **POS Channel**.
1. Toggle **Apply campaign for POS channel** → ON
2. The **Select channels** section appears below the toggle
> ⚠️ This toggle is disabled for campaigns that use the **Buy X Get X** (BXGX) mechanic. POS is not supported for BXGX.
> {% endstep %}
{% step %}
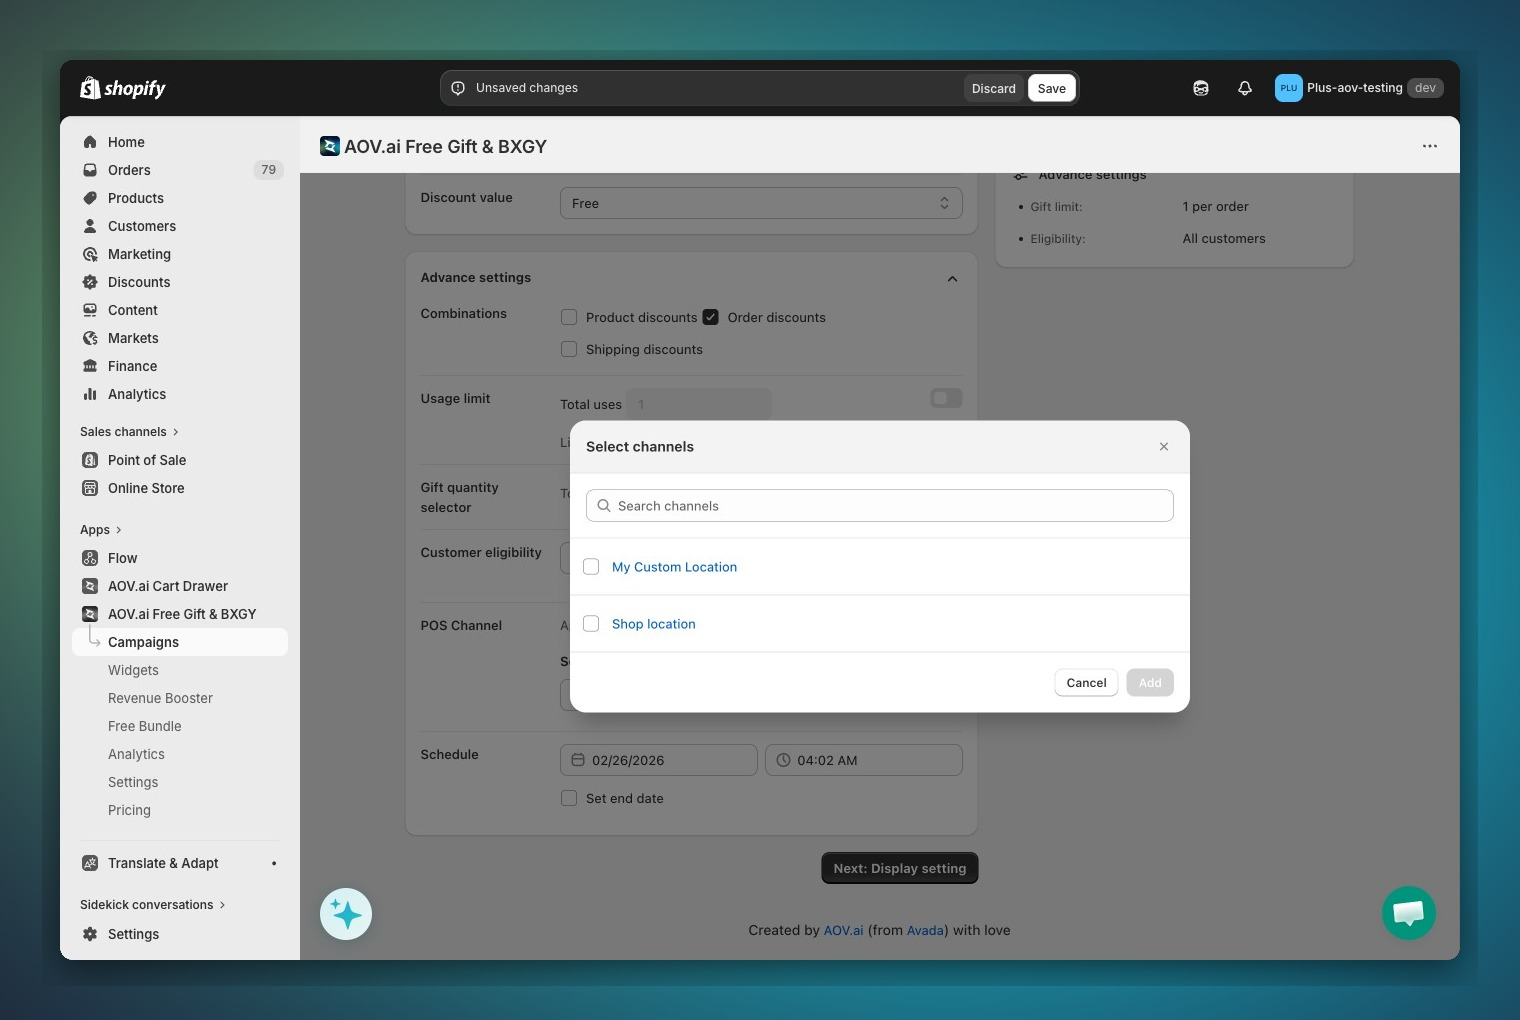
#### Step 6 — Select POS Locations
After enabling POS, you must select which physical store locations this campaign applies to.
1. In the **POS Channel** section, click **Browse** next to the search field
2. A **Select channels** modal opens listing all your POS locations
3. Select one or more locations
4. Confirm selection — the chosen locations appear as tags
> **Validation:** At least one location must be selected before you can save.
> 💡 Running different promotions per store? Create separate campaigns and assign each to its own location.
> {% endstep %}
{% step %}
#### Step 7 — Save and Activate
1. Review all settings
2. Click **Save**
3. Set the campaign **Status** to **Active**
The campaign is now live. Any POS device at the selected locations will start checking this campaign every time the cart changes.
{% endstep %}
{% endstepper %}
***
## PART 2 — Staff Usage on POS
{% stepper %}
{% step %}
#### What staff see when no campaign is active
The **AOV.ai Free Gifts** tile on the POS home screen is **grayed out** (neutral, non-tappable). This means the current cart does not qualify for any manual campaign.
Auto campaigns working in the background do not affect the tile's appearance.
{% endstep %}
{% step %}
#### Step 9 — Customer Qualifies for a Gift
Staff adds products to the cart as normal. When the cart meets a campaign's conditions, one of two things happens:
If the campaign is set to Automatically:
* The gift is added to the cart silently — no staff action needed. A toast appears:
* "Gift added successfully"
* or, if a discount code was also applied: "Gift and discount applied"
If the campaign is Customer chooses (Pop-up or Floating button):
* The **AOV.ai Free Gifts** tile turns **accent green** and shows a badge with the number of available campaigns (e.g., **1**). A toast appears at the bottom of the screen:
* "You have a free gift available"
{% endstep %}
{% step %}
#### Step 10 — Staff Adds the Gift
1. **Tap the AOV.ai Free Gifts tile** on the POS home screen
2. The **AOV.ai Free Gifts** modal opens
3. Each eligible campaign is listed with:
* Available gift variants, each showing:
* Product image, product name
* Variant name (e.g., "Black / 100ml") — hidden if only one variant
* Quantity per gift
* Discounted price ($0.00) and original price (struck through)
4. **Tap a variant** to select it — the radio button fills green
* Variants already in the cart are hidden
* Out-of-stock variants are hidden
5. The **Add to cart** button activates:
* `Add to cart (0)` → disabled (gray), nothing selected
* `Add to cart (1)` → enabled (green), one gift ready
6. **Tap Add to cart**
7. Toast confirms the result:
* "Gift added successfully" — gift added
* "Gift and discount applied" — gift added + discount code applied
* "Failed to apply promotion" — network error (see Troubleshooting)
{% endstep %}
{% step %}
#### Step 11 — Complete the Checkout
The free gift now appears as a line item in the cart at its configured price ($0 for free, or the discounted price). Proceed to checkout as normal.
**Automatic cleanup:** If the customer removes a trigger product before checkout and the cart no longer qualifies, the gift is automatically removed from the cart.
{% endstep %}
{% endstepper %}
***
## PART 3 — Troubleshooting
### Merchant side
POS Setting section not visible
Confirm the campaign type is BXGY or GWQU. POS is not available for other types.
POS toggle is grayed out
The campaign uses the BXGX mechanic, which is not supported on POS.
Save fails with location error
POS is enabled but no location selected. Click Browse and select at least one location.
***
### Staff side
Tile does not appear on home screen
The tile has not been added yet. Follow Step 1 to add the AOV Free Gift tile.
Tile is grayed out
Cart does not meet any manual campaign's conditions, or the campaign is set to Auto (tile stays neutral for Auto).
Modal says "No free gifts available"
Eligibility check is still loading. Wait a moment and tap the tile again.
Gift was removed from cart automatically
Cart no longer qualifies — a trigger product was removed or quantity dropped below threshold. Normal behavior.
"Failed to apply promotion" toast
Network error. Tap Add to cart again. If it persists, close and reopen Shopify POS.
or check if your gift product is available oin your POS location or POS channel
Variant not showing in gift list
Variant is out of stock, or already in the cart. Both are hidden by design.
---
# Agent Instructions: Querying This Documentation
If you need additional information that is not directly available in this page, you can query the documentation dynamically by asking a question.
Perform an HTTP GET request on the current page URL with the `ask` query parameter:
```
GET https://help.aov.ai/advanced-settings/pos-integration.md?ask=
```
The question should be specific, self-contained, and written in natural language.
The response will contain a direct answer to the question and relevant excerpts and sources from the documentation.
Use this mechanism when the answer is not explicitly present in the current page, you need clarification or additional context, or you want to retrieve related documentation sections.